KeyCloak Login Options (Part-3)
Keycloak offers various built-in features for the login page.
KeyCloak Login Options (Part-3)
Keycloak offers various built-in features for the login page.
Enabling “Forgot Password”
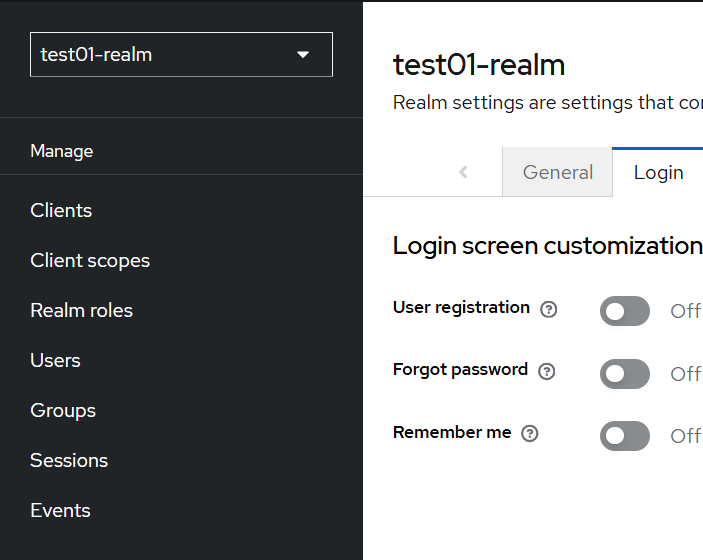
To allow users to reset their passwords or OTPs:
- Go to Realm Settings in the menu.
- Click the Login tab
Built-in login features, like “Forgot Password,” enhance usability, security, and user experience. They simplify account recovery, reduce support requests, and ensure seamless access to applications.
Use Cases:
- Forgot Password Feature:
- Why? Users often forget their passwords. A built-in “Forgot Password” feature helps them reset it without contacting support, improving user satisfaction.
- Example: In an e-commerce app, if a user forgets their password while trying to complete a purchase, they can use the “Forgot Password” option to reset it instantly and proceed without abandoning their cart.
- Toggle Forgot password to ON.
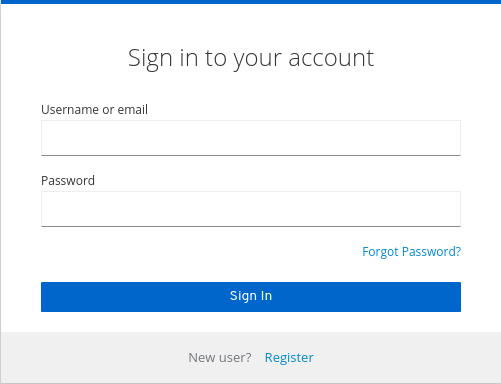
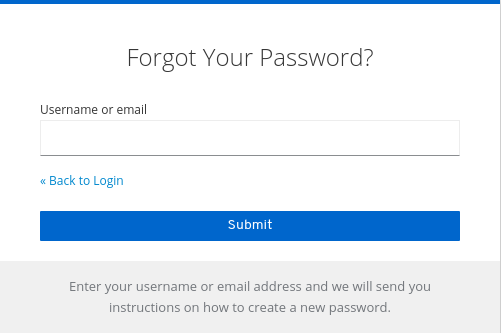
A Forgot Password? link displays in your login pages.
Forgot password link
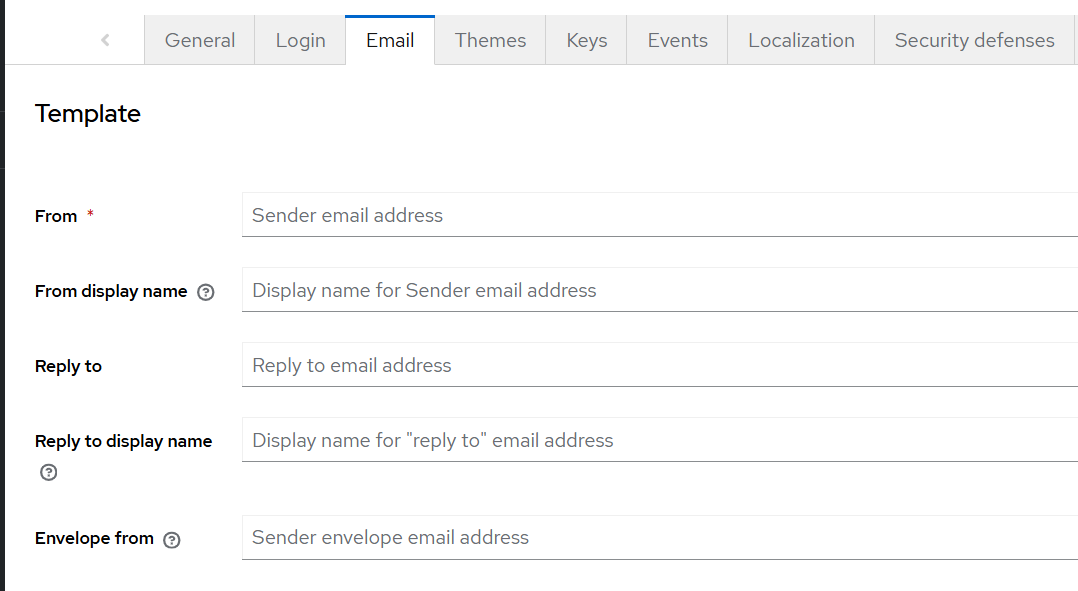
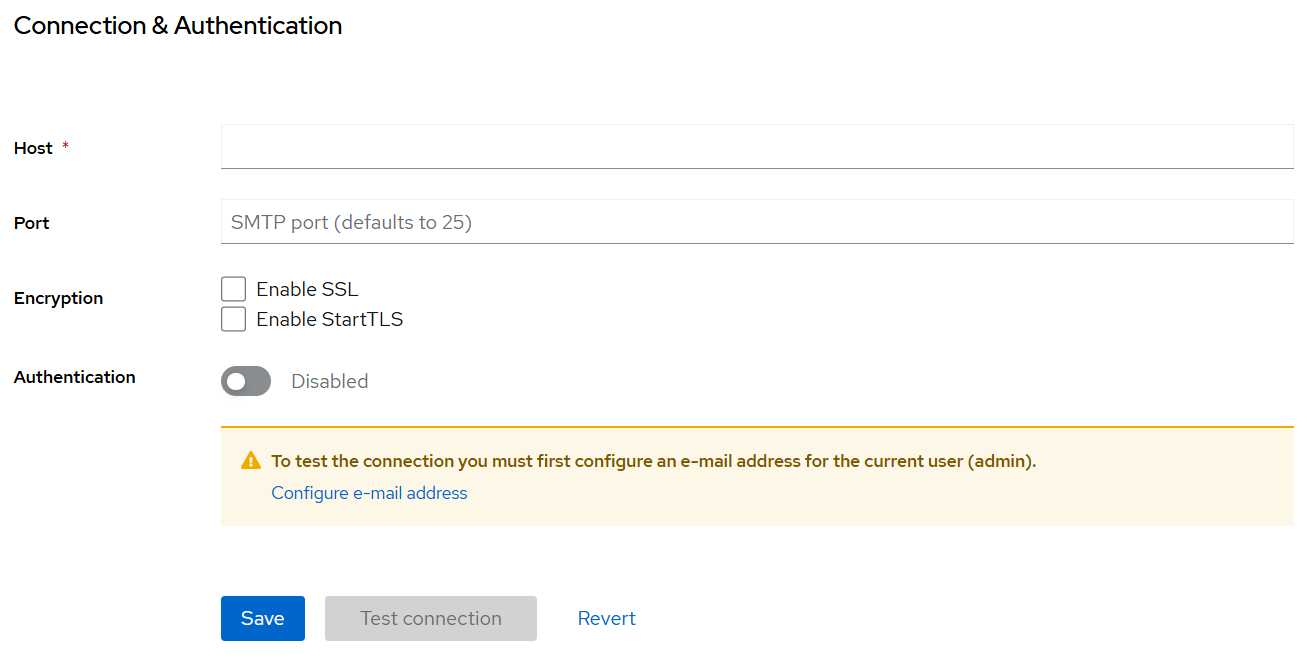
- Set the Host and From fields in the Email tab so Keycloak can send password reset emails.
-
When users click the “Forgot Password” link, they can enter their username or email address to get an email with a link to reset their password.
-
The email text for password reset can be customized. Refer to the Server Developer Guide for details.
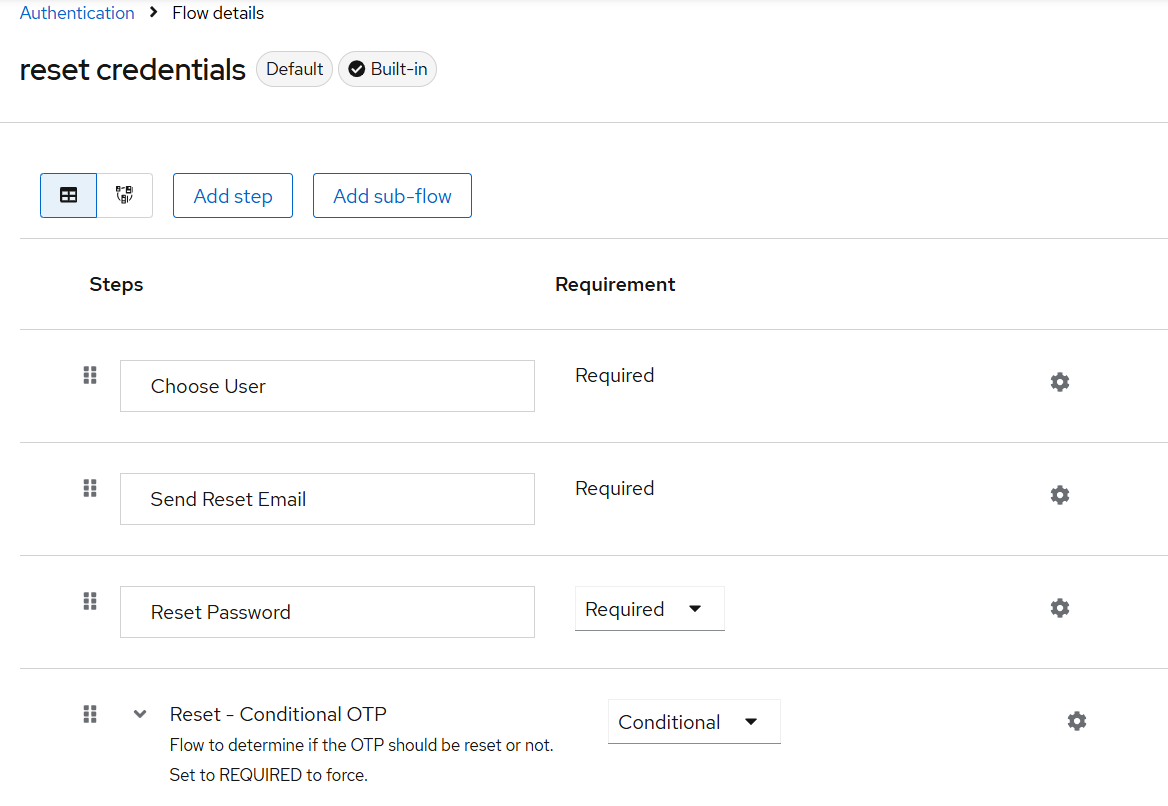
When users click the reset link in the email, Keycloak prompts them to update their password. If they use an OTP generator, Keycloak will also ask them to reconfigure it. For higher security, you can choose to prevent users from resetting their OTP generator via email.
To modify the behavior for resetting OTP during password resets, follow these steps:
Go to the Authentication menu.
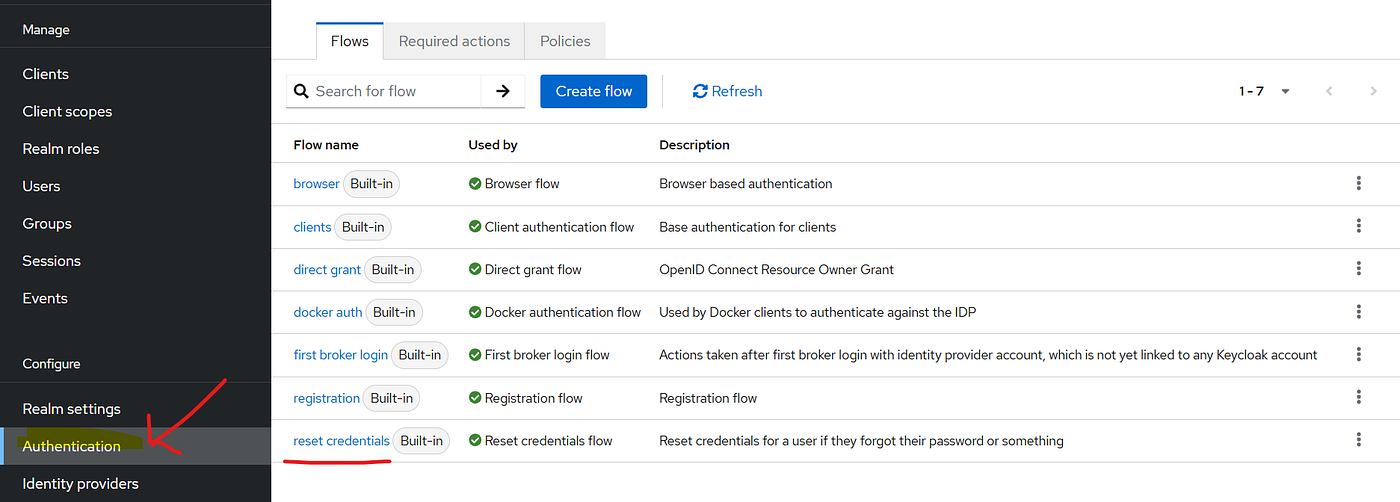
- Click the Flows tab.
- Select the Reset Credentials flow.
- Set the Reset — Conditional OTP sub-flow requirement to Disabled if you want to prevent OTP reset.
In the Authentication menu, click the Required actions tab.
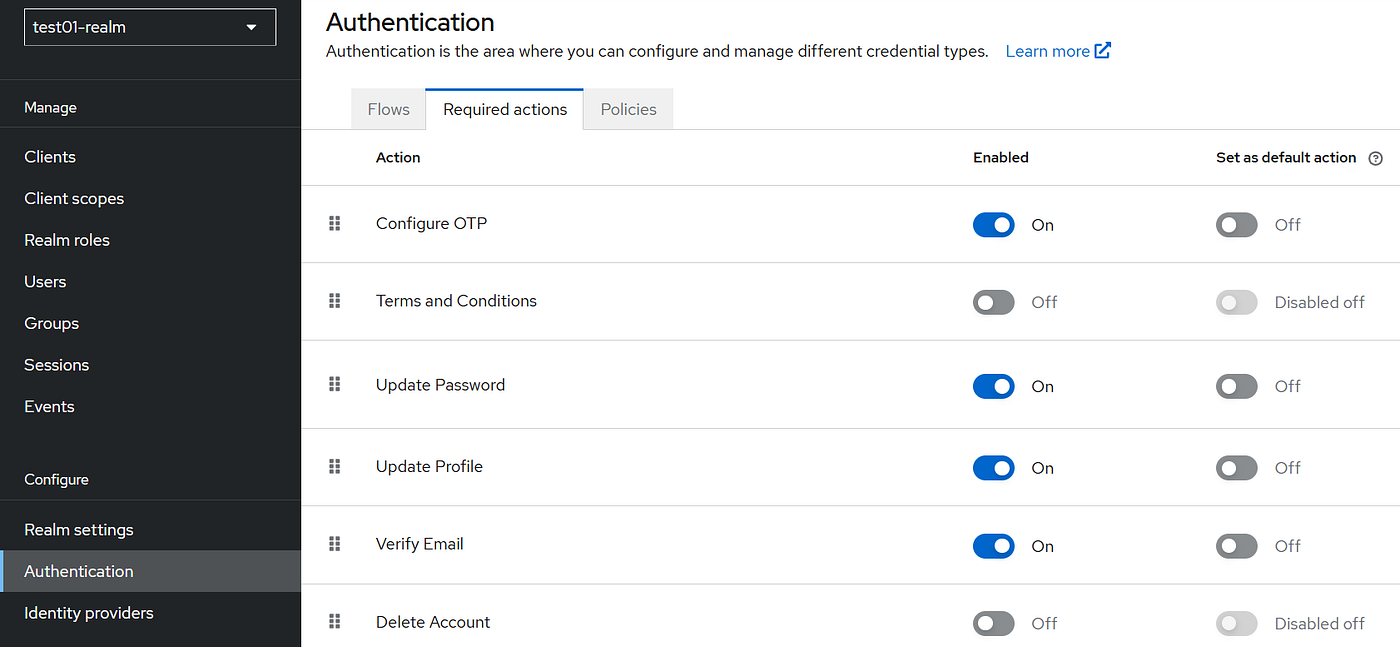
Ensure that Update Password is enabled.
Enabling Remember Me
To enable the Remember Me feature in Keycloak:
- Go to the Realm Settings menu.
- Click the Login tab.
- Toggle the Remember Me switch to On.
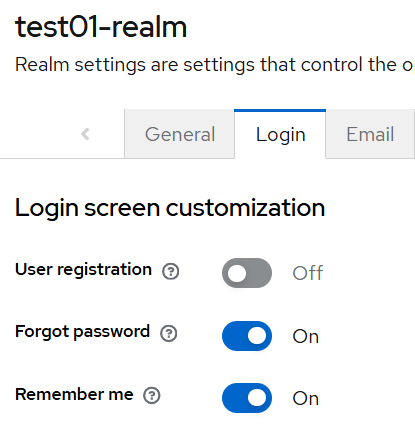
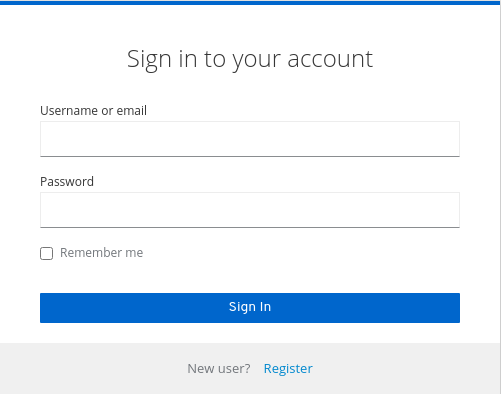
When enabled, the login page will display a “Remember Me” checkbox. If a user selects it during login, their session remains active even after closing the browser, as the login cookie becomes persistent instead of session-only.
ACR to Level of Authentication (LoA) Mapping
ACR to Level of Authentication (LoA) Mapping links an Authentication Context Class Reference (ACR) value to a Level of Authentication (LoA). This mapping helps define and enforce the security level of user authentication required for specific scenarios.
What is ACR?
ACR stands for Authentication Context Class Reference, which is a value used in OpenID Connect (OIDC) to describe the context or method of user authentication. For example:
- ACR values may indicate that a user logged in using a password, biometrics, or multi-factor authentication (MFA). Multi-Factor Authentication (MFA) is a security process requiring users to verify their identity using two or more authentication factors from different categories. It enhances security by combining multiple layers of protection.
Three Categories of Authentication Factors
- Something You Know Information only the user knows, such as:
- Passwords
- PINs
- Security questions
2. Something You Have Physical items or tokens the user possesses, such as:
- Mobile phones (for OTP or app-based authentication)
- Security tokens (e.g., hardware keys like YubiKey)
- Smart cards
3. Something You Are Biometric traits unique to the user, such as:
- Fingerprints
- Facial recognition
- Iris scans
- Voice recognition
How MFA Works
When logging into a system, the user must provide credentials from at least two of the above categories. Example Workflow:
- Step 1: Enter a username and password (Something You Know).
- Step 2: Receive a One-Time Password (OTP) on a mobile phone and enter it (Something You Have).
- Optional Step 3: Use fingerprint verification (Something You Are) for higher security requirements.
Real-World Examples
- Online Banking
- Step 1: Enter username and password to access the account.
- Step 2: Confirm identity by entering an OTP sent to the registered phone.
2. Workplace Access
- Step 1: Swipe a smart card to access the office.
- Step 2: Provide a fingerprint scan at the door.
3. Cloud Services (e.g., Google)
- Step 1: Log in with a password.
- Step 2: Verify login with an authentication app like Google Authenticator or receive a push notification on a trusted device.
What is LoA Mapping?
LoA (Level of Authentication) mapping refers to the process of associating specific authentication methods with a numeric value that represents their strength or security level. The numeric Level of Authentication (LoA) helps define the assurance or confidence that the user is who they claim to be, based on the method(s) used to authenticate them.
How LoA Mapping Works
- Define Levels of Authentication: Assign numeric values to different authentication strengths. For example:
- LoA 1: Basic authentication (e.g., username and password).
- LoA 2: Two-factor authentication (e.g., password + OTP).
- LoA 3: Advanced authentication (e.g., password + biometric scan).
- LoA 4: Very high-security authentication (e.g., hardware tokens + biometric + geo-location checks).
2. Associate Authentication Contexts (ACRs): The authentication method (or context) is mapped to the numeric LoA. This allows systems to enforce security policies based on the required level of assurance.
3. Use in Applications: When a user accesses a system or service, the authentication method they use determines the LoA, and access is granted only if the LoA meets or exceeds the system’s requirements.
Real-World Examples of LoA Mapping
- Banking Applications
- LoA 1: A user logs in to check account balances using only a password.
- LoA 2: A user makes a fund transfer, requiring OTP verification sent to their phone.
- LoA 3: A user accesses sensitive features like account deletion, requiring a biometric scan in addition to an OTP.
2. Government Services
- LoA 1: Citizens log in to view public service announcements using a simple username and password.
- LoA 2: To file taxes, they use two-factor authentication (password + OTP).
- LoA 3: For higher-level services (e.g., applying for visas or accessing personal health records), users authenticate using a hardware token and biometric scan.
3. Corporate Systems
- LoA 1: Employees log in to check their work schedules using passwords.
- LoA 2: Employees access confidential internal documents requiring MFA (password + mobile push notification).
- LoA 3: Administrators modify system configurations requiring a password, hardware token, and location verification.
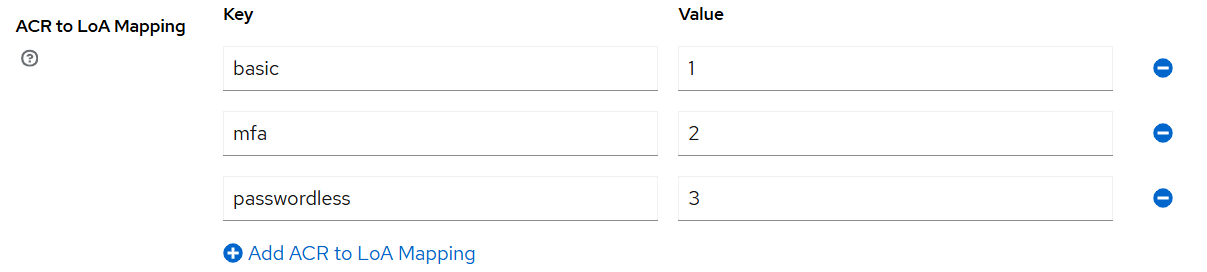
In the general settings of a realm, you can define which
Authentication Context Class Reference (ACR)value is mapped to whichLevel of Authentication (LoA).
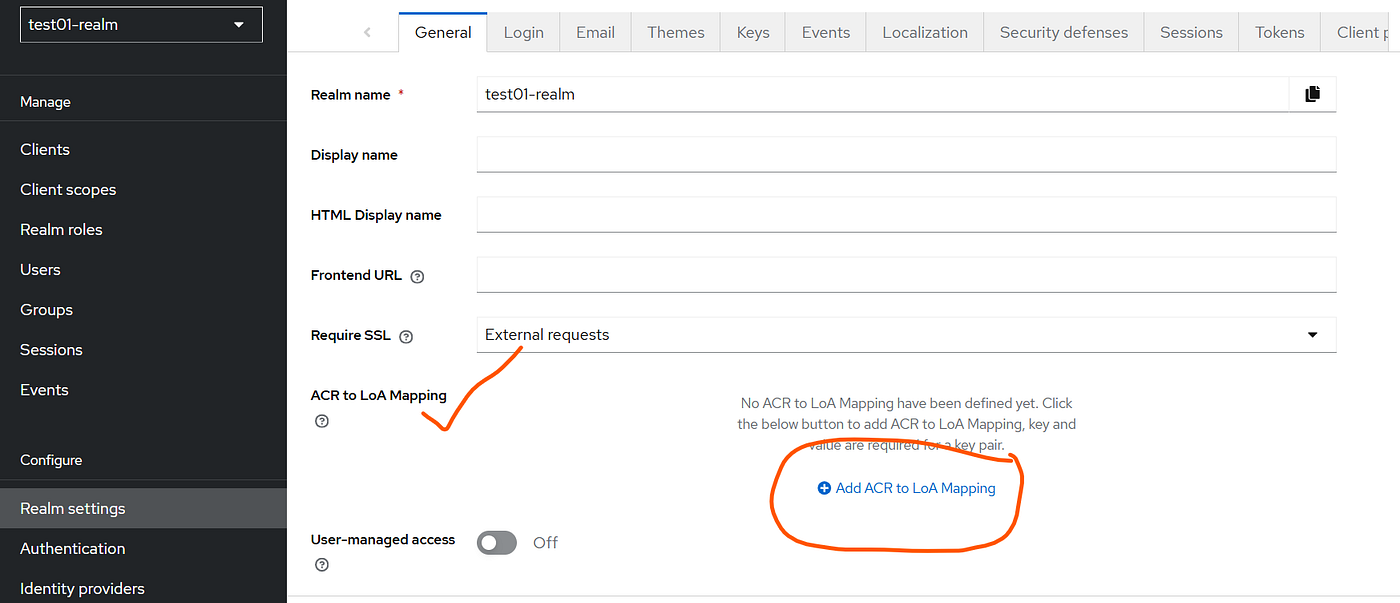

Key (ACR): Enter a string representing the authentication method or context. For example:
"basic": Username and password."mfa": Multi-factor authentication (e.g., password + OTP)."passwordless": Authentication without passwords (e.g., biometrics or magic links).
Value (LoA): Enter a numeric value representing the strength of the authentication method:
1: Basic authentication (low assurance).2: Multi-factor authentication (medium assurance).3: Passwordless or hardware token-based authentication (high assurance).
How to Use This Functionality?
- Set the Mapping:
- Go to Realm Settings → General Settings.
- Under ACR to LoA Mapping, enter the ACRs and their corresponding LoAs.
- To configure authentication flows in Keycloak that check the Level of Authentication (LoA) based on the mapped ACR, you need to set up authentication flows within the Keycloak admin console. These flows are used to determine the level of authentication required before granting access to a user.
Process to Configure Authentication Flows Based on ACR to LoA Mapping
1. Access Authentication Flows:
- In the Keycloak Admin Console, go to Authentication from the left-hand menu.
- Then, click on the Flows tab at the top of the page.
2. Create or Modify an Authentication Flow:
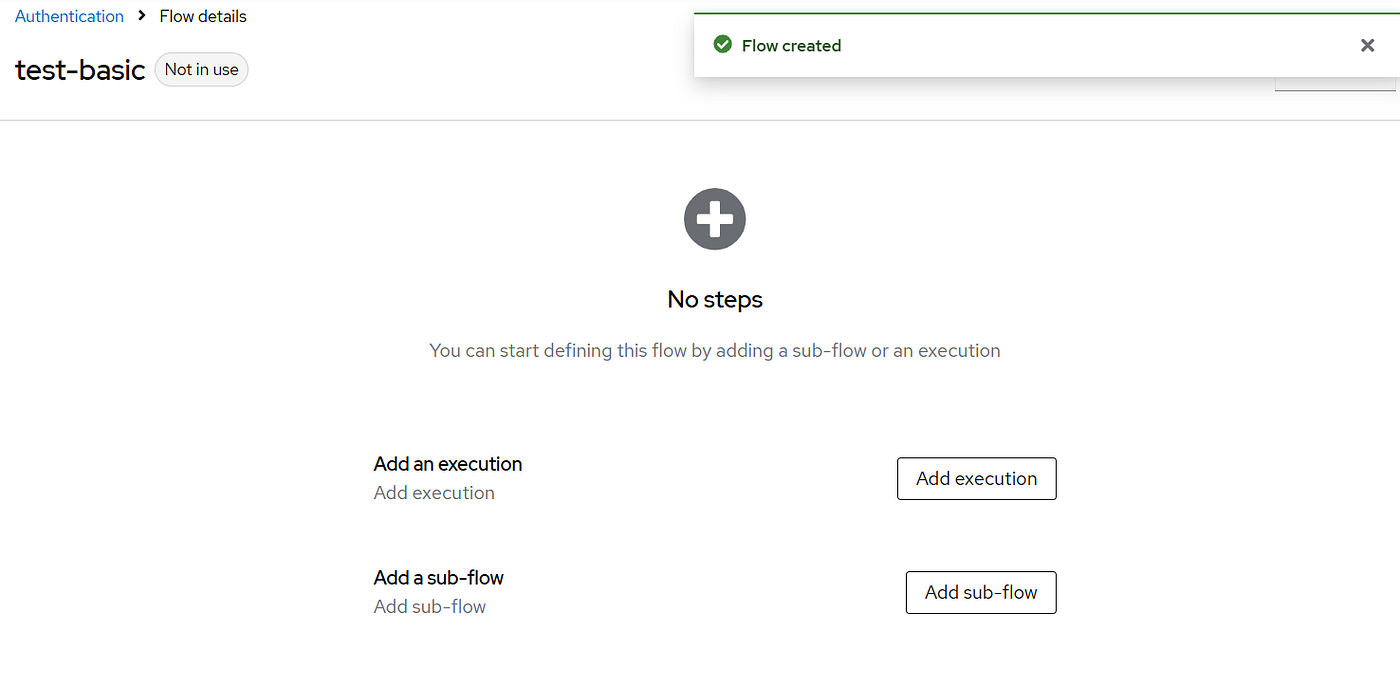
- Create a new flow or edit an existing flow to customize the authentication process.
- Click Add flow to create a new flow or click the Edit icon next to an existing flow if you want to modify it.
When configuring authentication flows in Keycloak, the two options you’re seeing — Basic Flow and Client Flow — are different types of authentication flows that serve specific purposes:
1. Basic Flow
- Purpose: This is the most commonly used flow, designed for general authentication scenarios.
- Use Case: It’s used for authenticating users through traditional means such as username/password, OTP, etc.
- Example: When a user tries to log in via the browser, this flow checks the username/password, may ask for OTP if multi-factor authentication (MFA) is enabled, and then grants access to the system.
- Common Flow Types: Login with username/password, OTP verification, password reset, etc.
Example Configuration:
- If the user tries to log in, they are first authenticated using their username and password (LoA 1). Then, if they are accessing a sensitive action, they are prompted for OTP (LoA 2).
2. Client Flow
- Purpose: This flow type is specifically designed for client-side applications (e.g., mobile apps, service-to-service authentication, etc.).
- Use Case: Used when a client (like a mobile app or an API) authenticates itself with Keycloak to obtain an access token (for OAuth or OpenID Connect flows).
- Example: When a mobile app needs to authenticate a user or request an access token to access backend APIs, a client flow is used.
Which One to Choose?
- Basic Flow: If you are working on user login and want to configure the authentication steps based on Level of Authentication (LoA), go with the Basic Flow. This is typically used for browser-based login scenarios where user credentials are involved.
- Client Flow: If you are working with client-side apps or API integrations (e.g., when your application needs to authenticate itself to access Keycloak or other resources), then you should use Client Flow.
For Basic Flow:
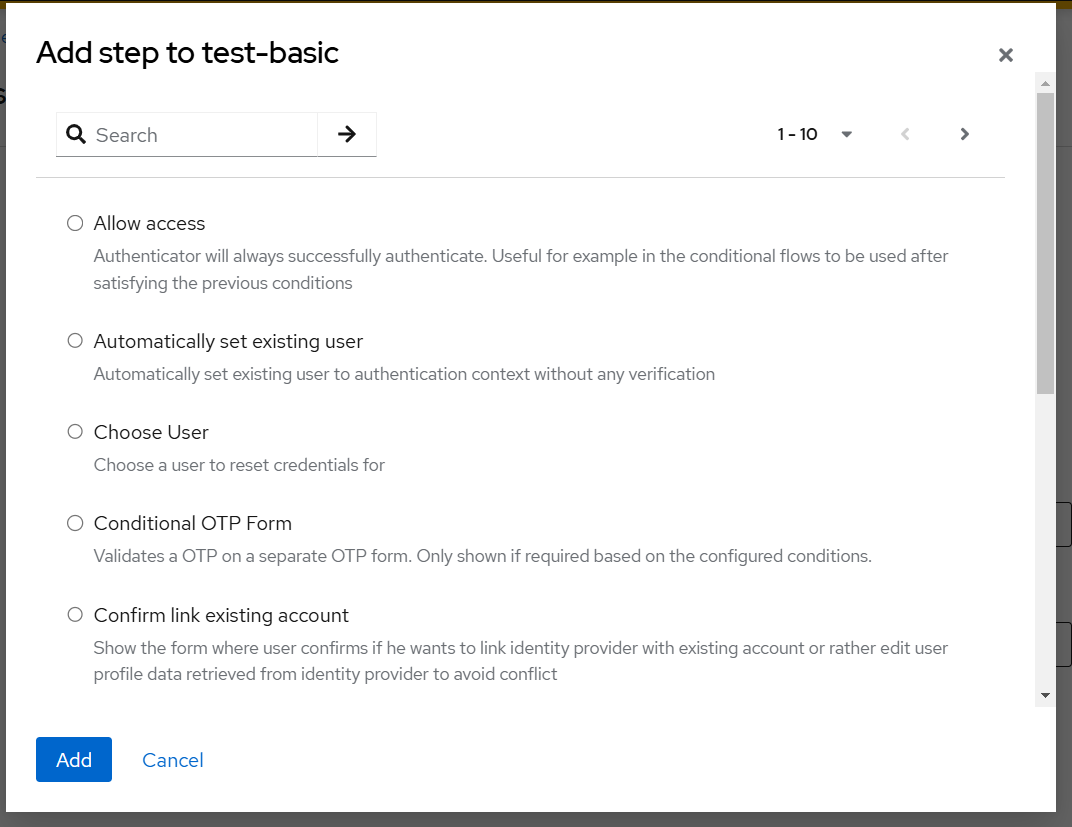
If you choose Basic Flow, you can then proceed to configure specific execution steps in the flow:
- Add Executions: You can add execution steps like:
- Username/password form.
- OTP verification for multi-factor authentication (LoA 2).
For Client Flow:
The executions we listed in the Client Flow in Keycloak are methods for client authentication. These executions define how Keycloak validates the client (i.e., the application or service trying to authenticate) when it attempts to interact with Keycloak.
1. Client ID and Secret:
This is the most common method for authenticating clients. When a client application (like a web app or mobile app) needs to authenticate, it sends its client ID and client secret (like a username and password for the application).
- The client sends its client_id and client_secret either in the request parameters or in the Authorization header (using Basic authentication).
- A backend service that interacts with Keycloak to get an access token for accessing a protected API would authenticate using its client_id and client_secret.
- This is used when you want to authenticate using traditional client credentials (client ID + secret).
2. Signed JWT:
- In this method, the client uses a signed JSON Web Token (JWT) to authenticate. The JWT is signed with the client’s private key, and Keycloak will verify this signature using the client’s public key.
- The client generates a JWT that includes information like the client ID and some claims (additional information), signs it with its private key, and sends it to Keycloak. Keycloak verifies the signature using the public key that it already has for the client.
- A client application that wants to authenticate without sending sensitive credentials like a secret could use JWT. For example, a secure service-to-service communication where the client securely signs a JWT for authentication.
- This is useful when you want a more secure, token-based authentication that avoids sending secrets over the wire.
3. Signed JWT with Client Secret:
- This is a variation of the Signed JWT method, but here the client signs the JWT using its client secret instead of a private key.
- The client generates a JWT and signs it with the client secret. Keycloak will then verify this JWT against the client’s known secret.
- This is useful when you want to use a JWT-based authentication but prefer to use the client secret for signing instead of managing private keys. It is a simpler option for clients that don’t have access to private keys.
- This method is good if you want to authenticate using JWTs but still prefer using secrets over private keys.
4. X509 Certificate:
- This method allows a client to authenticate using a client certificate (an X.509 certificate).
- The client presents a certificate (which includes the client’s public key) during the authentication process, and Keycloak verifies the certificate against a list of trusted certificates. The client also proves its identity by signing with its private key.
- A high-security environment where client-server communication requires certificates. For example, an enterprise service using mutual TLS (mTLS) for secure authentication.
- This method is used when you want to authenticate clients in environments that rely on public key infrastructure (PKI), using certificates instead of passwords or secrets.
When to Use Each Execution in Client Flow:
- Client ID and Secret: Ideal for most client applications that require a straightforward and simple authentication method using a client ID and secret.
- Signed JWT: Use when you want a more secure, token-based authentication, and avoid sending the client secret in requests.
- Signed JWT with Client Secret: A hybrid solution that allows you to authenticate using a JWT while still signing it with the client secret. It provides a good balance between using tokens and keeping secrets secure.
- X509 Certificate: Use this in high-security environments where you want to authenticate clients using certificates (for example, in scenarios involving mTLS or strict identity verification).
By selecting the appropriate execution in the client flow, you can customize how your clients authenticate with Keycloak based on your security needs and requirements.
Summary
we discussed key login options and authentication configurations in Keycloak, which are crucial for enhancing security and user experience:
- Forgot Password: This feature allows users to reset their passwords without contacting support. It helps improve user satisfaction and reduces support requests. If not configured, users may be unable to recover their accounts on their own, leading to frustration and possible abandonment of your app.
- Remember Me: Enabling this feature allows users to stay logged in even after closing the browser, enhancing user convenience. Without it, users would need to log in repeatedly, which may lead to a less user-friendly experience.
- ACR to LoA Mapping: This feature links Authentication Context Class Reference (ACR) values to Levels of Authentication (LoA). It allows systems to enforce varying levels of security, depending on the authentication method (e.g., username/password, multi-factor authentication). Without proper mapping, your application may not enforce appropriate security policies for different actions, potentially exposing sensitive data.
- Authentication Flows: These define the sequence of authentication steps a user or client must complete. Flows such as Basic Flow (for general user login) and Client Flow (for service-to-service authentication) help secure access based on the required security level. Without customized flows, you might not be able to enforce multi-factor authentication or handle client-specific authentication properly, leading to security risks.
These configurations and features enhance both user experience and security. If not properly implemented, users may face difficulties like account recovery issues, repeated logins, or security risks due to insufficient authentication checks.
메타데이터
- post_id
- e55b039bbfa2
- slug
- keycloak-login-options-part-3-e55b039bbfa2
- url
- https://medium.com/@gauravswarankar/keycloak-login-options-part-3-e55b039bbfa2
- canonical_url
- https://medium.com/@gauravswarankar/keycloak-login-options-part-3-e55b039bbfa2
- author_url
- https://medium.com/@gauravswarankar
- status
- ok
- fetched_at
- 2026-06-20 20:29:01