Linksharing in Storj
When working with cloud or decentralized storage, one common challenge is sharing files via stable, long-term URLs. Traditional presigned…
Linksharing in Storj
When working with cloud or decentralized storage, one common challenge is sharing files via stable, long-term URLs. Traditional presigned URLs often expire, forcing developers to regenerate links repeatedly.
Storj Linksharing solves this problem by allowing you to create browser-friendly, permanent (or restricted) URLs for objects stored in Storj’s decentralized network.
What Is Linksharing in Storj?
Linksharing is a Storj-provided service that lets you expose files stored in a bucket through public HTTP(S) URLs, without making your entire bucket public.
Instead of sharing your full access credentials, Linksharing uses a restricted, read-only access grant embedded into a URL.
In simple terms:
- Your file stays private in Storj
- A controlled public link is generated
- Anyone with the link can access the file
- No Storj account is required to view it
Why Does Storj Linksharing Exist?
The Problem with Traditional Approaches
- Presigned URLs : Expire after a short time
- Public buckets : Security risk
- Custom gateways : Complex to manage
- Backend proxy : Increases server load
Linksharing Solves These Problems
- Permanent or long-lived URLs
- Read-only access
- No backend server required
- Works with browsers, mobile apps, and CDNs
- Built on decentralized storage
How Linksharing Works (Behind the Scenes)
Storj Linksharing is built on three core components:
1. Access Grants
An Access Grant is a cryptographic token that defines:
- Which bucket can be accessed
- Which paths are allowed
- What permissions exist (read/write/list)
- Optional expiration time
- Restricted Access Grant
For Linksharing, you create a restricted, read-only access grant:
- Read access only
- Optional object path restriction
- Optional expiration (or no expiration for permanent links)
- Storj Linksharing Gateway
Storj hosts a gateway at:
https://link.storjshare.ioThis gateway:
- Validates the access grant
- Fetches encrypted data from the Storj network
- Decrypts it
- Serves it over HTTPS
Linksharing URL Formats
Preview / Browser-Friendly Link
https://link.storjshare.io/s/<shared_access_key>/<bucket>/<object_path>This provides:
- File previews (images, videos, PDFs)
- Download options
- Metadata display
Direct (Raw) File Access
https://link.storjshare.io/raw/<shared_access_key>/<bucket>/<object_path>This is best for:
<img>tags- APIs
- Mobile apps
- Direct downloads
- CDN integration
Step-by-Step: Generate a Permanent URL for an Image/File
Prerequisites
- Storj account
- A bucket with an uploaded file
- Uplink CLI installed OR access to Storj Console
Method 1: Using Uplink CLI
The Uplink CLI is Storj’s official command-line tool for interacting with Storj decentralized storage. It allows developers to upload files, manage buckets, generate access grants, and create Linksharing URLs programmatically.
What Is Uplink?
Uplink is a lightweight CLI tool that:
- Authenticates using an Access Grant
- Encrypts files client-side
- Uploads data to Storj’s decentralized network
- Allows fine-grained access control
You must set it up before using Linksharing via CLI.
Step 1: Create a Storj Account
Step 2: Create a Project
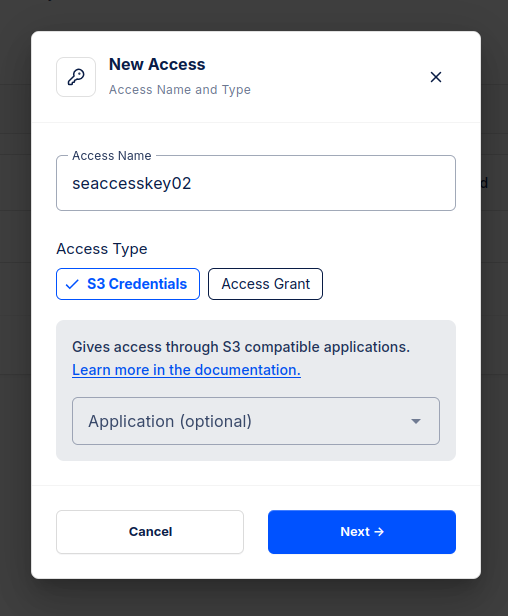
Step 3: Create an Access Grant with Full Access, NO expiration and all the bucket.
Step 4: Install Uplink CLI
curl -L https://github.com/storj/storj/releases/latest/download/uplink_linux_amd64.zip -o uplink.zip
unzip uplink.zip
sudo mv uplink /usr/local/bin/
Step 5: Configure Uplink
uplink setupIt will prompt you to give your API key or Access grant. Give necessary details.
Step 6: Verify Installation
uplink lsIt lists all of your bucket. It verifies sucessfull installation.
Now, since the uplink is working fine. Lets generate Linksharing using uplink.
Basic Uplink Commands:
List Available Access Grants : uplink access list
Step 1: Create a Restricted Access Grant
uplink access restrict \
  --readonly \
  --prefix sj://my-bucket/images/ \ #<-- you folder in bucket
  --access <your_access_grant_name>
  --import-as university-logo-readlonly
**--access <your_acccess_grant_name>**: Uses your existing project credentials (connected toap1.storj.io).**--prefix sj://...**: Limits the new credentials strictly to that specific bucket and folder path.**--readonly**: Ensures these credentials cannot upload, delete, or modify files.**--import-as university-logo-readonly**: Saves this restricted version into your CLI so you can use it later without typing the long key.
NOTE:
- Access grants are immutable : You cannot modify or extend an existing one
- Each prefix needs its own access
It means that, once a access grant is created for an folder/subfolder with specified permission it like (read, write, upload) it cannot be modified to grant same previlage to any sibling folder or child folder, For that we need to create a different access grant.
Step 2: Share the Access
uplink share --access restricted-access-grant
Copy the Shared Access Key from the output.
Step 3: Build the Link
https://link.storjshare.io/raw/<shared_access_key>/my-bucket/images/photo.jpgCommon Use Cases
<img src="https://link.storjshare.io/raw/shared_access_key/bucket/images/logo.png" />def get_public_url(self, object_key):
"""
Get the public URL for an uploaded object
Uses Storj's linksharing service for public access
"""
return (
f"https://link.storjshare.io/raw/"
f"{SHARED_ACCESS_KEY}/"
f"{self.bucket_name}/"
f"{object_key}"
)Now, this function gives you a url to view your image/files based.
메타데이터
- post_id
- e6a7513f3faf
- slug
- linksharing-in-storj-e6a7513f3faf
- url
- https://medium.com/@21bcs11201/linksharing-in-storj-e6a7513f3faf
- canonical_url
- https://medium.com/@21bcs11201/linksharing-in-storj-e6a7513f3faf
- author_url
- https://medium.com/@21bcs11201
- status
- ok
- fetched_at
- 2026-07-14 03:02:02