Configure traffic shaping on Palo Alto Networks Firewall
This is a guide on how to configure traffic shaping on Palo Alto Networks firewall using the QoS feature. It allows you to enforce maximum…
Configure traffic shaping on Palo Alto Networks Firewall
This is a guide on how to configure traffic shaping on Palo Alto Networks firewall using the QoS feature. It allows you to enforce maximum throughput for certain type of traffic.
The main steps are:
- Configure a QoS Profile
- Apply the QoS profile on applicable interfaces
- Configure QoS Rules
QoS Profile
The QoS profile defines multiple classes of traffic and their maximum egress bandwidth.
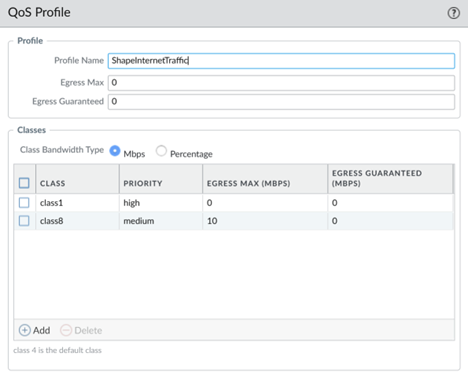
Navigate to Network > Network Profiles > QoS. Click Add to configure a new QoS profile. In the example below, we create a new profile named ShapeInternetTraffic with two classes of traffic. We will assign Internet traffic as Class 8 and set its maximum throughput to 10 Mbps. We will assign internal network traffic as Class 1 and set no limit.
Enable QoS on interfaces
Navigate to Network > QoS. Click add to apply the new QoS profile on the applicable interfaces. Under Physical Interface > Default Profile, set Clear Text to the newly configured QoS profile.

The QoS profile is applied as traffic exits the interface. In this example, we apply it to ethernet1/1 (Untrust) for upload and ethernet 1/2 (Trust) for download.

The QoS icon will be shown as a feature on those interfaces.

QoS Rules
The final step is to configure QoS policy rules to define the traffic that will receive QoS treatment. A QoS class, as previously configured in the QoS profile, is assigned by a QoS policy rule to matching traffic as it exits a QoS-enabled interface.
Navigate to Policies > QoS. Click Add to add a new rule. The first rule we will configure is to match internal network traffic which will be assigned QoS Class 1 (no limit).

Here we specify both source and destination addresses with addresses from the RFC1918 ranges. Leave all other settings to any.

The second rule we will configure is to match ingress traffic from the Internet which will be assigned QoS Class 8.

Set the source zone to the appropriate zone for Internet (Untrust in this example). Set the destination zone to any.

Under Other Settings, set the Class to 8.

The third rule we will configure is to match egress traffic to the Internet which will be assigned QoS Class 8. Repeat the steps for the second rule, this time setting the destination zone to the zone for Internet.

Once configured, you can navigate to Network > QoS > <interface name> > Statistics and observe the shaped traffic.

메타데이터
- post_id
- ea036bc8168a
- slug
- configure-traffic-shaping-on-palo-alto-networks-firewall-ea036bc8168a
- url
- https://medium.com/@tomssy/configure-traffic-shaping-on-palo-alto-networks-firewall-ea036bc8168a
- canonical_url
- https://medium.com/@tomssy/configure-traffic-shaping-on-palo-alto-networks-firewall-ea036bc8168a
- author_url
- https://medium.com/@tomssy
- status
- ok
- fetched_at
- 2026-07-17 03:44:50


