Installing Python Packages via a DAG in Apache Airflow
cause I was too lazy to use Docker
Installing Python Packages via a DAG in Apache Airflow
cause I was too lazy to use Docker
I recently started using Airflow to schedule Python scripts for personal projects. Since this is mainly for learning, I've been configuring everything manually, including how to handle dependencies. Docker is usually the way to go, but I was a bit lazy to set it up, so I created a DAG that installs the packages for me.
One important step to run your DAGs (and overall scripts) smoothly is managing package installation. For example, if you are importing Pandas in your script and you run this script in an Airflow scheduler, you’ll get an import error saying that you don’t have Pandas installed. You need to explicitly tell Airflow to install required packages, otherwise your task will fail due to missing dependencies.
If you opt to use Docker, the same applies. You will need to explicitly include them in your Docker setup, typically via a requirements.txt or a modified Dockerfile.
Since I'm just configuring it for learning purposes (and I was too lazy to try out Docker), I created a DAG to do that for me. If you are also starting to learn Airflow, I think this is a good way to pick up some core concepts.
Setting Things Up
To be able to create the DAG, I first had to set up Airflow locally. I won't go through it in much details (there are already plenty of tutorials available), but I’ve included a few key steps and references below!
Set Up a Virtual Environment
First, to be able to use Airflow, I created a virtual environment inside my project directory to create an isolated Python environment. Again, there are other ways to do that, you can also install conda or poetry, which are tools for managing Python packages.
Check out more in:
- *How to Create a venv *— Google's AI Overview explains very well
- *Understanding when and how to use each Python virtual environments*
Install Airflow
Once you have set up your venv and installed Python 3.10 (or other version allowed by Airflow), you can install Airflow through the Terminal with the command below. Make sure you have activated the virtual environment, otherwise it will fail.
pip install apache-airflowConfigure the DAG folder
This step is just to guarantee that your dags_folder parameter is correctly set. To check that out, you'll need to find the airflow.cfg file. Airflow will try to find DAG files under the path set in thedags_folder parameter.
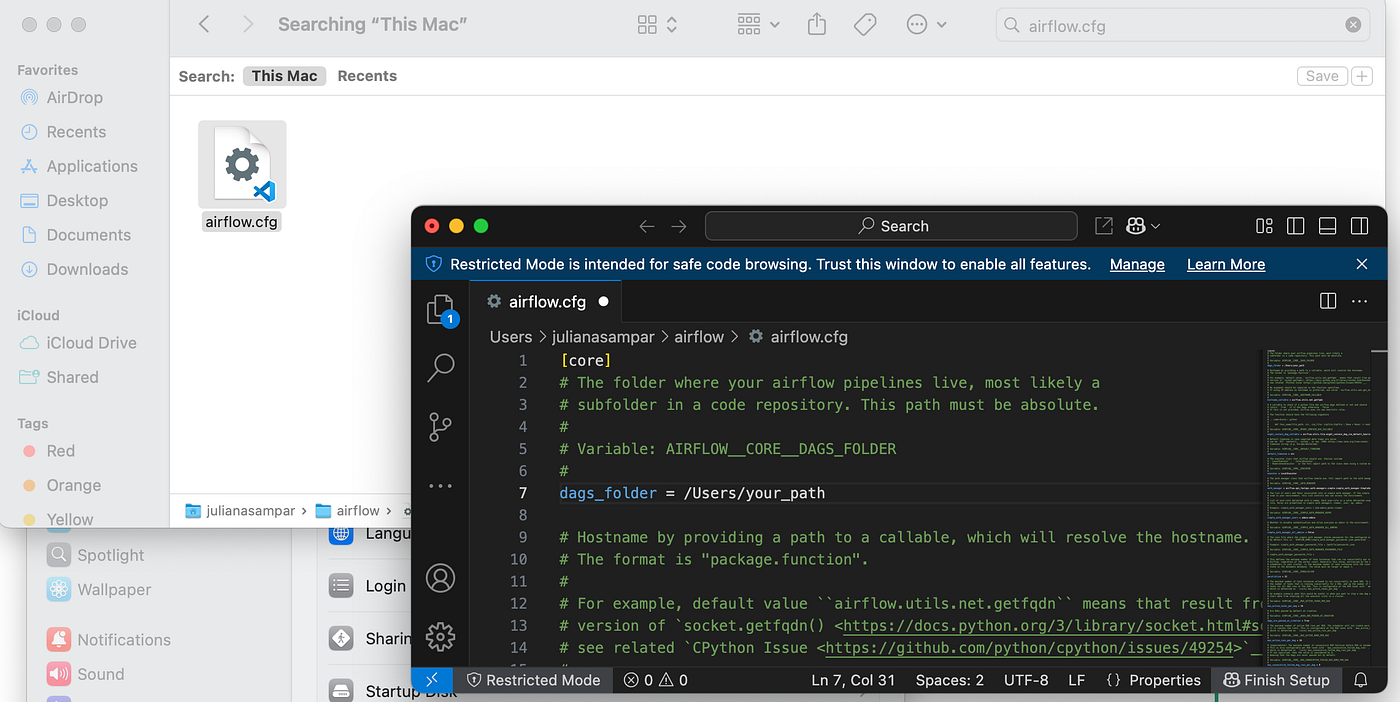
Screenshot or airflow.cfg search and file
Run airflow server locally
To open Airflow's UI, just run the command below in the Terminal with the virtual environment activated.
airflow standaloneLook for user and password information. It may appear directly on the Terminal or you might have to access airflow/simple_auth_manager_passwords.json.generated file.

Screenshot of local Terminal — opening Airflow UI
After that, you’ll be able to access the UI usually, which is usually under local host http://0.0.0.0:8080.

Screenshot of Airflow UI's login
Creating the DAG
Once Airflow is set up, we can start coding and checking how the DAG comes out in Airflow's UI.
Full Code
from airflow import DAG
from airflow.operators.python import PythonOperator
import sys
import subprocess
from datetime import datetime

with DAG(
    "install_packages"
    , start_date=datetime(2025, 1, 20)
    , schedule='@once'
    , catchup=False
    , tags=['packages', 'python']
):
    packages = [
            'pandas'
            , 'google.cloud'
            , 'google.cloud.bigquery'
            , 'google.cloud.storage'
            , 'json'
            , 'pyarrow'
            , 'fastavro'
            , 'spotipy'
    ]

    for package in packages:

        def install_packages(package=package):

            subprocess.check_call([sys.executable, '-m', 'pip', 'install', package])

            ## Defining DAG tasks

        task = PythonOperator(
            task_id = f"install_{package}"
            , python_callable=install_packages
        )

        task
Step by Step
(1) Creating the structure
The first step is to create the DAG structure, which follows a pretty standard pattern.
from airflow import DAG
from airflow.operators.python import PythonOperator

with DAG(
  "install_packages_test"
):

  def install_packages():
    print("it's doing something")

  task = PythonOperator(
            task_id = "install_packages"
            , python_callable=install_packages
        )

task- Imports: Since what we want is installing Python packages in Airflow,
we are importing DAG (default) and also a Python Operator to execute the
pip install; - with DAG(): Defines the DAG context. Every DAG file should include this structure. For now, I'm just defining the first parameter, the DAG ID, which is the name that will show up in the UI (in this case
install_packages_test). In the final step, I'm adding more relevant parameters to make the DAG work like I want to; - def install_packages(): Defining a function called
install_packages()to be executed by the DAG. In this first step, I’m just defining a print statement to see if it runs correctly, but the end goal is to create a command that executes thepip installfor multiple packages; - task = PythonOperator(): Variable assessing the function to be executed by the Python Operator. The
task_idparameter is the name of the task in the UI, andpython_callablemust be filled with the function you want to execute; - task: Calling the final executable function.
Output: The DAG was successfully created, the run was also successful and we can see the print statement "It's doing something" in the log.

install_packages_test DAG — Step 1
(2) Defining the pip install function
Next, the step is to replace the print statement to create a function to execute more closely what we want: an executable pip install command. In this step, I'll just try to install a single package, like pip install pandas.
Since the goal is for the DAG to execute a command-like code, the function might need modules like subprocess and sys, which are modules that allows the code to run external commands. More information in:
- *An Introduction to Python Subprocess — Data Camp*
- *Python Tutorial: Calling External Commands Using subprocess Module — Youtube*
- *What does sys.executable mean in Python coding? — Codango*
So, the changes we need to make are:
- Imports: Adding sys and subprocess imports, necessary modules to execute the
pip install. - def install_packages(): Contains the
pip installcommand usingsubprocess.check_call(), which ensures that the task fails if the installation fails.
from airflow import DAG
from airflow.operators.python import PythonOperator
import sys
import subprocess

with DAG(
  "install_packages_test"
):

  def install_packages():
    subprocess.check_call([sys.executable, '-m', 'pip', 'install', 'pandas'])

  task = PythonOperator(
            task_id = "install_packages"
            , python_callable=install_packages
        )

  task
Output:
The run was successful, and we can confirm that pandas was already installed in the Airflow environment.

install_packages_test DAG — Step 2
(3) Adding for loop to install multiple packages
With the function working properly, now it's time to add a loop to allow the DAG to execute multiple pip install commands. The goal here is to generate a separate task for each package installation command.
The additions we need to make are:
- Defining a
packageslist: The list can be defined outside or inside the with DAG() statement, the output will be the same. The list will contain the string values with the packages you want to install. - Place for loop outside function statement: Since we want to create separate tasks for each
pip installcommand, the loop must be outsideinstall_packages()function.
Why?
The task variable being called at the very end of the code is the statement that creates a new task in our DAG UI. By placing the loop outside the function, we ensure that multiple install_packages() tasks are created, with their own task_ids, and we are inducing Airflow to generate a task for each value in the list.
from airflow import DAG
from airflow.operators.python import PythonOperator
import sys
import subprocess

with DAG(
    "install_packages"
):
    packages = [
            'pandas'
            , 'google.cloud'
            , 'google.cloud.bigquery'
            , 'google.cloud.storage'
            , 'json'
            , 'pyarrow'
            , 'fastavro'
            , 'spotipy'
    ]

    for package in packages:

        def install_packages(package=package):

            subprocess.check_call([sys.executable, '-m', 'pip', 'install', package])

            ## Defining DAG tasks

        task = PythonOperator(
            task_id = f"install_{package}"
            , python_callable=install_packages
        )

        task
Output:
The DAG created a task for each variable in packages list, and all the runs were successful. Note that the install_packages task was not executed. This happened because I'm using the same DAG to execute all steps mentioned in this article. So, when I changed the DAG structure, Airflow realized that this task didn't exist anymore, but still maintained past executions of it.

install_packages_test DAG — Step 3
(4) Configuring DAG parameters
At this point, the DAG already ran the packages installation, so all the dependencies were met and now it's possible to go on and develop other projects… But if there is any need to run this DAG on a cadence or set up any other DAG configuration, this is the step for it.
The changes made here were:
- Adding
schedule,catchupandtagsparameters. With these parameters, I'm telling my DAG respectively to: schedule='@once': run just once, since in this case, there is no need to run on a cadence;catchup=False: avoid execute backfill. Skipped runs don't change the outcome;- and
tags, so it can be easily identified in Airflow's UI.
More about DAG-level config parameters in:
from airflow import DAG
from airflow.operators.python import PythonOperator
import sys
import subprocess
from datetime import datetime

with DAG(
    "install_packages_test"
    , start_date=datetime(2025, 1, 20)
    , schedule='@once'
    , catchup=False
    , tags=['packages', 'python']
):
    packages = [
            'pandas'
            , 'google.cloud'
            , 'google.cloud.bigquery'
            , 'google.cloud.storage'
            , 'json'
            , 'pyarrow'
            , 'fastavro'
            , 'spotipy'
    ]

    for package in packages:

        def install_packages(package=package):

            subprocess.check_call([sys.executable, '-m', 'pip', 'install', package])

            ## Defining DAG tasks

        task = PythonOperator(
            task_id = f"install_{package}"
            , python_callable=install_packages
        )

        task
Final Notes
This may not be the cleanest or most scalable way to handle dependencies, but it helped me learn how Airflow thinks.
It is important to note that this approach is meant for local and controlled environments only. It isn’t meant for Production environments neither more complex local infrastructure, but it’s a simple and effective way to understand how Airflow executes Python functions and handles dependencies.
If you’re just getting started, building small DAGs like this is a great way to get hands-on experience before diving into more advanced setups like Docker or Kubernetes!
Next post, I'll be sharing about a personal project using Claude API and Airflow 🤖
Hope to see you there! 👋
🤖 AI helped reviewing this article 🔗 Check me in LinkedIn / GitHub
메타데이터
- post_id
- ea1b01e0145a
- slug
- installing-python-packages-via-a-dag-in-apache-airflow-ea1b01e0145a
- url
- https://medium.com/@juliana.s.sampar/installing-python-packages-via-a-dag-in-apache-airflow-ea1b01e0145a
- canonical_url
- https://medium.com/@juliana.s.sampar/installing-python-packages-via-a-dag-in-apache-airflow-ea1b01e0145a
- author_url
- https://medium.com/@juliana.s.sampar
- status
- ok
- fetched_at
- 2026-06-20 20:29:01



