Object Creation in OCI Object Storage using OIC Multipart REST Request with APEX
This artical explains how to upload a file from Oracle APEX to OCI Object Storage by calling an Oracle Integration Cloud (OIC) integration…
Object Creation in OCI Object Storage using OIC Multipart REST Request with APEX
This artical explains how to upload a file from Oracle APEX to OCI Object Storage by calling an Oracle Integration Cloud (OIC) integration. APEX sends a multipart REST request to OIC. OIC receives the JSON metadata and file attachment, stages the file, calculates the required Content-Length, and invokes OCI Object Storage PutObject API to create the object in a bucket.
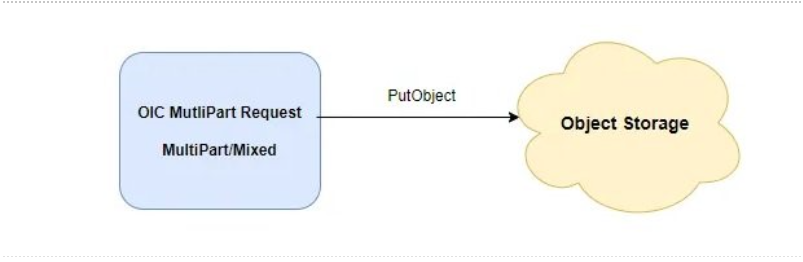
Architecture concept: OIC multipart request invokes OCI Object Storage PutObject API.
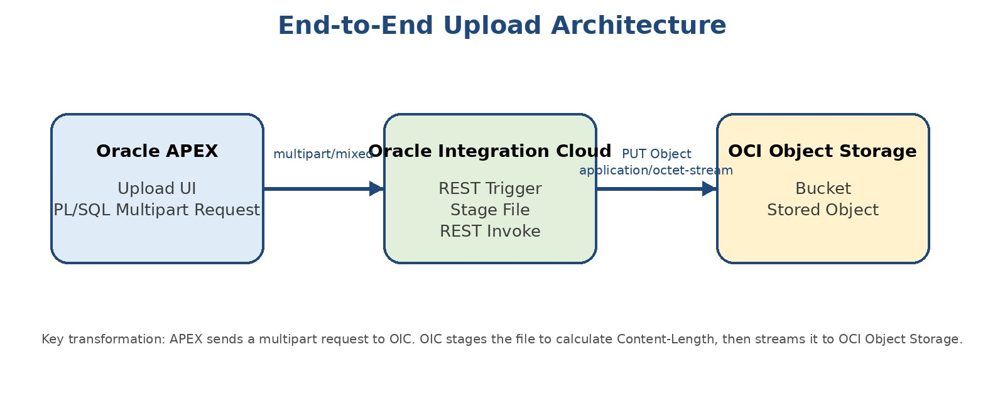
End-to-end architecture: APEX uploads the file to OIC, then OIC streams the object to OCI Object Storage.
Key concept: Multipart is used between APEX and OIC to send both metadata and file content in one request. OIC invokes OCI Object Storage as a binary stream using application/octet-stream.
Step 1: Create or Verify OCI Object Storage Bucket
OCI Object Storage provides high-performance, durable, and scalable storage for unstructured data. In this implementation, the target bucket is created in OCI and later used by the OIC PutObject invocation.
- Open OCI Console.
- Navigate to Storage > Object Storage & Archive Storage > Buckets.
- Select the required compartment.
- Create a bucket or use an existing bucket.
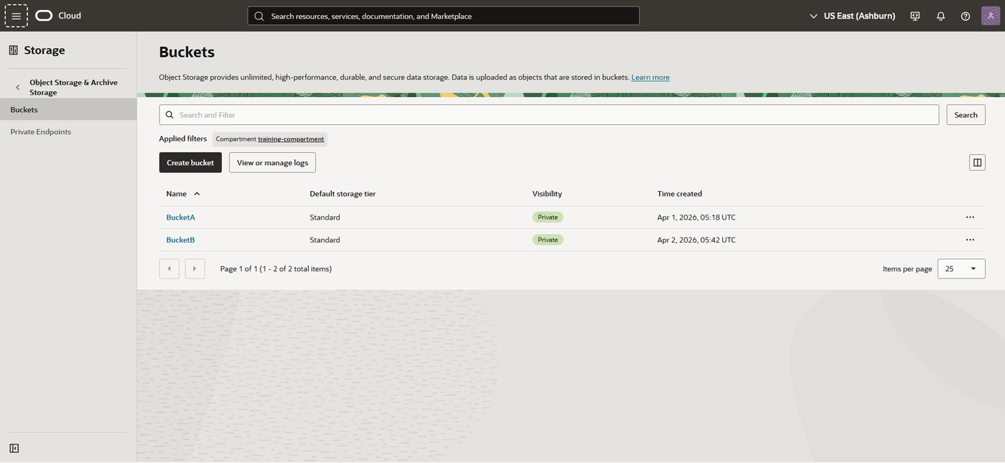
OCI Object Storage Buckets page showing existing buckets in the selected compartment.
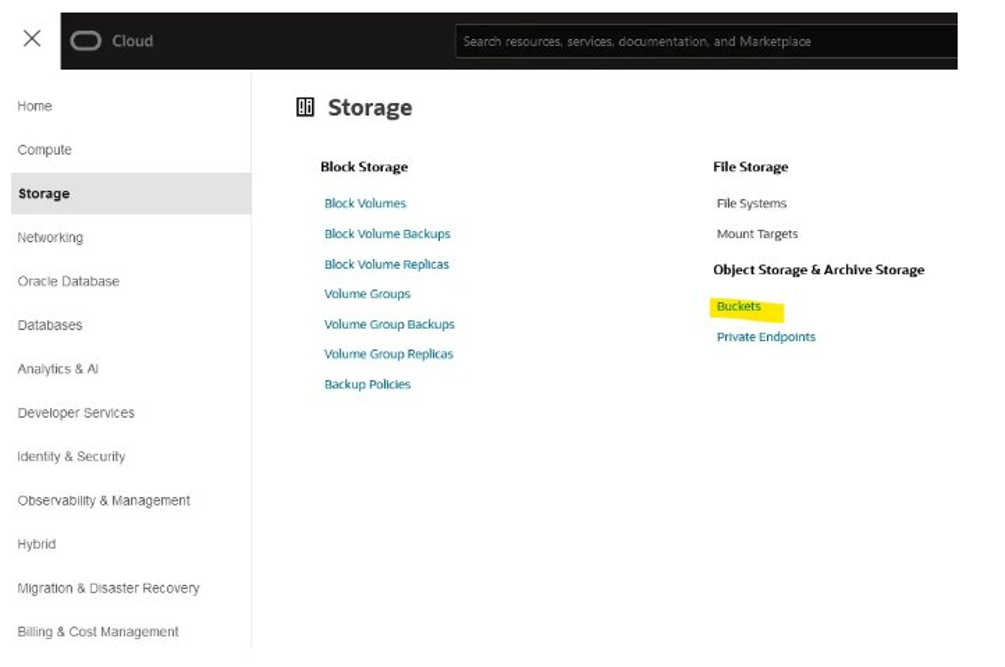
OCI navigation menu: Storage > Object Storage & Archive Storage > Buckets.
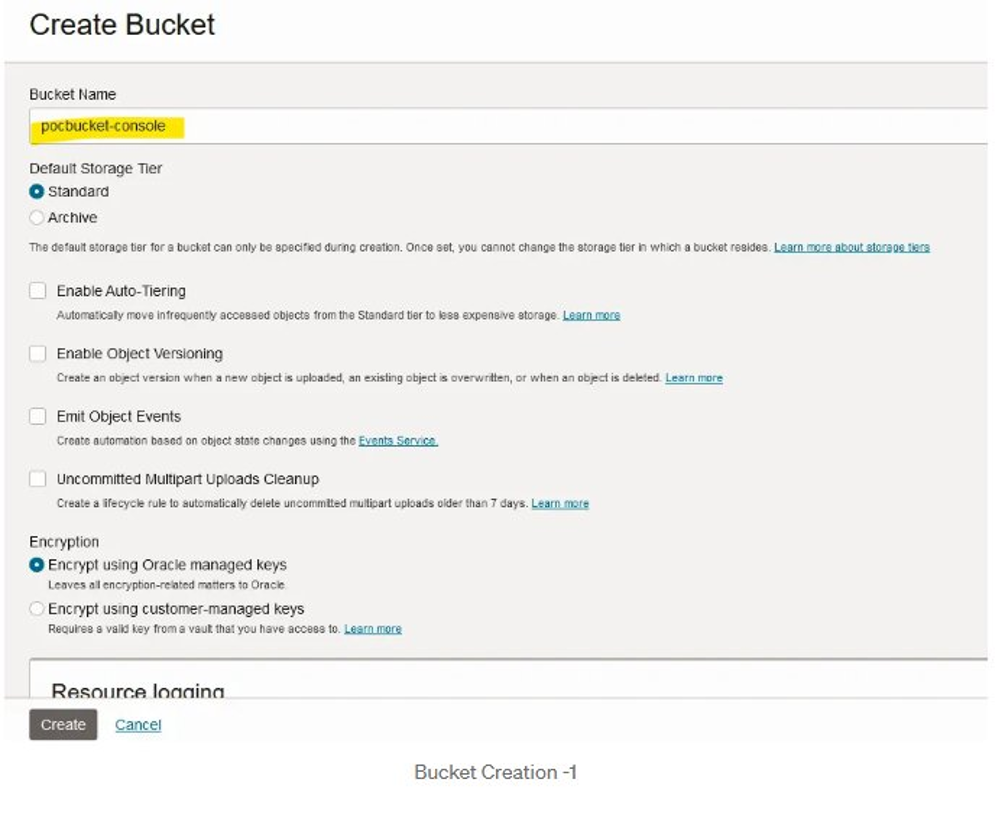
Create Bucket page with bucket name and Standard storage tier selected.
Policy requirement: The OCI user or group must have the required IAM policy permissions to manage buckets and objects in the selected compartment.
Step 2: Generate API Key in OCI
OIC uses OCI Signature Version 1 to sign requests to OCI Object Storage. To configure this security policy, collect the User OCID, Tenancy OCID, Fingerprint, Region, and an RSA private key.
-
Open the profile menu in the OCI Console.
-
Click User Settings.
-
Open API Keys.
-
Click Add API Key and generate an API key pair.
-
Download the private key and save the configuration details.
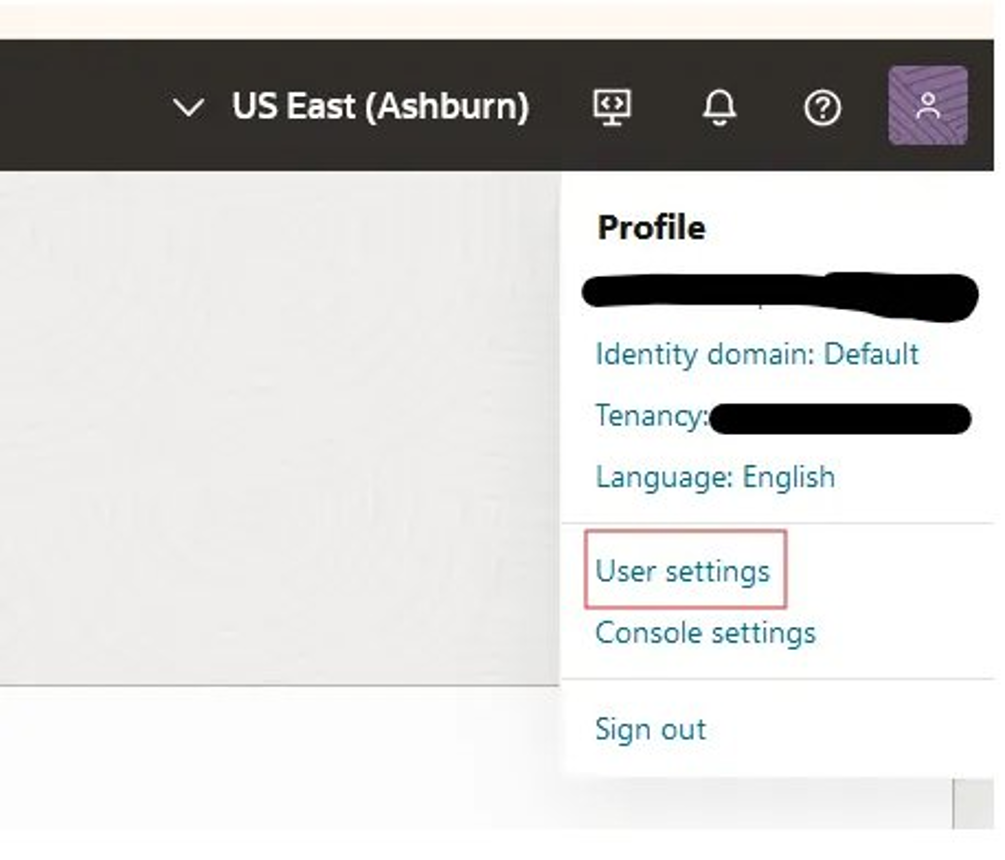
OCI profile menu showing the User Settings option.
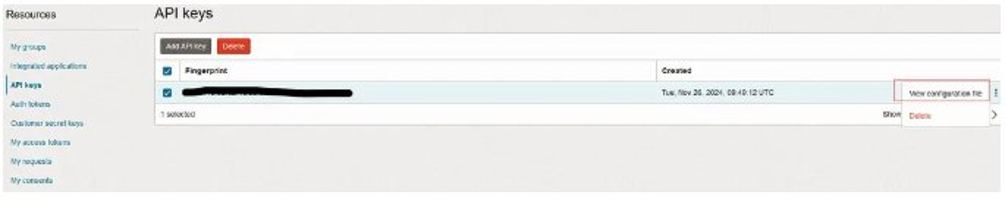
API Keys page showing generated fingerprint and the option to view configuration file.

Configuration file preview containing User OCID, Tenancy OCID, Fingerprint, and Region.
Step 3: Security & RSA Key Setup

Problem Summary
When the OCI private key is not in the expected RSA format, OIC may throw the following error:
PrivateKeyInfo cannot be cast to PEMKeyPairThe unsupported key format usually starts with:
- - -BEGIN PRIVATE KEY - - -The required key format must start with:
- - -BEGIN RSA PRIVATE KEY - - -Convert Private Key Using OpenSSL
Use OpenSSL on Windows PowerShell or Command Prompt to convert the downloaded key to RSA format. First, navigate to the folder where the private key was downloaded, then run the conversion command.
cd $env:USERPROFILE\Downloads
 & "C:\Program Files\OpenSSL-Win64\bin\openssl.exe" rsa -in "your_key.pem" -out "fixed_key.pem" -traditional
After conversion, open the generated file and verify that it starts with the RSA private key header.
notepad fixed_key.pem
OpenSSL command execution in PowerShell to convert the private key into RSA format.
Important Notes
· Use the converted fixed_key.pem file in the OIC connection.
· Do not use an encrypted key with a passphrase unless your configuration explicitly supports it.
· Ensure the command is executed from the folder that contains the downloaded .pem file.
· Keep private keys secure and do not commit them to source control or share them in documentation.
Step 4: Create OIC REST Connection for OCI Object Storage
After preparing the RSA private key and collecting the OCI configuration values, create a REST connection in Oracle Integration Cloud.
· Go to OIC > Design > Connections.
· Create a REST Adapter connection named ObjectStorage_Conn.
· Select REST API Base URL as the connection type.
· Use the regional Object Storage endpoint, for example: https://objectstorage.us-ashburn-1.oraclecloud.com.
· Select OCI Signature Version 1 as the security policy.
· Enter Tenancy OCID, User OCID, Fingerprint, and upload the RSA private key.
· Save and test the connection.
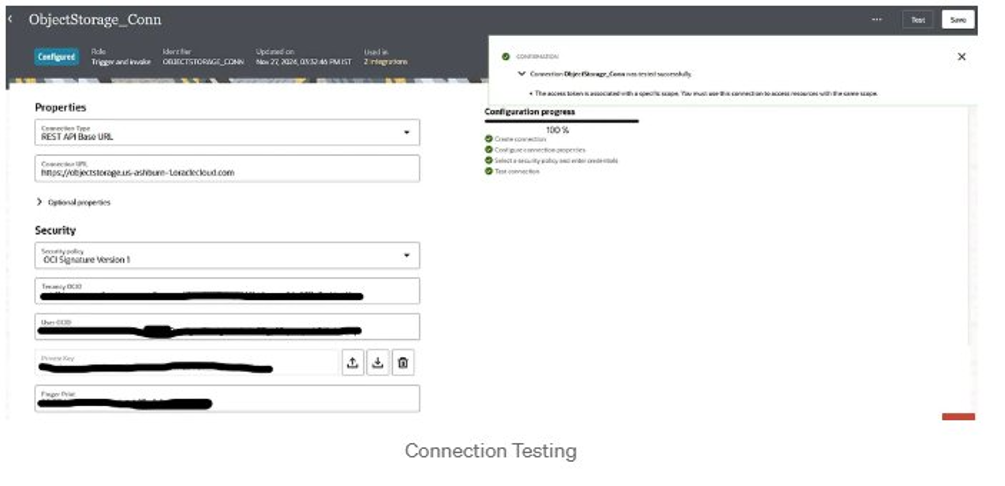
OIC REST connection configured with OCI Signature Version 1 and successfully tested.
Step 5: Create OIC Integration and REST Trigger
Create an Application Integration named INT_Put_Object. The REST Trigger receives the multipart request from APEX. The request contains both JSON metadata and the uploaded file.
· Operation name: putObject.
· Resource URI: /object.
· HTTP method: PUT.
· Enable request payload configuration and response configuration.
· Configure the request as multipart/mixed.
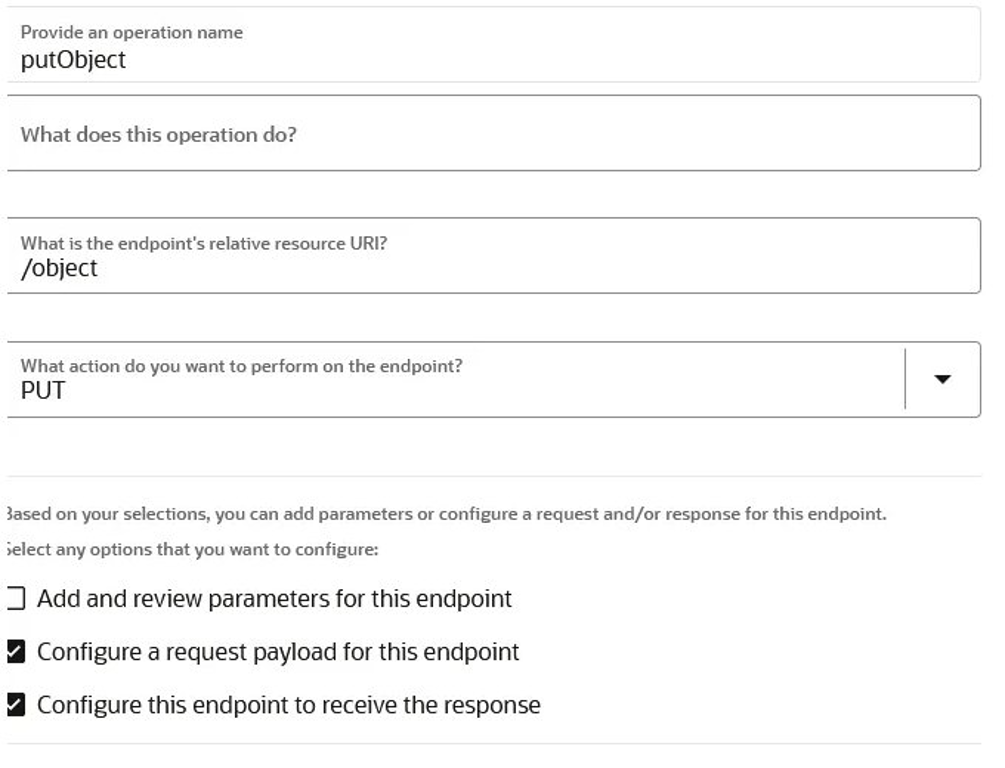
REST Trigger basic information with operation name putObject and resource URI /object.
{
  "namespace": "sample_namespace",
  "bucket": "pocbucket-console",
  "object": "Sample.jpg"
}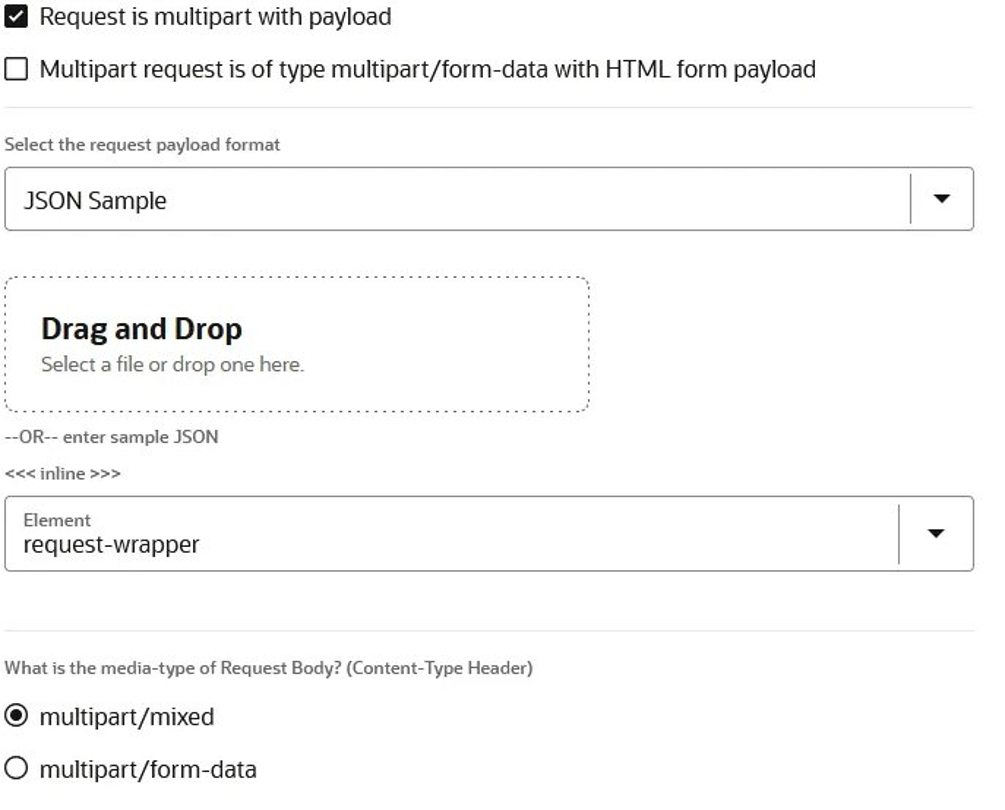
REST Trigger request configured as multipart/mixed with payload.
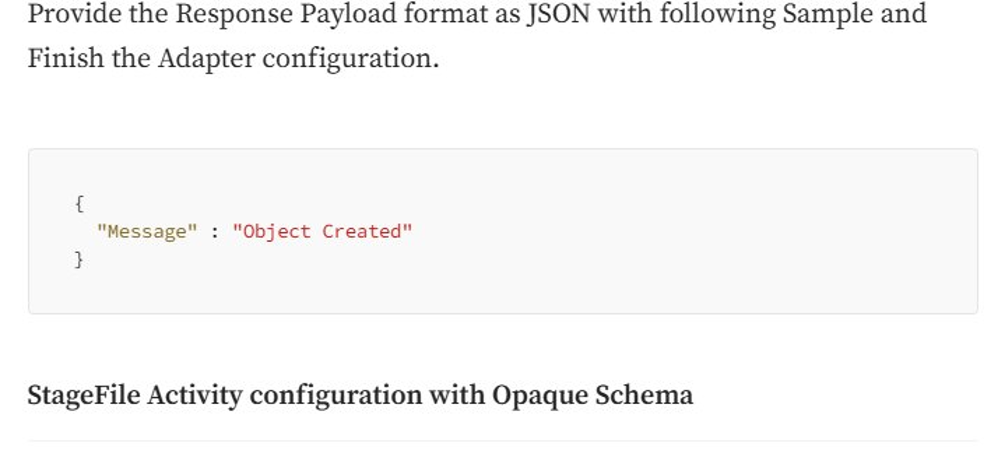
Optional JSON response payload example: Object Created.
Step 6: Configure Stage File Activity
The Stage File activity temporarily stores the uploaded file inside OIC. This is required because OCI Object Storage PutObject API requires the Content-Length header, which must be calculated from the staged file.
· Add Stage File action after the REST Trigger.
· Name the action WriteToStage.
· Select Write File operation.
· Map the file name from the attachment partName.
· Use /tmp/object as the output directory.

Stage File Write operation configured with file name and output directory /tmp/object.
Step 7: Configure Opaque Schema for Stage File
Opaque Schema is used to handle the uploaded file as binary content. The file is represented as base64Binary so OIC can write it to the staging area.
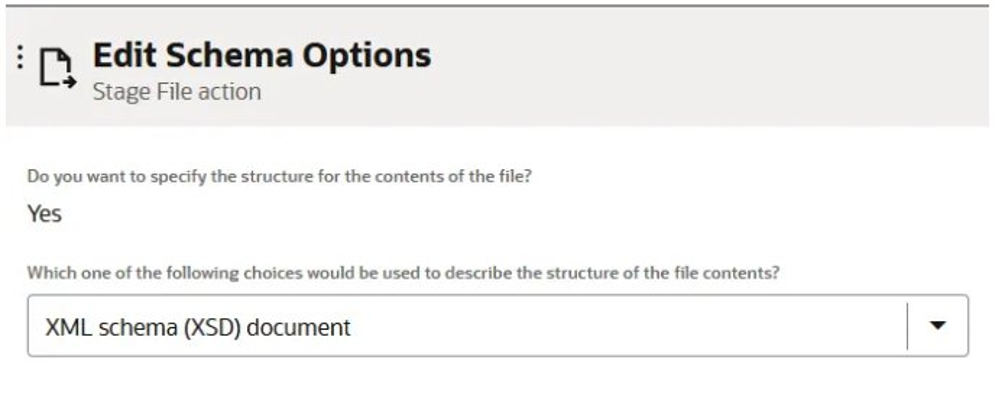
Stage File schema option configured to use XML Schema (XSD) document.
<?xml version="1.0" encoding="UTF-8"?>
<schema targetNamespace="http://xmlns.oracle.com/pcbpel/adapter/opaque/"
        xmlns="http://www.w3.org/2001/XMLSchema">
    <element name="opaqueElement" type="base64Binary"/>
</schema>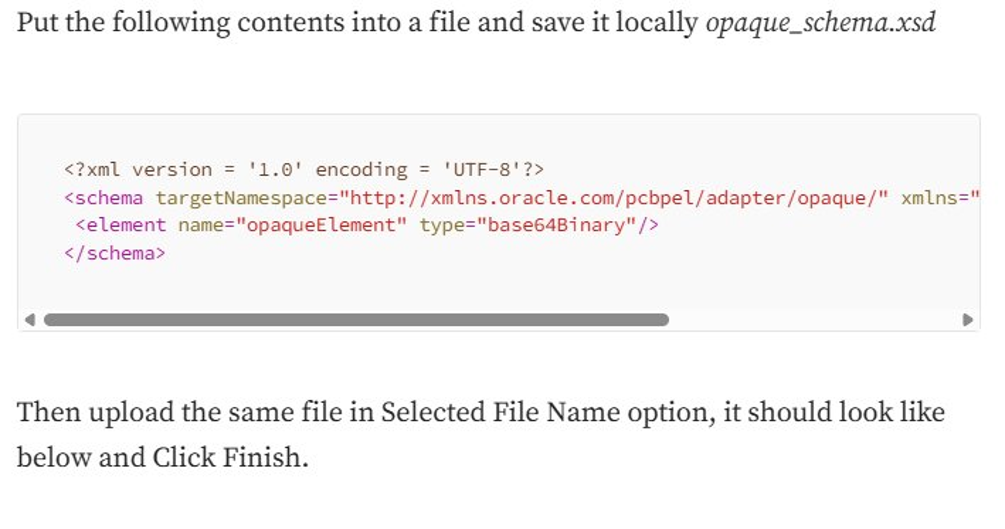
Opaque schema file uploaded and opaqueElement selected.

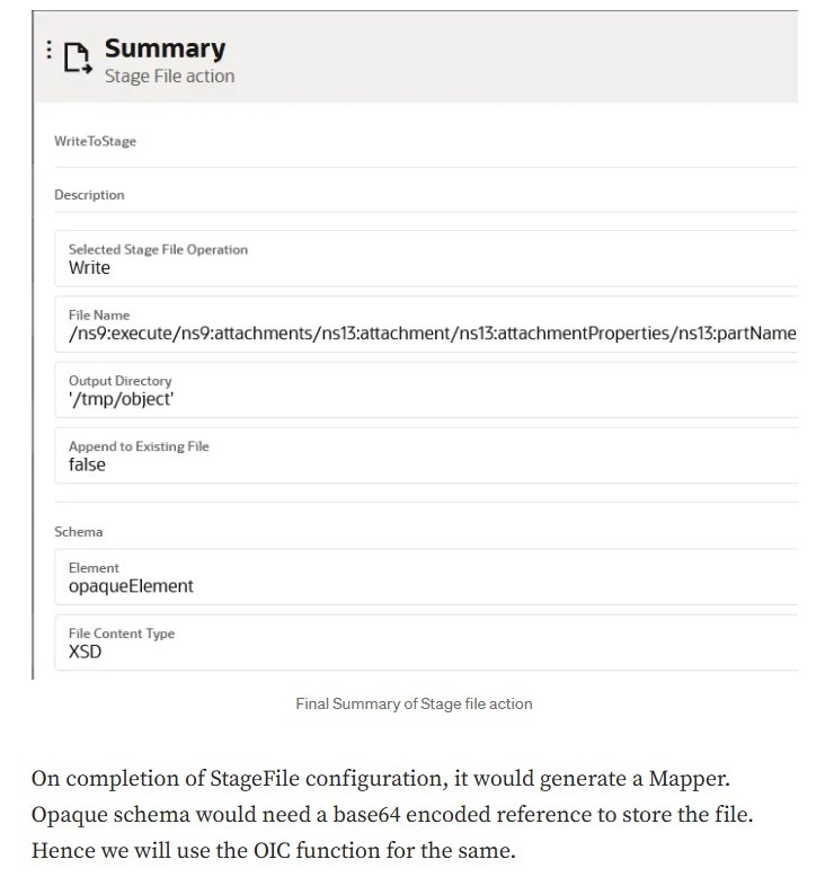
Stage File summary showing Write operation, file name, output directory, and schema element.
Mapper from REST attachment reference to Opaque Element using base64 encoding.
Step 8: Configure REST Invoke for OCI PutObject API
After the Stage File action, add a REST Invoke Adapter using the ObjectStorage_Conn connection. This invoke calls OCI Object Storage PutObject API to create the object in the bucket
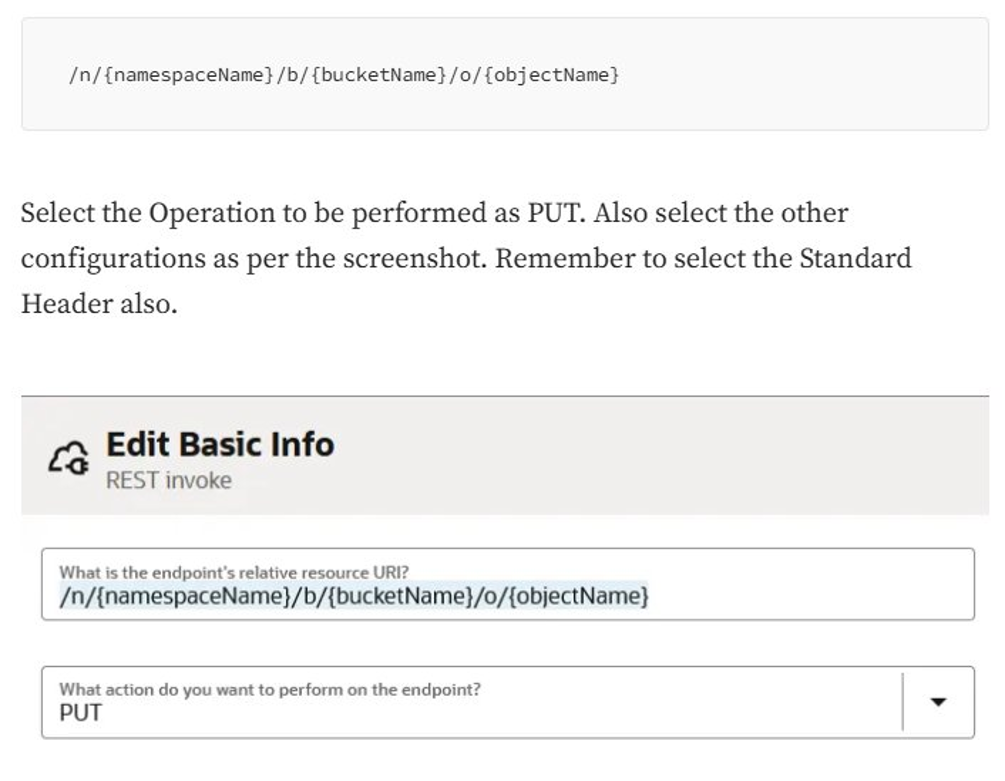
/n/{namespaceName}/b/{bucketName}/o/{objectName}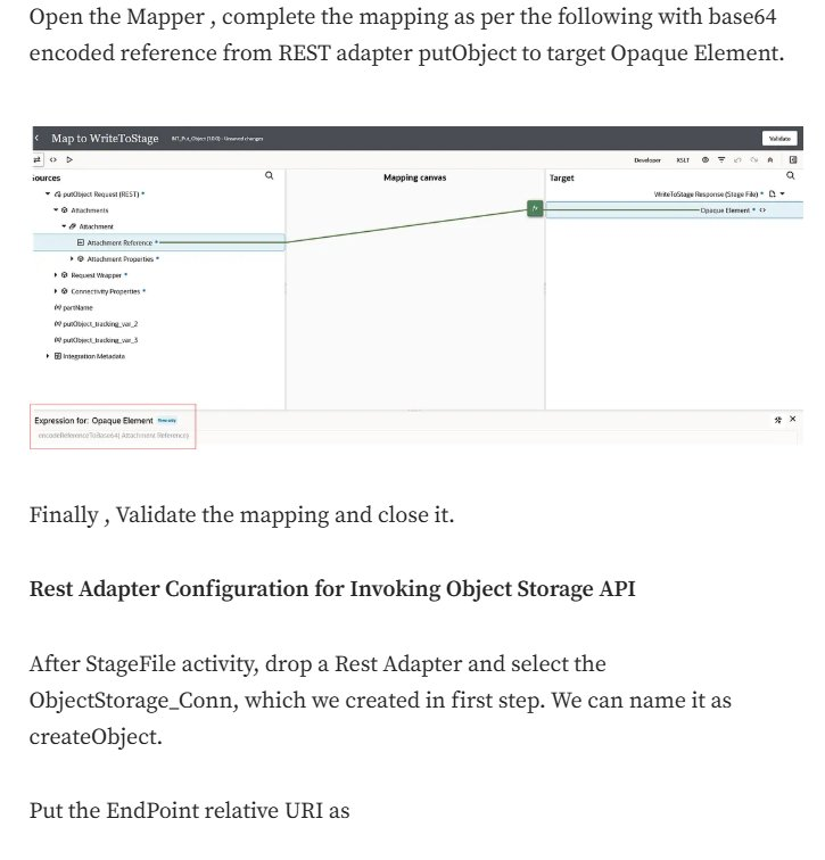
REST Invoke basic info configured with PutObject URI and PUT method.
REST Invoke template parameters generated from the URI: namespaceName, bucketName, and objectName.

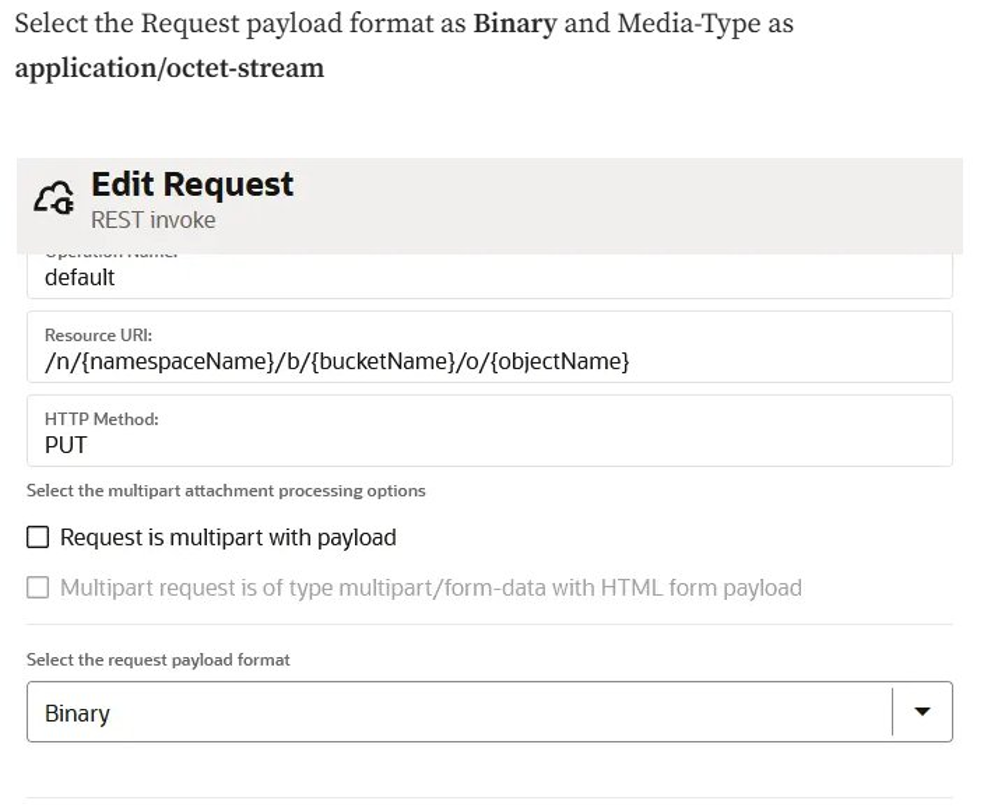
REST Invoke request configured as Binary payload.
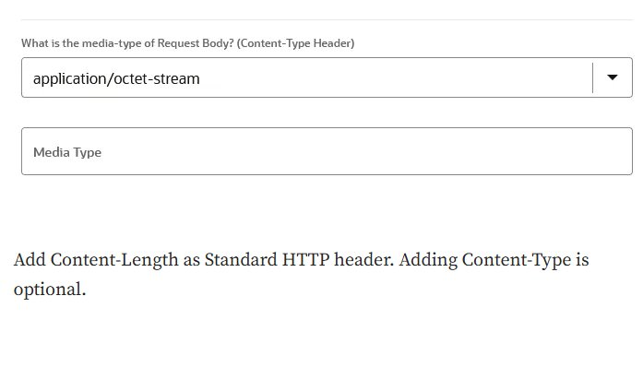
Request media type configured as application/octet-stream.
Standard HTTP headers section where Content-Length and optional Content-Type are added.

Sample JSON response used for response configuration; PutObject typically returns no body.
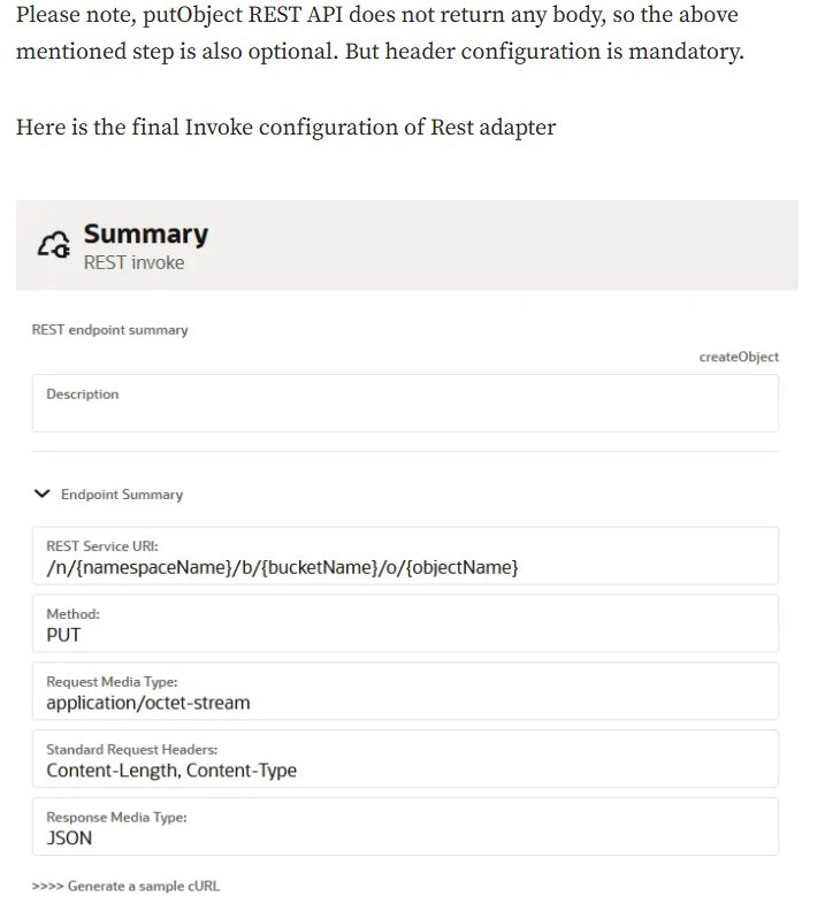
Final REST Invoke summary with URI, PUT method, application/octet-stream, and standard headers.
Mandatory header: Content-Length is mandatory for OCI Object Storage PutObject. Content-Type is optional but commonly included for clarity.
Step 9: Complete Invoke Mapping
Once the REST Invoke configuration is complete, OIC generates a mapper. Carefully map all required values from the REST Trigger and Stage File response to the target API.
-
Map namespace from the putObject request to namespaceName.
-
Map bucket from the putObject request to bucketName.
-
Map object from the putObject request to objectName.
-
Map FileReference from WriteToStage response to StreamReference.
-
Map Size from WriteToStage response properties to the Content-Length header.

Invoke mapper showing namespace, bucket, object, and file reference mappings.

Invoke mapper showing Size mapped to Content-Length header.
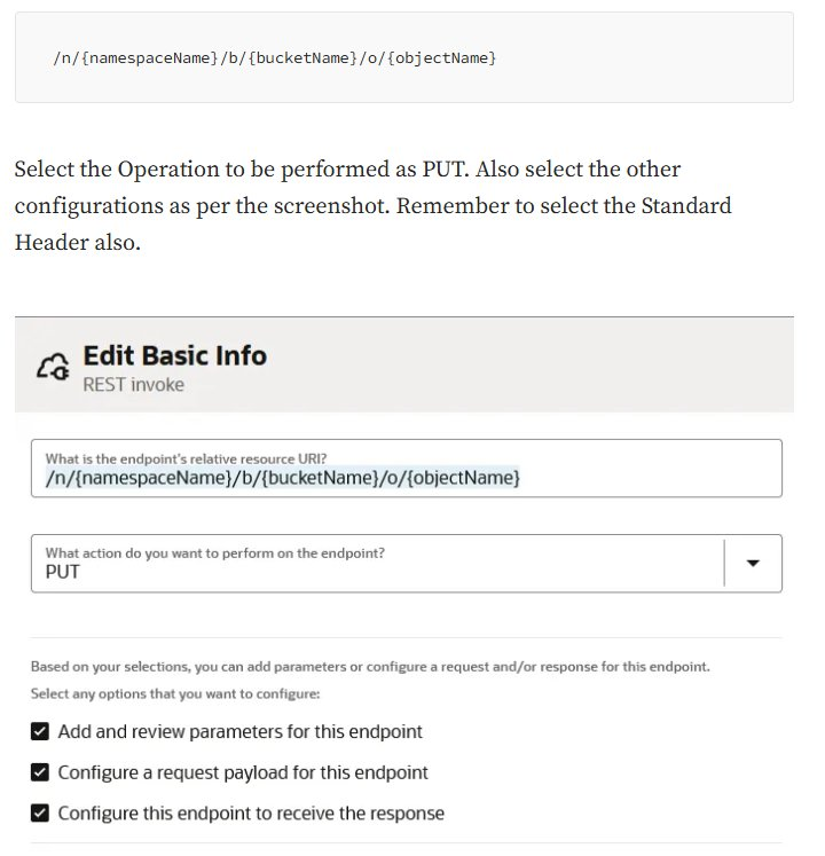
REST Invoke basic configuration with options enabled for parameters, request, and response.
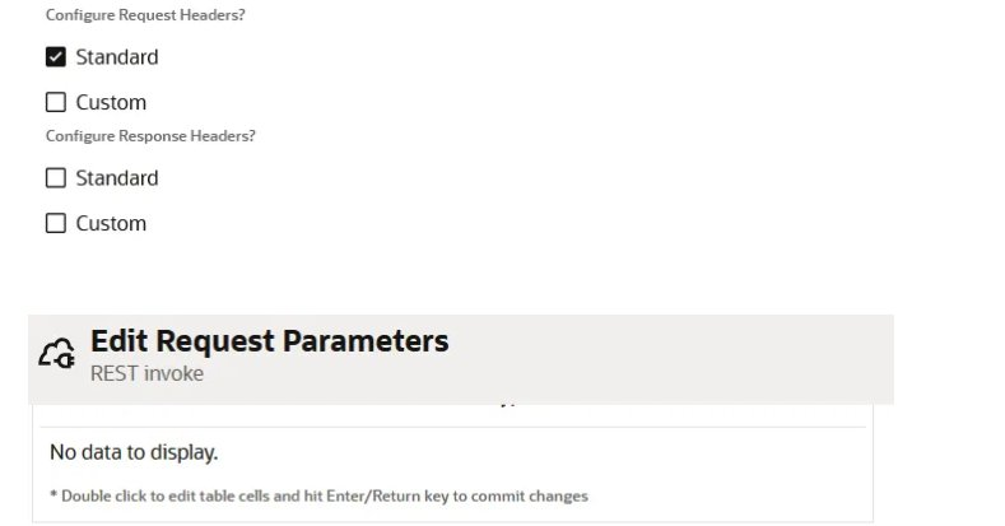
Standard request headers selected during REST Invoke configuration.

Template parameters namespaceName, bucketName, and objectName configured as string.

Binary request payload with media type application/octet-stream.

Standard HTTP Headers showing Content-Length and optional Content-Type.

Final REST Invoke summary after all configurations are complete.
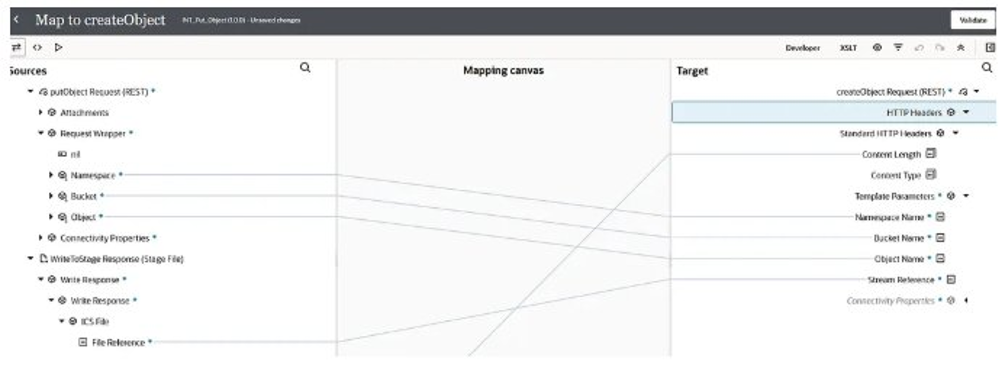
Final mapper connecting request metadata and FileReference to OCI PutObject target.
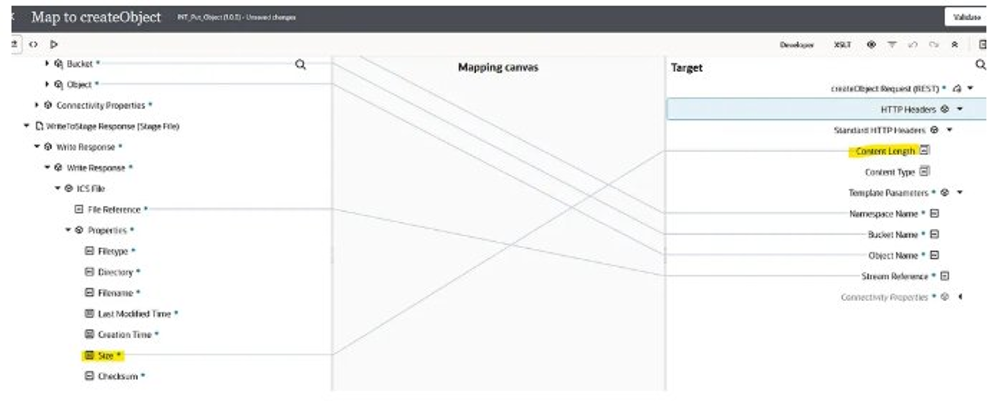
Mapping file Size to the Content-Length standard header.
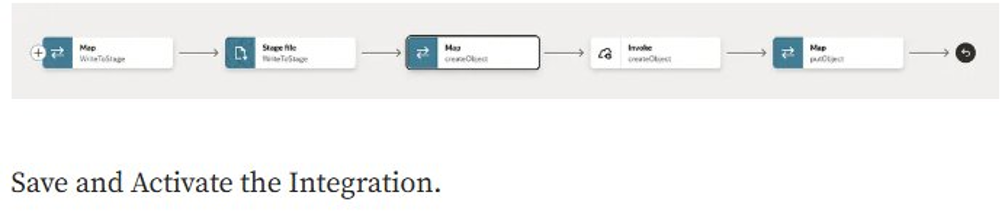
Completed OIC integration flow.
Step 10: Execute and Retrieve OIC Endpoint
After activating the integration, open the Run page or Endpoint Metadata to retrieve the integration endpoint URL. This endpoint will be called by APEX or tested using Postman.
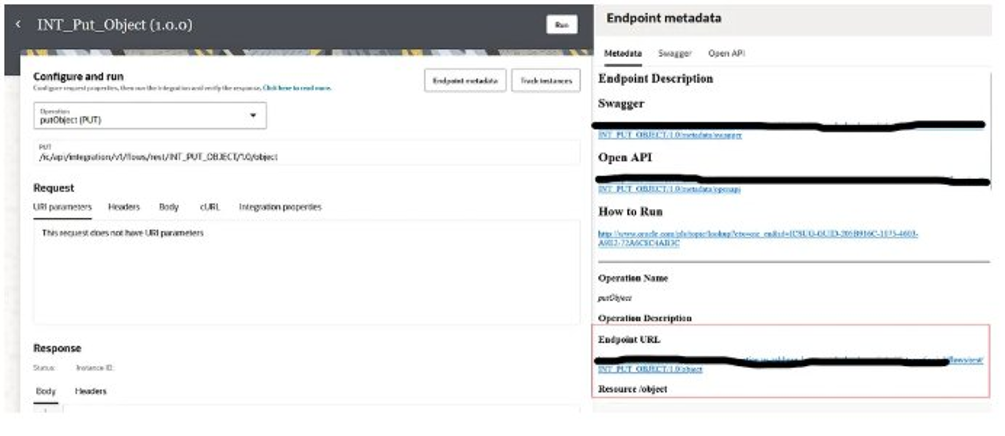
OIC Run page and Endpoint Metadata showing the REST endpoint URL.
Step 11: Create Oracle APEX Upload Page
Create a simple APEX page that allows users to upload a file and submit it to OIC.
· Create a Home page titled Upload File To Object Storage.
· Add a region named Upload Region.
· Add a File Upload item named P1_UPLOAD_FILE.
· Add an Upload button that submits the page.

APEX Page Designer showing the Home page and Upload Region.
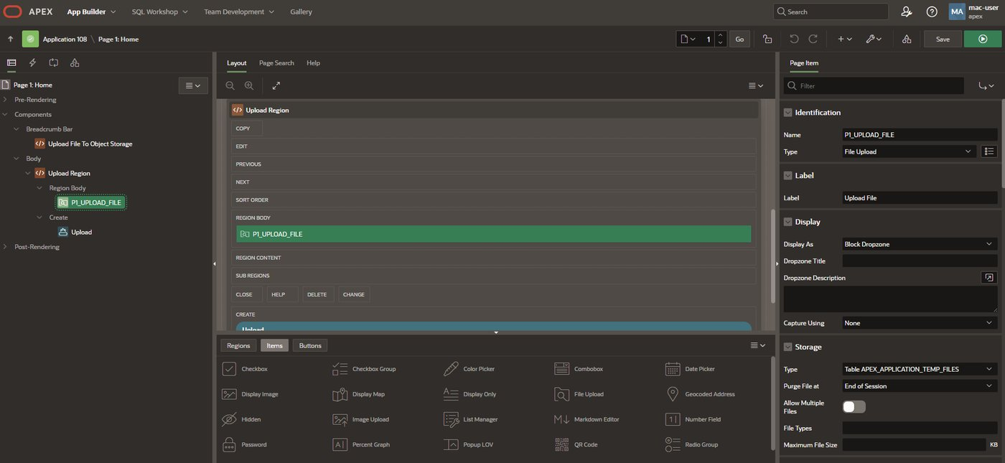
APEX File Upload item configured as P1_UPLOAD_FILE with Block Dropzone display.

APEX Upload button configured to submit the page.
Step 12: Create APEX PL/SQL Upload Process
Create a page process that runs when the Upload button is clicked. The process reads the uploaded file from APEX_APPLICATION_TEMP_FILES, builds a multipart/mixed request, and calls the OIC endpoint using APEX_WEB_SERVICE.
Security best practice: Do not hardcode service usernames or passwords in production. Use APEX Web Credentials, OCI Vault, or another secure credential mechanism.
DECLARE
    l_file_name     varchar2(4000);
    l_mime_type     varchar2(4000);
    l_blob          blob;
    l_body          blob;
    l_response      clob;
    l_multipart     apex_web_service.t_multipart_parts;
    l_json          clob;
    l_error_msg     varchar2(4000);
BEGIN
    SELECT filename, mime_type, blob_content
      INTO l_file_name, l_mime_type, l_blob
      FROM apex_application_temp_files
     WHERE name = :P1_UPLOAD_FILE;

    l_json := '{ "namespace" : "<namespace>", ' ||
              '"bucket" : "<bucket_name>", ' ||
              '"object" : "' || apex_escape.json(l_file_name) || '" }';

    apex_web_service.append_to_multipart(
        p_multipart    => l_multipart,
        p_name         => 'metadata',
        p_content_type => 'application/json',
        p_body         => l_json
    );

    apex_web_service.append_to_multipart(
        p_multipart    => l_multipart,
        p_name         => 'file',
        p_filename     => l_file_name,
        p_content_type => nvl(l_mime_type, 'application/octet-stream'),
        p_body_blob    => l_blob
    );

    l_body := apex_web_service.generate_request_body(p_multipart => l_multipart);

    apex_web_service.g_request_headers.delete;
    apex_web_service.g_request_headers(1).name  := 'Content-Type';
    apex_web_service.g_request_headers(1).value := 'multipart/mixed';

    l_response := apex_web_service.make_rest_request(
        p_url         => '<OIC_ENDPOINT_URL>',
        p_http_method => 'PUT',
        p_body_blob   => l_body,
        p_scheme      => 'Basic',
        p_username    => '<service_user>',
        p_password    => '<password>'
    );

    apex_application.g_print_success_message :=
        'Uploaded. Status: ' || apex_web_service.g_status_code;
END;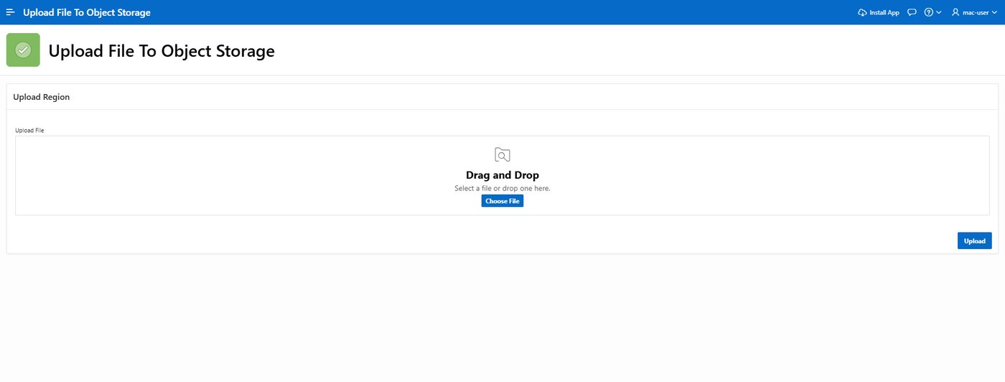
Final Oracle APEX upload interface.
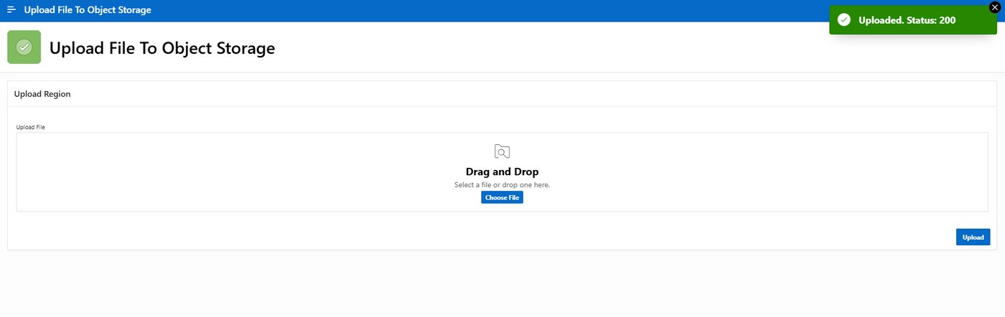
APEX success notification showing Uploaded. Status: 200.
Step 14: Verify Uploaded Object in OCI Object Storage
Open the target bucket in OCI Object Storage and verify that the uploaded file appears in the Objects tab. This confirms the end-to-end flow from APEX to OIC to OCI Object Storage.

OCI Object Storage bucket showing the uploaded file in the Objects list.
Best Practices and Troubleshooting
Best Practices
· Use APEX Web Credentials instead of hardcoded credentials.
· Keep OCI private keys secure and rotate keys according to your security policy.
· Always map Content-Length from the staged file size.
· Use application/octet-stream for the OIC to OCI binary request.
· Do not manually add multipart boundaries in APEX; APEX generates the body boundary.
Common Issues
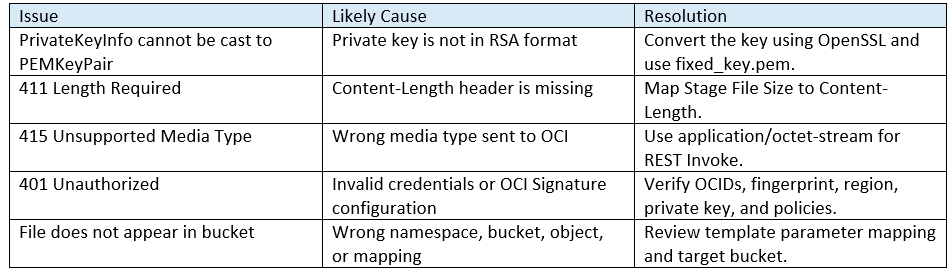
Conclusion
This implementation provides a complete and scalable approach to upload files from Oracle APEX to OCI Object Storage using Oracle Integration Cloud. The solution separates responsibilities clearly: APEX handles the user interface and multipart request, OIC handles integration processing and signing, and OCI Object Storage provides the final object repository.
메타데이터
- post_id
- ea4cab2e9ca0
- slug
- object-creation-in-oci-object-storage-using-oic-multipart-rest-request-with-apex-ea4cab2e9ca0
- url
- https://medium.com/@malekraed326/object-creation-in-oci-object-storage-using-oic-multipart-rest-request-with-apex-ea4cab2e9ca0
- canonical_url
- https://medium.com/@malekraed326/object-creation-in-oci-object-storage-using-oic-multipart-rest-request-with-apex-ea4cab2e9ca0
- author_url
- https://medium.com/@malekraed326
- status
- ok
- fetched_at
- 2026-06-12 18:14:10