The Making of EXIF Overlay (my new tool)
What is EXIF Overlay?
The Making of EXIF Overlay (my new tool)
What is EXIF Overlay?
EXIF Overlay is a free-to-use tool made for photographers, created by me, to generate clean summary overlays of your camera settings. These can be used on social media posts, portfolios, and anywhere else you want to showcase how a photo was taken.
Why I created it
I decided to create EXIF Overlay because I could never quite find a tool that did everything I wanted. Some tools lacked customisation, others didn’t automatically extract data from the EXIF embedded in the image, and the ones that did often didn’t allow editing afterwards, which is a problem when EXIF data is missing or incorrect.
Because of that, I decided to make my own tool, with help from Google Gemini. While AI helped with the technical side, I retained full control over the creative process, design decisions, features, and the technologies used.
Is it available?
Yes! EXIF Overlay is available now online at exifoverlay.com, and on the Microsoft Store.
The website is also available as a downloadable web app (PWA), meaning it can be used fully offline, just follow the instructions in the FAQs & Downloads section. Native apps for macOS, iOS/iPadOS, and Android are also planned and will be coming at a later date.
How I made it
To be fully transparent, I had a lot of help from Google Gemini while creating this tool. This wasn’t to replace an actual developer or designer, but because I don’t have an extensive background in coding. That said, I stayed in full control the entire time, from the creative direction and design, to the technologies used and the final product. It went through many iterations.
I’m also quite a techy person, so if you’re strictly into photography, some of this section might be less interesting, but here’s how it came together.
The idea started as a random thought: is this even possible? I asked AI whether what I wanted could be done, what features were realistic, how it could be hosted and distributed, and whether I could realistically build it myself. It confirmed that it was possible and outlined the steps I’d need to take.
So off I went.
Keeping in mind that I was using the free version of Gemini Pro, which had daily prompt limits, I wrote one large prompt detailing everything I wanted. This included the features, design, branding, colour scheme, hosting, and final result. From that, it generated a few core files: the main index.html app file, a service-worker.js file for offline functionality, and a manifest.json file for PWA metadata. These became the foundation of the app.
Next, I needed somewhere to host and view it. This is where GitHub and Cloudflare came in. GitHub was used to store the files in a repository, which was then connected to Cloudflare Pages so it could be viewed via a URL. Initially, I used a subdomain at exif.adlaidyson.co.uk.
At this point, I could finally see it running. The design was there, it matched my branding, and it even had a nice editor area with a checkerboard-style background similar to a PNG preview. But most of the features didn’t actually work yet, so it wasn’t usable.
Back to prompting.
After another round, the app could process an image and display a preview with the EXIF overlay, but downloading the result was broken. The exported file didn’t match the preview at all. After a lot of back-and-forth over several days, partly due to the free limits, the issue was identified and fixed. At last, processing an image actually worked.
There were still issues with scaling, but the foundation was solid.
Initially, only basic camera settings were supported, such as shutter speed, aperture, and ISO. These were automatically pulled from EXIF data but could also be edited manually. The next step was deciding what else should be included to make the overlay genuinely useful.
I looked at other tools I’d tried, which often included camera make, model, lens details, and sometimes social icons linking to portfolios. I asked for these to be implemented in a specific order, and also for the ability to drag fields around so users could customise the layout themselves.
From there, I added features to improve readability, such as background blur and darkness controls so the text remained visible over bright images. I then introduced icons for each field by sourcing royalty-free icons and specifying their usage and placement. Later, I added font selection and accent colour customisation, again by sourcing and specifying the assets myself.
At this point, the tool was starting to feel complete, but I wanted it to be practical long-term. I introduced sensible default values for blur, fonts, and colours, while also saving user preferences automatically using localStorage and cookies. These settings can also be exported to a file and re-imported later or on another device.
More usability features followed, including zoom controls, a hold-to-compare option to switch between the original image and the overlay, and two save options: one for the current image and one to export all images as a ZIP file, with up to 30 images processed at once.
After that, I felt adding anything else would start to make it too cluttered. The final steps were creating the FAQ & Downloads popup, a Privacy Notice page, and a feedback form link.
Once that was done, the website itself was complete. The only thing left was moving from the subdomain to its own dedicated domain. I registered exifoverlay.com through Cloudflare Registrar, connected it to Cloudflare Pages, and prepared it for release.
I thought that was the end, until distribution.
To get EXIF Overlay onto the Microsoft Store and properly test offline functionality, I used PWA Builder, a Microsoft tool. At first, it flagged a lot of errors, as my service worker and manifest weren’t fully valid. After fixing those issues, everything passed validation.
I tested the offline mode myself, confirmed it worked, and then used PWA Builder to package the app for Windows. It was submitted through Microsoft Partner Center, approved, and finally published.
And that was it. EXIF Overlay was live and ready for public use. But as always, feedback is always welcome via the form linked on the site.
—
Thanks for taking your time to read, and I hope to see you again! Adlai :)
Also available to read on my blog: https://blog.fusedframe.co.uk/?p=2026%2Fmaking-exif-overlay
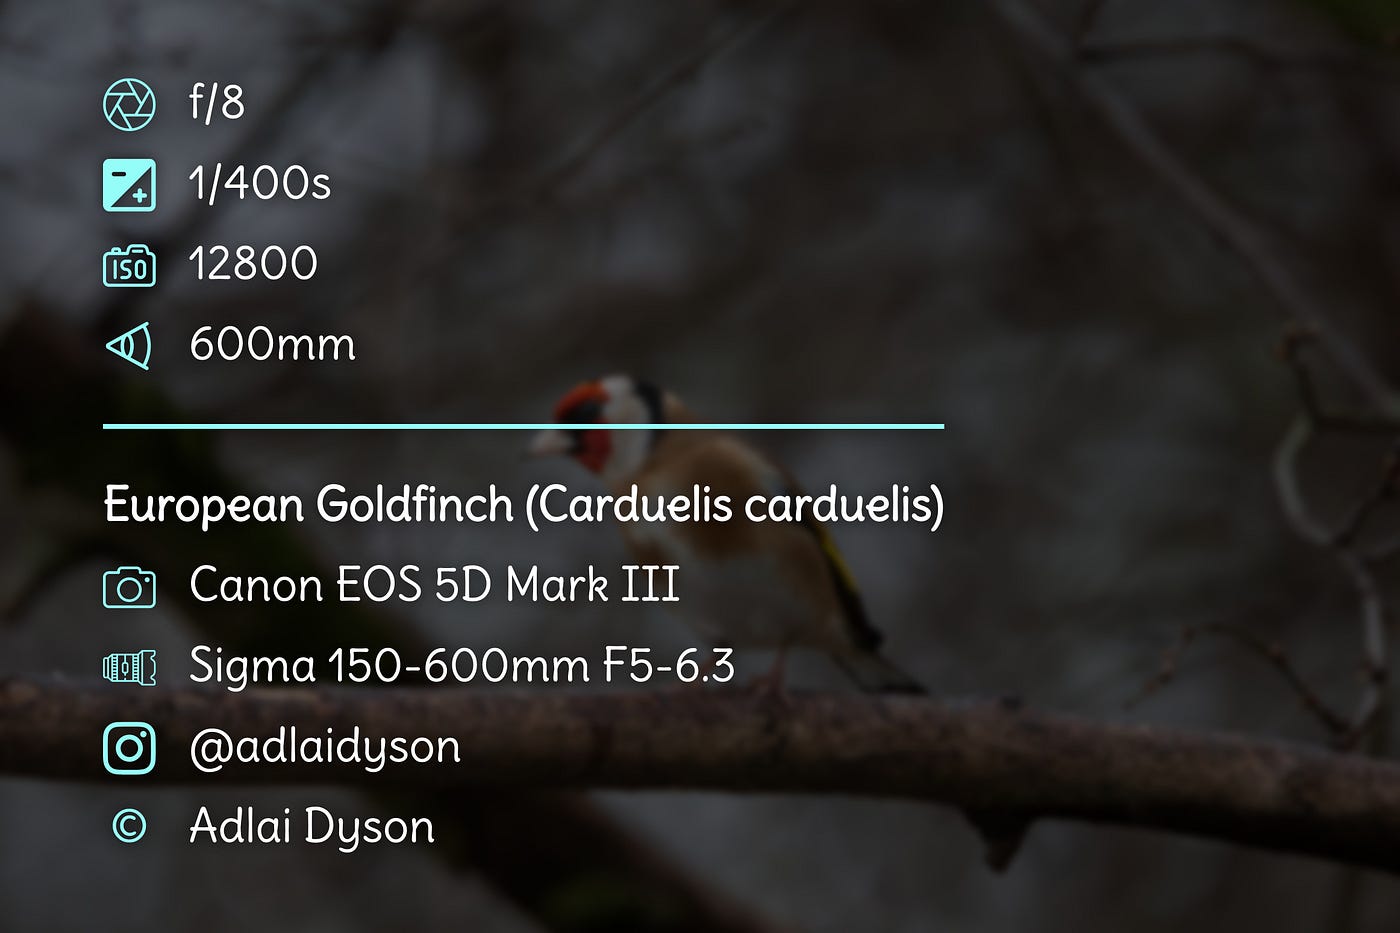
Example of Output from EXIF Overlay.
메타데이터
- post_id
- ea6e4bee9696
- slug
- the-making-of-exif-overlay-my-new-tool-ea6e4bee9696
- url
- https://medium.com/@adlaidyson/the-making-of-exif-overlay-my-new-tool-ea6e4bee9696
- canonical_url
- https://medium.com/@adlaidyson/the-making-of-exif-overlay-my-new-tool-ea6e4bee9696
- author_url
- https://medium.com/@adlaidyson
- status
- ok
- fetched_at
- 2026-06-16 19:09:56