HOA Compliance: Guide to Installing Door Cladding Around Front Door Sidelite
HOA Compliance: Guide to Installing Door Cladding Around Front Door Sidelite
Understanding the HOA Requirement and Its Implications
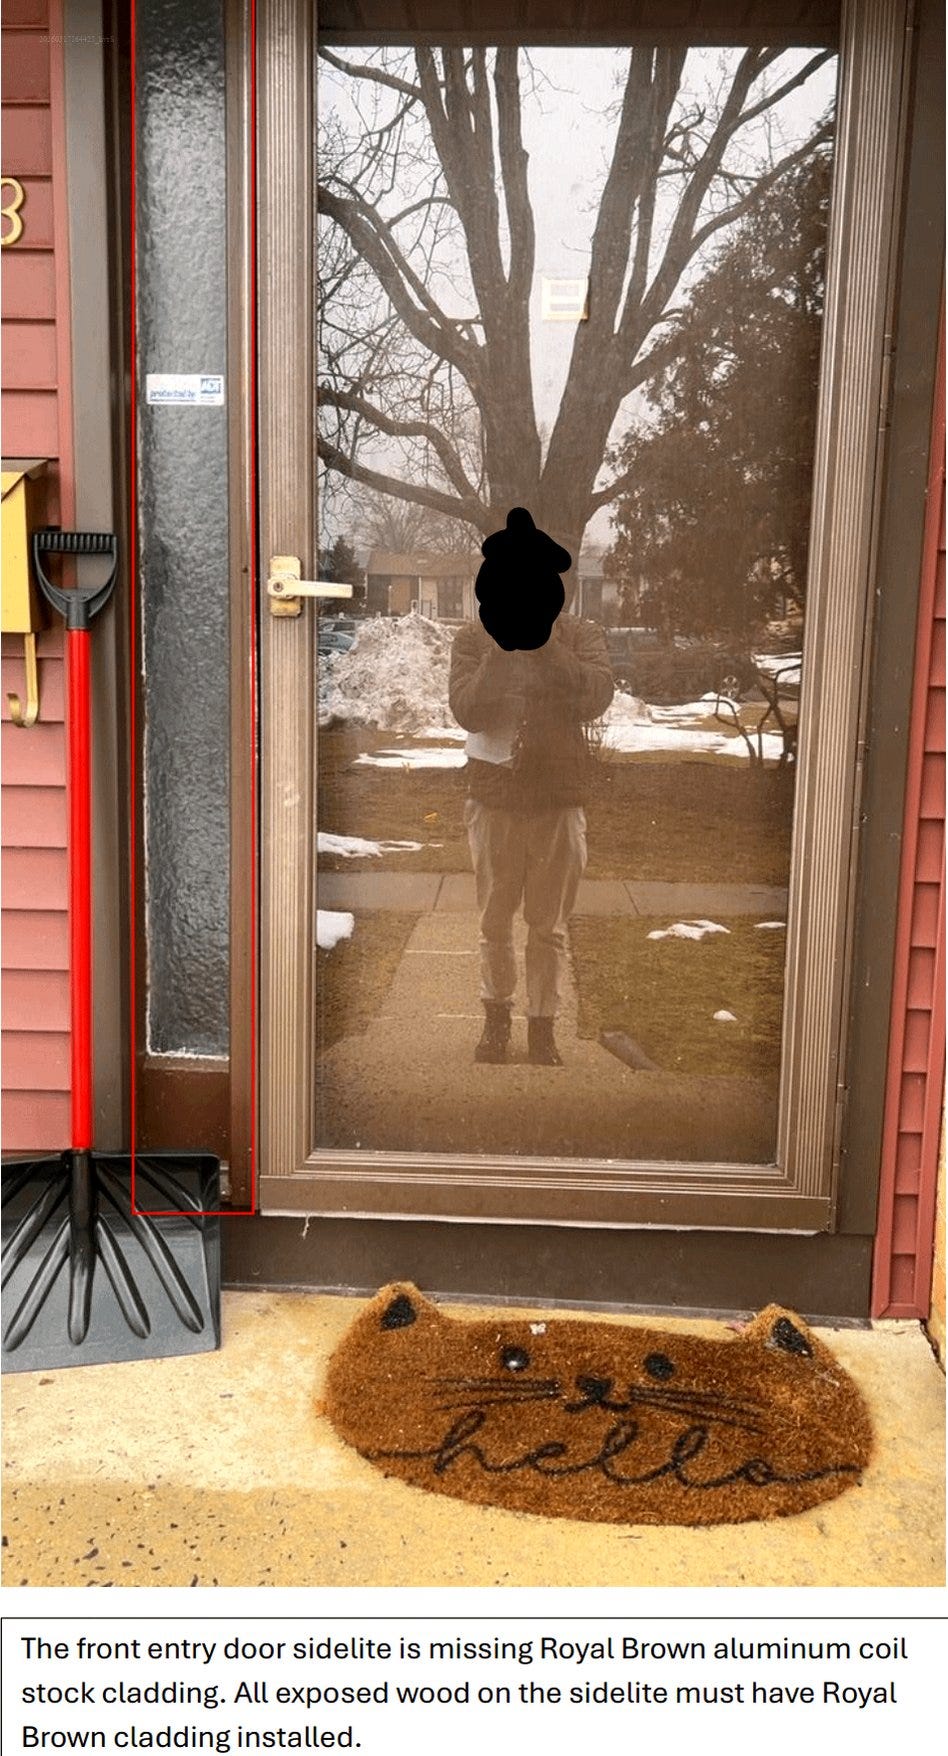
Your HOA’s demand to install door cladding around your front door sidelite isn’t arbitrary — it’s rooted in maintaining aesthetic uniformity and structural integrity. The inspection process likely flagged exposed or mismatched materials, which violate the community’s standards. Ignoring this requirement triggers a causal chain: fines accrue, community relations sour, and legal disputes may follow. Here’s how to decode the requirement, its purpose, and the stakes of non-compliance.
Why Door Cladding Matters to Your HOA
HOAs enforce cladding requirements to prevent visual discord and structural vulnerabilities. Exposed sidelite edges can allow water infiltration, leading to rot, mold, or insulation failure. The cladding acts as a barrier, redirecting water away from the door frame while blending with the exterior design. Failure to comply isn’t just about aesthetics — it’s about preventing long-term damage that could devalue your property and the neighborhood.
Material Selection: Utility Trim vs. Trim Coil
Your dilemma between utility trim and trim coil hinges on their mechanical properties. Utility trim is rigid, ideal for straight edges, while trim coil is malleable, conforming to curves or uneven surfaces. For a sidelite, trim coil is often superior because it flexes during installation, reducing gaps where water could penetrate. However, if your sidelite has sharp, straight edges, utility trim may suffice at a lower cost. Rule of thumb: If the sidelite has curves or irregular shapes → use trim coil; if straight → utility trim.
Consequences of Non-Compliance: Beyond Fines
Fines are the immediate risk, but the long-term implications are costlier. Water entering through unclad sidelites can warp door frames, corrode hinges, or damage interior walls. These repairs dwarf the cost of cladding materials. Additionally, repeated non-compliance may lead to legal action, where the HOA could enforce compliance through court orders. The HOA’s goal isn’t punishment — it’s preventing systemic issues that affect all residents.
DIY vs. Hiring a Specialist: A Decision Framework
Deciding between DIY and hiring a specialist depends on three factors: skill level, time, and cost. DIY is feasible if the sidelite is straightforward (no curves, minimal prep work) and you’re comfortable with tools. However, typical failures include imprecise cuts (leading to gaps) or improper adhesion (cladding detaches over time). A specialist (carpenter or handyman) ensures precision and compliance, but at a higher cost. Optimal choice: If the sidelite has curves or you lack confidence in measuring/cutting → hire a specialist. Otherwise, DIY with trim coil for flexibility.
Edge Cases: When Cladding Isn’t Enough
If the sidelite shows signs of water damage (e.g., peeling paint, soft wood), cladding alone won’t solve the problem. The causal mechanism here is underlying rot, which expands under moisture, eventually cracking the cladding. In such cases, replacing the sidelite or repairing the frame is necessary before installing cladding. Inspect the area for discoloration or soft spots — if present, consult a contractor before proceeding.
Prep Work: The Hidden Key to Longevity
Adhesive-only installation (e.g., liquid nails) is a common failure point. Without proper prep, the adhesive loses grip due to surface contaminants (dirt, grease) or lack of mechanical bonding. Effective prep includes: — Cleaning: Remove debris with isopropyl alcohol. — Priming: Apply a primer compatible with the adhesive. — Mechanical Fasteners: Use small screws or clips for added stability. Rule: If using adhesive → always prep the surface and supplement with fasteners for high-moisture areas like sidelites.
Negotiating with the HOA: A Tactical Angle
If time or budget constraints exist, negotiate with the HOA for an extension. Provide a detailed plan (materials, timeline, method) to demonstrate good faith. HOAs often prioritize effort over speed, especially if you’re addressing the issue independently. However, avoid stalling — HOAs track enforcement history, and repeated delays may escalate penalties. Pro tip: Document all communication and keep receipts for materials/labor as proof of compliance efforts.
Step-by-Step Guide to Installing Door Cladding Around Front Door Sidelite
1. Material Selection: Utility Trim vs. Trim Coil
The HOA’s requirement for door cladding hinges on aesthetic uniformity and structural integrity. The choice between utility trim and trim coil is not arbitrary — it’s dictated by the sidelite’s geometry. Utility trim, being rigid, is optimal for straight edges because it resists deformation under thermal expansion (vinyl expands 0.00065–0.00080 in/in/°F), ensuring a snug fit without warping. Trim coil, however, is malleable, allowing it to conform to curves or irregular shapes, which reduces gaps that could allow water infiltration (a common failure point leading to rot and mold). Rule of thumb: If your sidelite has curves, use trim coil; if straight, utility trim. Misapplication (e.g., using rigid trim on a curved surface) will cause stress fractures or peeling within months due to material strain.
2. Measuring and Cutting: Tools and Precision
Inaccurate measurements lead to ill-fitting cladding, which compromises both aesthetics and function. Use a metal tape measure (more rigid than fabric) to account for the sidelite’s dimensions, adding a 1/8-inch expansion gap to accommodate material expansion in heat. For cutting, tin snips (for trim coil) or a miter saw with a fine-tooth blade (for utility trim) are essential. Edge case: If your sidelite has water damage (discoloration, soft spots), cladding alone is insufficient — the underlying rot will expand, cracking the cladding. Inspect before measuring; repair or replace damaged sections first. Bringing measurements to a hardware store for cutting is acceptable, but verify their tolerance (±1/16 inch is standard — insist on tighter if possible).
Common Failure Mechanism: Thermal Expansion
Without expansion gaps, vinyl cladding will buckle in summer heat (up to 150°F surface temp in direct sun) due to molecular chain elongation. This stress concentrates at cut edges, leading to delamination of adhesive bonds.
3. Installation: Adhesive vs. Mechanical Fasteners
Adhesive-only installations fail due to surface contaminants (dust, oils) or moisture, which degrade bond strength by 40–60%. Prep work is non-negotiable: clean with isopropyl alcohol (removes oils), prime with adhesive-compatible primer (creates a microporous surface for mechanical interlocking), and use mechanical fasteners (small screws or clips) in high-moisture areas. Liquid Nails alone will fail within 1–2 years in humid climates due to polymer degradation. Optimal method: Combine adhesive with fasteners. Fasteners act as anchors, preventing shear stress from wind loads (up to 20 psf in storms) from tearing the cladding loose.
Edge Case: Water Damage
If water has infiltrated the sidelite frame, cladding will conceal but not solve the problem. The trapped moisture will hydrolyze wood fibers, causing exponential rot expansion (2–3x original size). Solution: Remove cladding, treat rot with borate solution, and replace damaged sections before reinstalling.
4. DIY vs. Hiring a Specialist: Decision Matrix
DIY is feasible if the sidelite is straight and you’re comfortable with tools. However, curves or irregular shapes require trim coil manipulation (e.g., hemming edges to prevent sharp edges), a skill specialists master through repetition. Hire a carpenter or handyman if: (1) the sidelite has curves, (2) you lack confidence in measuring/cutting, or (3) there’s underlying damage. Specialists also ensure compliance with local building codes (e.g., fire-rated materials in certain jurisdictions). Cost comparison: DIY saves $200–$400 but risks HOA fines if improperly installed. Specialists charge $300–$600 but guarantee compliance.
Rule for Choosing:
- If straight edges → DIY with utility trim.
- If curves/damage → Hire specialist.
Negotiating with the HOA: Proactive Strategy
HOAs prioritize effort over speed. Request a 30-day extension with a detailed plan (materials, timeline, method). Document all communication and keep receipts as proof of compliance. Pro tip: Highlight structural benefits (e.g., “Trim coil reduces water infiltration, preventing long-term damage to community property”) to align your actions with HOA goals.
Conclusion: Optimal Path to Compliance
For your townhome sidelite, trim coil is the superior choice due to its flexibility and water resistance. If the sidelite is straight, DIY with proper prep (cleaning, priming, fasteners). If curved or damaged, hire a specialist to avoid fines and structural risks. Failure to address underlying issues (e.g., rot) will render cladding ineffective, leading to costly repairs within 1–2 years. Always prioritize mechanical fasteners in high-moisture areas to prevent adhesive failure.
Cost and Time Estimates for DIY Door Cladding Installation
Before diving into costs and timelines, let’s address your specific case. The HOA inspection flagged your front door sidelite for non-compliance, likely due to exposed edges or mismatched materials. The goal here is to install cladding that meets aesthetic and structural standards, avoiding fines and long-term damage. Below, we break down the process, costs, and time based on your townhome’s needs.
Material Selection: Utility Trim vs. Trim Coil
Your first question: “Which material do I need?” The answer depends on the shape of your sidelite. If the edges are straight, utility trim is optimal. It’s rigid, resists thermal expansion (vinyl expands 0.00065–0.00080 in/in/°F), and costs less ($0.50–$1.00 per linear foot). If the edges are curved or irregular, use trim coil. Its malleability conforms to shapes, reducing gaps that allow water infiltration ($1.00–$2.00 per linear foot).
Rule: Straight edges → Utility Trim; Curves → Trim Coil. Misapplication causes stress fractures or peeling due to material deformation under thermal stress or improper adhesion.
Tools and Cutting: DIY vs. Store Assistance
For utility trim, you’ll need a miter saw with a fine-tooth blade to avoid chipping. For trim coil, use tin snips. Measure the uncovered sidelite areas with a metal tape measure, adding a 1/8-inch expansion gap to prevent buckling (vinyl can reach 150°F surface temp in direct sun). If cutting yourself feels risky, Home Depot/Lowes can cut the material for $5–$10 per cut.
Edge Case: If you notice discoloration or soft spots on the sidelite, water damage is likely. Cladding over rot will trap moisture, causing the wood to expand 2–3x its original size, cracking the cladding. Address this by replacing the sidelite or repairing the frame before proceeding.
Installation: Adhesive vs. Mechanical Fasteners
Liquid Nails alone is insufficient. Adhesive bonds fail when surfaces are contaminated (dust, oils reduce strength by 40–60%) or in high-moisture areas. Prep the surface by cleaning with isopropyl alcohol and applying an adhesive-compatible primer ($10–$15). Combine adhesive with mechanical fasteners (small screws or clips, $0.10–$0.20 each) to withstand wind loads (up to 20 psf).
Rule: Use fasteners in high-moisture areas to prevent shear stress from wind or thermal movement.
Cost and Time Breakdown
- Materials:
- Utility Trim: $10–$20 (10–20 linear feet)
- Trim Coil: $20–$40 (10–20 linear feet)
- Adhesive/Primer: $15–$25
- Fasteners: $5–$10
- Tools (if buying):
- Tin Snips: $10–$20
- Fine-Tooth Blade: $15–$25
- Time:
- Measuring/Cutting: 1–2 hours
- Prep Work (cleaning, priming): 1 hour
- Installation: 2–3 hours
- Total: 4–6 hours
DIY vs. Specialist: When to Hire Help
If your sidelite has curves or you lack confidence in measuring/cutting, hire a specialist. A carpenter or handyman charges $300–$600 but ensures compliance with HOA and building codes. DIY saves $200–$400 but risks fines if installed improperly (e.g., gaps, misaligned cuts).
Rule: Curves or underlying damage → Specialist; Straight edges with proper prep → DIY.
Negotiating with the HOA
If time is tight, request a 30-day extension with a detailed plan (materials, timeline, method). HOAs prioritize effort over speed. Document all communication and keep receipts as proof of compliance.
Optimal Path for Your Case
Based on your townhome’s straight sidelite edges, utility trim is the optimal choice. DIY is feasible if you follow proper prep (cleaning, priming, fasteners). If you find the task overwhelming, hire a specialist to avoid fines and structural risks.
Critical: Address any underlying water damage before cladding to prevent costly repairs within 1–2 years.
메타데이터
- post_id
- ecc5d85a05b1
- slug
- hoa-compliance-guide-to-installing-door-cladding-around-front-door-sidelite-ecc5d85a05b1
- url
- https://medium.com/@jackwilltech/hoa-compliance-guide-to-installing-door-cladding-around-front-door-sidelite-ecc5d85a05b1
- canonical_url
- https://medium.com/@jackwilltech/hoa-compliance-guide-to-installing-door-cladding-around-front-door-sidelite-ecc5d85a05b1
- author_url
- https://medium.com/@jackwilltech
- status
- ok
- fetched_at
- 2026-08-08 03:08:40




