Deploying a Deep Learning Model on the STM32N6 Nucleo Board: From PyTorch to Edge AI Inference
1. Introduction
Deploying a Deep Learning Model on the STM32N6 Nucleo Board: From PyTorch to Edge AI Inference
1. Introduction
This tutorial shows how to deploy and run a deep learning model on the NUCLEO-N657X0-Q board based on the STM32N6 series. The model is first trained offline, optimized for embedded inference, converted to ONNX, compiled using ST’s AI tooling, and finally executed directly on the board.
As a case study, I use a computer-vision model developed for MNIST handwritten digit classification. The same deployment flow can be adapted to other image classification tasks.
2. Tutorial Overview
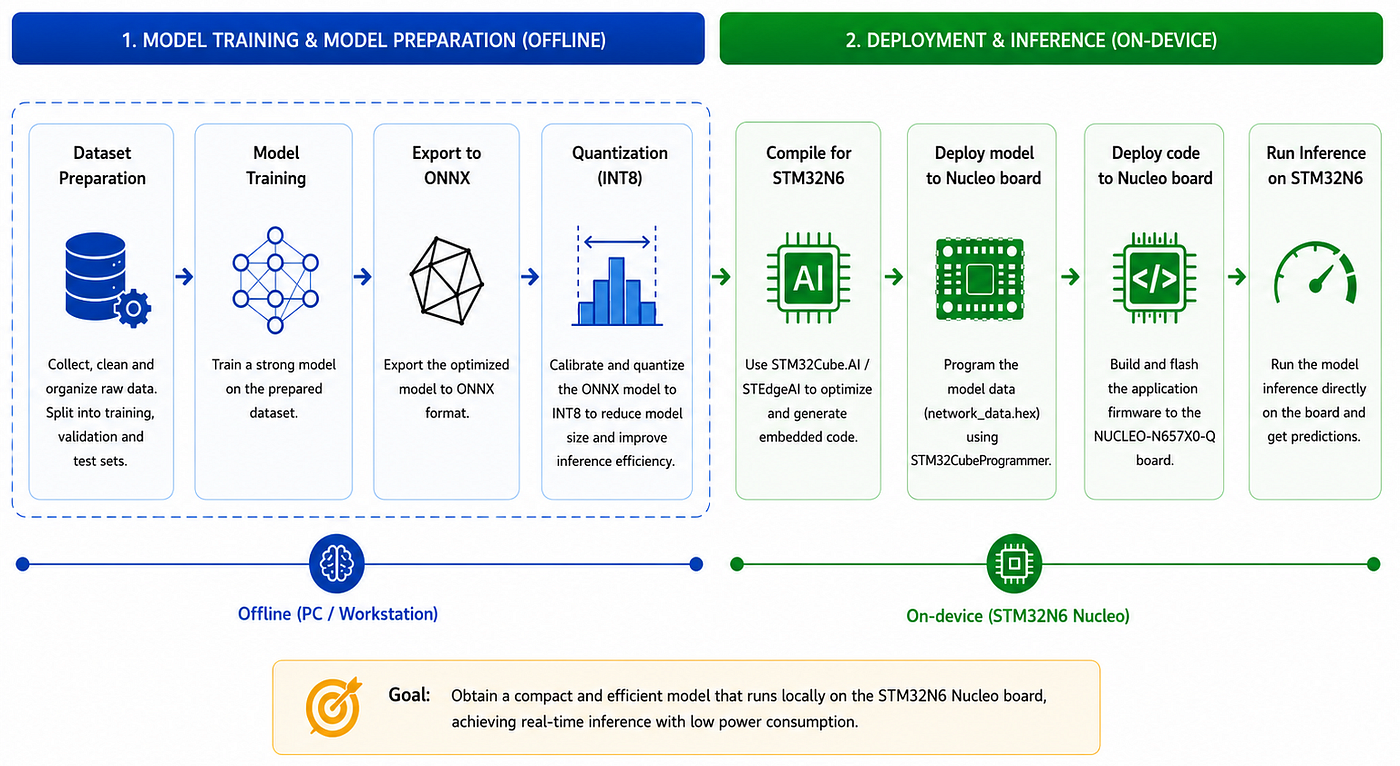
Figure 1. Overview of the proposed edge-AI deployment pipeline, from offline model training to on-device inference on the STM32N6 Nucleo board.
The figure summarizes the complete workflow followed to deploy the trained model on the STM32N6 Nucleo board. The process starts with an offline model training stage, performed on a PC or workstation, where the dataset is first prepared and then used to train the neural network. After training, the optimized model is exported to the ONNX format, which provides an intermediate representation suitable for deployment. The ONNX model is then compiled for the STM32N6 target using the STM32 AI toolchain, generating the embedded code required by the firmware application. Finally, the generated files are integrated into the Nucleo board project, the firmware is flashed, and inference is executed directly on the STM32N6 device. This pipeline enables the model to run locally at the edge, reducing the need for external computation while supporting efficient real-time predictions.
What This Tutorial Covers In this tutorial, we go through the complete deployment workflow:
- Preparing the dataset and training a small CNN on MNIST
- Exporting the trained PyTorch model to ONNX
- Quantizing the ONNX model to INT8
- Compiling the model for STM32N6 using STEdgeAI
- Programming the model data onto the Nucleo board
- Flashing the firmware application using STM32CubeIDE
- Running inference on the board using a Python UART GUI
Sections
- Introduction
- Project overview 2.1 Requirements
- Methodology 3.1 Dataset preparation and model training 3.2 Export to ONNX 3.3 Quantization 3.4 Compile for STM32N6 3.5 Deploy on Nucleo board 3.5.1 Model 3.5.2 Code 3.6 Run inference on STM32N6
2.1 Hardware and Software Requirements
Hardware — NUCLEO-N657X0-Q board — USB-C cable — Host PC running Windows Software — Python — PyTorch — ONNX — STM32CubeIDE — STM32CubeMX — STM32Cube.AI / X-CUBE-AI or STEdgeAI — STM32CubeProgrammer Requirements — torch — torchvision — numpy — matplotlib — onnx>=1.17.0 — onnxruntime — pyserial Tested with: — torch==2.1.0 — torchvision==0.16.0 — onnx==1.22.0 — onnxruntime==1.22.2
3. Methodology
3.1 Dataset Preparation and Model Training
The dataset preparation and model training stage is highly problem-specific. In a real industrial edge-AI application, this step depends on the target task, the type of sensor data, the number of classes, the quality of the collected samples, and the constraints of the embedded device. For example, in a visual inspection application, this phase may include collecting images from the production environment, cleaning noisy samples, balancing the dataset, applying data augmentation, splitting the data into training, validation, and test sets, and finally training a compact neural network suitable for deployment.
In this tutorial, to keep the deployment process simple and reproducible, we use a classic benchmark example: MNIST handwritten digit classification. MNIST consists of grayscale images of handwritten digits, representing the digits 0 through 9. Each image has a resolution of 28 × 28 pixels, making it a good starting point for demonstrating the complete workflow from training to embedded deployment.
The goal of this stage is to train a small convolutional neural network using PyTorch. The trained model will later be exported to ONNX and compiled for execution on the STM32N6 Nucleo board. Although MNIST is much simpler than most real-world edge-AI applications, the same workflow can be adapted to custom datasets by replacing the dataset loading and preprocessing steps.
import torch
import torch.nn as nn
import torch.optim as optim
from torchvision import datasets, transforms
from torch.utils.data import DataLoader

# --------------------------------------------------
# 1. Configuration
# --------------------------------------------------

batch_size = 64
num_epochs = 5
learning_rate = 0.001

device = torch.device("cuda" if torch.cuda.is_available() else "cpu")

print(f"Using device: {device}")

# --------------------------------------------------
# 2. Dataset preparation
# --------------------------------------------------

transform = transforms.Compose([
    transforms.ToTensor(),
    transforms.Normalize((0.1307,), (0.3081,))
])

train_dataset = datasets.MNIST(
    root="./data",
    train=True,
    download=True,
    transform=transform
)

test_dataset = datasets.MNIST(
    root="./data",
    train=False,
    download=True,
    transform=transform
)

train_loader = DataLoader(
    dataset=train_dataset,
    batch_size=batch_size,
    shuffle=True
)

test_loader = DataLoader(
    dataset=test_dataset,
    batch_size=batch_size,
    shuffle=False
)

# --------------------------------------------------
# 3. Define a small CNN model
# --------------------------------------------------

class SmallCNN(nn.Module):
    def __init__(self):
        super(SmallCNN, self).__init__()

        self.features = nn.Sequential(
            nn.Conv2d(1, 8, kernel_size=3, padding=1),
            nn.ReLU(),
            nn.MaxPool2d(kernel_size=2),

            nn.Conv2d(8, 16, kernel_size=3, padding=1),
            nn.ReLU(),
            nn.MaxPool2d(kernel_size=2)
        )

        self.classifier = nn.Sequential(
            nn.Flatten(),
            nn.Linear(16 * 7 * 7, 32),
            nn.ReLU(),
            nn.Linear(32, 10)
        )

    def forward(self, x):
        x = self.features(x)
        x = self.classifier(x)
        return x

model = SmallCNN().to(device)

print(model)

# --------------------------------------------------
# 4. Loss function and optimizer
# --------------------------------------------------

criterion = nn.CrossEntropyLoss()
optimizer = optim.Adam(model.parameters(), lr=learning_rate)

# --------------------------------------------------
# 5. Training loop
# --------------------------------------------------

for epoch in range(num_epochs):
    model.train()

    running_loss = 0.0
    correct = 0
    total = 0

    for images, labels in train_loader:
        images = images.to(device)
        labels = labels.to(device)

        optimizer.zero_grad()

        outputs = model(images)
        loss = criterion(outputs, labels)

        loss.backward()
        optimizer.step()

        running_loss += loss.item() * images.size(0)

        _, predicted = torch.max(outputs, 1)
        total += labels.size(0)
        correct += (predicted == labels).sum().item()

    train_loss = running_loss / len(train_loader.dataset)
    train_accuracy = 100.0 * correct / total

    print(
        f"Epoch [{epoch + 1}/{num_epochs}] "
        f"Loss: {train_loss:.4f} "
        f"Train Accuracy: {train_accuracy:.2f}%"
    )

# --------------------------------------------------
# 6. Evaluation on the test set
# --------------------------------------------------

model.eval()

correct = 0
total = 0

with torch.no_grad():
    for images, labels in test_loader:
        images = images.to(device)
        labels = labels.to(device)

        outputs = model(images)
        _, predicted = torch.max(outputs, 1)

        total += labels.size(0)
        correct += (predicted == labels).sum().item()

test_accuracy = 100.0 * correct / total

print(f"Test Accuracy: {test_accuracy:.2f}%")

# --------------------------------------------------
# 7. Save the trained PyTorch model
# --------------------------------------------------

torch.save(model.state_dict(), "mnist_small_cnn.pth")

print("Model saved as mnist_small_cnn.pth")
3.2 Export to ONNX

After training the PyTorch model, the next step is to export it to the ONNX format. ONNX stands for Open Neural Network Exchange. It provides a common representation for neural networks and makes it easier to transfer a trained model from a deep-learning framework such as PyTorch to an embedded deployment toolchain.
This step is important because the STM32 AI deployment tools do not directly use the PyTorch .pth file. The .pth file only stores the trained model weights, while the deployment toolchain needs a complete computational graph that describes the model structure, input shape, operations, and parameters. Exporting the model to ONNX creates this portable representation.
In the original project workflow, the trained model is first switched to evaluation mode using model.eval(), then moved to the CPU, and finally exported to ONNX. The same idea is used here for the MNIST example. We reload the small CNN architecture, load the previously saved weights from mnist_small_cnn.pth, define a dummy input tensor with the same shape as the real input images, and export the model to mnist_small_cnn.onnx.
For MNIST, the input tensor has shape:
1 × 1 × 28 × 28where:
batch size = 1
channels   = 1
height     = 28
width      = 28
The exported ONNX model will be used in the next step, where it is imported into the STM32 AI toolchain and compiled for execution on the STM32N6 Nucleo board.
import torch
import torch.nn as nn

# --------------------------------------------------
# 1. Define the same model architecture used during training
# --------------------------------------------------

class SmallCNN(nn.Module):
    def __init__(self):
        super(SmallCNN, self).__init__()

        self.features = nn.Sequential(
            nn.Conv2d(1, 8, kernel_size=3, padding=1),
            nn.ReLU(),
            nn.MaxPool2d(kernel_size=2),

            nn.Conv2d(8, 16, kernel_size=3, padding=1),
            nn.ReLU(),
            nn.MaxPool2d(kernel_size=2)
        )

        self.classifier = nn.Sequential(
            nn.Flatten(),
            nn.Linear(16 * 7 * 7, 32),
            nn.ReLU(),
            nn.Linear(32, 10)
        )

    def forward(self, x):
        x = self.features(x)
        x = self.classifier(x)
        return x

# --------------------------------------------------
# 2. Load the trained PyTorch model
# --------------------------------------------------

device = torch.device("cpu")

model = SmallCNN()
model.load_state_dict(torch.load("mnist_small_cnn.pth", map_location=device))

model.to(device)
model.eval()

print("Trained PyTorch model loaded successfully.")

# --------------------------------------------------
# 3. Create a dummy input tensor
# --------------------------------------------------
# MNIST images are grayscale and have size 28 x 28.
# The input shape is: batch_size x channels x height x width

dummy_input = torch.randn(1, 1, 28, 28, device=device)

# --------------------------------------------------
# 4. Export the model to ONNX
# --------------------------------------------------

onnx_file_name = "mnist_small_cnn.onnx"

torch.onnx.export(
    model,
    dummy_input,
    onnx_file_name,
    export_params=True,
    opset_version=13,
    do_constant_folding=True,
    input_names=["input"],
    output_names=["output"],
    dynamic_axes={
        "input": {0: "batch_size"},
        "output": {0: "batch_size"}
    }
)

print(f"Model exported successfully to {onnx_file_name}")
After exporting the model, it is good practice to verify that the ONNX file was created correctly.
import onnx

onnx_model = onnx.load("mnist_small_cnn.onnx")
onnx.checker.check_model(onnx_model)

print("ONNX model is valid.")
Before moving to the STM32 toolchain, you can also compare the PyTorch output with the ONNX Runtime output.
import torch
import numpy as np
import onnxruntime as ort

# --------------------------------------------------
# 1. Prepare a test input
# --------------------------------------------------

test_input = torch.randn(1, 1, 28, 28)

# --------------------------------------------------
# 2. Run inference with PyTorch
# --------------------------------------------------

model.eval()

with torch.no_grad():
    torch_output = model(test_input).numpy()

# --------------------------------------------------
# 3. Run inference with ONNX Runtime
# --------------------------------------------------

session = ort.InferenceSession("mnist_small_cnn.onnx")

input_name = session.get_inputs()[0].name
onnx_output = session.run(None, {
    input_name: test_input.numpy().astype(np.float32)
})[0]

# --------------------------------------------------
# 4. Compare the outputs
# --------------------------------------------------

max_difference = np.max(np.abs(torch_output - onnx_output))

print("PyTorch output:")
print(torch_output)

print("ONNX output:")
print(onnx_output)

print(f"Maximum difference: {max_difference:.6f}")
At the end of this step, we obtain the file mnist_small_cnn.onnx. This file contains both the neural network structure and the trained parameters, making it suitable for the next stage of the workflow: compilation for the STM32N6 target using the STM32 AI toolchain.
3.3 Quantization
After exporting the trained model to ONNX, the next step is quantization. Quantization reduces the numerical precision of the model parameters and activations, typically from 32-bit floating point values to 8-bit integer values. This is a key optimization step for embedded AI deployment because it reduces memory usage, decreases model size, and can improve inference speed on hardware accelerators such as the STM32N6 Neural-ART Accelerator.
In this tutorial, we use post-training static quantization. Unlike dynamic quantization, static quantization requires a small calibration dataset. During calibration, representative input samples are passed through the model so that the quantization tool can estimate the activation ranges of the network. These ranges are then used to insert quantization and dequantization operations into the ONNX graph.

Figure 2. Quantization workflow used to convert the FP32 ONNX model into an INT8 ONNX model for STM32N6 deployment. The process includes ONNX preprocessing, calibration-data preparation, activation-range estimation, and static INT8 quantization, producing a compact model suitable for efficient on-device inference.
import torch
import numpy as np
import onnx
import onnxruntime as ort

from torchvision import datasets, transforms
from torch.utils.data import DataLoader

from onnxruntime.quantization import (
    quantize_static,
    QuantType,
    QuantFormat,
    CalibrationDataReader
)

from onnxruntime.quantization.shape_inference import quant_pre_process

# --------------------------------------------------
# 1. Configuration
# --------------------------------------------------

fp32_onnx_model = "mnist_small_cnn.onnx"
preprocessed_onnx_model = "mnist_small_cnn_preprocessed.onnx"
int8_onnx_model = "mnist_small_cnn_int8.onnx"

batch_size = 32
num_calibration_batches = 10

# --------------------------------------------------
# 2. Prepare the MNIST calibration dataset
# --------------------------------------------------
# Important:
# The preprocessing used here must be the same as the preprocessing
# used during model training and ONNX export.

transform = transforms.Compose([
    transforms.ToTensor(),
    transforms.Normalize((0.1307,), (0.3081,))
])

calibration_dataset = datasets.MNIST(
    root="./data",
    train=True,
    download=True,
    transform=transform
)

calibration_loader = DataLoader(
    calibration_dataset,
    batch_size=batch_size,
    shuffle=True
)

# --------------------------------------------------
# 3. Define a calibration data reader
# --------------------------------------------------

class MNISTCalibrationDataReader(CalibrationDataReader):
    def __init__(self, model_path, dataloader, max_batches=10):
        self.dataloader = dataloader
        self.max_batches = max_batches
        self.enum_data = None
        self.batch_count = 0

        session = ort.InferenceSession(
            model_path,
            providers=["CPUExecutionProvider"]
        )

        self.input_name = session.get_inputs()[0].name

    def get_next(self):
        if self.enum_data is None:
            self.enum_data = iter(self.dataloader)

        if self.batch_count >= self.max_batches:
            return None

        try:
            images, _ = next(self.enum_data)
        except StopIteration:
            return None

        images_np = images.detach().cpu().numpy().astype(np.float32)

        self.batch_count += 1

        return {
            self.input_name: images_np
        }

# --------------------------------------------------
# 4. Preprocess the ONNX model
# --------------------------------------------------
# This step performs graph optimization and shape inference.
# It helps the quantizer understand the model graph more reliably.

quant_pre_process(
    input_model_path=fp32_onnx_model,
    output_model_path=preprocessed_onnx_model,
    skip_optimization=False,
    skip_onnx_shape=False,
    skip_symbolic_shape=False,
    auto_merge=True,
    verbose=1
)

print(f"Preprocessed ONNX model saved as: {preprocessed_onnx_model}")

# --------------------------------------------------
# 5. Create the calibration reader
# --------------------------------------------------

calibration_reader = MNISTCalibrationDataReader(
    model_path=preprocessed_onnx_model,
    dataloader=calibration_loader,
    max_batches=num_calibration_batches
)

# --------------------------------------------------
# 6. Run static INT8 quantization
# --------------------------------------------------
# QDQ format inserts QuantizeLinear and DequantizeLinear nodes.
# This format is commonly used for hardware-oriented deployment flows.

quantize_static(
    model_input=preprocessed_onnx_model,
    model_output=int8_onnx_model,
    calibration_data_reader=calibration_reader,

    quant_format=QuantFormat.QDQ,
    weight_type=QuantType.QInt8,
    activation_type=QuantType.QInt8,

    per_channel=True,
    reduce_range=False
)

print(f"Quantized INT8 ONNX model saved as: {int8_onnx_model}")

# --------------------------------------------------
# 7. Validate the quantized ONNX model
# --------------------------------------------------

onnx_model = onnx.load(int8_onnx_model)
onnx.checker.check_model(onnx_model)

print("Quantized ONNX model is valid.")
After quantization, it is useful to check that the INT8 model still gives reasonable predictions.
import numpy as np
import onnxruntime as ort

from torchvision import datasets, transforms
from torch.utils.data import DataLoader

# --------------------------------------------------
# 1. Load the MNIST test dataset
# --------------------------------------------------

transform = transforms.Compose([
    transforms.ToTensor(),
    transforms.Normalize((0.1307,), (0.3081,))
])

test_dataset = datasets.MNIST(
    root="./data",
    train=False,
    download=True,
    transform=transform
)

test_loader = DataLoader(
    test_dataset,
    batch_size=64,
    shuffle=False
)

# --------------------------------------------------
# 2. Create an ONNX Runtime session
# --------------------------------------------------

session = ort.InferenceSession(
    "mnist_small_cnn_int8.onnx",
    providers=["CPUExecutionProvider"]
)

input_name = session.get_inputs()[0].name
output_name = session.get_outputs()[0].name

# --------------------------------------------------
# 3. Evaluate the quantized model
# --------------------------------------------------

correct = 0
total = 0

for images, labels in test_loader:
    images_np = images.numpy().astype(np.float32)

    outputs = session.run(
        [output_name],
        {input_name: images_np}
    )[0]

    predictions = np.argmax(outputs, axis=1)

    correct += np.sum(predictions == labels.numpy())
    total += labels.size(0)

accuracy = 100.0 * correct / total

print(f"INT8 ONNX test accuracy: {accuracy:.2f}%")
At the end of this step, we obtain an INT8 ONNX model. Compared with the original FP32 model, the quantized model is more suitable for embedded deployment because it reduces the memory footprint and uses integer operations that are better aligned with the STM32N6 acceleration pipeline. The next step is to import this model into the STM32 AI toolchain and generate the embedded code for the Nucleo board.
3.4 Compile for STM32N6
After obtaining the quantized INT8 ONNX model, the next step is to compile it for the STM32N6 target. This step converts the generic ONNX representation into files that can be integrated into an STM32 firmware project.
In this tutorial, we use the STEdgeAI command-line tool to generate the embedded AI code. The input is the INT8 ONNX model produced in the previous section. The target is set to stm32n6, and the Neural-ART accelerator configuration is provided through a board-specific JSON file for the NUCLEO-N657X0-Q.
The compilation step produces several generated files, including the network source code, header files, and binary data required by the embedded application. These files are then copied into the firmware project folder. In this workflow, the generated network data is also converted into a .hex file so it can be programmed at the correct external memory address.

Figure 3. STM32N6 compilation workflow from an INT8 ONNX model to firmware-ready files. The quantized ONNX model is processed with STEdgeAI to generate the network source files and binary data, which are then copied into the Nucleo firmware project and converted to HEX format before building and flashing the application on the STM32N6 board.
Windows Batch Script: Compiling the Model for STM32N6
:: --------------------------------------------------
:: 1. Generate STM32N6 AI code from the INT8 ONNX model
:: --------------------------------------------------

stedgeai generate ^
  --model mnist_small_cnn_int8.onnx ^
  --target stm32n6 ^
  --st-neural-art default@user_neuralart_NUCLEO-N657X0-Q.json ^
  --input-data-type uint8

:: --------------------------------------------------
:: 2. Copy generated AI source files into the Nucleo project
:: --------------------------------------------------

xcopy st_ai_output\network.c NUCLEO-N657X0-Q\ /Y
xcopy st_ai_output\network_ecblobs.h NUCLEO-N657X0-Q\ /Y
xcopy st_ai_output\stai_network.c NUCLEO-N657X0-Q\ /Y
xcopy st_ai_output\stai_network.h NUCLEO-N657X0-Q\ /Y

:: --------------------------------------------------
:: 3. Copy the generated network binary data
:: --------------------------------------------------

xcopy st_ai_output\network_atonbuf.xSPI2.raw NUCLEO-N657X0-Q\network_data.xSPI2.bin /Y

:: --------------------------------------------------
:: 4. Convert the binary network data to Intel HEX format
:: --------------------------------------------------

"C:\ST\STM32CubeIDE_1.19.0\STM32CubeIDE\plugins\com.st.stm32cube.ide.mcu.externaltools.gnu-tools-for-stm32.14.3.rel1.win32_1.0.100.202602081740\tools\bin\arm-none-eabi-objcopy" ^
  -I binary ^
  NUCLEO-N657X0-Q\network_data.xSPI2.bin ^
  --change-addresses 0x70380000 ^
  -O ihex ^
  NUCLEO-N657X0-Q\network_data.hex
Required files, located in the STM32 project folder:
user_neuralart_NUCLEO-N657X0-Q.json
my_mpools/stm32n6-app2_NUCLEO-N657X0-Q.mpool
Here:
--modelspecifies the quantized ONNX model generated in the previous step.
--target stm32n6tells STEdgeAI to generate code for the STM32N6 family.
--st-neural-artprovides the Neural-ART accelerator configuration for the target board.
--input-data-type uint8sets the input tensor type expected by the generated network interface.
The generated files are placed in the st_ai_output directory. The script then copies the required files into the NUCLEO-N657X0-Q firmware project folder.
After running the command, the following files are copied into the board project:
network.c
network_ecblobs.h
stai_network.c
stai_network.h
network_data.xSPI2.bin
network_data.hex
The C and header files contain the network interface used by the application firmware. The network_data.xSPI2.bin file contains the model data generated for external memory. The final network_data.hex file is produced from the binary using arm-none-eabi-objcopy, with the base address set to:
0x70380000This address must match the memory mapping expected by the STM32N6 firmware project.
At the end of this step, the ONNX model has been transformed into STM32N6-ready network files. These generated files can now be included in the Nucleo firmware project, compiled with STM32CubeIDE, and flashed to the board. The next step is to build the firmware application and program both the application code and the generated network data onto the STM32N6 Nucleo board.
3.5 Deploy to Nucleo board
3.5.1 Model
After compiling the model for STM32N6, the next step is to deploy the generated model data to the NUCLEO-N657X0-Q board. At this stage, the model has already been converted from ONNX into STM32N6-compatible files, and the network binary data has been converted into a HEX file.
In this tutorial, the model is programmed using STM32CubeProgrammer. The file programmed at this stage is:
network_data.hexThis file contains the compiled network data generated in the previous step. In the compilation script, the binary model data was converted to HEX format using arm-none-eabi-objcopy, with the model data mapped to the external memory address:
0x70380000This address is important because it must match the memory location expected by the firmware application. When the application runs on the STM32N6 board, it accesses the model weights and network data from this programmed memory region.

Figure 4. Deployment workflow for programming the compiled model data onto the STM32N6 Nucleo board. The generated network_data.hex file is loaded into STM32CubeProgrammer, written to the target memory of the NUCLEO-N657X0-Q board, and verified before being used by the firmware application for on-device inference.
To program the model data, connect the Nucleo board to the PC using USB, open STM32CubeProgrammer, and select the appropriate connection interface. After connecting to the target, load the network_data.hex file and start the programming operation. Once programming is complete, STM32CubeProgrammer can verify that the data has been correctly written to the target memory.
At the end of this step, the compiled model data is stored on the board and is ready to be used by the firmware application. The next step is to build and flash the application firmware, which will load the generated network interface and run inference using the programmed model data.
Before flashing the code to the board, the board must be put into development mode by configuring the BOOT0 and BOOT1 pins as shown in the image below.

Figure 5. BOOT0 and BOOT1 pins for development mode.
3.5.2 Code
After programming the model data to the board, the next step is to deploy the application firmware. This firmware contains the code that initializes the STM32N6 hardware, configures the Neural-ART runtime, connects the generated network interface to the programmed model weights, receives input data, runs inference, and returns the result.
In this tutorial, the application code is programmed on the NUCLEO-N657X0-Q using STM32CubeIDE. While the previous step programmed the model data file, network_data.hex, this step programs the actual firmware application generated and built from the STM32CubeIDE project.

Figure 6. Workflow for deploying the firmware application to the STM32N6 Nucleo board using STM32CubeIDE. The application source file and generated network files are included in the STM32CubeIDE project, built into firmware, programmed to the NUCLEO-N657X0-Q board, and then executed to receive input data and run on-device inference.
The complete firmware source code is available in the following GitHub Gist: main.c for STM32N6 deployment. In the following paragraphs, I only highlight the key parts required to understand the deployment flow.
The main.c file defines the embedded application executed by the STM32N6. During startup, the firmware initializes the board hardware, configures the clock system, enables the NPU RAMs, initializes the UART console, configures the external XSPI NOR memory, enables memory-mapped access, and prepares the security and cache settings required by the NPU.
A key point in the application is the model-weight address:
#define NETWORK_WEIGHTS_XSPI2_BASE_ADDR ((uintptr_t)0x70380000U)This address must match the address used when converting and programming network_data.hex. In the previous step, the model data was programmed at 0x70380000. In the firmware, the same address is passed to the generated STAI network using stai_network_set_weights(), allowing the application to access the model weights stored in external memory.
The neural network is initialized in the NeuralNetwork_init() function. This function initializes the STAI runtime, creates the network instance, assigns the external model weights, retrieves the input and output tensor information, and connects the input and output buffers to the generated network.
At runtime, the firmware enters a serial inference loop. The host PC sends an input tensor to the board through UART. The firmware checks the received frame, verifies its length and CRC, copies the payload into the neural-network input buffer, handles cache synchronization, runs the network using:
stai_network_run(network_context, STAI_MODE_SYNC);and finally sends the output tensor and inference time back to the host. The LED is toggled after inference to provide a simple visual indication that the model has executed successfully.
In STM32CubeIDE, this step can be performed as follows:
- Open the NUCLEO-N657X0-Q firmware project.
- Make sure that the generated files are included in the project (they should be inside “Model\NUCLEO-N657X0-Q”):
- — network.c — network_ecblobs.h — stai_network.c — stai_network.h*
- Make sure the application source file, main.c, is part of the project.
- Build the project.
- Connect the NUCLEO-N657X0-Q board to the PC.
- Click “Run” or “Debug” in STM32CubeIDE to program the firmware.
At the end of this step, the board contains both components required for inference: the model data programmed in external memory and the firmware application programmed through STM32CubeIDE. The STM32N6 is now ready to receive input tensors from the host PC and execute neural-network inference directly on the board.
3.6 Run Inference on STM32N6
After deploying both the model data and the firmware application to the NUCLEO-N657X0-Q board, the final step is to run inference on the STM32N6. In this tutorial, inference is triggered from a host PC using a simple Python GUI.
The purpose of the GUI is to make the testing process easier and more visual. Instead of manually preparing binary input tensors, the application loads the MNIST test dataset, displays a set of digit samples, allows the user to select an image, sends the corresponding tensor to the STM32N6 board over UART, receives the inference result, and plots the output scores.

Figure 7. Workflow for running MNIST inference on the STM32N6 Nucleo board using a Python UART GUI. The GUI loads and displays MNIST samples, lets the user select a digit, sends the input tensor to the STM32N6 board over UART, receives the output tensor and inference time, and visualizes the predicted digit and output scores.
In this setup, the PC acts only as a data provider and visual interface. The neural-network inference itself is executed on the STM32N6 board. The firmware receives an input tensor through UART, copies it into the generated network input buffer, runs the model using the STAI runtime, and sends the output tensor back to the PC.
For MNIST, each input image is a grayscale image of size 28 × 28. Since the model was compiled using an unsigned 8-bit input format, the GUI converts each selected image into a uint8 tensor before sending it to the board.
Python GUI for sending MNIST samples to the board
Install the required packages first:
pip install pyserial torch torchvision matplotlib numpyThen save the following script as:
mnist_uart_gui.pyThe most important function to adapt is:
mnist_image_to_board_input()This function controls how the image is converted before being sent to the STM32N6 board. In this tutorial, the MNIST image is sent as a uint8 tensor with 784 bytes:
1 × 28 × 28 = 784 bytesThis must match the input tensor size expected by the firmware. If the board returns a length error, it usually means that the tensor sent by Python does not match the input size expected by the generated network.
UART
The GUI assumes the firmware uses the same UART frame protocol implemented in main.c: the PC sends a DATA frame, the board replies with an ACK, the PC sends a READY_FOR_RESULT frame, and the board sends back a RESULT frame containing the output tensor and inference time. The GUI communicates with the NUCLEO-N657X0-Q board over UART at 921600 baud. This value must match the UART configuration used in the STM32 firmware.
Quantization parameters
For an INT8/UINT8 quantized model, the data exchanged with the STM32N6 board must use the same quantization parameters generated during model compilation. The input image is first preprocessed as during training, then converted from floating point to unsigned 8-bit using the input scale and zero-point: input_uint8 = round(input_float / IN_SCALE + IN_ZP). This ensures that the tensor sent by the Python GUI matches the format expected by the compiled network. Similarly, the output returned by the board is an INT8 tensor and must be converted back to floating point using: output_float = OUT_SCALE * (output_int8 - OUT_ZP). The resulting values can then be interpreted as logits and passed through a softmax function to obtain class probabilities. The values of IN_SCALE, IN_ZP, OUT_SCALE, and OUT_ZP are model-specific and should not be chosen manually. They can be taken from the STM32Cube.AI/STEdgeAI generated report or directly from the generated network.c file, where the input and output tensor descriptors include the quantization scale and zero-point values.

Figure 8. Examples of input quantization parameters found in network.c

Figure 9. Examples of output quantization parameters found in network.c
At the end of this step, the complete deployment loop is closed: a sample is selected on the PC, transferred to the STM32N6 board, processed by the neural network on-device, and visualized again on the PC.
Acknowledgements
I would like to thank Rakesh Rankawat for his valuable help and support during the development of this tutorial.
External links
To learn more about this work and related research activities, you can visit the following pages:
메타데이터
- post_id
- ed9d090e1ecb
- slug
- deploying-a-deep-learning-model-on-the-stm32n6-nucleo-board-from-pytorch-to-edge-ai-inference-ed9d090e1ecb
- url
- https://medium.com/@angeloUNIMI/deploying-a-deep-learning-model-on-the-stm32n6-nucleo-board-from-pytorch-to-edge-ai-inference-ed9d090e1ecb
- canonical_url
- https://medium.com/@angeloUNIMI/deploying-a-deep-learning-model-on-the-stm32n6-nucleo-board-from-pytorch-to-edge-ai-inference-ed9d090e1ecb
- author_url
- https://medium.com/@angeloUNIMI
- status
- ok
- fetched_at
- 2026-07-09 23:18:01




