Build Your Own Local LLM Agent Workflow in 400 Lines of Python
Turning a single agent into a repeatable, human-gated pipeline made of numbered folders and plain markdown: layered context loading, review…
Build Your Own Local LLM Agent Workflow in 400 Lines of Python
Turning a single agent into a repeatable, human-gated pipeline made of numbered folders and plain markdown: layered context loading, review gates, per-stage tool scoping, a stop-and-synthesize salvage, and per-module drafting, in the ICM style.
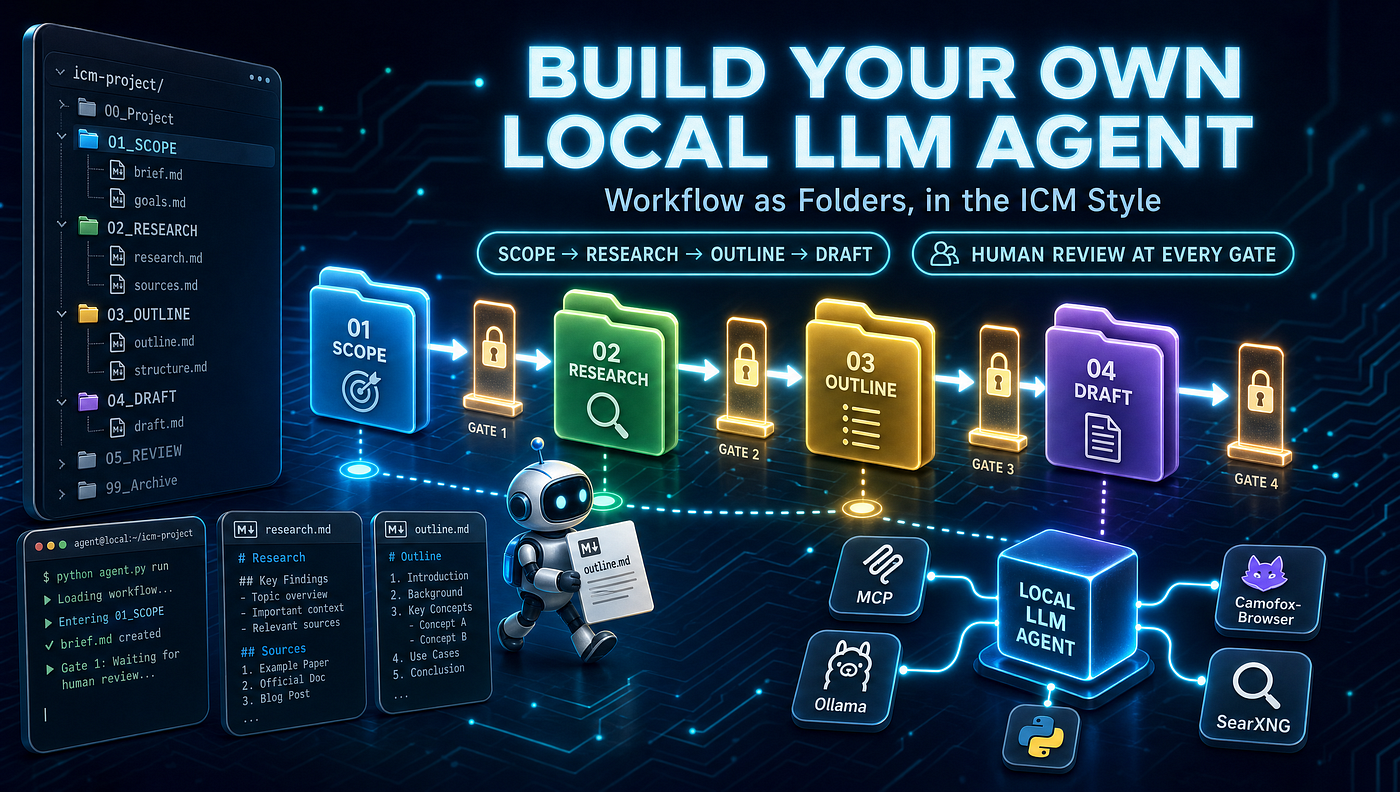
In this article, I will show you how to give the local agent a repeatable, inspectable workflow without adding a framework. By the end you’ll be able to run a multi-stage job where each stage is a folder, the prompt for each stage is a plain markdown file you can read and edit, and a human reviews the output between stages. The agent itself does not change. Only how its context is filed changes, and that turns out to be the whole point.
This is Part 7 of the series. In Part 6 the agent learned to interact with pages: a persistent-tab lifecycle, tab-aware readers, and action tools like click and type_into. So by now the agent can search, read, and act. What it could not do was run a repeatable job with a human checkpoint in the middle.
The reason was that everything steering the agent lived in code. There was one system prompt, assembled at import time, and one tool list, built once at startup and handed to the model on every turn. If I wanted the agent to play a different role for a different step, I edited Python. If I wanted to stop and look at the intermediate output before the expensive step ran, there was nowhere to stop. That is fine for a chat loop. It is awkward for a job with stages.
So, the result of this part is a small course-research pipeline: four stages that take a one-line course idea to a drafted mini-course, one stage at a time, with a review gate between each. The context that steers the agent at each step now lives in numbered folders of plain markdown. You can read it, edit it, and fix the outline before the draft stage runs, all without touching code.
The structure here is built in the style of a method called Interpretable Context Methodology, or ICM, by Van Clief and McDermott. The idea is to replace framework-level orchestration with filesystem structure.
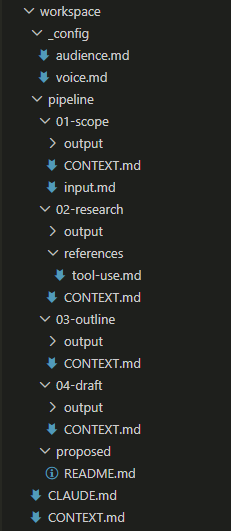
The workflow is a folder (called workspace here). Each numbered folder under pipeline/ is a stage, each CONTEXT.md is that stage's prompt, and proposed/ is a staging area a human promotes from by hand.
Numbered folders are stages, markdown files carry the per-stage context, and local scripts do the mechanical work that needs no model. It draws on Unix pipelines and multi-pass compilers, where the output of one step is the input of the next and every intermediate is a plain file you can open. The series already half-embodied this, with numbered stage folders and an editable config, so it was a short walk.
I am running qwen3.5:9b through Ollama, with thinking off and the temperature at 0.1. The browser and search tools come from the earlier parts: camofox-browser on port 9500 and SearXNG on port 8090, both in Docker. So, please make sure you have those running, and Ollama with a tool-capable model, before you start.
Here are the five stages we will go through:
- Stage 1: camofox-browser and SearXNG in Docker, the local services the later stages call.
- Stage 2: context from files. The agent’s system prompt is assembled per stage from a folder of markdown, instead of being one hardcoded string.
- Stage 3: the pipeline driver, the review gates, and per-stage tool scoping.
- Stage 4: the outline gate, where a stage reads two earlier outputs at once and a human approves the plan before the expensive step.
- Stage 5: drafting per module, and a
proposed/folder that leaves the door open for the next part.
So, let us get started.
Installation
The full code is on GitHub at local-LLM-agent-icm-workflow. Each stage lives in its own subdirectory and is exposed as a console script via pyproject.toml, so you can install once and then run any stage by name.
First, clone the repo and install it in editable mode:
git clone https://github.com/jfjensen/local-LLM-agent-icm-workflow.git
cd local-LLM-agent-icm-workflow

python -m venv .venv

# Windows PowerShell:
.\.venv\Scripts\Activate.ps1

pip install -e .
This pulls in mcp, ollama, and httpx, and registers the console scripts: the workflow runner for each stage (mcp-workflow-stage2 through mcp-workflow-stage5), the agent for each stage (mcp-agent-stage2 through mcp-agent-stage5), and the two MCP servers (mcp-search-part3, mcp-browser-stage5), which are shared copies from the earlier parts. So this repo is self-contained.
Then, before running anything, bring up the local services in Stage 1 (see the next section). The settings live in config.toml at the repo root, the same file as in Part 6, with one new [workflow] section.
Each stage writes its history/ and reads its workspace/ from the current working directory. So, it is best to run each stage from its own folder. For example:
cd stage5
mcp-workflow-stage5
So, with the install out of the way, let us go through the stages.
Stage 1: camofox-browser and SearXNG in Docker
This stage has no Python in it. It stands up the two local services the agent talks to in the research stage: camofox-browser, the stealth browser behind the reader tools, and SearXNG, the search engine behind search. If you followed Part 6, this is the same docker-compose.yml, so you can reuse what you already have.
cd stage1
docker compose up -d
docker compose logs -f
A few things to note:
- The ports. camofox comes up on 9500 and SearXNG on 8090, the same ports
config.tomlexpects, so the agent finds them with no extra configuration. - The SearXNG settings. The compose file bind-mounts
searxng/settings.yml, which turns the JSON API on and the rate limiter off, so the search tool works on the first run. - The camofox image. You build it once from the upstream repo. The first build takes a while, since the Camoufox binary is large. The build steps are in
stage1/README.md.
To check both are healthy, curl http://localhost:9500/health and curl "http://localhost:8090/search?q=ollama&format=json". Both should return JSON.
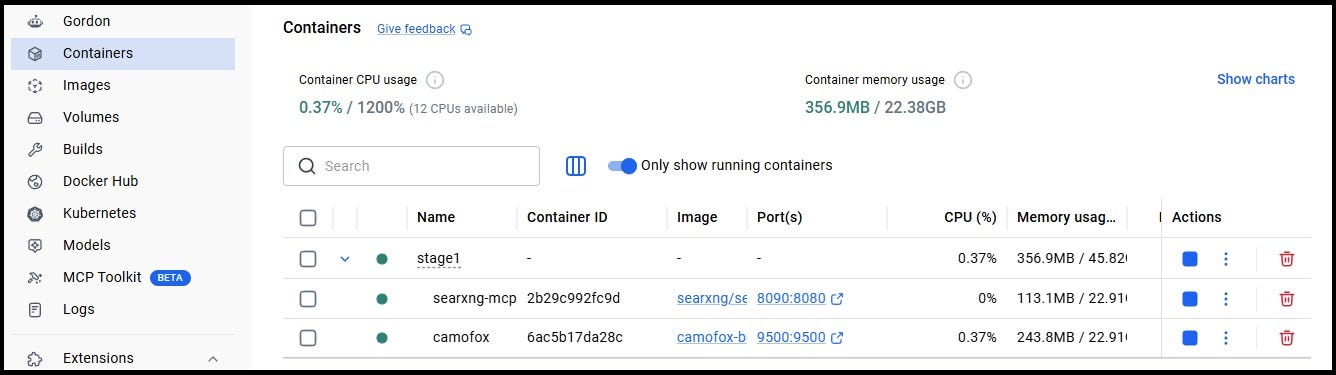
Stage 1 is just the two services. With camofox on 9500 and SearXNG on 8090, the agent has something to talk to in the research stage.
So, with the services up, we can give the agent its workflow.
Stage 2: Context from files
Here is the one real code change in this whole part. In Part 6 the agent had a single system prompt, a module-level string assembled when the program started. That string was the same on every turn, no matter what I asked the agent to do. To let the agent play a different role at each stage of a job, the system prompt has to come from somewhere editable, and the most straightforward way to do that is to read it from files.
So, the first thing to do is to let the agent’s system prompt be overridden:
def build_messages_for_model(self) -> list[dict[str, Any]]:
    system = self.system_text if self.system_text is not None else SYSTEM_PROMPT
    return [{"role": "system", "content": system}] + self.messages
Here is a step-by-step description of the above code:
- The fallback: if nothing set
system_text, the agent uses the same hardcodedSYSTEM_PROMPTas Part 6. So the interactive agent,mcp-agent-stage2, still behaves exactly as before. - The override: if
system_textis set, that is the system prompt for this run. The workflow runner sets it per stage, from files. The agent class is otherwise untouched.
Now, where do the files live. An ICM workspace is a folder. Inside stage2/workspace/ there is a CLAUDE.md that says which workspace this is and how it is laid out, a CONTEXT.md that lists the stages in order, a _config/ folder with reference material that stays the same across runs, and a pipeline/ folder with the numbered stages. Each stage folder holds a CONTEXT.md contract and an output/ folder.
The two files at the top are the identity and the routing. CLAUDE.md is Layer 0, what the agent reads first:
# Workspace: course-research

You are a single agent operating inside an ICM workspace. This file tells
you where you are and how the workspace is laid out. Read it first.

This workspace turns a one-line course idea into a drafted mini-course,
through four stages that run one at a time with a human review between each.

Layout:

- `CONTEXT.md` (next to this file): the workspace routing. It lists the
  stages in order and the shared resources they draw on.
- `_config/`: shared reference material that stays the same across runs
  (the audience profile, the writing voice). This is the factory.
- `pipeline/`: the numbered stages. Each stage folder holds a `CONTEXT.md`
  contract, an `output/` folder for what that stage produces, and
  sometimes a `references/` folder for stage-local reference material.
- `pipeline/proposed/`: a staging area, not a stage. A human moves
  improvements from here into `_config/` once they are happy with them.

You only ever work on one stage at a time. The stage's own `CONTEXT.md`
tells you exactly what to read, what to do, and what to write. Do not read
files the stage contract does not list.
And CONTEXT.md next to it is Layer 1, the routing that lists the stages:
# Routing

The course-research pipeline runs in four stages, in this order:

1. `01-scope`: turn the one-line course idea and the audience profile into
   a short list of scoped learning objectives.
2. `02-research`: for each objective, search the web and read sources, and
   write structured notes with links. This is the only stage that uses
   tools.
3. `03-outline`: turn the objectives and the notes into a module-by-module
   course outline. This is the gate before the expensive stage, so the
   outline is worth a careful human read.
4. `04-draft`: draft each module from the approved outline and the notes.

Each stage reads from the stage before it (its `output/` folder) and
writes to its own `output/` folder. A human reviews each output before the
next stage runs.

Shared resources (in `_config/`, the same every run):

- `audience.md`: who the course is for. Every stage should respect it.
- `voice.md`: how the course should read. The draft stage follows it.
The shared reference material lives in _config/. It is configured once and used by every run. Here is audience.md, the Layer 3 file the scope, research, and outline stages all read:
# Audience

The course is for working software developers who are comfortable with
Python and the command line, but who have not run a language model on
their own machine before.

They want practical, hands-on knowledge they can apply the same day, not
a survey of the field. Assume they can install software, edit a config
file, and read a stack trace. Do not assume they know any machine-learning
theory, model formats, or GPU terminology.

Keep examples concrete and runnable. Prefer one worked example over three
abstract options. When a trade-off matters, state it plainly and give a
default.
The 01-scope/CONTEXT.md contract is the heart of it. Here is the full one for the first pipeline stage:
# Stage: 01-scope

## Inputs
- Layer 4 (working): input.md
- Layer 3 (reference): ../../_config/audience.md

## Tools
none

## Process
Read the one-line course idea and the audience profile. Produce a short
list of scoped learning objectives for the course, four to six of them.

Each objective should be one sentence, start with a verb, and describe
something the learner will be able to do by the end. Keep the scope tight:
this is a short course, so leave out anything that does not fit a learner
going from zero to a working local model. Do not pad the list to hit a
number. Fewer, sharper objectives are better.

Write the objectives as a numbered markdown list, nothing else.

## Outputs
- objectives.md -> output/
The one Layer 4 input, 01-scope/input.md, is the run's working material: the one-line idea I am turning into a course.
# Course idea

A short, practical course that takes a developer from zero to running a
local large language model on their own machine with Ollama, and calling
it from a small Python script.
A few things to note:
- The Inputs table says exactly which files this stage reads, and labels each by layer. Layer 3 is reference material that does not change between runs (the audience profile). Layer 4 is the working material for this run (the one-line idea). The agent loads only these files, not the whole workspace.
- The Tools line says
none, because turning an idea into objectives needs no tools. More on this in Stage 3. - The Process is the instruction the agent follows. It becomes the user turn.
- The Outputs line names the file this stage writes, into its own
output/folder.
The loader reads this contract, resolves the Inputs table to actual file contents, and assembles them into the context. Reference material and working material are kept separate, because they ask different things of the model. Reference material is a set of constraints to follow. Working material is the input to transform.
# System text: identity + routing + the reference material (Layer 3).
parts = []
if layer0:
    parts.append(layer0.strip())
if layer1:
    parts.append(layer1.strip())
refs3 = [r for r in inputs if r.layer == 3 and r.exists]
if refs3:
    block = ["# Reference material (follow these as constraints)"]
    for r in refs3:
        block.append(f"\n## {r.rel_path}\n\n{r.text.strip()}")
    parts.append("\n".join(block))
system_text = "\n\n".join(parts).strip()
Here is a step-by-step description of the above code:
- The identity and routing (
CLAUDE.mdandCONTEXT.md) go in first, so the agent knows which workspace it is in and what the stages are. - The reference files (Layer 3) are appended under a heading that frames them as constraints. The working files (Layer 4) are assembled separately, under the stage’s Process text, as the input to act on.
- The result is the system prompt for this one stage, built from plain files, with nothing in it that the stage did not ask for.
Before running anything against the model, it is worth checking what the loader produces, since that part is deterministic. The repo ships a small probe, probe_loader.py, that prints the assembled context for a stage and a rough token count, without calling the model.
We can run the probe as follows:
cd .\stage2\
python ..\probe_loader.py 01-scope
Running it on 01-scope gives:
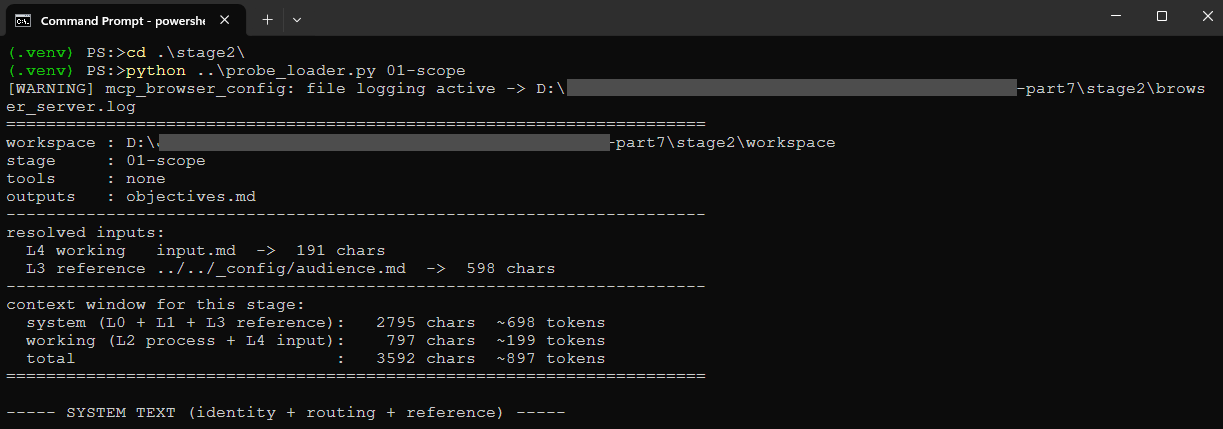
Screenshot showing the first lines when running the probe_loader script on the 01-scope. Take note of the size of the context window.
So the scope stage gets a focused context of around 900 tokens, all of it relevant. That is the ICM claim made concrete: each stage sees a small, scoped window instead of one big prompt with everything in it.
Now, to run the stage for real: mcp-workflow-stage2. It reads the contract, runs the agent once, and writes output/objectives.md. On the course idea I used (a short practical course on running a local LLM with Ollama), it produced five clean objectives, the kind of thing a human glances at and either keeps or trims.

Stage 2 runs a single stage from files. The banner is the scoped context the probe predicted, around 900 tokens, and the output is objectives.md.
Below are the objectives from this run. Another run will give (slightly) different objectives.
1. Install the necessary software stack (Ollama) and verify it is successfully pulling and serving a local LLM like `llama3`.
2. Configure environment variables to securely expose the local model's API endpoint for external access.
3. Write a Python script using the `requests` library to send prompts to Ollama and parse JSON responses into readable text.
4. Implement error handling in your script to gracefully manage connection timeouts or out-of-memory errors common with local inference.
5. Build an interactive loop that allows you to chat with the model directly from a terminal-based Python application without using a GUI framework.
So, with context coming from files, the next thing we cannot do yet is run the stages in order and stop between them. That is Stage 3.
Stage 3: The driver, the gates, and tool scoping
A workflow is stages in order with a human checkpoint between them. So, the driver walks the numbered folders, runs the first stage whose output is empty, and then stops.
async def run_pipeline(workspace_dir: Path, run_all: bool = False) -> None:
    stages = stage_dirs(workspace_dir)
    for sd in stages:
        if stage_is_done(sd):
            print(f"[skip] {sd.name}: output already present")
            continue
        await run_stage(workspace_dir, sd.name)
        if run_all:
            continue
        # The review gate. Stop here so the human can read and edit the
        # output before the next stage reads it.
        print("\n--- review gate ---")
        print(f"Review and edit if needed:\n  {sd / 'output'}")
        return
Here is a step-by-step description of the above code:
- The state lives on disk. A stage is done when its
output/folder holds a real file. There is no separate state store. The filesystem is the state. - The gate is the early return. After running one stage, the driver prints where to look and stops. You read the output, edit it if you want, and re-run the same command to continue with the next stage.
- The escape hatch.
--allruns straight through without stopping, for when you trust it. The default is gated, because the gates are the point.
So, to run the pipeline: mcp-workflow-stage3, then read the output, then run it again to advance. The first run does 01-scope and stops. The second does the research stage and stops. And so on.
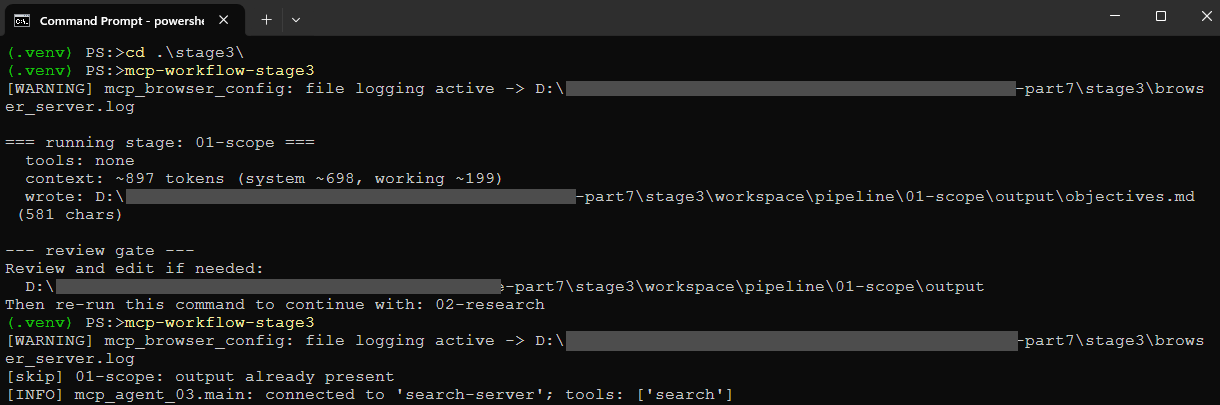
One invocation runs a single stage, prints where to look, and stops at the review gate. Then we re-run the same command to continue.
Now, the research stage is the only one that uses tools, and it is where I hit the first real problem. The agent connects to the search and browser servers, and in Part 6 it built one flat tool list from every connected server and handed all of it to the model on every turn. That is around fifteen tools. The research stage needs maybe five of them. The rest are the tab and action tools, for interacting with a page, which research does not do.
When I first ran research with all fifteen tools exposed, the 9B wandered straight into the interaction tools. It called open_tab and read_tab instead of the readers, and read_tab returns only the head of a page. On the Ollama docs, which are built with Mintlify, the head of every page is the same navigation chrome ("Skip to main content", "Toggle dark mode", "Open search"). So the model read the same menu over and over, opened tab after tab, and spun until it hit the call cap. The output was a 143-character apology.
The fix is to scope the tools to the stage. The contract declares which tools it needs, and the runtime exposes only those. Here is the full research contract:
# Stage: 02-research

## Inputs
- Layer 4 (working): ../01-scope/output/objectives.md
- Layer 3 (reference): ../../_config/audience.md
- Layer 3 (reference): references/tool-use.md

## Tools
search-server: search
browser-server: summarize, extract, fetch_snippet, fetch_urls

## Process
For each learning objective, find and read one or two good current sources,
then write short, factual notes the outline and draft stages can rely on.

Work objective by objective. For each one: run a web search, then read the
most promising result with `summarize` or `extract`. Use `summarize(url,
question=...)` for an open question about a page, and `extract(url, schema)`
when you can name the fields you want (a version number, a default port).
These read the whole page; do not try to page through a site by hand. Read
each page at most once and do not re-read a page you have already read. Once
you have one or two sources per objective, stop calling tools and write the
notes. Pull out the concrete facts that matter for teaching this objective
(commands, version notes, default ports, common pitfalls). Prefer official
documentation and project sources over blog aggregators.

Write the notes as markdown, grouped under a heading per objective. Under
each heading, a few bullet points of facts, then a "Sources:" line with
the URLs you actually read. Keep it factual. Do not draft course prose here;
that happens later.

## Outputs
- notes.md -> output/
The Tools section is the new part. It lists search on the search server, and only four of the browser server's tools, the readers. The runtime reads that and filters the tool list before handing it to the model:
def rebuild_ollama_tools(self, allowed: dict[str, set[str] | None] | None = None):
    out = []
    self._tool_to_server = {}
    for server_name, tools in self.mcp_tools_by_server.items():
        allow_set = allowed.get(server_name) if allowed else None
        for tool in tools:
            if allow_set is not None and tool.name not in allow_set:
                continue
            prefixed = f"{server_name}_{tool.name}"
            self._tool_to_server[prefixed] = server_name
            out.append({
                "type": "function",
                "function": {
                    "name": prefixed,
                    "description": tool.description or "",
                    "parameters": tool.inputSchema,
                },
            })
    self.ollama_tools = out
Here is a step-by-step description of the above code:
- The allow-map is per server. A value of
Nonefor a server means all of its tools. A set of names means only those. - The filter drops any tool not in the allow-set, so the model never sees it. The research stage now sees five tools, the scope, outline, and draft stages see zero.
- The map is rebuilt to match, so a tool that is not exposed is also not callable. Even if the model hallucinated a call to
open_tab, it would come back as an unknown tool.
The research contract also carries its own Layer 3 reference, references/tool-use.md, scoped to this stage alone, that tells the model how to use the readers it does have:
# Tool use (research stage only)

You have two MCP servers for this stage. Use them like this.

- `search-server_search(query, max_results)`: a web search. Start here for
  any lookup. It returns URLs with titles and snippets. After a search,
  your next action must be a browser-server call on the most promising URL.
  Do not stop after a search and do not answer from the snippets alone.

The browser-server reader tools each return a small slice of a page, not
the raw page:

- `browser-server_fetch_snippet(url)`: the head of a page, for a quick look.
- `browser-server_fetch_urls(url)`: the page's links, to decide what to read next.
- `browser-server_fetch_structure(url)`: the page's heading outline.
- `browser-server_extract(url, schema)`: pull named fields you can list in
  advance (a version number, a default port) using a JSON Schema.
- `browser-server_summarize(url, question="")`: a prose summary of a whole
  page; pass `question` to focus it on what this objective needs.

Prefer `extract` when you know the field names, `summarize` for an open
question about a long page, and `fetch_snippet` for a quick confirmation.
Prefer official documentation and project sources over blog aggregators.
This is the filesystem doing the framework’s job again. In a framework, which tools an agent gets is code. Here it is a line of markdown a reader can edit. With the readers scoped in and the tab tools scoped out, the model used summarize and extract, which read whole pages through the chunked reader from Part 5, and the research came back with real facts: the install command, the default port 11434, the Python library usage, all with source links.
There was a second problem, and it is a more interesting one. With the right tools, the model now read good pages, but it did not know when to stop. On one run it re-summarized the same page with the same question more than a dozen times, made no new progress, and hit the call cap. All that good research was sitting in the message history, and the output was again the apology, because the model never produced a final answer.
So, when a turn is cut short, the workflow runner does one more thing. It makes a final call with no tools, telling the model to write the answer from what it already gathered.
async def _finalize(self, stop_reason: str) -> dict:
    if not self.synthesize_on_stop:
        self.messages.append({"role": "assistant", "content": stop_reason})
        return {"role": "assistant", "content": stop_reason}
    self.messages.append({
        "role": "user",
        "content": ("Stop using tools now. Using only the information you have "
                    "already gathered above, write the final output the task "
                    "asked for. Do not call any tools."),
    })
    resp = ollama.chat(model=MODEL_NAME, messages=self.build_messages_for_model(),
                       options={"temperature": MODEL_TEMPERATURE}, think=MODEL_THINKING)
    msg = resp["message"]
    content = msg.get("content", "") if isinstance(msg, dict) else getattr(msg, "content", "")
    final = {"role": "assistant", "content": content or stop_reason}
    self.messages.append(final)
    return final
A few things to note:
- It is opt-in. The interactive agent leaves
synthesize_on_stopoff and keeps the Part 6 behavior, which is to report the stop. The workflow turns it on, so a stage always writes real output. - It salvages the work. The gathered tool results are already in the history, so the no-tools call has everything it needs to write the notes. A runaway research turn becomes a real
notes.mdinstead of an apology. - The stuck-loop guard helps it along. The same call repeated three times in a row now stops the turn early, whether or not it errored, so the model spins less before the synthesis step takes over.
On a clean run, research took about seven minutes and produced just over 10,000 characters of sourced notes across the five objectives.

The second tool run finalizing and asking us to review the output.
So, with the gates, the tool scoping, and the salvage in place, the research stage is reliable enough to build on. Next is the gate that matters most.
Stage 4: The outline gate
The outline stage is the one to get right, because the stage after it is the expensive one. So, this is the cheapest place to fix a mistake. It reads two earlier outputs at once, the objectives from 01-scope and the notes from 02-research, and turns them into a module-by-module outline. Here is its full contract:
# Stage: 03-outline

## Inputs
- Layer 4 (working): ../01-scope/output/objectives.md
- Layer 4 (working): ../02-research/output/notes.md
- Layer 3 (reference): ../../_config/audience.md

## Tools
none

## Process
Turn the objectives and the research notes into a module-by-module course
outline. One module per objective is a reasonable default, but merge or
split where the notes suggest it.

For each module, give a short title and three to five bullet points naming
what it covers, drawn from the notes. Order the modules so each one builds
on the one before it. Note any module that depends on something from an
earlier module.

This outline is the last checkpoint before the course is drafted, so make
it easy for a human to read and correct. Write it as markdown headings with
bullet points. Do not draft the module text yet.

## Outputs
- outline.md -> output/
The two Layer 4 lines are the new shape here. This is the multi-pass handoff from the ICM paper, made concrete. One stage’s output is the next stage’s input, and here a stage reads two earlier outputs together. The loader resolves both, loads them as working material, and the model writes the outline.
So, to run it: mcp-workflow-stage4. By now the scope and research stages are done, so this run does 03-outline and stops at the gate, with outline.md written.
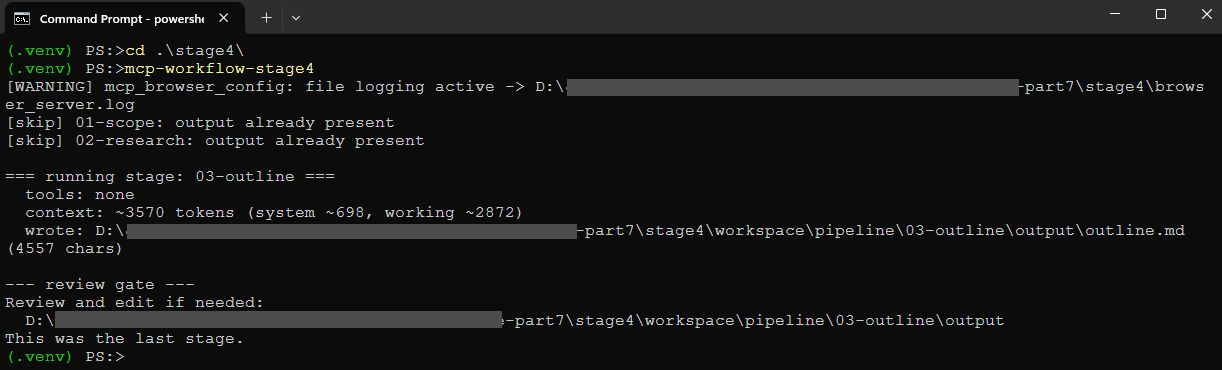
Running mcp-workflow-stage4 produces the outline and stops at the gate. This is the last cheap place to fix the course before the draft stage runs.
The gate earns its place immediately. On one of my runs, the research stage over-collected. The audience for the course is someone going from zero to a running model plus a small script, but the notes wandered into cloud API keys and KV-cache quantization, because the model found those on the docs and dutifully wrote them down. The outline then carried that forward as a whole module called “Securing Your Connection with Environment Variables”, full of material a beginner course does not need.
That is not a failure of the workflow. That is the workflow working. The over-collection surfaced as a readable heading in a plain file, before any course prose was written. I can delete that module, adapt the lessons, or retarget it, and the draft stage never wastes a call on it. Fixing it here costs one edit to a markdown file. Fixing it after the draft would mean re-reading five drafted modules and countless lessons to find the one that should not exist.
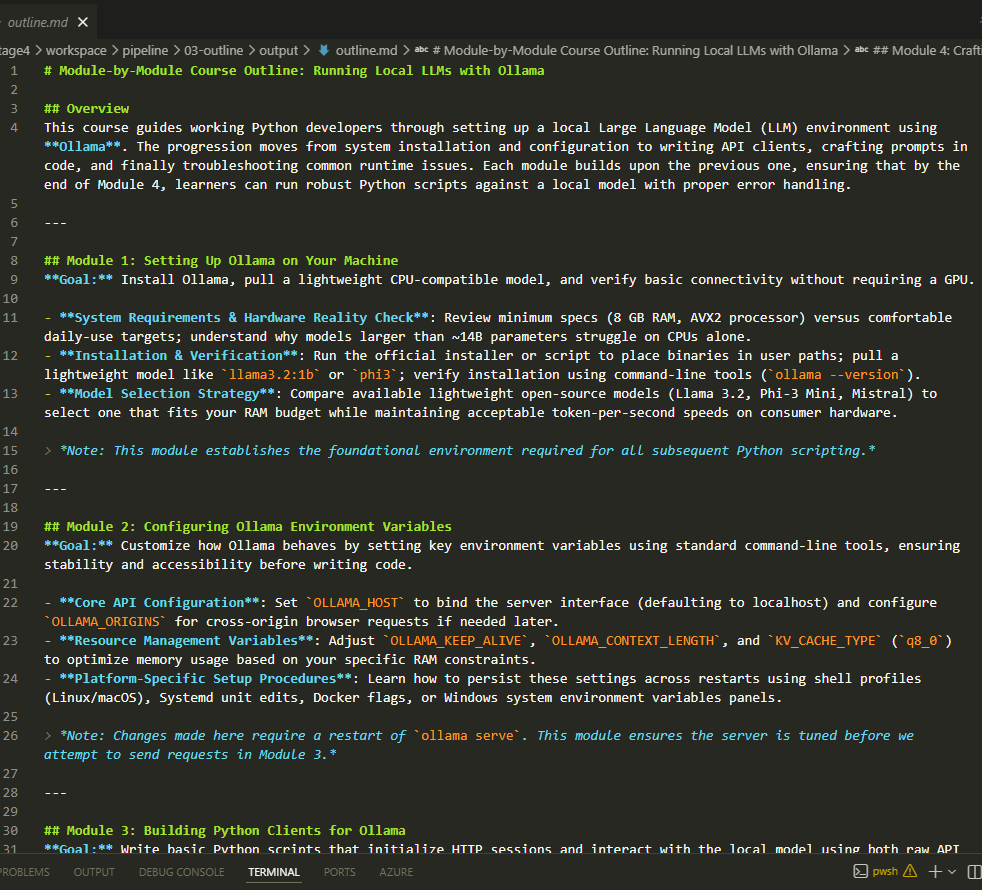
Editing an example outline at the gate in VS Code. Potential off-scope modules or lessons get cut before the expensive draft stage ever sees it.
At the gate, you edit the outline down to the modules and lessons you actually want, then re-run to continue. The number of modules is just the number of ## Module headings in that file, so editing the outline is also how you set how long the course is. More on that in the next stage.
Stage 5: Drafting per module, and the proposed folder
The draft stage writes each module from the approved outline, using the notes for facts. My first version asked the model to write the whole course in a single turn, and that did not hold up. Sometimes it drafted four modules, sometimes it drafted one and decided it was done. A small model treats “write the whole course” as one big task and often returns early.
So, the draft stage loops over the modules instead. Here is its full contract, with a For each directive that declares the loop:
# Stage: 04-draft

## Inputs
- Layer 4 (working): ../02-research/output/notes.md
- Layer 3 (reference): ../../_config/voice.md
- Layer 3 (reference): ../../_config/audience.md

## Tools
none

## For each
module in ../03-outline/output/outline.md

## Process
Draft the one module shown below, and only that module. Use the research
notes for the facts (commands, ports, pitfalls) rather than inventing them,
and follow the voice and audience guides. Write a few short paragraphs of
teaching prose plus any commands the learner should run. Do not write the
other modules. Start your output with the module's heading, and output only
the drafted module, nothing else.

This is a first draft for a human to revise, so aim for a clear, correct
scaffold rather than a finished, polished module.

## Outputs
- draft.md -> output/
The draft is the one stage that reads voice.md, the last Layer 3 file in the workspace, which sets how the course should read:
# Voice

Write plainly, as one developer explaining something to another at the
next desk. Short instructional sentences, followed by a longer one that
explains why.

- Lead with what to do, then explain the reasoning.
- Use concrete names: real tools, real commands, real file paths.
- Hedge honestly when something is a judgement call or can fail.
- No marketing language. No hype. No "unlock", "seamless", "robust".
- One idea per paragraph. Bullets only for listing the parts of a thing.
The For each line is what turns one open-ended turn into a loop. The runtime runs the Process once per module:
fe = ctx.for_each
print(f"  for each: {len(fe.modules)} {fe.item}(s) from {fe.rel_path}")
pieces = []
for i, (heading, body) in enumerate(fe.modules, 1):
    print(f"  [{i}/{len(fe.modules)}] {heading}")
    agent.messages = []
    item_block = (f"# The {fe.item} to write now\n\n"
                  f"## {heading}\n\n{body}")
    agent.messages.append({"role": "user", "content": ctx.user_text + "\n\n" + item_block})
    final = await agent.run_turn()
    pieces.append((final.get("content", "") or "").strip())
content = "\n\n".join(p for p in pieces if p)
Here is a step-by-step description of the above code:
- It splits the outline into modules on the
##headings, so the loop runs once per module. Nothing fixes the count at five. A four-module outline runs four times, a six-module outline runs six. The count is whatever you left in the outline at the gate. - Each call starts fresh.
agent.messagesis cleared each time, so the model drafts one module with the notes in front of it and no memory of the other modules. The turns stay small and independent. - The pieces are joined into one
draft.md. Turning "write the course" into one bounded call per module is what gets the 9B to finish all of them.
The directive is general, not special-cased to the draft stage. Any stage could declare For each. The other three stages have no directive and run as a single turn. So, to run it: mcp-workflow-stage5, and you see [1/5] through [5/5] go by. On my run it wrote just over 15,000 characters across the five modules.
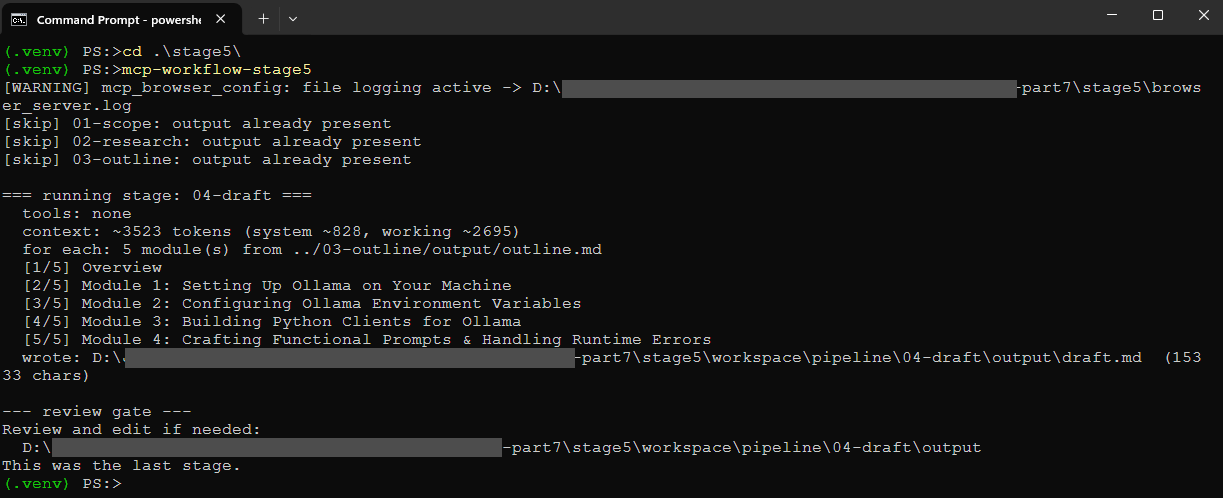
The draft stage loops over the outline, one model call per module. The count is whatever you left in the outline, so a four-module or six-module outline runs four or six times.
I will be honest about what that draft is, in the failure-modes paragraph below. First, the hook for the next part. The workspace has a proposed/ folder that the pipeline never runs. It is a staging area. When a run turns up an improvement that should outlive it, a sharper objective, a voice rule the draft stage keeps getting wrong, it lands there as a file, and a human moves it into _config/ if they agree. The point is the human gate. Nothing changes the workspace until a person promotes it by hand, which keeps the review where ICM wants it. It is also where the next part will plug in.
What works and what does not
So, a fair word about the draft. A 9B model drafting the modules produces serviceable scaffolding, not finished teaching. The win here is the workflow and its interpretability, not a local model writing a course unattended.
These are the rough edges I actually saw, not hypothetical ones. The draft confidently produced a broken systemd unit, with the [Unit] and [Service] lines mashed onto one line and the environment variables jammed into ExecStart. It invented a version string the notes never mentioned, and it drifted between gemma2, gemma3, and gemma3:2b across modules. Because each module is drafted independently with no memory of the others, Modules 1 and 2 overlapped heavily, both covering environment variables and systemd. And the research stage is slow: about seven minutes, because every page goes through the chunked summarizer, and the Ollama FAQ page alone was 41,000 characters across eight chunks. One source was a Cloudflare bot-check wall, which the reader correctly reported as having no real content, so the model moved on rather than inventing some.
None of this turns the agent into a deterministic pipeline. If you need that, you write a script. The value here is that the steering lives in files a human reads and fixes between stages, so the rough draft is something you correct at a gate, not something you discover after the fact. The “four to six objectives” line in the scope contract is a suggestion to the model and a hard fact once you have edited the file. That gap, between what the model tends to do and what you pin down by hand, is exactly why the gates exist.
Putting it all together
What we end up with is a workspace folder per pipeline, sitting next to the agent, with one CONTEXT.md contract per stage and an output/ folder that carries the work forward. The agent is the same multi-server agent from Part 6. The runtime that drives it, the loader, the gated driver, the tool scoping, and the per-module loop, is one file of about 400 lines.
What we have:
- A workspace where the per-stage context lives in numbered folders of plain markdown you can read and edit without touching code.
- A loader that assembles each stage’s system prompt from files, keeping reference and working material separate, in a focused window of around 900 to 1,500 tokens per stage.
- A gated driver that runs one stage, stops for human review, and resumes, with state on disk.
- Per-stage tool scoping, so a stage sees only the tools its contract declares.
- A stop-and-synthesize salvage, so a stage still writes real output when the model over-researches.
- Per-module drafting, where the number of modules is just the number of headings in the approved outline.
Because a workspace is only a folder, the same agent runs a different job by pointing at a different one. The repo ships a second workspace, workspace-rust, for a beginners' Rust course. It is a copy of the first that differs in exactly two files: the audience profile and the one-line idea. Every stage contract, the routing, and the tool-use reference are byte-identical. Run it with mcp-workflow-stage5 --workspace workspace-rust, and the same pipeline produces a Rust course instead. That is the ICM idea of configuring the factory, not the product: the pipeline is the factory, the course is what it makes.

The two workspaces differ in only audience.md and the one-line idea. Same pipeline, different course.
There is room to extend this. You could add a Verify section to a stage contract, so a stage re-reads an earlier output and flags drift before the human looks, an idea the ICM paper sketches as cross-stage verification. You could feed a one-line summary of prior modules into each draft call, to cut the Module 1 and 2 overlap. Or you could turn the proposed/ folder into something that fills itself, which is where the next part goes.
So, why build this thin version by hand instead of reaching for CrewAI or LangGraph. Those are good tools, and once you have a workflow that needs concurrent agents, dynamic branching, or real deployment, they earn their weight. The point of this part is that a large and common class of jobs, the sequential, reviewable, repeatable ones, does not need that weight. For those, the simplest thing that works is one that already exists on every machine: a folder of files. Building it yourself first is the best way to see exactly where the heavier tools start to pay off.
References
- The full code for this part: local-LLM-agent-icm-workflow.
- Part 6, the interaction agent this builds on: local-LLM-agent-mcp-interaction.
- Van Clief and McDermott, Interpretable Context Methodology: Folder Structure as Agent Architecture, arXiv:2603.16021.
- Ollama, the local model runner.
- Model Context Protocol, for the tool servers.

This story is published on Generative AI. Connect with us on LinkedIn and follow Zeniteq to stay in the loop with the latest AI stories.
Subscribe to our newsletter and YouTube channel to stay updated with the latest news and updates on generative AI. Let’s shape the future of AI together!

메타데이터
- post_id
- ee6e0b749dfd
- slug
- build-your-own-local-llm-agent-workflow-in-400-lines-of-python-ee6e0b749dfd
- url
- https://generativeai.pub/build-your-own-local-llm-agent-workflow-in-400-lines-of-python-ee6e0b749dfd
- canonical_url
- https://generativeai.pub/build-your-own-local-llm-agent-workflow-in-400-lines-of-python-ee6e0b749dfd
- author_url
- https://medium.com/@jesfinkjensen
- status
- ok
- fetched_at
- 2026-06-27 07:40:21