Setting Up a Mail Server on Linux: A Complete Guide to Postfix and Dovecot
A practical, step-by-step walkthrough for configuring Postfix (SMTP) and Dovecot (IMAP) on a Linux server — including DNS setup, SSL, and…
Setting Up a Mail Server on Linux: A Complete Guide to Postfix and Dovecot
A practical, step-by-step walkthrough for configuring Postfix (SMTP) and Dovecot (IMAP) on a Linux server — including DNS setup, SSL, and Thunderbird verification.
Introduction
Running your own mail server gives you full control over your email infrastructure — essential for organizations that prioritize privacy, compliance, or custom domain management. In this guide, we will walk through configuring two core components: Postfix, the industry-standard Mail Transfer Agent (MTA) responsible for sending and routing email, and Dovecot, the IMAP/POP3 server that allows mail clients to retrieve messages.
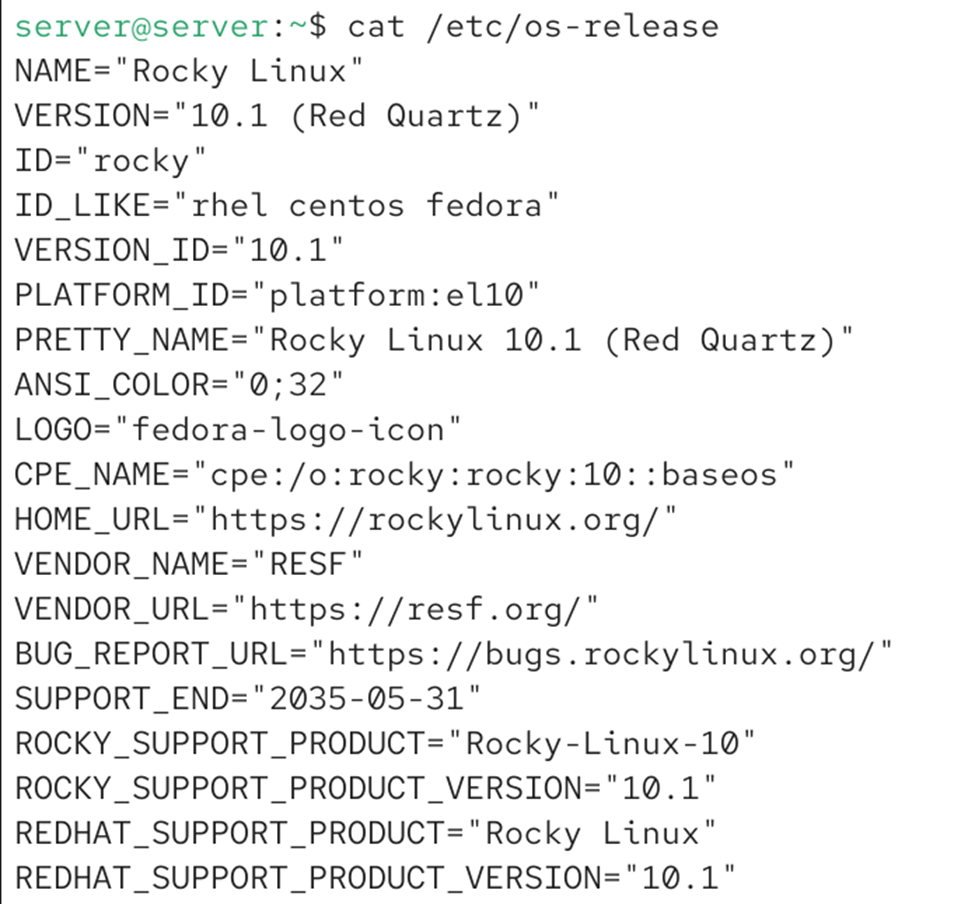
This tutorial uses a domain named shadow.com as an example. All configuration values referencing this domain should be replaced with your actual domain name. The steps were tested on a Red Hat-based Linux distribution (using dnf), but the configuration principles apply broadly across modern Linux environments.
Part 1: Configuring Postfix (SMTP)
Step 1 — Install Postfix
Begin by installing the Postfix package using your system’s package manager. On RHEL/CentOS/Fedora-based systems, run:
sudo dnf install postfix -y
This command installs Postfix and its dependencies. Once the installation completes, proceed to enable and start the service.
Step 2 — Enable and Verify the Postfix Service
Enable Postfix to start automatically at boot, then start it immediately and verify its status:
sudo systemctl enable postfix
sudo systemctl start postfix
sudo systemctl status postfix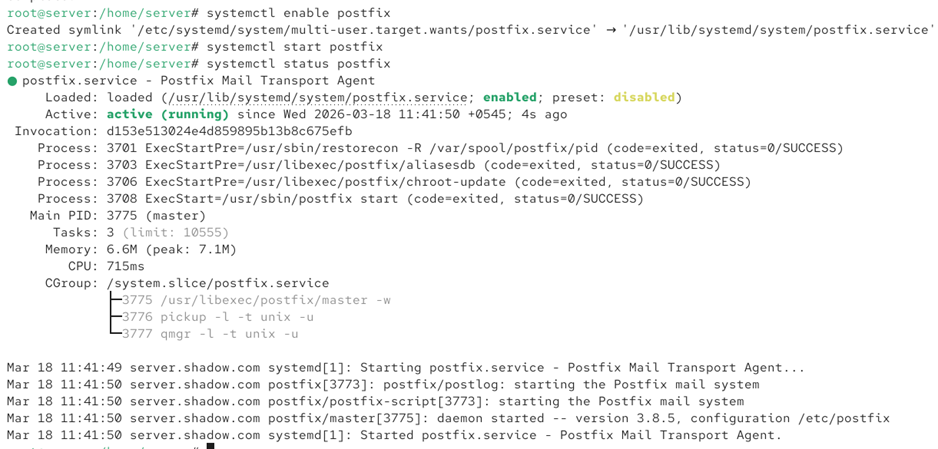
The status output should show the service as active (running). If it shows any errors, review the system logs using journalctl -xe for details.
Step 3 — Configure the Postfix main.cf File
The primary Postfix configuration file is located at /etc/postfix/main.cf. Open it with your preferred text editor and update the following parameters. Some of these lines may be commented out by default — uncomment them and set the values as shown:
myhostname = server.shadow.com
mydomain = shadow.com
myorigin = $mydomain
inet_interfaces = all
mynetworks = 192.168.200.0/24, 127.0.0.0/8
home_mailbox = Maildir/
Here is what each parameter controls:
myhostname sets the fully qualified domain name (FQDN) of your mail server. mydomain defines the mail domain for outgoing messages. myorigin appends the domain name to locally generated mail. inet_interfaces = all tells Postfix to listen on all network interfaces. mynetworks specifies the IP ranges trusted to relay mail without authentication. home_mailbox = Maildir/ instructs Postfix to deliver mail in the Maildir format, which Dovecot also expects.
**📝 Note: **After making changes, always restart Postfix to apply them.
Step 4 — Restart Postfix and Confirm the Configuration
Restart the Postfix service and verify it is running correctly:
sudo systemctl restart postfixsudo systemctl status postfixStep 5 — Verify Telnet is Installed
Telnet is a useful tool for manually testing SMTP connections. Check whether it is installed:
rpm -q telnet
If telnet is not available, install it with:
sudo dnf install telnet -yStep 6 — Create Test User Accounts
Create two local Linux user accounts to use for testing email delivery between users. In our example, we create users named user1 and user2:
sudo useradd user1
sudo passwd user1
sudo useradd user2
sudo passwd user2
These users will serve as the sender and recipient for our mail tests.
Step 7 — Add a Mail DNS Record to the Forward Zone
For your mail server to send and receive mail correctly, you must add an MX (Mail Exchange) record to your DNS forward zone file. This step is critical — a missing or misconfigured MX record is one of the most common causes of mail delivery failures.
Edit your forward zone file (e.g., /var/named/fwd…..) and add the following records:
@ IN MX 10 mail.shadow.com.
mail IN A 192.168.200.X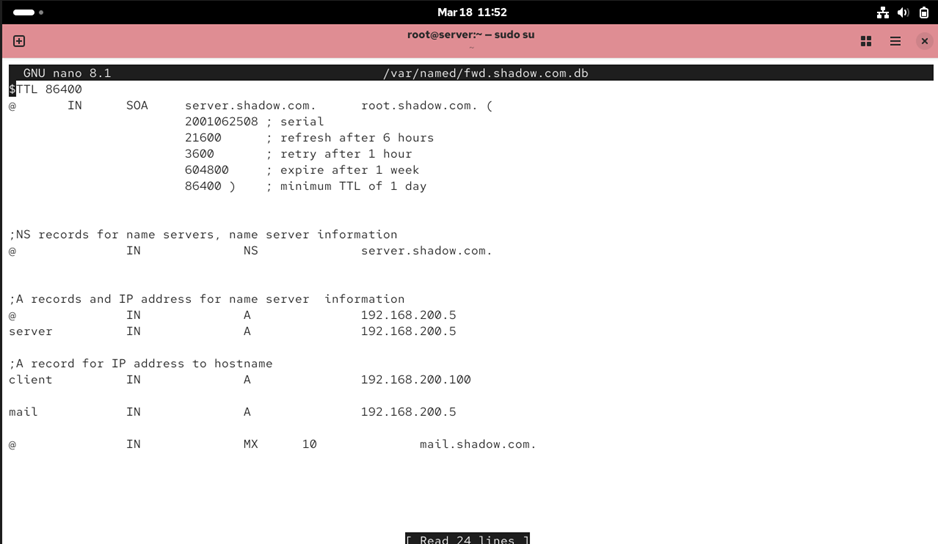
Replace 192.168.200.X with the actual IP address of your mail server. After editing, restart the named (DNS) service to apply the change.
**📝 Note: **Forgetting to add the MX record in the forward lookup zone is a common pitfall. Without it, the server cannot resolve mail routing, preventing email from being sent or received.
Step 8 — Verify Postfix is Working
Use telnet to connect to the SMTP port and simulate sending a test email:
telnet mail.shadow.com 25
EHLO shadow.com
MAIL FROM:<name@shadow.com>
RCPT TO:<name@shadow.com>
DATA
Message
.
QUIT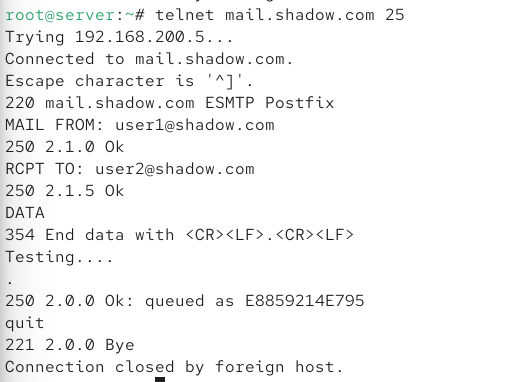
A successful response at each step confirms that Postfix is accepting and routing mail correctly.
Step 9 — Confirm Mail Delivery by Switching Users
Switch to the recipient user account and check for the received message in their Maildir directory:
su - user2
ls ~/Maildir/new/
cat ~/Maildir/new/<filename>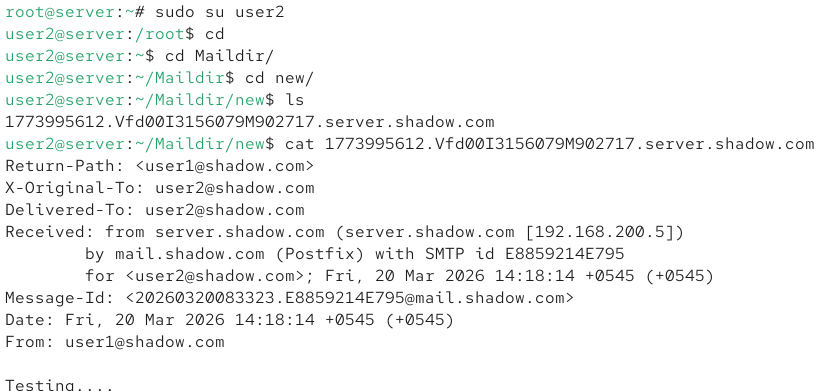
If the message appears, Postfix is fully operational and delivering mail to the correct local mailboxes. Postfix configuration is now complete.
Part 2: Configuring Dovecot (IMAP)
Dovecot handles mail retrieval — it is the component that allows mail clients such as Thunderbird or Outlook to connect and read email from the server. The following steps configure Dovecot to work with the Maildir format set up by Postfix.
Step 10 — Install or Verify Dovecot
Check whether Dovecot is already installed, or install it:
rpm -q dovecot # check if installed
sudo dnf install dovecot -y # install if not present
Step 11 — Configure the Main Dovecot Protocol File
Open the main Dovecot configuration file at /etc/dovecot/dovecot.conf and navigate to line 24. Uncomment the protocols line to enable IMAP:
protocols = imap pop3 lmtpThis tells Dovecot which protocols to listen on. At minimum, imap is required for modern mail clients.
Step 12 — Set the Mail Location in 10-mail.conf
Open /etc/dovecot/conf.d/10-mail.conf and navigate to line 24. Uncomment and update the mail_location setting to match the Maildir format used by Postfix:
mail_location = maildir:~/MaildirThis ensures Dovecot looks for messages in the same location where Postfix delivers them.
Step 13 — Allow Plain-Text Authentication in 10-auth.conf
Open /etc/dovecot/conf.d/10-auth.conf and go to line 10. Uncomment the disable_plaintext_auth line and set it to no — this is necessary for basic testing without TLS. In a production environment, you would set this to yes and enforce SSL/TLS instead.
disable_plaintext_auth = noStep 14 — Enable Login Authentication Mechanism
Still in 10-auth.conf, navigate to approximately line 100 and add login to the auth_mechanisms list:
auth_mechanisms = plain loginThe login mechanism is required by many older mail clients and provides compatibility across a wider range of client software.
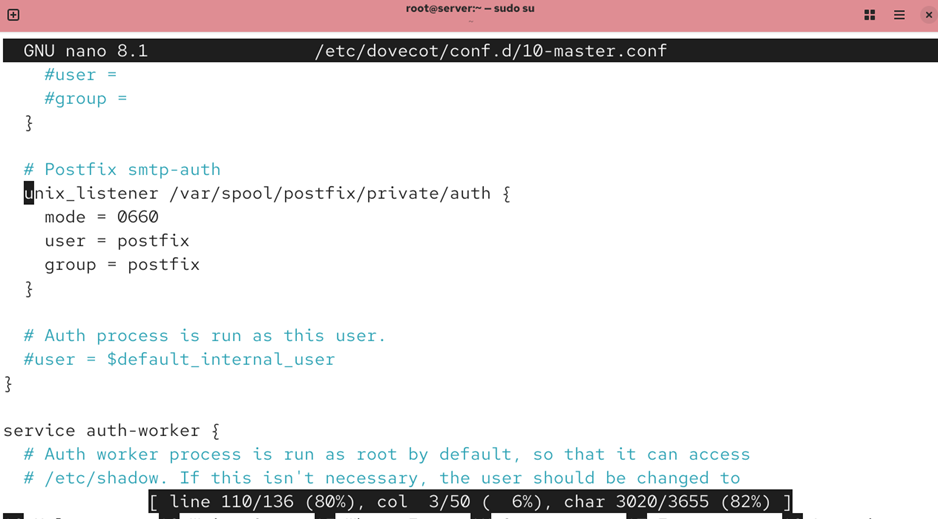
Step 15 — Grant Postfix Access in 10-master.conf
Open /etc/dovecot/conf.d/10-master.conf and navigate to around line 110. Uncomment the relevant section and add postfix as both the user and group. This enables Postfix and Dovecot to communicate via a Unix socket, which is required for SASL authentication:
unix_listener /var/spool/postfix/private/auth {
mode = 0666
user = postfix
group = postfix
}
Step 16 — Start and Enable Dovecot
Start the Dovecot service, enable it to start at boot, and check its status:
sudo systemctl start dovecot
sudo systemctl enable dovecot
sudo systemctl status dovecot
Step 17 — Verify Dovecot is Running
Use the telnetcommand-line tool to confirm everything is operational:
telnet mail.shadow.com pop3
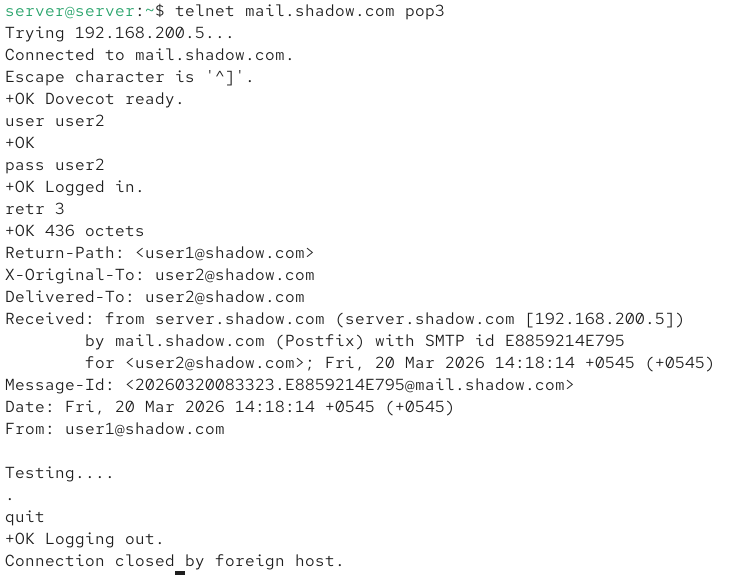
A successful connection returning a Dovecot greeting confirms the IMAP service is active and listening.
Step 18 — Generate an SSL Certificate for Secure Communication
To encrypt communication between the mail client and server, generate a self-signed SSL certificate. For testing purposes, use openssl:
sudo openssl req -new -x509 -days 365 -nodes
  -out /etc/pki/dovecot/certs/dovecot.pem
  keyout /etc/pki/dovecot/private/dovecot.pem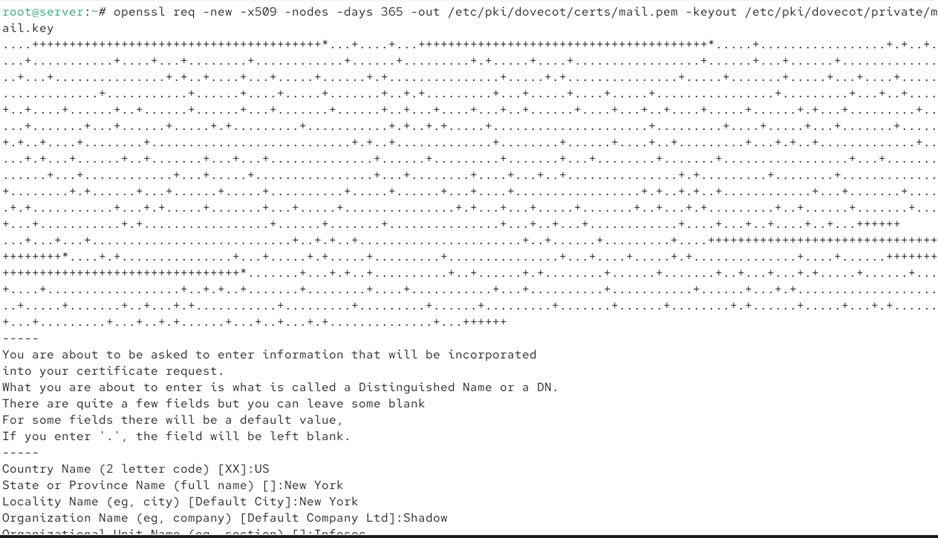
In a production environment, replace this self-signed certificate with one issued by a trusted Certificate Authority (CA) such as Let’s Encrypt.
Part 3: Verifying with Thunderbird on Ubuntu
Mozilla Thunderbird is an excellent open-source mail client for verifying that the server is fully functional end-to-end. The following steps describe how to configure it to connect to your newly configured mail server.
Step 1 — Install Thunderbird
On Ubuntu, install Thunderbird using:
sudo apt install thunderbird -y
Step 2 — Add User Accounts in Thunderbird
Open Thunderbird and add both test user accounts (user1 and user2).
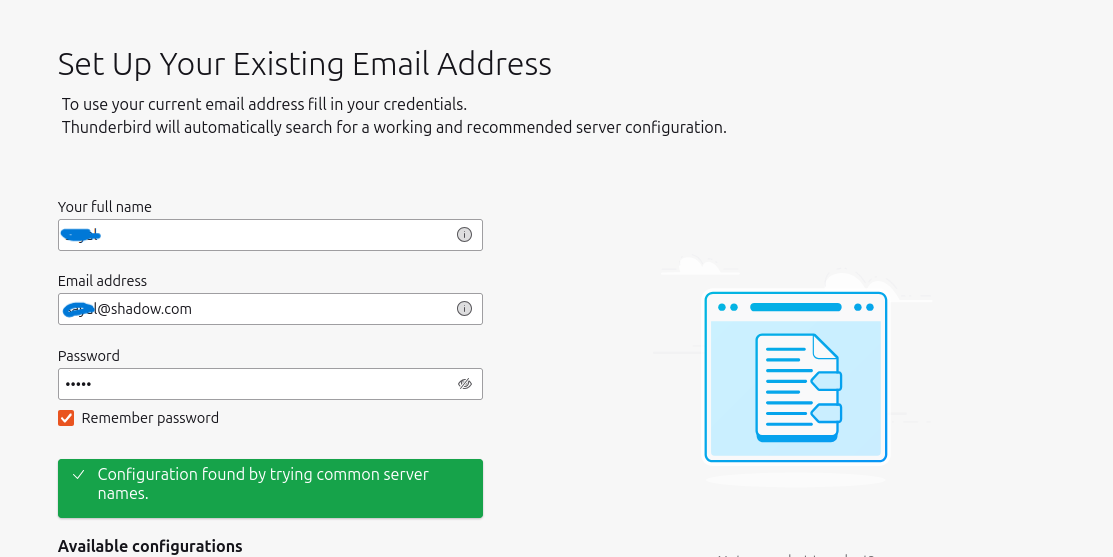
Accept the self-signed certificate warning if prompted — this is expected in a test environment.
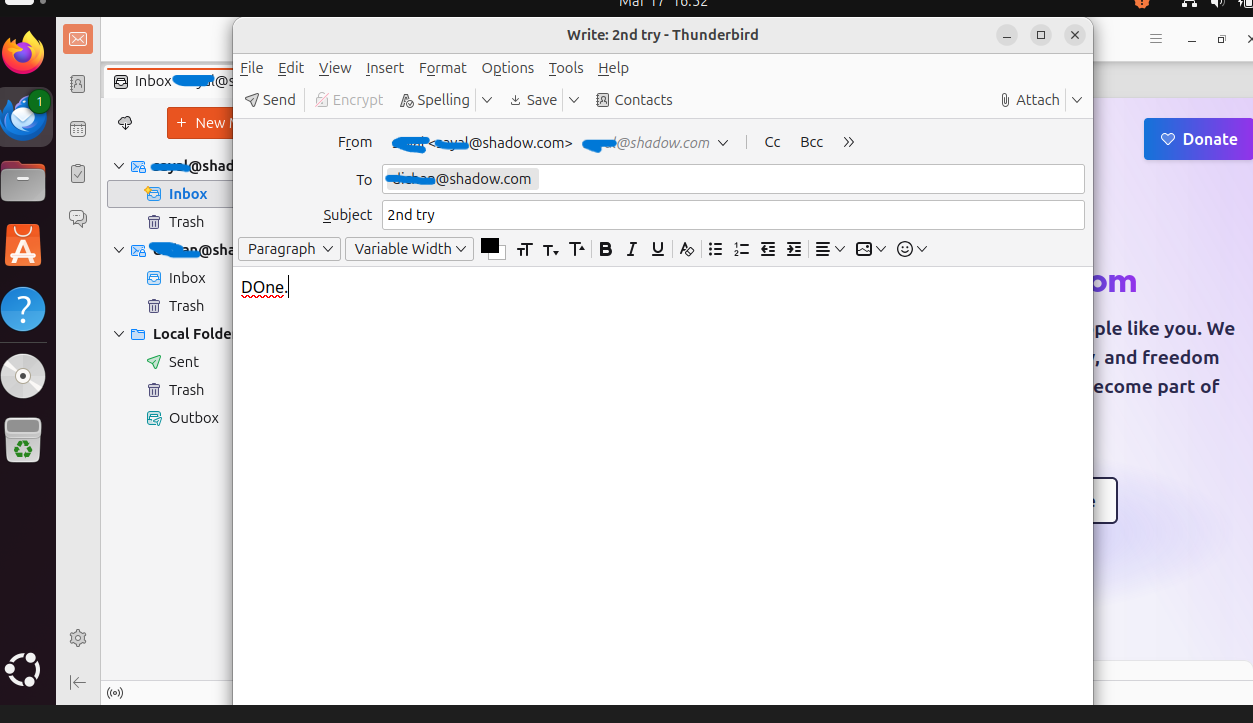
Step 3 — Send a Test Email Between Users
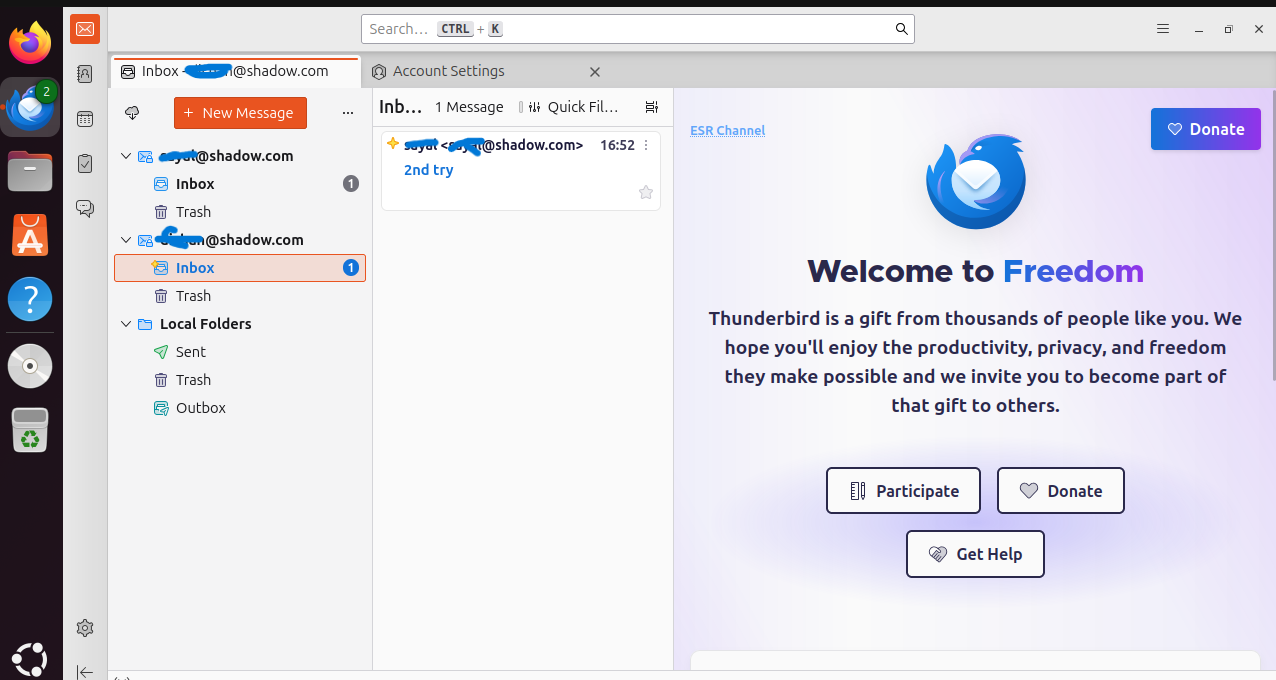
Compose an email from the suer1 account addressed to user2@shadow.com and send it. Then switch to the user2account and confirm the message appears in the inbox. A successful delivery confirms that both Postfix (sending) and Dovecot (receiving) are working correctly together.
Common Issues and Troubleshooting
Missing MX Record in DNS
The most frequent issue encountered during this setup is failing to add the MX record to the forward lookup zone file. Without it, the server cannot resolve where to deliver mail, and all send attempts will fail. Always verify your DNS records with:
nslookup -type=MX shadow.comFirewall Blocking Mail Ports
Ensure that the firewall permits traffic on ports 25 (SMTP), 143 (IMAP), and 993 (IMAPS). On firewalld-based systems:
sudo firewall-cmd --permanent --add-service=smtp
sudo firewall-cmd --permanent --add-service=imap
sudo firewall-cmd --reload
SELinux Restrictions
If you are running SELinux in enforcing mode, it may block Postfix or Dovecot from functioning correctly. Check the audit log and apply the necessary SELinux policies if needed, or temporarily set SELinux to permissive mode for testing.
Conclusion
With Postfix and Dovecot configured together, you have a fully functional mail server capable of sending, receiving, and serving emails to clients. This setup forms the foundation of any self-hosted mail infrastructure. From here, you can extend it with spam filtering (SpamAssassin), virus scanning (ClamAV), webmail interfaces (Roundcube), and more robust TLS enforcement.
Self-hosting email requires attention to DNS configuration, security hardening, and regular maintenance — but the control and flexibility it provides make it a worthwhile investment for technical teams and organizations with specific infrastructure requirements.
👉 Follow the full series on my Medium profile and find all config files on my GitHub.
메타데이터
- post_id
- eedc64b60bdf
- slug
- setting-up-a-mail-server-on-linux-a-complete-guide-to-postfix-and-dovecot-eedc64b60bdf
- url
- https://medium.com/@gurungatwork98/setting-up-a-mail-server-on-linux-a-complete-guide-to-postfix-and-dovecot-eedc64b60bdf
- canonical_url
- https://medium.com/@gurungatwork98/setting-up-a-mail-server-on-linux-a-complete-guide-to-postfix-and-dovecot-eedc64b60bdf
- author_url
- https://medium.com/@gurungatwork98
- status
- ok
- fetched_at
- 2026-07-18 05:18:37