How to Capture a HAR File for Troubleshooting
A HAR (HTTP Archive) file records the network activity between your browser and a website. Support teams often use HAR files to investigate…

How to Capture a HAR File for Troubleshooting
A HAR (HTTP Archive) file records the network activity between your browser and a website. Support teams often use HAR files to investigate slow page loads, failed requests, authentication issues, and unexpected errors.
This guide explains how to capture a HAR file in Google Chrome, Microsoft Edge, and Mozilla Firefox.
Select your browser:
Before You Start
Before capturing a HAR file:
- Close unnecessary browser tabs.
- Open the page where the issue occurs.
- Be prepared to reproduce the problem.
- Note that HAR files may contain sensitive information such as URLs, request headers, and form data. Review the file before sharing it externally.
Google Chrome
Step 1: Open Developer Tools
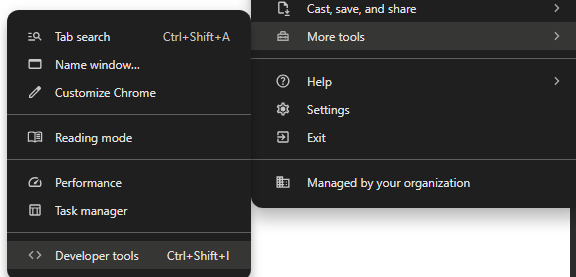
Press F12 or Ctrl + Shift + I.
Alternatively:
Menu → More Tools → Developer Tools
Step 2: Open the Network Tab
Select the Network tab.
Step 3: Enable Network Logging
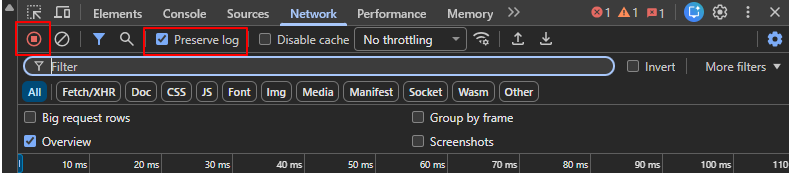
Ensure:
- The Record button (●) is red.
- Preserve log is enabled.
Step 4: Clear Existing Requests
Click the Clear button (⊘).
Step 5: Reproduce the Issue
Perform the actions that trigger the problem.
Step 6: Export the HAR File
Click on the Export HAR button
Choose a location and save the file.

Microsoft Edge
Step 1: Open Developer Tools
Press F12 or Ctrl + Shift + I.
Step 2: Open the Network Tab
Select Network.
Step 3: Enable Logging
Verify that:
- The Record button (●) is red.
- Preserve log is enabled.
Step 4: Clear Existing Requests
Click the Clear button (⊘).
Step 5: Reproduce the Issue
Perform the actions that generate the problem.
Step 6: Save the HAR File
Click on the Export HAR button
Choose a location and save the file.
Mozilla Firefox
Step 1: Open Developer Tools
Press F12 or Ctrl + Shift + E.
Alternatively:
Menu → More Tools → Web Developer Tools
Step 2: Open the Network Monitor
Select the Network tab.

Step 3: Enable Persistent Logs
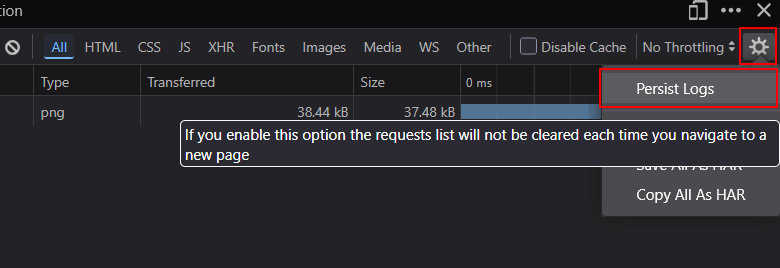
Click the gear icon and enable:
Persist Logs
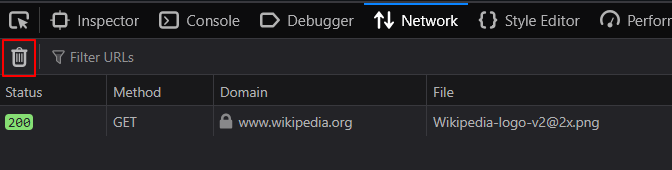
Step 4: Clear Existing Requests
Click the trash can icon.
Step 5: Reproduce the Issue
Perform the steps that cause the issue.
Step 6: Save the HAR File
Right-click within the request list and select:
Save All As HAR
Alternatively — Click on the gear icon and select to Save All as HAR:
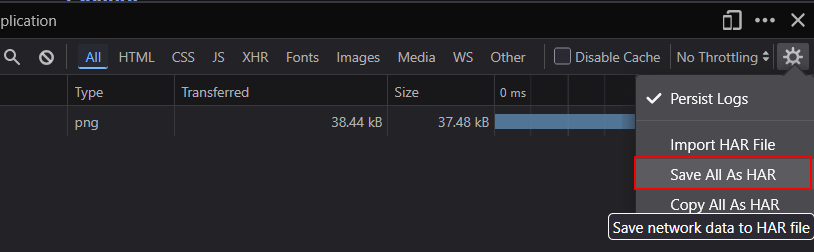
Choose a location and save the file.
Common Tips
Capture From the Beginning
Start recording before reproducing the issue to ensure all relevant requests are captured.
Include Screenshots
When submitting a HAR file to support, include:
- A screenshot of any error message
- The exact time the issue occurred
- Steps to reproduce the problem
Compress Large HAR Files
HAR files can become large. If the file exceeds your email attachment limit:
- Right-click the HAR file.
- Select Send to → Compressed (zipped) folder.
- Share the ZIP file instead.
Conclusion
Capturing a HAR file is one of the most effective ways to help a support team diagnose browser-based issues. By following the steps above, you can provide detailed network information that helps identify errors, performance bottlenecks, and failed requests more quickly.
메타데이터
- post_id
- ef51752334af
- slug
- how-to-capture-a-har-file-for-troubleshooting-ef51752334af
- url
- https://medium.com/@jean.smit/how-to-capture-a-har-file-for-troubleshooting-ef51752334af
- canonical_url
- https://medium.com/@jean.smit/how-to-capture-a-har-file-for-troubleshooting-ef51752334af
- author_url
- https://medium.com/@jean.smit
- status
- ok
- fetched_at
- 2026-06-16 19:09:56