Developing a Simple App with React Native: Using React Navigation
Hello everyone, in this article we will develop a small application using the React Navigation library. In this article, I will first…
Developing a Simple App with React Native: Using React Navigation
Hello everyone, in this article we will develop a small application using the React Navigation library. In this article, I will first explain what React Navigation is.
React Navigation is a routing library for React Native apps. This library allows us to create solutions such as navigation between screens, tabs, side menus within the application. Thanks to these features, users can use the application in a more comfortable and understandable way.
React Navigation offers different navigation structures. These structures can be used to navigate between various pages in your application. These builds include Stack Navigator, BottomTab Navigator, and Drawer Navigator. Each one is designed for a different purpose. So what are these Navigators?
1.Stack: Manages stack screens and enables switching between screens. It is used in the application to open one screen and return to other screens. It can be used in conjunction with other navigation structures.
https://[reactnavigation.org/docs/stack-navigator](http://reactnavigation.org/docs/stack-navigator)
2.Drawer The Drawer provides a menu designed as a sidebar. Used to quickly switch between multiple pages. It can be opened from the side of the application and the user can quickly switch between pages by tapping the menu items. It can be used in conjunction with other navigation structures.
3.Bottom Tabs Bottom Tabs is a structure that organizes multiple pages in tabs at the bottom of the application. It is often used as the home page of the application and can be used in conjunction with other types of navigation. It supports certain features by React Navigation library e.g. color of tabs, size etc. features can be adjusted
In this application, we will develop an application by combining the Stack and BottomTab navigators.
The following installation steps allow us to add the required libraries to our project:
1.Project creation: npx react-native@latest init projectname 2. Installing the React Navigation library: npm i @react-navigation/native 3. Installing the Stack Navigator library: npm i @react-navigation/stack 4. Installing the Bottom Tabs Navigator library: npm i @react-navigation/bottom-tabs 5. Optionally loading the Vector Icons library containing the icons we want to use in the application: npm i react-native-vector-icons
Completing the above steps allows us to use the required libraries in our project.
After creating the React Native project and making the necessary setups, we create our folders as follows:

The routes.ts file located in the Constans folder is used to define the page names and keys used for a navigation created using the React Navigation library.

For example, the key “ABOUT” corresponds to the page named ‘About’. This object can also be used on other pages, making it easier to use. In our Pages folder, we have the screens that we want to be directed to. These screens provide what the user wants to see in the app. For a simple view, we have screens as in the picture below.


The navigation folder creates two homepages, AppNavigator and BottomTabNavigator.
BottomTabNavigator
const Tab = createBottomTabNavigator(); Tab(alt) navigation is created using the function.
Sub-navigation is created using the Tab.Navigator function. Components that show each subtab are created using Tab.Screen components. For example, the code ***<Tab.Screen name={ROUTES.READ} component={ReadPage} />*** creates a tab in the bottom navigation that will go to the page named “READ” and displays the content of the “ReadPage” component.
The initialRouteName property specifies the page to be displayed when the application is first opened, while the screenOptions property is a function that sets properties for each sub-tabs. These properties include the tabBarIcon property, which sets an icon for each subtab, the tabBarActiveTintColor property, which sets the icon color for the active subtab, and the tabBarInactiveTintColor property, which sets the icon color for the inactive subtab. The headerShown property determines whether to display the title of the page, while the options property specifies additional properties for each subtab page. Among these properties is the tabBarButton property, which is used to hide a button that is not showing in any subtabs.
AppNavigator
AppNavigator has a structure that uses both Stack and BottomTabNavigators together. The main pages are displayed in the subtabs and the contents of these master pages are presented as Stack Navigation pages. This code can be easily edited to customize page transitions.
Stack Navigation is created with the createStackNavigator() function.
A function called AppNavigator is created and this function contains the NavigationContainer component. The NavigationContainer component covers all the navigation functions of the application.
There is one Stack.Screen component in the Stack.Navigator component. With the ***screenOptions*** property, a set of properties can be specified for all Stack Navigation pages. Among these properties, the ***headerShown*** property determines whether or not the title of a page is displayed.
The Stack.Screen component is named with the ***name*** property and displays the corresponding page with the ***component*** property. This code uses a component named BottomTabNavigator, which indicates that it is a Bottom Tab Navigation component.
With the configuration made, an image is displayed on the main page of the application and it is possible to switch to other pages by using the bottom tab navigation. In order to arrange this structure, first of all, the content of the pages must be updated as desired. For this purpose, the content of each page should be determined and necessary arrangements should be made. Also, the bottom tab navigation can be customized to increase the user experience. For example, icons and colors can be changed or the order of the subtabs can be changed. For this, the features in the React Navigation library can be used.
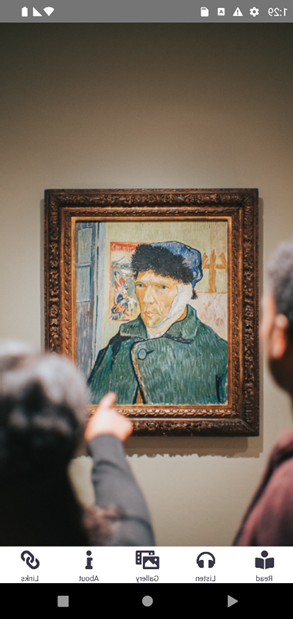


As I mentioned above, we created a Stack and BottomTab Navigator structure using the React Navigation library in this simple application. Thanks to these structures, users can navigate the application comfortably and switch between different pages. The React Navigation library, which we have seen only the basic features in this example, offers much more complex and customizable features. Many features such as advanced navigations, animations and transition effects are possible with React Navigation.
I hope this sample app has given you an idea of how to use React Navigation. You may have more complex navigation needs in your own application. In this case, the React Navigation documentation will be a valuable resource for you.
Good luck and good coding!
https://[github.com/bstkpnr/RN-BottomTabsNav](http://github.com/bstkpnr/RN-BottomTabsNav)
메타데이터
- post_id
- ef8247bfb27d
- slug
- developing-a-simple-app-with-react-native-using-react-navigation-ef8247bfb27d
- url
- https://medium.com/@bstkpnr/developing-a-simple-app-with-react-native-using-react-navigation-ef8247bfb27d
- canonical_url
- https://medium.com/@bstkpnr/developing-a-simple-app-with-react-native-using-react-navigation-ef8247bfb27d
- author_url
- https://medium.com/@bstkpnr
- status
- ok
- fetched_at
- 2026-06-28 10:39:35




