Web Scraping Using Scrapy Part6: Books ToScrape site.
A Step-by-Step Guide to Extracting Book Data from “Books to Scrape” Using Scrapy, XPath, and CSS Selectors
Web Scraping Using Scrapy Part6: Books ToScrape site.
A Step-by-Step Guide to Extracting Book Data from “Books to Scrape” Using Scrapy, XPath, and CSS Selectors
Outlines: What We’ll Cover:
- Introduction.
- What is Book.toscrape?
- Create a Virtual Environment.
- Plan Your Scraping Strategy.
- Scrapy Shell.
- Creating a New Spider in Scrapy.
- Items.py.
- Parsing Each Book Page.
- Data Pipeline.
- The Helper methods.
- Configure CSV export.
- Running Your Spider
Take a look at this repository to explore the code. Mustafaadel7/Book-To-Scrape: A small practice project for web scraping using Scrapy.
Introduction.
In this blog post, we will walk through the entire process of scraping the “Books to Scrape” website, focusing on how to efficiently extract data using both XPath and CSS selectors. We will cover everything from setting up your Scrapy project to writing the necessary code for parsing book details such as titles, prices, ratings, and more. Whether you’re a beginner looking to learn the basics of web scraping or an experienced developer seeking to refine your skills, this guide will provide you with the tools and knowledge you need to successfully scrape data from this engaging online resource. Let’s dive in and start building our web scraping project!
What is Book.toscrape?
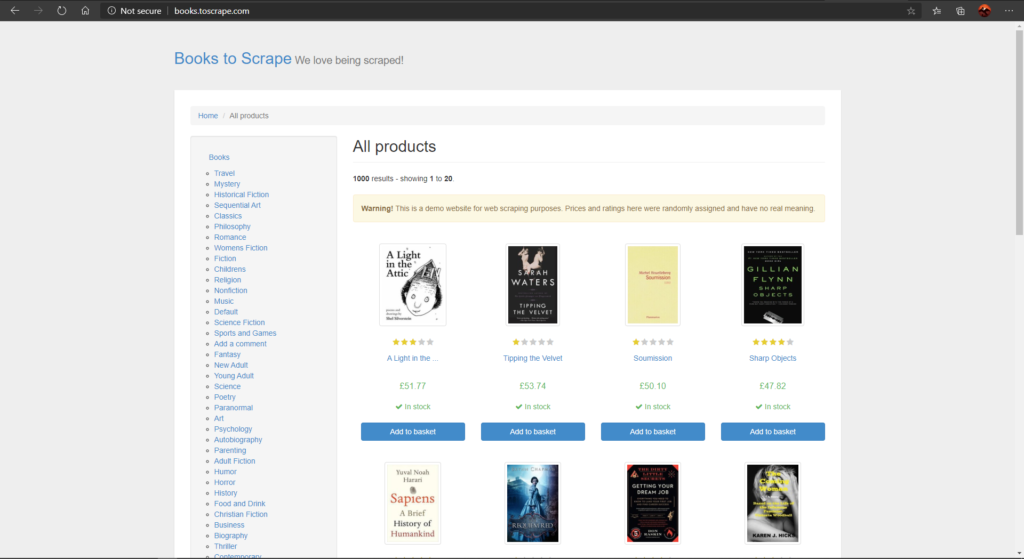
BookToScrape is a demo website created for web scraping practice. It features a catalog of books, complete with cover images, titles, authors, prices, and ratings. While it doesn’t sell books, it provides an excellent platform for developers and data enthusiasts to practice their web scraping skills. The site is structured to resemble a typical e-commerce bookstore, making it an ideal tool for learning and experimentation.
This site is designed to mimic a real online bookstore, showcasing a wide array of fictional books and their details. Here’s a closer look at what makes Book.toscrape a must-visit for book lovers.
Take a closer look at this warning from the origin site.

If you’re learning about web scraping, this site offers a safe and legal environment to practice your skills without risking any violations. You can experiment with different scraping tools and techniques.
Key Features of BookToScrape site.
- Detailed Book Information:
Each book entry includes essential details e.g., the book title, genre, description, price with/without tax, tax, availability, user ratings and number of reviews. This information is valuable for anyone interested in analyzing book trends or preferences.
- User-Friendly Interface:
The layout is straightforward and intuitive, making it easy for users to navigate through different sections. Whether you’re searching for a specific title or browsing by category, the design enhances the user experience.
Create a Virtual Environment.
When embarking on a web scraping project, one of the best practices is to create a virtual environment. This approach not only enhances your development process but also helps manage dependencies effectively. Read my blog about virtual environments for more.
Creating a virtual environment for your web scraping project is a best practice that offers numerous benefits, including effective dependency management, conflict avoidance, reproducibility, and enhanced security. By adopting this approach, you can streamline your development process and ensure that your projects remain organized and efficient. Whether you’re a novice or an experienced developer, leveraging virtual environments will ultimately lead to a smoother and more productive web scraping experience.
Now, let me show you a step-by-step Guide to Creating a Virtual Environment in Python Step 1: Install Python Ensure that you have Python installed on your system. You can download it from the official Python website. To check if Python is installed, open your terminal or command prompt and run:
python --versionStep 2: Install venv Module. The venv module is included with Python 3.3 and later. If you’re using an older version of Python, consider upgrading. To check if venv is available, you can run:
python -m venv - helpIf you see help information, you’re good to go! Step 3: Create a Virtual Environment. Open your terminal or command prompt. Navigate to your project directory where you want to create the virtual environment. You can use the cd command to change directories. For example:
cd path/to/your/projectCreate the virtual environment by running the following command:
python -m venv envHere, env is the name of the virtual environment. You can choose any name you prefer.
Step 4: Activate the Virtual Environment To start using the virtual environment, you need to activate it. The activation command varies depending on your operating system.
.\env\Scripts\activateOn macOS and Linux:
source env/bin/activateOnce activated, you should see the name of your virtual environment in parentheses at the beginning of your terminal prompt, indicating that the environment is active.
Step 5: Install Packages Now that your virtual environment is active, you can install packages using pip. For example, to install requests, run:
pip install scrapyOne downside for this method, is you have to install every package one-by-one.
A more professional solution is using a requirements.txt file, you can easily replicate the exact environment on another machine. This is crucial for collaboration or deployment, ensuring that everyone is working with the same setup.
Plan Your Scraping Strategy.
After activating the virtual environment, you can use the command below to create a new Scrapy project.
scrapy startproject <projectname>This command is essential for anyone looking to build web scrapers using the Scrapy framework, which is a powerful and flexible tool for web scraping in Python. Here’s a detailed look at what this command does and how to use it effectively.
It automates the creation of the necessary project structure and files, allowing you to focus on writing your scraping logic. By understanding this command and the generated structure, you can efficiently build and manage your web scraping projects. Happy scraping!
When you execute the scrapy startproject projectname command, Scrapy creates a new directory structure that looks like this:
projectname/
    scrapy.cfg            # Project configuration file
    projectname/          # Python package for your project
        __init__.py
        items.py          # Define the data structure (items) to scrape
        middlewares.py     # Custom middlewares for processing requests/responses
        pipelines.py       # Data processing pipelines
        settings.py        # Settings for your Scrapy project
        spiders/           # Directory for your spiders
            __pycache__/
            __init__.py
Scrapy Shell.
Scrapy Shell is an interactive command-line interface provided by the Scrapy framework that allows developers to test and debug their scraping code in real-time. It serves as a powerful tool for experimenting with Scrapy’s features, inspecting web pages, and quickly prototyping spiders without the need to create a full Scrapy project initially. Key Features of Scrapy Shell
- Interactive Environment: The shell provides an interactive Python environment where you can execute Scrapy commands and Python code on-the-fly. This is particularly useful for testing specific scraping logic or commands.
- Immediate Feedback: You can send requests to a URL and immediately see the response, allowing you to inspect the HTML content and test your parsing logic without running a complete spider.
- Access to Scrapy Objects: Inside the Scrapy Shell, you have access to various Scrapy objects and methods, including Response, Selector, and others, which facilitate the extraction of data from web pages.
- Easy Testing of Selectors: You can use XPath and CSS selectors directly in the shell to test and refine your data extraction logic. This helps ensure that your selectors work correctly before implementing them in your spider.
After activating the Scrapy environment is activated. You can open the Scrapy Shell by running the following command in your terminal:
scrapy shell

# You can also directly pass a URL to the shell:
scrapy shell 'http://example.com'
Or you can use the fetch command in Scrapy Shell, which is a powerful tool that allows users to send a request to a specified URL and retrieve the response within the interactive shell environment. This command is particularly useful for testing and debugging web scraping logic, as it enables quick access to the content of a web page without needing to create a complete spider.
We can use the scrapy shell to experiment with different selectors and extraction methods, making adjustments as needed until you get the desired output. It allows for quick testing and debugging of scraping logic, making it easier to develop effective spiders. By leveraging the interactive nature of the shell, you can refine your data extraction techniques and ensure your scraping code works as intended before implementing it in a full project.
fetch('http://books.toscrape.com/')If you opened the shell with a URL, Scrapy automatically sends a request to that URL. You can then inspect the response using the response object.
In Scrapy, the Response object is a fundamental component that represents the HTTP response returned by a web server after a request has been made. It encapsulates all the information about the server’s response, including the content of the page, headers, status codes, and more. Understanding the Response object is crucial for effectively scraping data from web pages.
After executing the fetch command, you can access various attributes of the response object to examine the output. Here are some key attributes you might check:
**response.text**: Returns the response body as a Unicode string.**response.body**: Returns the raw response body as bytes.**response.status**: Returns the HTTP status code of the response.**response.headers**: Returns the headers of the response as a dictionary-like object.**response.url**: Returns the URL of the response.**response.meta**: A dictionary for storing custom metadata.**response.css()**: Allows you to extract data using CSS selectors.**response.xpath()**: Allows you to extract data using XPath expressions.
To extract data, you can use XPath or CSS selectors.
titles = response.css('h2 a::text').getall() # Using CSS selector
titles = response.xpath('//h2/a/text()').getall() # Using XPath
You can easily check the response status using the response.status attribute. The status code provides crucial information about the outcome of the HTTP request, indicating whether it was successful or if there were any errors.
response.status- 200 OK: This indicates that the request was successful, and the server returned the requested resource.
- 404 Not Found: This means the requested resource could not be found on the server.
- 500 Internal Server Error: This indicates that there was an error on the server while processing the request.
- Other Status Codes: Various other status codes indicate different responses, such as redirects (3xx), client errors (4xx), and server errors (5xx).
Creating a New Spider in Scrapy.
To create a new spider in Scrapy, you’ll need to create a Python file inside the spiders folder of your Scrapy project.
- Make sure you are in the root directory of your Scrapy project. This is the directory that contains the scrapy.cfg file.
- Inside your project directory, you should see a folder named spiders. This is where all your spider files will reside.
- Create a new Python file for your spider. You can name it according to the function of the spider or the website you are scraping. I.e., if you’re scraping a book website, you might name it books_spider.py. You can create this file using a text editor or via the command line.
cd projectname/spiders
touch books_spider.py  # On macOS/Linux
# or
echo. > books_spider.py  # On Windows
Open the newly created books_spider.py file in your preferred text editor and define your spider. Here’s a basic example of what your books_spider.py file might look like:
import scrapy

class BooksSpider(scrapy.Spider):
    name = "bookspider"
    allowed_domains = ["books.toscrape.com"]
    start_urls = ["https://books.toscrape.com/"]
      def parse(self, response):
          pass
Explanation of the Spider Code
**Imports**: To import the scrapy module.**Spider Class**: The spider is defined as a class that inherits from scrapy.Spider.**Name**: The name attribute is a unique identifier for the spider.**Start URLs**: The start_urls attribute contains a list of URLs where the spider will begin scraping.**Parse Method**: The parse method processes the response. It extracts book titles using CSS selectors and yields them as items. It also follows pagination links to scrape additional pages.**allowed_domins**:This attribute is used to restrict the spider to only crawl and scrape pages from specified domains.
The Parse Method.
Now let’s modify the parse method to start scraping the data.
def parse(self, response):
        books = response.xpath("//article[contains(@class, 'product_pod')]")
        for book in books:
            relative_url = book.xpath(".//h3/a/@href").get()
            if relative_url:
                if "catalogue/" in relative_url:
                    yield response.follow("https://books.toscrape.com/" + relative_url, callback=self.parse_book_page)
                else:
                    yield response.follow("https://books.toscrape.com/catalogue/" + relative_url, callback=self.parse_book_page)

        next_page = response.css("li.next a::attr(href)").get()
        if next_page:
            if "catalogue/" in next_page:
                yield response.follow("https://books.toscrape.com/" + next_page, callback=self.parse)
            else:
                yield response.follow("https://books.toscrape.com/catalogue/" + next_page, callback=self.parse)
The parse method is responsible for:
- Extracting Book Information: It identifies all books on the current page and constructs URLs to their detail pages. Following Links: It yields requests to follow those URLs, allowing the spider to scrape detailed information about each book. Handling Pagination: It checks for a link to the next page of books and yields a request to continue scraping until there are no more pages left.
- This method effectively manages both the extraction of data and the navigation through multiple pages, making it a core part of the web scraping process in the spider.
The parse method in the provided code snippet is a crucial part of a Scrapy spider designed to scrape book information from the “Books to Scrape” website. This method processes the HTTP response received from the server, extracts relevant data, and manages pagination to continue scraping additional pages.
Let’s break down the method step by step.
def parse(self, response):Function Definition: This line defines the parse method, which takes response as an argument. The response object contains the HTML content of the page that the spider has fetched.
books = response.xpath("//article[contains(@class, 'product_pod')]")XPath Selector: This line uses an XPath expression to select all <article> elements that contain the class product_pod. Each of these elements represents a book on the page. The result is stored in the books variable.
for book in books:
    relative_url = book.xpath(".//h3/a/@href").get()
Iterating Over Books: The method iterates over each book element found in the previous step.
Extracting Relative URL: For each book, this line extracts the relative URL of the book’s detail page using an XPath expression. The @href attribute of the <a> tag within the <h3> element is retrieved. The get() method returns the first matching result, or None if no match is found.
if relative_url:
                if "catalogue/" in relative_url:
                    yield response.follow("https://books.toscrape.com/" + relative_url, callback=self.parse_book_page)
                else:
                    yield response.follow("https://books.toscrape.com/catalogue/" + relative_url, callback=self.parse_book_page)
Checking for Valid URL: This conditional checks if a valid relative_url was found.
Constructing Full URL: Depending on whether the relative_url already includes “catalogue/”, the method constructs the full URL to the book’s detail page.
If it does, it directly appends the relative_url to the base URL. If it does not, it prepends “catalogue/” to ensure the URL is correct.
Yielding a Request: The response.follow() method is used to create a new request to the constructed URL, specifying self.parse_book_page as the callback function. This means that once the new page is fetched, the parse_book_page method will be called to handle the response.
Handling Pagination.
next_page = response.css("li.next a::attr(href)").get()Finding the Next Page: This line uses a CSS selector to find the link to the next page of books. It looks for an anchor tag (<a>) within a list item (<li>) that has the class next. The @href attribute is retrieved.
if next_page:
            if "catalogue/" in next_page:
                yield response.follow("https://books.toscrape.com/" + next_page, callback=self.parse)
            else:
                yield response.follow("https://books.toscrape.com/catalogue/" + next_page, callback=self.parse)
Checking for Next Page: This conditional checks if a valid next_page link was found.
Constructing Full Next Page URL: Similar to the book detail page logic, the method constructs the full URL for the next page based on whether “catalogue/” is present in the next_page URL. Yielding a Request: Again, response.follow() is used to create a request to the next page, with self.parse as the callback function. This means that when the next page is fetched, the parse method will be called again to process the new response.
Items.py.
Before proceeding to the next parsing method, let’s address the items.py file and its contents.
In Scrapy, the items.py file is used to define the data structures that represent the items you want to scrape from a website. Items are essentially Python classes that define the fields you wish to extract and store from the scraped data. This file plays a crucial role in organizing and structuring the data collected by your spider, making it easier to manage and manipulate.
import scrapy

class BookscraperItem(scrapy.Item):
    # define the fields for your item here like:
    name = scrapy.Field()

class BookItem(scrapy.Item):

    url= scrapy.Field()
    title= scrapy.Field()
    Book_Category= scrapy.Field()
    Star_Rating = scrapy.Field()
    Book_Description= scrapy.Field()
    upc= scrapy.Field()
    Product_Type = scrapy.Field()
    Price_excl_tax= scrapy.Field()
    Price_incl_tax= scrapy.Field()
    tax= scrapy.Field()
    Availability= scrapy.Field()
    num_reviews= scrapy.Field()

    Image_URL= scrapy.Field()
Let’s break down the provided items.py code, which defines 2 item classes for a Scrapy project focused on scraping book information.
- Importing Scrapy: This line imports the Scrapy framework, which is necessary for defining items and using its functionalities.
- class BookscraperItem(scrapy.Item): This class is named BookscraperItem and inherits from scrapy.Item. It is a simple item class that currently defines only one field: This class also inherits from scrapy.Item. It is designed to represent a more detailed structure for a book, with multiple fields defined to capture various attributes of the book. Here’s a breakdown of each field:
**name**: This field is defined using scrapy.Field(), which will store the name of the book or item. The comment suggests that more fields could be added here as needed.**url**: This field will store the URL of the book’s detail page.- title: This field will hold the title of the book.
**Book_Category**: This field is intended to capture the category or genre of the book.**Star_Rating**: This field will store the star rating of the book, which may be represented as a string or a numerical value.**Book_Description**: This field will contain a description of the book, providing more context about its content.**upc**: This field is for the Universal Product Code (UPC) of the book, which is a unique identifier for products.**Product_Type**: This field will indicate the type of product, such as “book” or “ebook.”**Price_excl_tax**: This field will store the price of the book excluding any taxes.**Price_incl_tax**: This field will capture the price of the book including taxes.**tax**: This field will store the amount of tax applied to the book’s price.- Availability: This field will indicate whether the book is in stock or out of stock.
**num_reviews**: This field will hold the number of reviews the book has received.
Purpose of Each Item Class
**Data Structure**: Both classes serve as structured data containers for the information you want to scrape. The BookscraperItem class is simpler and may be used for basic scraping tasks, while the BookItem class is more detailed and suitable for capturing comprehensive information about books.**Consistency**: By defining fields in these classes, you ensure that all instances of these items will have a consistent structure, which is crucial for data processing later in your pipelines.**Ease of Use**: When you create an instance of BookItem (or BookscraperItem) in your spider, you can easily assign values to these fields after scraping the corresponding data from the web page. This makes the code cleaner and more manageable.
Parsing Each Book Page.
Now, let’s move to the crucial step in a our sscraping project, especially when you want to gather detailed information about individual books. This process typically involves navigating from a list of books to their respective detail pages, extracting specific data fields, and storing that information for further analysis or storage.
Scraping each book page involves navigating from a main listing page to individual book detail pages, extracting specific data points, and yielding structured items for further processing. By following this approach, you can effectively gather comprehensive information about each book, allowing for detailed analysis or storage in a database. This method is fundamental in web scraping projects, enabling you to collect rich datasets from websites.
    def parse_book_page(self, response):

        book_item = BookItem()
        table_rows = response.xpath("//table[contains(@class, 'table table-striped')]/tr")

        book_item["url"] = response.url
        book_item["title"] = response.xpath("//div[contains(@class, 'product_main')]/h1/text()").get()
        book_item["Book_Category"] = response.xpath("//ul[contains(@class, 'breadcrumb')]/ li[3]/a/text()").get()

        book_item["Star_Rating"] = self.extract_rating_number(response.xpath("//p[contains(@class, 'star-rating')]/@class").get())
        book_item["Book_Description"] = response.xpath("//div[@id='product_description']/following-sibling::p[1]/text()").get()

        book_item['upc']= table_rows[0].xpath("//td/text()").get()
        book_item["Product_Type"] = table_rows[1].xpath("//td/text()").get()
        book_item["Price_excl_tax"] = table_rows[2].xpath("//td/text()").get()
        book_item["Price_incl_tax"] = table_rows[3].xpath("//td/text()").get()
        book_item["tax"] = table_rows[4].xpath("//td/text()").get()
        book_item["Availability"] = self._extract_availability_number(table_rows[5].xpath("//td/text()").get())
        book_item["num_reviews"] = table_rows[6].xpath("//td/text()").get()

        book_item["Image_URL"] = response.xpath("//div[contains(@class, 'item')]/img/@src").get()

        yield book_item
and Using CSS locators.
def parse_book_page(self, response):

        book_item = BookItem()
        table_rows = response.css("table.table.table-striped tr")

        book_item["url"] = response.url
        book_item["title"] = response.css("div.product_main h1::text").get()
        book_item["Book_Category"] = response.css("ul.breadcrumb li:nth-last-child(2) a::text").get()
        book_item["Star_Rating"] = self.extract_rating_number(response.css("p.star-rating::attr(class)").get())
        book_item["Book_Description"] = response.css("div#product_description + p::text").get()

        book_item['upc']= table_rows[0].css("td::text").get()
        book_item["Product_Type"] = table_rows[1].css("td::text").get()
        book_item["Price_excl_tax"] = table_rows[2].css("td::text").get()
        book_item["Price_incl_tax"] = table_rows[3].css("td::text").get()
        book_item["tax"] = table_rows[4].css("td::text").get()
        book_item["Availability"] = self.extract_availability_number(table_rows[5].css("td::text").get())
        book_item["num_reviews"] = table_rows[6].css("td::text").get()

        book_item["Image_URL"] = response.css("div.item img::attr(src)").get()

        yield book_item
The **parse_book_page** method is responsible for:
- Creating a Structured Item: It initializes a BookItem instance to hold the scraped data.
- Extracting Information: It uses XPath expressions to extract various details about the book, including its title, category, rating, description, and various pricing details.
- Processing Data: Helper methods are used to process specific fields, ensuring that the data is in a usable format.
- Yielding the Result: Finally, it yields the populated item for further processing in the Scrapy pipeline.
This method effectively gathers detailed information about each book, allowing for comprehensive data collection in your web scraping project.
Let’s break down the **parse_book_page** method step by step. This method is designed to scrape detailed information about a book from its individual detail page using Scrapy.
def parse_book_page(self, response):Method Definition: This line defines the parse_book_page method, which takes response as an argument. The response object contains the HTML content of the book detail page that the spider has fetched.
Creating an Item Instance.
book_item = BookItem()Creating an Item Instance: An instance of BookItem is created to store the data extracted from the book’s detail page. This item will hold all relevant information about the book.
Extracting Data from the Response Extracting Basic Information
**URL: **This line stores the current URL of the book detail page in the url field of the book_item.
book_item["url"] = response.url**Title**: This line uses an XPath expression to extract the book’s title from the <h1> tag within the product_main div. The get() method retrieves the first matching result.
book_item["title"] = response.xpath("//div[contains(@class, 'product_main')]/h1/text()").get()**Book Category:**This extracts the book category from the breadcrumb navigation, specifically targeting the third list item.
book_item["Book_Category"] = response.xpath("//ul[contains(@class, 'breadcrumb')]/ li[3]/a/text()").get()**Star Rating:**This line calls a helper method extract_rating_number, passing the class attribute of the star rating element. This method likely processes the class string to return a numerical rating.
book_item["Star_Rating"] = self.extract_rating_number(response.xpath("//p[contains(@class, 'star-rating')]/@class").get())**Book Description:**This extracts the book description by selecting the first paragraph following the product_description div.
book_item["Book_Description"] = response.xpath("//div[@id='product_description']/following-sibling::p[1]/text()").get()**Extracting Table Rows:** This line selects all rows (<tr>) from the table that contains product details. The rows are stored in the table_rows variable for further processing.
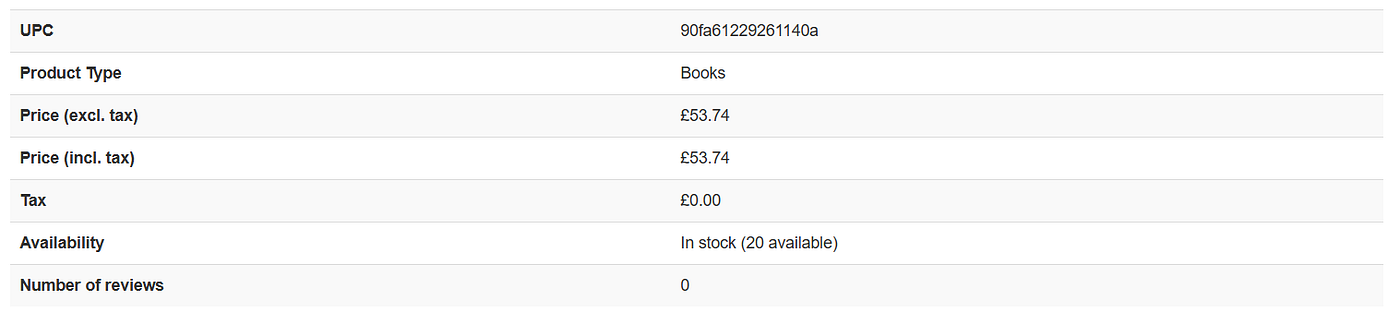
table_rows = response.xpath("//table[contains(@class, 'table table-striped')]/tr")**UPC**: This line attempts to extract the UPC (Universal Product Code) from the first row of the table.
book_item['upc'] = table_rows[0].xpath(".//td/text()").get()**Product Type:** This extracts the product type from the second row of the table, similar to the UPC extraction.
book_item["Product_Type"] = table_rows[1].xpath("//td/text()").get()**Price Excluding Tax**: This retrieves the price excluding tax from the third row.
book_item["Price_excl_tax"] = table_rows[2].xpath("//td/text()").get()**Price Including Tax**: This line extracts the price including tax from the fourth row.
book_item["Price_incl_tax"] = table_rows[3].xpath("//td/text()").get()**Tax**: This retrieves the tax amount from the fifth row.
book_item["tax"] = table_rows[4].xpath("//td/text()").get()**Availability**: To extract the number of available book, we’ll address the_extract_availability_numbermethod in the next section.
book_item["Availability"] = self._extract_availability_number(table_rows[5].xpath("//td/text()").get())**Number of Reviews**: This extracts the number of reviews from the seventh row.
book_item["num_reviews"] = table_rows[6].xpath("//td/text()").get()**Image URL**: This line extracts the URL of the book’s image from the src attribute of the <img> tag within a div that contains the class item.
book_item["Image_URL"] = response.xpath("//div[contains(@class, 'item')]/img/@src").get()Yielding the Item: This statement sends the populated book_item to the Scrapy pipeline for further processing, such as storage or additional validation.
yield book_itemData Pipeline.
In summary, writing code in the pipelines.py file to extract clean data is a foundational aspect of any web scraping project. It significantly enhances data quality, usability, and maintainability while supporting efficient processing and informed decision-making. By investing time and effort into developing a robust data cleaning process within your Scrapy pipeline, you ensure that the data collected is not only accurate and reliable but also valuable for analysis and strategic planning. This ultimately contributes to the success of the project and the organization as a whole.
# useful for handling different item types with a single interface
from itemadapter import ItemAdapter

class BookscraperPipeline:
    def process_item(self, item, spider):

        adapter= ItemAdapter(item)

        lowercases=["Book_Category", "Product_Type"]
        for case in lowercases:
            value= adapter.get(case)
            adapter[case]= value.lower()

        prices= ["Price_excl_tax", "Price_incl_tax", "tax"]
        for num in prices:
            value= adapter.get(num)
            value= value.replace('£', "")
            adapter[num]= float(value)

        return item
The provided code snippet defines a Scrapy pipeline class named BookscraperPipeline. This pipeline is responsible for processing items scraped from a website, specifically focusing on cleaning and standardizing certain fields. Let's break down the code step by step.
from itemadapter import ItemAdapterImporting ItemAdapter: The ItemAdapter class from the itemadapter module is imported. This class provides a unified interface for accessing and manipulating item data, allowing you to work with different item types in a consistent manner.
Process Item Method.
def process_item(self, item, spider):This method, process_item, is called for each item that is yielded by the spider. It takes 2 parameters:-
- The item being processed (an instance of your Scrapy item). spider:
- The spider that generated the item (not used in this method but can be useful for context).
Using ItemAdapter.
adapter = ItemAdapter(item)Creating an Adapter: An ItemAdapter instance is created using the item passed to the method. This adapter allows for easy access to the item’s fields using a consistent interface, regardless of the underlying data structure.
        lowercases=["Book_Category", "Product_Type"]
        for case in lowercases:
            value= adapter.get(case)
            adapter[case]= value.lower()
Lowercase Conversion: This block of code processes specific fields (Book_Category and Product_Type) to convert their values to lowercase.
A list named lowercases contains the names of the fields to be processed. The loop iterates over each field name (case), retrieves its value using adapter.get(case), converts it to lowercase, and then updates the item with the new value using adapter[case] = value.lower().
        prices= ["Price_excl_tax", "Price_incl_tax", "tax"]
        for num in prices:
            value= adapter.get(num)
            value= value.replace('£', "")
            adapter[num]= float(value)
Price Cleaning: This block processes specific fields related to pricing
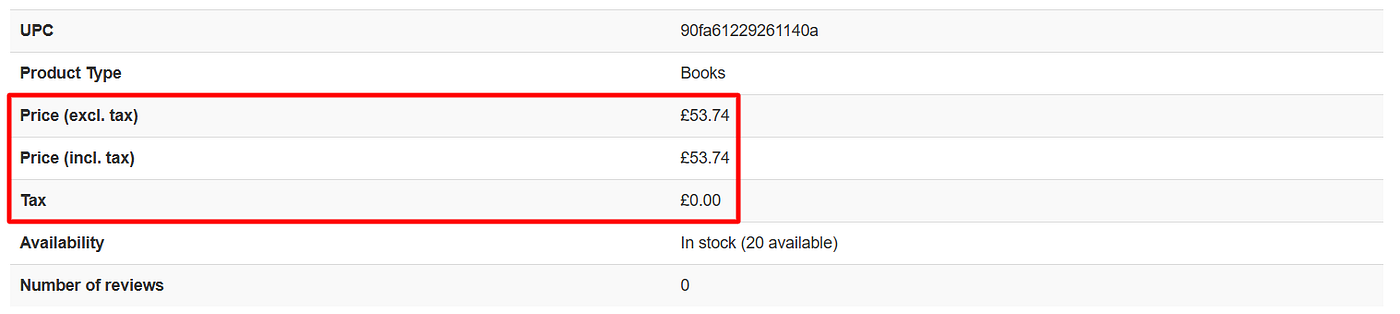
A list named prices contains the names of these fields. The loop iterates over each field name (num), retrieves its value, removes the currency symbol (in this case, ‘£’) using value.replace(‘£’, “”), and converts the cleaned string to a float. The updated value is then stored back in the item using adapter[num] = float(value).
The Helper methods.
Here are some example functions that you can use to extract and clean data from the “Books to Scrape” site. These functions can be integrated into your Scrapy spider.
If you examine the availability row, which displays the number of books available in the store, you may notice it includes numbers within strings. However, we only need the numeric values for storage.
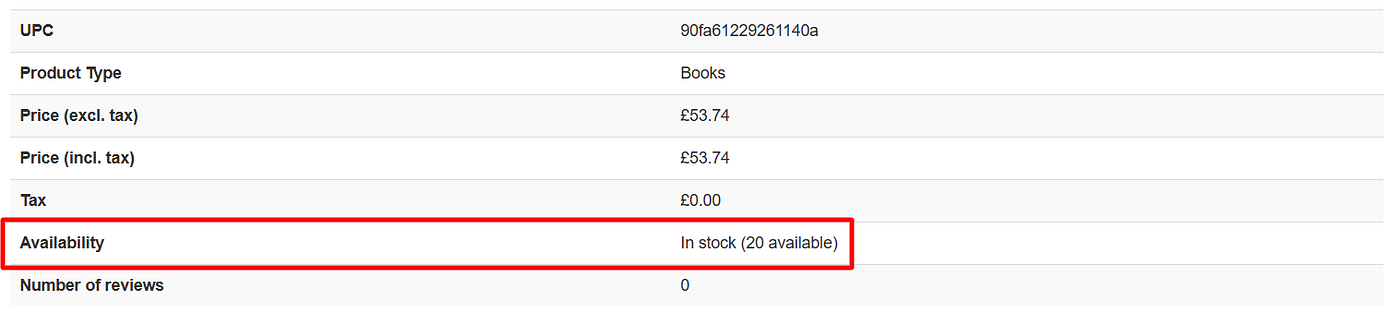
So, we’ll create a function to extract the numbers in this cell.
def extract_availability_number(self, availability_text):
        """Extract numeric value from availability text."""
        if not availability_text:
            return np.nan

        match = re.search(r'\d+', availability_text)
        if match:
            return int(match.group())
        return np.nan
The extract_availability_number function you provided is designed to extract a numeric value from a string that describes the availability of a book. Let's break down the code and explain its components and functionality.
It handles cases where the input might be empty or where no numeric value is present, ensuring that the function returns a consistent output (either an integer or np.nan). This approach is useful in data processing tasks where you need to handle various formats and ensure clean, usable data.
Rating Number.
As mentioned earlier, the Star_Rating includes the number of reviews. But for better eye view, it’s displayed as stars.
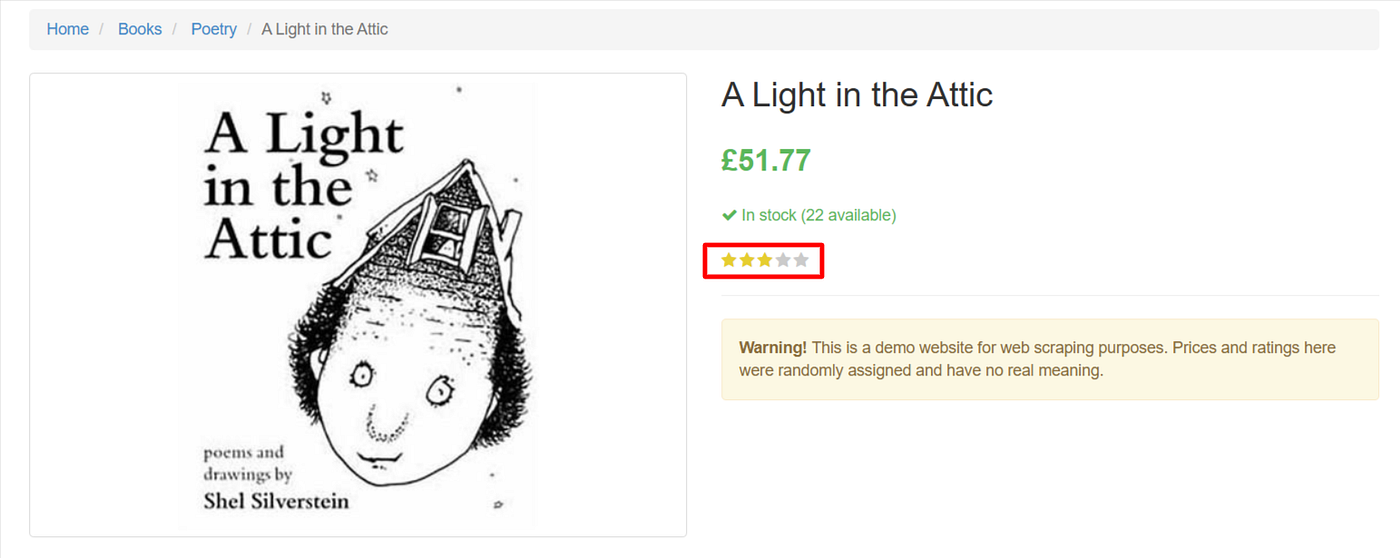
If we inspect the html, we’ll get the star rate as below:
<P>class="star-rating Three" </p>So, we extracted the class attribute in the **parse_book_page method.
Now, we’ve to only extract number of stars and ignore the rest of the string. **So, we created a method to extract this number and map this into a numerical value.
    def extract_rating_number(self, class_attrbuite):
        """Extract numeric rating from star-rating class attribute."""
        if not class_attrbuite:
            return np.nan

        rating_map = {'Zero':0, 'One': 1, 'Two': 2, 'Three': 3, 'Four': 4, 'Five': 5}

        class_attrbuite= class_attrbuite.split()
        for text, num in rating_map.items():
            if text in class_attrbuite:
                return num
        return np.nan
The extract_rating_number function is designed to extract a numeric rating from a string that represents the class attribute of a star rating element. This is commonly used in web scraping to convert visual representations of ratings (like stars) into numerical values that can be easily analyzed. Let’s break down the code step by step.
Configure CSV export.
To configure CSV export in a Scrapy project and save the results as a CSV file, you can follow these steps. Scrapy provides built-in support for exporting scraped data in various formats, including CSV. Below is a step-by-step guide on how to achieve this.
You can specify the output format and file name directly in your Scrapy settings or when running the spider. Here’s how to do it through the settings file.
Open your settings.py file in your Scrapy project and add or modify the following lines:
# Enable the Feed Export
FEEDS = {
    'output/books.csv': {
        'format': 'csv',
        'overwrite': True,  # Overwrite the file if it already exists
        'encoding': 'utf-8',  # Specify encoding if needed
    },
}
Running Your Spider
Once you have created and saved your spider, you can run it using the following command from the root directory of your Scrapy project:
scrapy crawl <spidername>메타데이터
- post_id
- f0dc4e99be8a
- slug
- web-scraping-using-scrapy-part6-books-toscrape-site-f0dc4e99be8a
- url
- https://medium.com/@Mustafa77/web-scraping-using-scrapy-part6-books-toscrape-site-f0dc4e99be8a
- canonical_url
- https://medium.com/@Mustafa77/web-scraping-using-scrapy-part6-books-toscrape-site-f0dc4e99be8a
- author_url
- https://medium.com/@Mustafa77
- status
- ok
- fetched_at
- 2026-07-13 22:18:33