Turn Your API into a Global Revenue Stream
As autonomous AI Agents and machine-to-machine (M2M) workflows reshape the internet, the way we monetize digital assets must adapt…
Turn Your API into a Global Revenue Stream
As autonomous AI Agents and machine-to-machine (M2M) workflows reshape the internet, the way we monetize digital assets must adapt. Traditional Web2 API monetization paths — gated by complex billing platforms, registration flows, and regional credit card restrictions — frequently block a massive pipeline of global programmatic traffic.
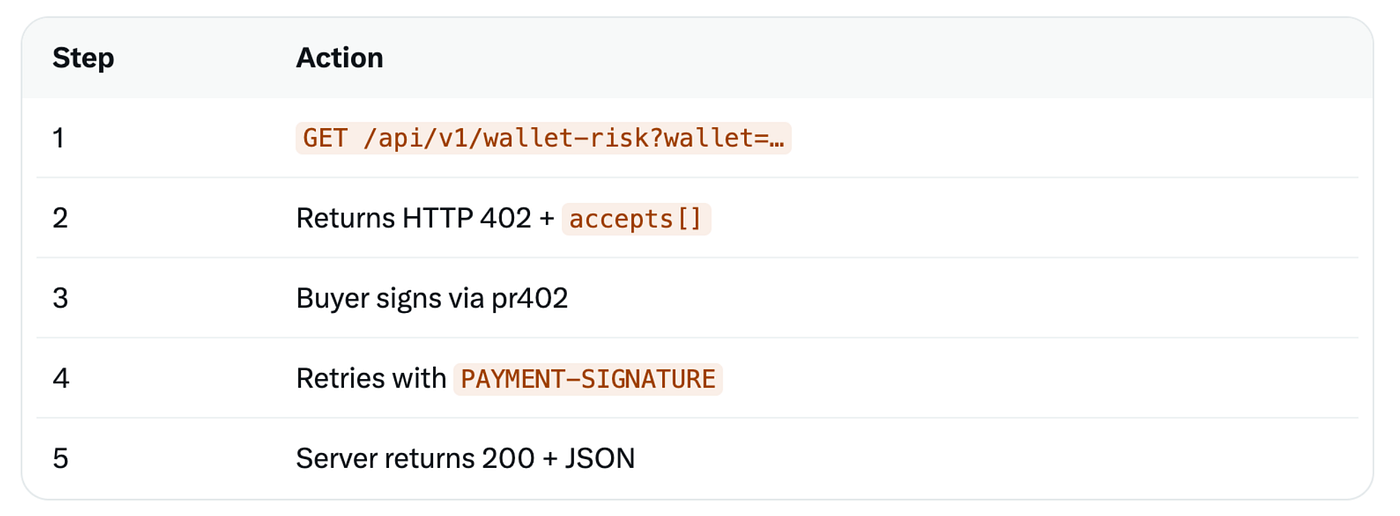
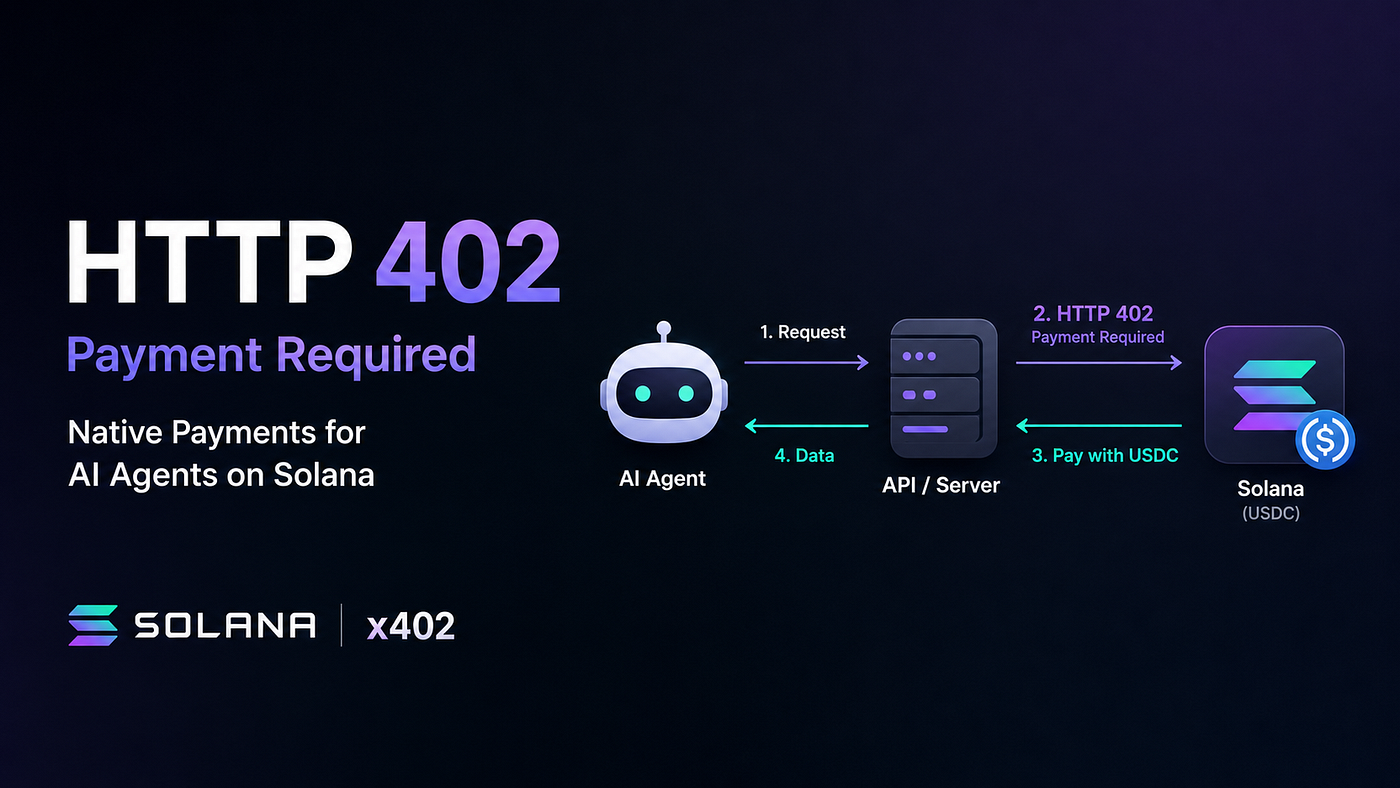
Enter x402: an open, internet-native payment standard reviving the native HTTP 402 Payment Required status code. By hooking an API (Express in this demo) into an x402-compliant middleware layer, you transform any backend routing into a frictionless, pay-per-request digital vending machine.
This technical guide walks you through setting up Miraland Labs’ open-source repository x402-seller-lab-express. You will see exactly how to wire your endpoints up to the pr402 Facilitator on the Solana blockchain to clear micro-payments automatically in USDC.
A. Prerequisites: Set Up Your Test Wallet
Before initializing the codebase, establish your developer runtime wallet and claim development network resources:
- Install Browser Wallet Extension: Add Phantom or Solflare to your desktop browser (do not utilize mobile applications).
- Switch Network Environment: Set your browser wallet network directly to Solana Devnet.
- Extract Public Key: Copy your wallet’s base public address.
- Acquire Devnet SOL: Head to
://solana.com, input your address, and request 1–2 Devnet SOL tokens to fund execution gas requirements. - Acquire Devnet USDC (Optional): Visit
://circle.com, select the Solana Devnet pipeline, and request test USDC stablecoins into your address.
B. Local Project Initialization and 402 Interception Testing
The sandbox is built on a TypeScript + Express architecture. To instantiate the runtime environment locally:
Clone the repository, enter the workspace, install dependencies, and build your configuration baseline:
cd x402-seller-lab-express
npm install
cp env.example .env
Open your newly generated .env configuration file and insert your designated test target address:
SELLER_WALLET=YOUR_DESKTOP_WALLET_DEVNET_ADDRESSNext, open two distinct terminal matrices to run cross-validation loops:
Terminal 1 (Spawn Local Monetization Server):
export $(grep -v '^#' .env | xargs)
npm run enrich
npm run dev
Note: Confirm your server initializes properly upon seeing the console message: listening on [http://localhost:3000.](http://localhost:3000.)
Terminal 2 (Execute Built-in 402 Handshake Validator):
cd x402-seller-lab-express
npm run verify-402 -- "http://localhost:3000/api/v1/weather?city=Atlanta"
If Terminal 2 returns PASS: 402 with enriched x402 v2 body, your API payment gateway layer is functional locally!
C. Public HTTPS Deployment
Because the settlement orchestrator preview.ipay.sh cannot execute handshake validations against a local localhost framework, you must project this application onto a publicly accessible cloud environment that handles HTTPS (such as Vercel, Cloudflare Workers, Railway, AWS, or your private production infrastructure).
Critical Sync Constraint: Your deployment bundle must include the compiled payment-body.devnet.json context payload generated in your previous step.
The Step-by-Step Deployment Pipeline:
-
Execute your standard deployment script to push the codebase live and capture your remote production HTTPS URL.
-
Open your local
.envconfiguration file and remap theRESOURCE_URLvariable to point directly to your remote edge route:
RESOURCE_URL=https://YOUR-DOMAIN/api/v1/weather?city=Atlanta- Run the context compiler block locally to re-bake the runtime structural meta-payload:
export $(grep -v '^#' .env | xargs)
npm run enrich-
Re-trigger your cloud deployment step to push the updated
payment-body.devnet.jsoncontext file live (e.g., if leveraging Vercel, runnpx vercel@latest --yes). -
Execute the validation script directly against your remote HTTPS routing destination to confirm global payment readiness:
npm run verify-402 -- "https://YOUR-DOMAIN/api/v1/weather?city=Atlanta"Once the console returns a PASS status on your HTTPS destination, your cloud routing is secure and operational.
D. Directory Listing and Gateway Activation
With your verified production address active, navigate to the unified settlement interface at preview.ipay.sh/#seller-lifecycle using your designated browser wallet. Complete the following lifecycle steps using the exact same wallet address throughout:
- (in page https://preview.ipay.sh) Step 3: Activate Vault: Connect your extension wallet -> Click Activate -> Approve the on-chain cryptographic signature prompt.
- Why is this essential? Initializing your merchant vault early structures your pr402 registry profile, locking your protocol operational fee down from 1.00% to 90 bps (0.90%).
2. Step 4: Register Shop: Locate the Website interface field, input your raw base web address string (e.g., https://YOUR-DOMAIN—do not add specific route suffixes like /api/...) -> Approve wallet signature.
3. Step 5: Add API: Navigate explicitly to preview.ipay.sh/resources -> Paste your complete RESOURCE_URL -> Check the list publicly parameters flag -> Approve wallet signature.
4. Step 6: Directory Verification: Allow roughly 60 seconds for global replication tracking. Check the public repository at preview.ipay.sh/#directory—your active pay-per-request endpoint will now be visible to global agent traffic.
E. Migration: Porting x402 into Your Production Commercial APIs
Once you have verified the sandbox implementation using the mock Weather API template, port the payment architecture into your team’s existing production endpoints using this step-by-step path:
1. Transfer Core Bridge Files
Copy the three foundational enforcement components directly from the lab repository into your existing TypeScript / Express engine architecture:
src/x402-bridge.tsscripts/enrich-402-body.mjsscripts/verify-402.mjs
2. Bind Lifecycle Automation Scripts
Open your existing production package.json file and append the following orchestration scripts to your "scripts" block:
json
{
  "scripts": {
    "enrich": "node scripts/enrich-402-body.mjs",
    "verify-402": "node scripts/verify-402.mjs"
  }
}
3. Declare Production Environment Variables
Inject the specific target keys into your live runtime configuration .env file:
SELLER_WALLET=YOUR_SOLANA_PRODUCTION_RECEIVING_ADDRESS
FACILITATOR_URL=https://ipay.sh
RESOURCE_URL=https://your-commercial-domain.com
PAYMENT_BODY_PATH=payment-body.devnet.json
PAYMENT_AMOUNT=50000
4. Intercept Endpoints via requireX402Payment
Import the bridge mechanism into your routing controller matrix and pass your existing business handler as a callback execution parameter:
import { requireX402Payment } from "./x402-bridge.js";

// Gating existing commercial code routes via the x402 native proxy watchdog
app.get("/api/v1/premium-endpoint", requireX402Payment(async (req, res) => {
    // Your pre-existing high-value business or database execution logic runs here safely
    res.json(await yourExistingHandler(req));
}));ty
Deploying your real API follows the identical release cycle: Run compile enrich script -> Deploy codebase along with the updated JSON manifest -> Verify live URL via verify-402 script -> Register properties via the ipay dashboard.
F. Mainnet & Production Pricing Strategy Notes
When transitioning your API profiles from Devnet testbeds to live Solana Mainnet processing real-world transactional currencies, maintain these system constraints:
- Minimum Target Pricing Recommendation: It is highly suggested to configure per-call access parameters to no less than $0.05 USDC per call.
- Protocol Fee Settlement Floors: The underlying pr402 processing system implements a flat network micro-clearance floor base rate of $0.01 USDC per transaction.
Notes: The $0.01 floor exists because the Facilitator must cover operational costs during initial go-live. It may decrease as the ecosystem matures; treat
GET …/capabilitiesas authoritative for current values.
- Pre-emptive Activation Mandatory Requirement: Ensure your merchant identity passes the Activate configuration loop prior to publishing endpoints. Skipping vault activation defaults your profile status to a Just-In-Time (JIT) tier, exposing your clearings to a higher 100 bps (1.00%) protocol fee rate.
Review the complete open-source wrapper codebase over at miraland-labs/x402-seller-lab-express to start capturing M2M stablecoin flows today.
메타데이터
- post_id
- f151da6a3fac
- slug
- turn-your-api-into-a-global-revenue-stream-f151da6a3fac
- url
- https://medium.com/@miraland.labs/turn-your-api-into-a-global-revenue-stream-f151da6a3fac
- canonical_url
- https://medium.com/@miraland.labs/turn-your-api-into-a-global-revenue-stream-f151da6a3fac
- author_url
- https://medium.com/@miraland.labs
- status
- ok
- fetched_at
- 2026-06-15 20:49:13