iOS Video Sharpening Looks Simple — Until It Starts Sharpening Noise
Sharpening is one of the easiest video enhancement features to demo and one of the easiest to overdo.
iOS Video Sharpening Looks Simple — Until It Starts Sharpening Noise
Sharpening is one of the easiest video enhancement features to demo and one of the easiest to overdo.
A slightly sharper frame looks impressive in a screenshot. But during playback, the same setting can turn compression blocks, film grain, and sensor noise into flickering artifacts. That is the real problem: sharpening does not recover missing detail; it increases contrast around existing edges.
On iOS, Core Image already provides sharpening filters that work with still and video images, including CISharpenLuminance and CIUnsharpMask. Core Image itself is designed for high-performance processing and analysis of still and video images. Apple describes CISharpenLuminance as increasing image detail by adjusting luminance, and its Swift API notes that sharpening luminance does not affect chroma data. That makes it a good default choice for video playback: it improves perceived detail while reducing the chance of strange color edges.
The senior engineering rule is simple: sharpen edges, not noise.
The Key Idea
Classic Unsharp Masking sounds backwards: blur the image, subtract the blurred version from the original, then add part of that difference back. But the idea is practical. Blurring removes high-frequency detail. The difference between the original and the blurred image roughly represents edge/detail information. Adding a controlled amount of that information back makes edges look crisper.
Apple’s CIUnsharpMask exposes this idea directly as a filter; its documentation describes the effect as increasing contrast at edges between pixels of different colors. CIGaussianBlur is also available as a built-in blur primitive if you need to build a custom pipeline.
But for iOS video playback, I would not start by hand-writing the full algorithm. I would start with a small sharpening policy that can be tuned, disabled, and measured.
Core Example: A Safe Sharpening Pass for SwiftUI Video Playback
Problem:
The app wants a “Sharper” playback mode.
A fixed aggressive sharpening value makes low-bitrate video look noisy and artificial.
Naive approach:
// Looks good on one test clip.
// Breaks easily on noisy or compressed video.
let sharpened = image.applyingFilter("CIUnsharpMask", parameters: [
    "inputRadius": 3.0,
    "inputIntensity": 1.2
])
Better approach: keep sharpening modest, apply it in the frame pipeline, and prefer luminance sharpening for a safer default.
import SwiftUI
import AVKit
import CoreImage
import CoreImage.CIFilterBuiltins
import Observation

enum SharpeningMode: Double {
    case off = 0.0
    case natural = 0.25
    case crisp = 0.45
}

@Observable
final class SharpenedPlayerModel {
    let player = AVPlayer()

    private let context = CIContext(options: [
        .cacheIntermediates: false
    ])

    func load(url: URL, mode: SharpeningMode) {
        let asset = AVURLAsset(url: url)
        let item = AVPlayerItem(asset: asset)

        if mode != .off {
            item.videoComposition = AVMutableVideoComposition(asset: asset) { [context] request in
                let source = request.sourceImage.clampedToExtent()

                let filter = CIFilter.sharpenLuminance()
                filter.inputImage = source
                filter.sharpness = Float(mode.rawValue)

                let output = (filter.outputImage ?? source)
                    .cropped(to: request.sourceImage.extent)

                request.finish(with: output, context: context)
            }
        }

        player.replaceCurrentItem(with: item)
    }
}

struct SharpenedVideoView: View {
    @State private var model = SharpenedPlayerModel()
    @State private var mode: SharpeningMode = .natural

    let url: URL

    var body: some View {
        VStack {
            VideoPlayer(player: model.player)

            Picker("Sharpness", selection: $mode) {
                Text("Off").tag(SharpeningMode.off)
                Text("Natural").tag(SharpeningMode.natural)
                Text("Crisp").tag(SharpeningMode.crisp)
            }
            .pickerStyle(.segmented)
            .padding()
        }
        .task {
            model.load(url: url, mode: mode)
            model.player.play()
        }
        .onChange(of: mode) { _, newMode in
            model.load(url: url, mode: newMode)
            model.player.play()
        }
    }
}
This example keeps SwiftUI out of pixel processing. The view owns the user choice. The model owns the playback item. The sharpening happens inside AVMutableVideoComposition, where each frame can be processed before rendering.
The important design detail is the enum. It prevents the UI from exposing arbitrary sharpness values too early. That matters because sharpening parameters are not normal user preferences like volume. They are visual trade-offs. A value that looks great on a clean 4K sample may look terrible on a low-bitrate stream.
Why This Works
This works because it treats sharpening as a controlled frame transformation instead of a cosmetic UI effect.
CISharpenLuminance is a good first pass because it targets luminance detail rather than pushing color channels directly. That reduces the chance of colored halos around edges. It is not magic, but it is a safer default than blindly increasing edge contrast everywhere.
The modest preset values also matter. In production video playback, the goal is usually not maximum sharpness. The goal is perceived clarity without artifacts. Once users notice halos, crawling noise, or shimmering edges, the enhancement has already failed.
There is also a performance boundary. Apple’s Core Image video guidance emphasizes building efficient Core Image pipelines for video effects and reducing memory footprint when using CIContext. Reusing a context and keeping the filter chain short is usually a better starting point than creating complex per-frame logic in the UI layer.
One Practical Trade-off
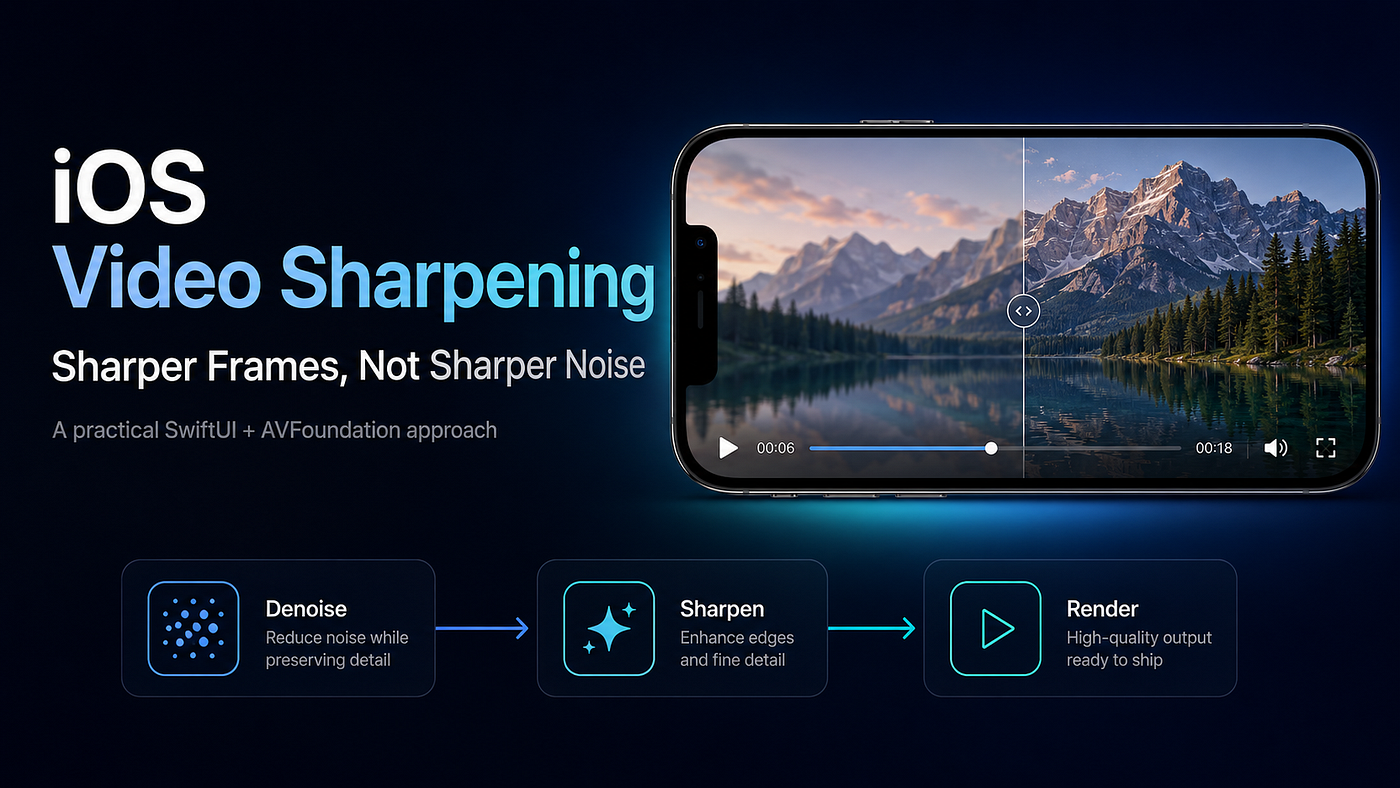
Sharpening should usually come after denoising, not before it.
If you sharpen first, noise becomes part of the “detail” you are enhancing. That is why a video can look sharper in a paused frame but worse during motion. A practical enhancement pipeline often looks like this:
Decode frame
-> light denoise
-> luminance sharpening
-> color / contrast adjustment
-> render
For high-quality sources, sharpening can be subtle. For noisy sources, the best sharpening setting may be “off” or “natural.” A good player should be allowed to do less.
Practical Rule
Use sharpening to improve perceived edge clarity, not to compensate for poor source quality.
If the source lacks detail, sharpening will not restore it. It will only make the absence of detail more obvious.
Key Takeaways
- Sharpening is edge contrast enhancement, not real detail recovery.
CISharpenLuminanceis a safer first choice for iOS video because it focuses on luminance detail.- Keep sharpening inside the frame pipeline, not inside SwiftUI view logic.
- Start with conservative presets instead of exposing unlimited sharpness sliders.
- Interview-friendly sentence: a good sharpening pipeline sharpens edges after reducing noise; a bad one sharpens everything and calls the artifacts “detail.”
메타데이터
- post_id
- f20bae82d384
- slug
- ios-video-sharpening-looks-simple-until-it-starts-sharpening-noise-f20bae82d384
- url
- https://medium.com/@foks.wang/ios-video-sharpening-looks-simple-until-it-starts-sharpening-noise-f20bae82d384
- canonical_url
- https://medium.com/@foks.wang/ios-video-sharpening-looks-simple-until-it-starts-sharpening-noise-f20bae82d384
- author_url
- https://medium.com/@foks.wang
- status
- ok
- fetched_at
- 2026-06-09 15:37:30