Rethinking Node Scaling in Amazon EKS with Karpenter | EKS Crash Course (Chapter 4)
Build a production-ready Karpenter deployment using Terraform, Helm, EC2NodeClasses, and NodePools while validating the complete node…
Rethinking Node Scaling in Amazon EKS with Karpenter | EKS Crash Course (Chapter 4)
Build a production-ready Karpenter deployment using Terraform, Helm, EC2NodeClasses, and NodePools while validating the complete node lifecycle.
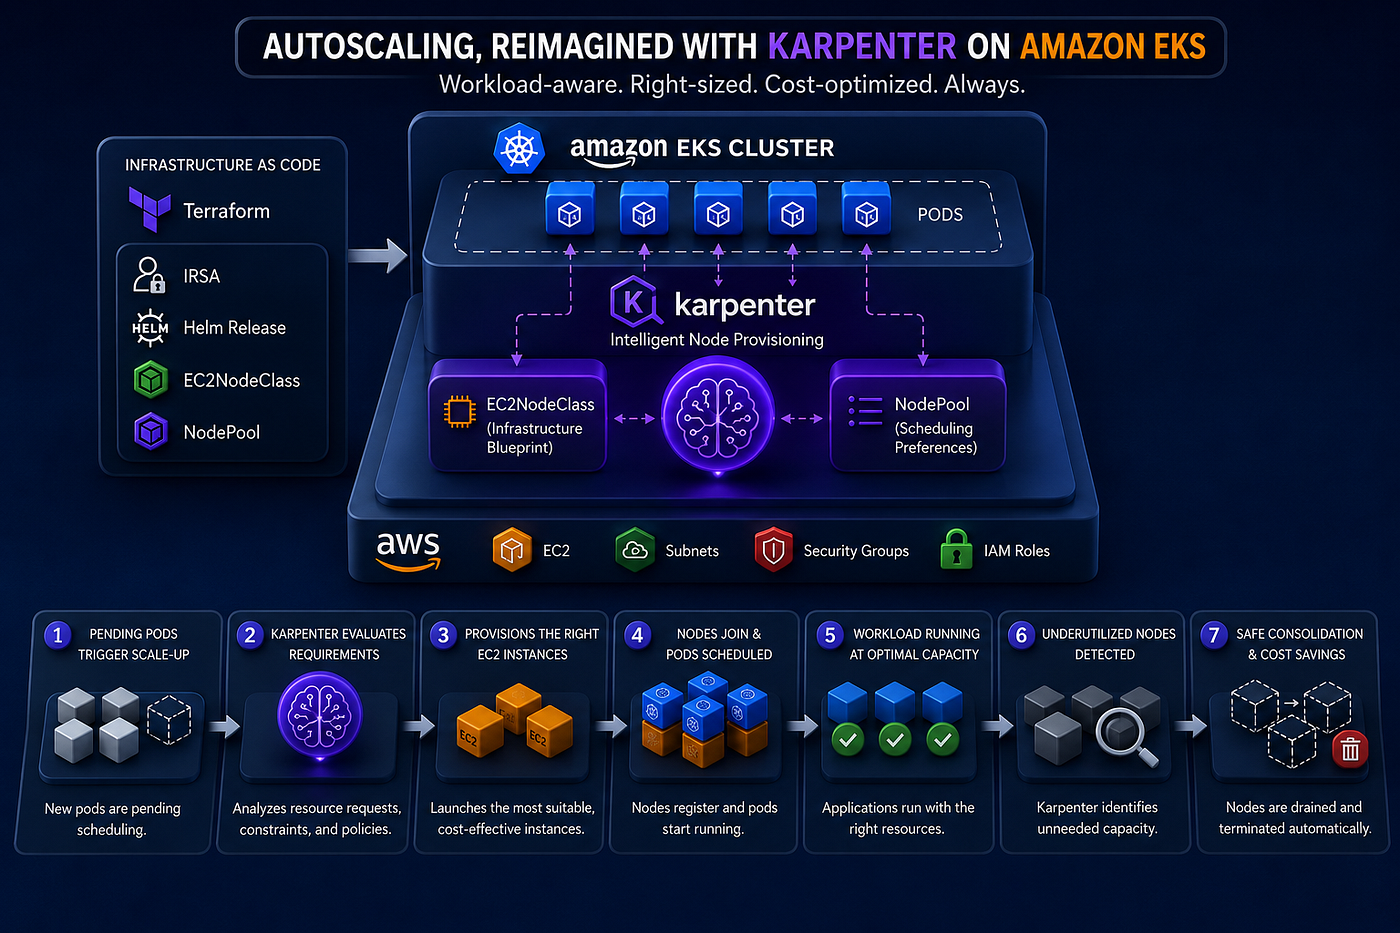
AI generated image
Series Navigation
Chapter 1 — Build an Amazon EKS Cluster with Terraform
Chapter 2 — Upgrade an Amazon EKS Cluster Using the AWS CLI
Chapter 3 — Upgrade an Amazon EKS Cluster Using Terraform
Chapter 4 — Rethinking Node Scaling in Amazon EKS with Karpenter (current)
TL;DR: Modern Kubernetes platforms shouldn’t rely on fixed-capacity node groups. In this chapter, you’ll integrate Karpenter into an existing Amazon EKS cluster, enabling workload-aware node provisioning, intelligent instance selection, and automatic infrastructure consolidation. Using Terraform, IRSA, Helm, EC2NodeClasses, and NodePools, you’ll build a production-ready autoscaling architecture and validate the complete node lifecycle — from pending pods triggering new EC2 instances to unused capacity being safely reclaimed. Rather than treating autoscaling as simply adding more nodes, this chapter demonstrates how Karpenter continuously optimizes cluster capacity, reduces infrastructure costs, and delivers the elasticity expected from enterprise-grade cloud-native platforms.
Introduction
In this chapter, we move beyond static node groups and adopt a workload-driven approach to infrastructure scaling using Karpenter. Rather than predefining compute capacity, Karpenter provisions and removes EC2 instances dynamically based on the scheduling requirements of Kubernetes workloads.
For consistency throughout this lab, the environment should start from the Terraform-managed Amazon EKS platform created in *Chapter 1 — Build an Amazon EKS Cluster with Terraform*. This chapter builds directly on that foundation by integrating Karpenter without replacing the existing managed node group, allowing both provisioning models to coexist while demonstrating Karpenter’s dynamic provisioning capabilities.
Unlike traditional node autoscaling, which adjusts the size of predefined node groups, Karpenter makes scheduling decisions directly from pending pods. It evaluates workload requirements, selects the most appropriate EC2 instance types, provisions capacity on demand, and continuously consolidates underutilized nodes to optimize infrastructure utilization.
The objective is not simply to install Karpenter, but to establish a production-ready capacity management model using Terraform, IRSA, Helm, EC2NodeClasses, and NodePools. By the end of this chapter, you will have validated the complete node lifecycle — from automatic capacity provisioning in response to application demand through intelligent workload consolidation and infrastructure reclamation when resources are no longer required.
Context and Scope
This chapter focuses on integrating Karpenter into an existing Terraform-managed Amazon EKS cluster to enable dynamic, workload-driven node provisioning. Rather than relying on predefined node groups for scaling, Karpenter provisions, consolidates, and removes compute capacity based on the real-time scheduling requirements of Kubernetes workloads.
Key objectives include:
- Understanding Karpenter’s architecture and how it differs from traditional node autoscaling approaches
- Configuring Karpenter using Terraform, IRSA, Helm, EC2NodeClasses, and NodePools
- Dynamically provisioning EC2 instances in response to unschedulable workloads
- Validating automatic node consolidation and infrastructure reclamation after workload removal
- Establishing a production-ready capacity management model aligned with enterprise Amazon EKS best practices
Prerequisites & Repository
⚠️ Critical Operational Notice: This walkthrough requires access to a configured cloud environment with authorization to provision infrastructure resources. Refer to
[prerequisites.md](https://github.com/jmpires/anthropomorphic/blob/main/docs/prerequisites.md) for baseline knowledge and setup requirements.
Warning: This process provisions real cloud infrastructure. Failure to deprovision unused resources will result in significant ongoing costs. Strictly follow the guidelines in
[operational-notes.md](https://github.com/jmpires/anthropomorphic/blob/main/docs/prerequisites.md) to prevent unintended charges.
The complete code for this chapter is available in the projects/crashCourseEKS/terraform/chapter4 directory of the **Anthropomorphic** GitHub repository.
Hands-On Walkthrough
⚠️ Critical Note
This chapter builds directly on the Terraform-managed Amazon EKS platform created in Chapter 1.
Rather than provisioning a new environment, we will extend the existing cluster configuration to introduce Karpenter and implement workload-driven node provisioning.
The examples in this chapter target Amazon EKS 1.31. While Karpenter supports multiple Kubernetes versions, it is recommended to deploy new environments using a currently supported Amazon EKS release. Before proceeding, ensure that your
terraform.tfvars—cluster_version = "1.31".
Before proceeding, ensure that the Step 4 — Access & Verification: Connecting to the Cluster from Chapter 1 were successfully completed.
Throughout this chapter, we will incrementally evolve the existing Terraform-managed EKS platform to integrate Karpenter and enable workload-driven node provisioning.
Hands-On Walkthrough
Project Structure
crashCourseEKS/
├── docs/                           # Architecture diagrams, implementation notes, and operational guidance.
└── terraform/
    └── chapter4
        ├── tools
        │   └── oneStep.sh          # Automates the end-to-end deployment, configuration, and validation of the EKS and Karpenter environment.
        ├── yaml
        │   ├── ec2nodeclass.yaml   # Defines the Karpenter EC2NodeClass for provisioning EC2 instances.
        │   ├── inflate.yaml        # Deploys a sample workload to trigger Karpenter node provisioning.
        │   └── nodepool.yaml       # Defines the Karpenter NodePool for dynamic node provisioning.
        └── terraform
            ├── backend.tf          # Remote Terraform state backend stored in S3 for centralized state management and collaboration.
            ├── eks.tf              # Defines the Amazon EKS cluster, managed node groups, and admin access configuration.
            ├── karpenter-irsa.tf
            ├── main.tf             # Defines required providers and AWS provider configuration.
            ├── output.tf           # Exposes key EKS and networking outputs for external use.
            ├── README.md           # Project overview, prerequisites, and quick start instructions.
            ├── terraform.tfvars    # Defines environment-specific variables for AWS, EKS, and VPC configuration.
            ├── variables.tf        # Declares and validates input variables for AWS, EKS, node groups, and VPC configuration.
└── vpc.tf # Creates the VPC, subnets, and networking required for the EKS cluster.- Step 1: Clone the repository
To get started quickly, clone the companion repository locally. This gives you the full reference implementation used throughout the chapter:
git clone git@github.com:jmpires/anthropomorphic.gitThe following sections progressively explain the architectural decisions, Terraform resources, and Kubernetes configurations introduced to integrate Karpenter into the existing EKS platform.
- Step 2: Configure IAM Roles for Service Accounts (IRSA)
IRSA is now the recommended authentication mechanism for workloads running on Amazon EKS because it allows individual pods — not entire worker nodes — to obtain AWS credentials with least-privilege IAM permissions.
Karpenter interacts directly with the AWS EC2 APIs to provision, terminate, and manage compute capacity on behalf of the Kubernetes scheduler. Rather than granting broad AWS permissions to every worker node, we’ll configure IAM Roles for Service Accounts (IRSA) so that only the Karpenter controller receives the AWS permissions required to manage EC2 resources.
First, enable IRSA support in the existing module "eks" configuration:
cluster_endpoint_public_access = var.cluster_endpoint_public_access

enable_irsa = true

vpc_id     = module.eks-vpc.vpc_id
subnet_ids = module.eks-vpc.private_subnets
Figure 1: Expected configuration after adding the IRSA support
This enables the EKS OIDC identity provider, allowing Kubernetes ServiceAccounts to assume IAM roles securely through AWS STS. Without this configuration, IRSA cannot be used.
Next, create a dedicated karpenter-irsa.tf file to define the IAM role assumed by the Karpenter controller.
# karpenter-irsa.tf

module "karpenter_irsa" {
  source  = "terraform-aws-modules/iam/aws//modules/iam-role-for-service-accounts-eks"
  version = "~> 5.39"

  role_name = "${var.cluster_name}-karpenter-irsa"

  attach_karpenter_controller_policy = true

  karpenter_controller_cluster_name = var.cluster_name

  oidc_providers = {
    eks = {
      provider_arn               = module.eks.oidc_provider_arn
      namespace_service_accounts = ["karpenter:karpenter"]
    }
  }

  tags = {
    environment = var.tag_environment
    application = var.tag_application
  }
}
This configuration creates the IAM role assumed by the Karpenter controller, attaches the required controller permissions, and associates the role with the karpenter Kubernetes ServiceAccount through the cluster's OIDC provider.
Apply the updated Terraform configuration to provision the IAM resources and enable IRSA support for the cluster.
terraform fmt
terraform init
terraform validate
terraform plan
terraform apply
Figure 2: Expected output from previous commands
At this stage, the cluster is ready to support IAM-based authentication for Kubernetes ServiceAccounts. In the next step, we’ll deploy the Karpenter controller and configure it to use the newly created IAM role.
- 2.1 Verify the IRSA Prerequisites
Before deploying Karpenter, verify that the cluster is reachable and that the OIDC identity provider required by IRSA has been successfully configured.
This validation confirms that Terraform successfully enabled the cluster’s OIDC identity provider, which is required before any Kubernetes ServiceAccount can assume an IAM role through IRSA.
# Update local kubeconfig with EKS cluster credentials
aws eks update-kubeconfig \
  --region us-east-1 \
  --profile <aws-profile> \
  --name <cluster-name>

# Validate cluster connectivity
kubectl get nodes

# Verify the OIDC identity provider
 aws eks describe-cluster \
  --name dev-eks-cluster \
  --region us-east-1 \
  --query "cluster.identity.oidc.issuer" \
  --no-cli-pager
Figure 3: Expected output from previous commands
The final command should return the cluster’s OIDC issuer URL. Its presence confirms that the EKS OIDC provider was created successfully and that the cluster is ready to support IAM Roles for Service Accounts.
- Step 3: Install Karpenter Using Helm
Karpenter is deployed as a Kubernetes controller that continuously watches for unschedulable pods and provisions the compute capacity required to satisfy their scheduling constraints. In this section, we will install the controller using Helm and integrate it into the existing EKS platform.
Because Karpenter is distributed as a Helm chart, Terraform requires the Helm provider to manage its lifecycle declaratively alongside the rest of the infrastructure. Add the following provider definition to the existing main.tf configuration:
    helm = {
      source  = "hashicorp/helm"
      version = "~> 2.14"
    }
Figure 4: Terraform configuration with the Helm provider enabled
The Helm and Kubernetes providers require authenticated access to the EKS API server. Rather than relying on an existing local kubeconfig file, we configure both providers directly from Terraform using data sources that retrieve the cluster endpoint, certificate authority, and authentication token. This keeps the deployment fully reproducible and independent of local workstation configuration.
Create a new providers.tf file and add the following code:
# providers.tf

data "aws_eks_cluster" "this" {
  name = module.eks.cluster_name
}

data "aws_eks_cluster_auth" "this" {
  name = module.eks.cluster_name
}

provider "kubernetes" {
  host                   = data.aws_eks_cluster.this.endpoint
  cluster_ca_certificate = base64decode(data.aws_eks_cluster.this.certificate_authority[0].data)
  token                  = data.aws_eks_cluster_auth.this.token
}

provider "helm" {
  kubernetes {
    host                   = data.aws_eks_cluster.this.endpoint
    cluster_ca_certificate = base64decode(data.aws_eks_cluster.this.certificate_authority[0].data)
    token                  = data.aws_eks_cluster_auth.this.token
  }
}
With the providers configured, Terraform can now communicate directly with the Kubernetes API and install Helm charts into the cluster.
Create a new karpenter.tf file and add the following code:
# karpenter.tf

resource "helm_release" "karpenter" {
  namespace        = "karpenter"
  create_namespace = true

  name       = "karpenter"
  repository = "oci://public.ecr.aws/karpenter"
  chart      = "karpenter"
  version    = "1.3.3"

  wait = true

  values = [
    yamlencode({
      serviceAccount = {
        name = "karpenter"
        annotations = {
          "eks.amazonaws.com/role-arn" = module.karpenter_irsa.iam_role_arn
        }
      }

      settings = {
        clusterName = var.cluster_name
      }
    })
  ]

  depends_on = [
    module.eks,
    module.karpenter_irsa
  ]
}
The previous configuration installs the Karpenter controller using Helm, creates the karpenter namespace if it does not already exist, associates the controller's ServiceAccount with the IAM role created through IRSA, and configures the controller to manage the current EKS cluster.
Before proceeding, reconcile the Terraform state to apply the configuration changes introduced in this section:
terraform init -upgrade
terraform plan
terraform apply -auto-approve
Figure 5: Successful deployment of the Karpenter Helm release
At this stage, the Karpenter controller has been installed, but we have not yet configured it to provision nodes. In the next step, we’ll verify the controller is running before defining the EC2NodeClass and NodePool resources that enable dynamic node provisioning.
- 3.1 Validating Karpenter installation
At this stage, we’re simply verifying that the Karpenter controller is running and that the Helm chart created the expected Kubernetes namespace.
To verify that the Karpenter controller has been installed successfully, run the following commands:
# Update local kubeconfig with EKS cluster credentials
aws eks update-kubeconfig \
  --region us-east-1 \
  --profile <aws-profile> \
  --name <cluster-name>

# Verify the Karpenter controller is running
kubectl get pods -n karpenter

# Verify the namespace was created
kubectl get ns
Figure 6: Successful validation of the Karpenter controller installation
A healthy installation should show one or more Karpenter controller pods in the Running state and the karpenter namespace listed as Active.
With the controller running successfully, the next step is to define how Karpenter should provision infrastructure. This is accomplished by creating an EC2NodeClass, which specifies the AWS resources and configuration used when launching worker nodes.
- Step 4 : Configure EC2NodeClass
EC2NodeClass defines the AWS infrastructure configuration Karpenter uses when provisioning EC2 instances for Kubernetes worker nodes. It controls settings such as subnet selection, security groups, AMI family, and instance profiles.
Before creating the EC2NodeClass, Karpenter must be able to discover the AWS networking resources used to provision worker nodes. This is achieved through discovery tags applied to the cluster subnets and node security group.
Karpenter does not require subnet IDs or security group IDs to be hardcoded. Instead, it discovers the appropriate AWS networking resources dynamically using tags. This makes the configuration portable across environments and avoids coupling the EC2NodeClass to infrastructure-specific resource identifiers.
Add the following inside the existing module "eks" block:
node_security_group_tags = {
  "karpenter.sh/discovery" = var.cluster_name
}
Figure 7: Expected configuration after adding the Karpenter discovery tag
And in vpc.tf:
private_subnet_tags = {
  "kubernetes.io/cluster/${var.cluster_name}" = "shared"
  "kubernetes.io/role/internal-elb"           = 1

  "karpenter.sh/discovery" = var.cluster_name
}
Figure 8: Expected configuration after adding the Karpenter discovery tag
Before proceeding, reconcile the Terraform state to apply the configuration changes introduced in this section:
terraform init -upgrade
terraform plan
terraform apply -auto-approve
Figure 9: Expected output from previous commands
With the required discovery tags now applied, Karpenter can automatically locate the appropriate subnets and security groups when provisioning new EC2 instances. The EC2NodeClass we’ll create next references these tagged resources together with the AMI family and IAM role required for worker node provisioning.
*⚠️ Critical Note*:** Before applying the EC2NodeClass resource, identify the IAM role associated with the EKS managed node group. Karpenter uses this role when launching worker nodes, and the value must match the role specified in the
spec.rolefield of the EC2NodeClass configuration.
Run the following command:
terraform state show 'module.eks.module.eks_managed_node_group["eks_node"].aws_iam_role.this[0]' | grep '^ *name *='Locate the name attribute and use its value in the role field of the ec2nodeclass.yaml file.

Create a new ../yaml/ec2nodeclass.yaml file and add the following configuration:
apiVersion: karpenter.k8s.aws/v1
kind: EC2NodeClass
metadata:
  name: default
spec:
  amiFamily: AL2023

  # IAM role used by Karpenter-provisioned worker nodes.
  # Use the IAM role created for the EKS managed node group.
  role: dev-eks-cluster-node-role-20260624142151317800000001

  amiSelectorTerms:
    - alias: al2023@latest

  subnetSelectorTerms:
    - tags:
        karpenter.sh/discovery: dev-eks-cluster

  securityGroupSelectorTerms:
    - tags:
        karpenter.sh/discovery: dev-eks-cluster

  tags:
    karpenter.sh/discovery: dev-eks-cluster
The role name will differ between environments. Use the value returned by your own Terraform state rather than copying the example shown here.
Apply the EC2NodeClass resource:
kubectl apply -f ../yaml/ec2nodeclass.yamlVerify that the EC2NodeClass is ready to provision nodes:
kubectl get ec2nodeclass
kubectl describe ec2nodeclass default | grep True
Figure 10: Expected output after validation commands
With the EC2NodeClass successfully reconciled and all readiness conditions reporting True, Karpenter now has all the AWS-specific infrastructure information required to provision worker nodes dynamically. The next step is to define a NodePool, which determines when and how those nodes are created to satisfy workload scheduling demands.
- Step 5: Configure NodePools
Each NodePool references an EC2NodeClass, combining infrastructure settings with scheduling policies. While the EC2NodeClass defines how instances are provisioned, the NodePool defines when and which instances Karpenter is allowed to create. Through NodePools, platform teams can control instance selection, capacity types, scheduling constraints, and node consolidation behavior.
In this example, the NodePool is intentionally restricted to Linux, AMD64, On-Demand capacity, and a small set of instance types. These constraints make provisioning deterministic for the lab while illustrating how NodePools can enforce organizational policies.
At runtime, Karpenter creates a NodeClaim based on the scheduling requirements defined by the NodePool. The NodeClaim, in turn, references the EC2NodeClass to determine how the underlying EC2 instance should be provisioned.
Create a new ../yaml/nodepool.yaml file and add the following code:
apiVersion: karpenter.sh/v1
kind: NodePool
metadata:
  name: default
spec:
  template:
    spec:
      nodeClassRef:
        group: karpenter.k8s.aws
        kind: EC2NodeClass
        name: default

      requirements:
        - key: kubernetes.io/arch
          operator: In
          values:
            - amd64

        - key: kubernetes.io/os
          operator: In
          values:
            - linux

        - key: karpenter.sh/capacity-type
          operator: In
          values:
            - on-demand

        - key: node.kubernetes.io/instance-type
          operator: In
          values:
            - t3.medium
            - t3.large

  limits:
    cpu: "10"

  disruption:
    consolidationPolicy: WhenEmptyOrUnderutilized
    consolidateAfter: 30s
The disruption policy enables automatic node consolidation. When a node becomes empty or underutilized, Karpenter waits 30 seconds before evaluating whether workloads can be safely rescheduled onto fewer nodes, helping reduce infrastructure costs without manual intervention.
Apply the NodePool resource:
kubectl apply -f ../yaml/nodepool.yamlValidate that the NodePool has been successfully reconciled and is ready to provision nodes:
kubectl get nodepool
kubectl describe nodepool default | grep True
kubectl get nodeclaims
Figure 11: Expected output after validation commands
At this stage, the NodePool is ready but no NodeClaims exist yet. This is expected because there are no pending workloads requiring additional capacity. Karpenter creates NodeClaims only when Kubernetes cannot schedule a pod onto the existing nodes.
With both the EC2NodeClass and NodePool successfully reconciled, Karpenter is now fully configured. In the next section, we’ll deploy a workload that cannot be scheduled on the existing nodes and observe Karpenter dynamically provisioning new EC2 instances.
- Step 6: Validate Dynamic Node Provisioning
One of Karpenter’s core capabilities is dynamically provisioning compute capacity in response to unschedulable workloads. In this section, we will deploy a workload that exceeds the existing cluster capacity and observe how Karpenter automatically launches and registers new worker nodes.
Create a new ../yaml/inflate.yaml file and add the following code:
apiVersion: apps/v1
kind: Deployment
metadata:
  name: inflate
spec:
  replicas: 20
  selector:
    matchLabels:
      app: inflate
  template:
    metadata:
      labels:
        app: inflate
    spec:
      terminationGracePeriodSeconds: 0
      containers:
        - name: inflate
          image: public.ecr.aws/eks-distro/kubernetes/pause:3.7
          resources:
            requests:
              cpu: "1"
This deployment intentionally requests more CPU than the existing managed node group can provide, forcing pods into the Pending state and triggering Karpenter to provision additional capacity.
Deploy the workload:
kubectl apply -f ../yaml/inflate.yaml- 6.1 Observe pending pods
Immediately after deployment:
kubectl get pods -o wide -wSeveral pods should enter the Pending state because the existing worker nodes cannot satisfy the requested CPU resources. These unschedulable pods are the signal Karpenter uses to evaluate whether additional capacity should be provisioned.

Figure 12: Expected output after validation command
- 6.2 Observe nodeclaims
As Karpenter decides to provision new capacity, it creates NodeClaim resources. A NodeClaim represents a provisioning request and tracks the complete lifecycle of the underlying EC2 instance until it becomes a Kubernetes node.
kubectl get nodeclaims -w
Figure 13: Expected output after validation command
- 6.3 Observe Karpenter provisioning nodes
In another terminal:
kubectl get nodes -wOnce the EC2 instances finish bootstrapping and join the cluster, they appear as Kubernetes nodes. The previously pending pods are then scheduled automatically onto the newly available capacity.

Figure 14: Expected output after validation command
- 6.4 Inspect Karpenter logs
To observe provisioning decisions:
kubectl logs -n karpenter \
  -l app.kubernetes.io/name=karpenter \
  --tail=50
The controller logs provide visibility into Karpenter’s provisioning decisions. During this exercise you should observe events such as:
• detection of unschedulable pods • instance type evaluation • NodeClaim creation • EC2 instance launch • node registration

Figure 15: Expected log output
At this point, Karpenter has successfully provisioned new EC2 instances, registered them with the Kubernetes control plane, and scheduled pending workloads. However, autoscaling does not imply unlimited growth. Karpenter continuously evaluates scheduling requirements against the constraints defined in the NodePool. These constraints act as guardrails, allowing platform teams to balance workload demand against cost, quota, and operational policies.
limits:
  cpu: "10"
and the event:
{"level":"ERROR","time":"2026-06-24T14:53:44.752Z","logger":"controller","message":"could not schedule pod","commit":"ad71530","controller":"provisioner","namespace":"","name":"","reconcileID":"56043957-29f3-44bf-b64e-c7b46f19bf06","Pod":{"name":"inflate-67cd5bb766-mlskz","namespace":"default"},"error":"all available instance types exceed limits for nodepool \"default\""}This behavior demonstrates an important distinction between Karpenter and traditional cluster autoscalers. Karpenter is not merely adding nodes in response to pending pods; it is enforcing a declarative capacity policy. Once a NodePool reaches its configured CPU limit, additional capacity requests are intentionally rejected, even though suitable instance types remain available in AWS.
In production environments, these limits provide an effective governance mechanism, preventing uncontrolled infrastructure growth caused by runaway workloads, misconfigured deployments, or unexpected traffic spikes while enabling platform teams to enforce predictable capacity, control infrastructure costs, and establish clear operational boundaries.
- Step 7: Validate Consolidation and Scaling Behavior
Provisioning additional capacity is only part of Karpenter’s value. Equally important is its ability to continuously evaluates cluster state and automatically reclaim infrastructure as demand decreases.
Unlike traditional node autoscaling approaches that primarily focus on adding capacity, Karpenter continuously analyzes cluster state, identifies consolidation opportunities, and safely removes underutilized or empty nodes whenever workloads can be rescheduled without violating scheduling constraints. This enables Kubernetes clusters to remain both elastic and cost-efficient without requiring manual operational intervention.
In this section, we will remove the test workload, observe Karpenter’s reconciliation process, and validate the complete scale-in lifecycle — from workload termination to NodeClaim deletion and EC2 instance reclamation.
To observe each stage of the consolidation workflow, open four terminal sessions before deleting the workload.
# Remove the workload that triggered Karpenter scale-out
kubectl delete -f ../yaml/inflate.yaml

# Observe workload removal
kuebctl get pods -o wide -w

# # Observe NodeClaim lifecycle
kubectl get nodeclaims -w

# Observe node consolidation
kubectl get nodes -w

# Observe Karpenter consolidation decisions
kubectl logs -n karpenter -l app.kubernetes.io/name=karpenter -f- 7.1 Observe Workload Removal
Once the Deployment is deleted, Kubernetes immediately begins terminating the application Pods and releasing the CPU resources that were previously requested by the workload. This frees cluster capacity and allows Karpenter to re-evaluate whether the existing infrastructure is still required.

Figure 16: Expected output after workload removal process starts
- 7.2 Observe NodeClaim Lifecycle
After the workload has been removed, Karpenter continuously reconciles the cluster state. When it determines that a dynamically provisioned node is no longer required, it initiates the disruption workflow, marks the corresponding NodeClaim for deletion, and schedules the associated EC2 instance for termination, automatically returning unused compute capacity to AWS.

Figure 17: Expected output of NodeClaim lifecycle
- 7.3 Observe Node Consolidation
As NodeClaims enter the termination workflow, Karpenter safely drains the corresponding Kubernetes nodes before removing them from the cluster. This process respects Kubernetes scheduling guarantees and disruption policies, ensuring nodes are only consolidated when it is safe to do so.
The result is a gradual reduction in cluster capacity until only the resources required to satisfy the current workload remain.

Figure 18: Expected output of Node consolidation
- 7.4 Observe Karpenter Reconciliation
The controller logs provide the clearest view into Karpenter’s internal decision-making process. Rather than reacting only to workload changes, Karpenter continuously reconciles the desired and actual cluster state, evaluating whether existing nodes remain necessary.
Typical log events include:
reason="empty"decision="delete"- tainted node
- deleted node
- deleted
NodeClaim

Figure 19: Example reconciliation log output
- 7.5 Final Thoughts
Throughout this validation, we observed Karpenter managing the complete infrastructure lifecycle — from provisioning new capacity in response to workload demand to safely reclaiming it when that demand subsides.
Once the workload was removed, Kubernetes released the previously requested CPU resources, allowing Karpenter to continuously re-evaluate cluster utilization. As nodes became empty — or their workloads could be safely rescheduled elsewhere — Karpenter identified them as consolidation candidates. After the configured consolidation window elapsed, it tainted and drained the nodes, deleted the associated NodeClaims, and terminated the backing Amazon EC2 instances.
This end-to-end workflow demonstrates that Karpenter is far more than a provisioning engine. It continuously reconciles the desired cluster state, automatically scaling infrastructure out when demand increases and reclaiming unused capacity as demand decreases.
For production Amazon EKS environments, this approach reduces infrastructure costs, minimizes operational overhead, and maintains the elasticity and efficiency expected from modern cloud-native platforms.
With dynamic node provisioning now in place, the cluster foundation is complete. The next step is managing the platform services that run on top of it. In the next chapter, we’ll build an enterprise-grade add-on management strategy using Terraform and Helm, covering version management, dependency ordering, upgrade workflows, and operational best practices for Kubernetes platform services.
Further Reading
⚠️ Note: Curated links and additional resources for this article are available in the
[projects/references](https://github.com/jmpires/anthropomorphic/tree/main/projects/references) directory of the **Anthropomorphic** GitHub repository.
Feedback
Thank you for working through this guide! If you spot an issue, have suggestions, or want to share how you’ve extended this setup in your own environment, I’d love to hear from you:
- Report issues or suggest improvements: **Open an issue on GitHub**
- Connect or discuss: **LinkedIn**
- Questions or comments: **Email me**
If you found this guide valuable, consider sharing it with your team or giving it a 👏. Your feedback and engagement help make these resources better for everyone.
메타데이터
- post_id
- f482bde62def
- slug
- rethinking-node-scaling-in-amazon-eks-with-karpenter-eks-crash-course-chapter-4-f482bde62def
- url
- https://towardsaws.com/rethinking-node-scaling-in-amazon-eks-with-karpenter-eks-crash-course-chapter-4-f482bde62def
- canonical_url
- https://towardsaws.com/rethinking-node-scaling-in-amazon-eks-with-karpenter-eks-crash-course-chapter-4-f482bde62def
- author_url
- https://medium.com/@jorgemanuelpires
- status
- ok
- fetched_at
- 2026-07-09 06:53:08