Scaling Out: My Journey from SNO to a 3-Node Openshift Cluster
Learn how to deploy a 3-node OKD cluster using virt-manager and libvirt on AlmaLinux 10. This step-by-step guide covers VM configuration…
Scaling Out: My Journey from SNO to a 3-Node Openshift Cluster
Learn how to deploy a 3-node OKD cluster using virt-manager and libvirt on AlmaLinux 10. This step-by-step guide covers VM configuration, agent-based installation, nginx reverse proxy setup, and how to increase the max pods per node limit in OpenShift.
In one of my recent posts, I walked through setting up a single-node OKD cluster using the manual installation method.
How I Replaced K3s with Openshift 4.20 in My Homelab
After running that setup for a while, I wanted to push further and build a proper 3-node OKD cluster. This time, I chose virt-manager and libvirt as my virtualization platform for hosting the cluster nodes instead of just using bare-metal.
The Setup
To track this work, I created a new branch in my OKD cluster setup repository called okd-virtlib-setup which can be found here on Github
The Instructions.md file now includes comprehensive guidance for deploying a 3-node cluster using libvirt as the virtualization layer.
Hardware Specifications
My host server runs AlmaLinux 10.1 with 130 GB of RAM and 12 CPU cores, providing ample resources for this deployment.

Virtual Machine Configuration
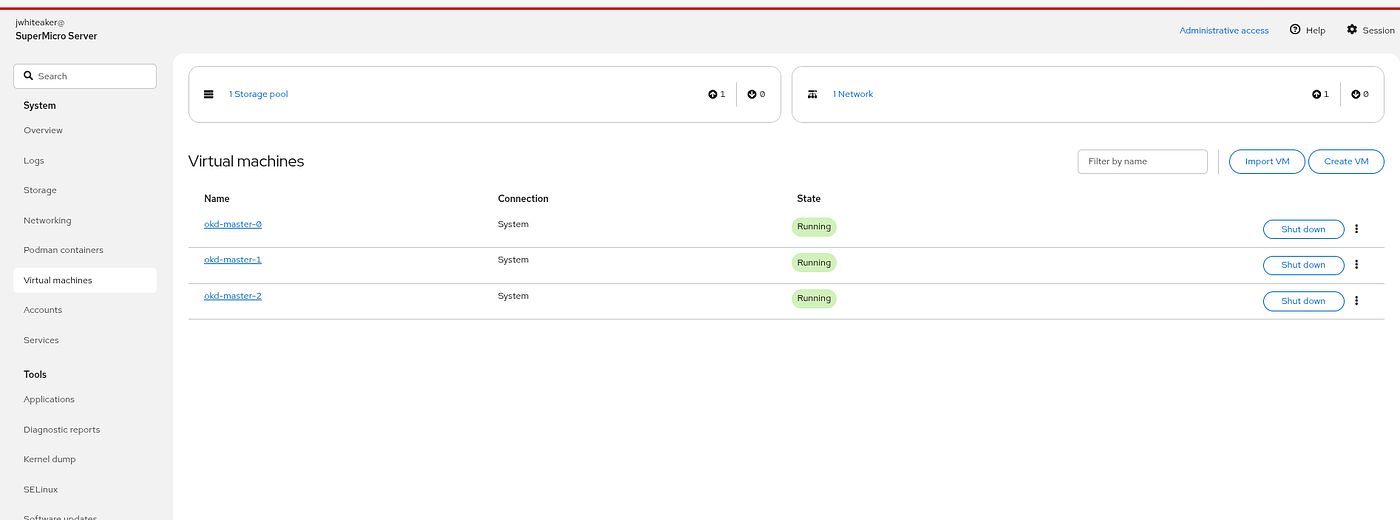
Using virt-manager, I provisioned three virtual machines with identical specifications:
- 16 GB RAM
- 4 CPU cores
- 120 GB disk
Network Configuration
One crucial decision was assigning static network identities to each VM. I configured pre-defined IP addresses, MAC addresses, and hostnames on my LAN network. This approach dramatically simplified the installation process since I could create the dnsmasq configuration and agent install config files without worrying about dynamic IP assignments from DHCP.
The Ansible playbook handling VM creation is available here on Github.
Reverse Proxy Setup
An nginx container serves as the reverse proxy for API requests to the OKD cluster. All oc commands route through this nginx container before reaching one of the OKD master nodes.

Agent-Based Installation
This cluster eliminates the need for a dedicated bootstrap node by leveraging the agent-based installation method. Here’s how it works: okd-master-0 initially boots as the bootstrap node. Once okd-master-1 and okd-master-2 come online, okd-master-0 transitions from bootstrap to master role. The node age differences in the cluster clearly illustrate this sequence.

Why Choose a 3-Node Cluster Over Single Node?
While a single-node cluster works perfectly for learning and experimentation with OKD and OpenShift, I had broader goals. This project became an opportunity to develop skills with virt-manager and libvirt, relying exclusively on tools that ship with a standard Linux server installation.
Many organizations depend on ESXi, Proxmox, or similar hypervisor solutions for virtualization. However, I wanted to explore what’s achievable with just the native tooling available on a Linux server, keeping the infrastructure as straightforward as possible.
Additional Automation and Configuration
I developed Ansible playbooks to automate several key tasks:
- Provisioning cluster VMs
- Deploying the nginx reverse proxy container
- Configuring dnsmasq with the okd.conf file for cluster DNS resolution
- Destroying VMs when the cluster is no longer needed
- Removing the nginx container during teardown
- Replacing the default self-signed certificate with a valid SSL certificate for the OKD console (I reused the certificate from my single-node installation)

- Integrating Entra ID authentication with the OKD console


- Adjusting the kubelet’s maximum pod limit on each node
Lessons from the Single-Node Cluster: Understanding Pod Limits
My single-node OKD cluster taught me valuable troubleshooting lessons. Initially, everything ran smoothly. However, after installing Advanced Cluster Management (ACM) and then deploying OKD virtual machines (OVM) on top, I encountered pod scheduling failures. The cluster had reached its default limit of 250 pods per node.
Researching solutions revealed two requirements for increasing this limit:
1. Adjusting the Host Prefix
The install-config.yaml file typically uses a host prefix of 23, but I needed a lower value. Setting it to 20 enables substantially more pods per node.
The math is straightforward. With a host prefix of 20, the theoretical maximum becomes 4,094 pods per node, a massive improvement over the 250-pod default.
Calculating pods per node from host prefix:
2 ^ (32 — hostprefix) = pods per node
For a host prefix of 20:
2 ^ (32–20) = 2 ^ 12 = 4,096
Understanding network capacity:
With the standard 10.128.0.0/14 network used in OKD/OpenShift clusters, you have 262,144 available IP addresses. Dividing by 4,094 pods per node yields capacity for approximately 64 nodes.
For those familiar with networking fundamentals, there’s a simple formula:
2 ^ (hostprefix — network prefix) = maximum nodes in the network
With my host prefix of 20 and network prefix of 14:
2 ^ (20–14) = 2 ^ 6 = 64 nodes
Calculating total cluster capacity
Rather than multiplying pods per node by node count, use:
2 ^ (32 — network prefix) = total pods in the cluster
For a /14 network:
2 ^ (32–14) = 2 ^ 18 = 262,144 total pods
Running just 3 nodes on my current server means I won’t approach this ceiling anytime soon. However, understanding these calculations proves invaluable for future scaling. If you’re planning larger deployments, consider expanding the network range accordingly.
One caveat: excessively large networks introduce their own challenges, including increased broadcast traffic and potential congestion. For real world use, always try to design your network architecture around specific requirements rather than arbitrary maximums.
2. Configuring the Kubelet
The second step involves creating and applying a KubeletConfig resource. This process is remarkably straightforward.
Here’s the configuration I used:
apiVersion: machineconfiguration.openshift.io/v1
kind: KubeletConfig
metadata:
  name: set-max-pods
spec:
  machineConfigPoolSelector:
    matchLabels:
      pools.operator.machineconfiguration.openshift.io/master: ""
  kubeletConfig:
    maxPods: 1500
    podsPerCore: 0
I chose 1,500 as my maxPods value since the full 4,094 capacity wasn’t necessary. Adjust this based on your workload requirements.
Applying the configuration uses a simple make command from my repository:
make apply-kubelet-configThe update rolls out sequentially across nodes. Each node stops accepting new pods, drains existing workloads, applies the kubelet configuration, and reboots. After restart, the node resumes scheduling with the new pod limit.
Expect 5–10 minutes per node for this process. My 3-node cluster completed the full reconfiguration in roughly 15–30 minutes, a worthwhile investment for the increased capacity.
Verification is simple:
oc get nodes -o custom-columns=NAME:.metadata.name,MAX_PODS:.status.capacity.podsThis command confirmed all three nodes now support 1,500 pods instead of the default 250.

Why Not Configure This During Initial Installation?
Including this configuration in the manifest directory from the start would have been ideal. However, I only recognized the need after the cluster was operational. Fortunately, the KubeletConfig custom resource can be applied whenever in the cluster lifecycle.
Why Not Apply This Fix to the Single-Node Cluster?
I considered this option. The single-node cluster’s host prefix of 23 allows for 512 pods (2 ^ 9). When I attempted setting maxPods to 400 via KubeletConfig, the node entered a degraded state without resolution. Even power cycling the server didn’t help (tried about a dozen times).
Given the kubelet configuration failure and the inevitability of hitting limits again even if it were to somehow start working, transitioning to a 3-node cluster with a host prefix of 20 from the outset made more sense.
Future Plans: Nested Clusters and OpenShift Virtualization
One future experiment involves using a single-node OKD cluster as the hypervisor host for a nested 3-node OKD deployment. Instead of running virt-manager/libvirt on plain AlmaLinux, the SNO cluster would manage virtualization.
The Stolostron (Advanced Cluster Management) console UI actually supports creating new clusters using OKD virtual machines on existing clusters. Testing this capability would provide insights into nested OpenShift virtualization performance.
The KubeletConfig issue on the single-node cluster remains unresolved, but that’s a challenge for another day. If needed, I can always redeploy the 3-node cluster using my existing Ansible playbooks.
Conclusion
Deploying a 3-node OKD cluster using virt-manager and libvirt on AlmaLinux 10 proved to be a powerful but simple approach for my homelab Kubernetes environment. This setup offers several advantages:
- No commercial hypervisor required: virt-manager and libvirt provide enterprise-capable virtualization using standard Linux tools. No need for ESXI or ProxMox (not that there’s anything wrong with them, but why learn another tool if you dont have to)
- Full automation: Ansible playbooks handle the complete cluster lifecycle from VM creation to teardown
- Scalable architecture: The host prefix and network configuration support growth to 64 nodes if needed
- Production-like environment: A 3-node cluster enables testing of high availability, workload distribution, and realistic OpenShift operations
The lessons learned from troubleshooting pod limits on my single-node cluster directly improved this deployment. Understanding the relationship between host prefix, network sizing, and KubeletConfig settings is essential knowledge for anyone running OpenShift in production or homelab environments.
If you’re considering running OKD or OpenShift at home, a 3-node cluster with virt-manager provides an excellent balance of capability, simplicity, and limiting compute resources needed.
메타데이터
- post_id
- f4aa3f27df4a
- slug
- scaling-out-my-journey-from-sno-to-3-node-openshift-cluster-f4aa3f27df4a
- url
- https://medium.com/@josephsims1/scaling-out-my-journey-from-sno-to-3-node-openshift-cluster-f4aa3f27df4a
- canonical_url
- https://medium.com/@josephsims1/scaling-out-my-journey-from-sno-to-3-node-openshift-cluster-f4aa3f27df4a
- author_url
- https://medium.com/@josephsims1
- status
- ok
- fetched_at
- 2026-07-13 16:57:44



