Walkthrough: Hash Cracking w/ John The Ripper and Hashcat!
The focus of this project will be to breach networking devices and exfiltrate any encrypted credentials found. Once obtained, I will…
Walkthrough: Hash Cracking w/ John The Ripper and Hashcat!
[embed]
The focus of this project will be to breach networking devices and exfiltrate any encrypted credentials found. Once obtained, I will attempt to decrypt the ciphertext to reveal the passwords being obfuscated behind it.

Identifying and Finding a Way Into the Networking Devices
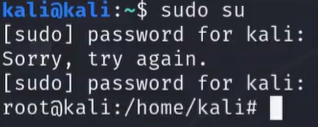
Similar to my previous project, I start by running the “sudo su” command to switch to Kali’s root account (again, this is not recommended in a real‑life scenario). This ensures that I have the highest possible privileges to run all commands necessary for this project.

Next, I run an ARP scan to discover the devices running on the target network (“arp-scan — — localnet”). From the returned list, I begin enumerating the device located at IP address 172.20.1.101.
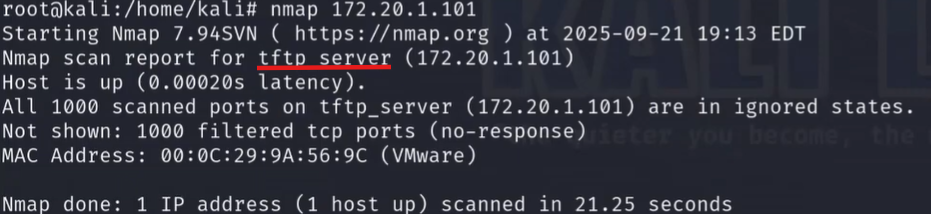
I run an Nmap scan on 172.20.1.101 to identify which ports are open. According to the results, any open ports appear to be filtered by a firewall (“nmap 172.20.1.101”). However, the hostname “tftp_server” is returned, so I decide to run a UDP scan against the IP address. Unless specified, Nmap performs a TCP scan by default, which may explain why the TFTP port didn’t appear earlier.
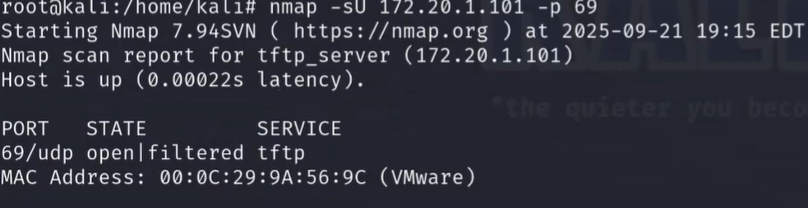
Trivial File Transfer Protocol (TFTP) is a simple protocol commonly used to transfer small configuration files to network devices like routers and switches. I run Nmap again, this time specifying a UDP scan on port 69 (TFTP’s default port): “nmap -sU 172.20.1.101 -p 69”. The results confirm that port 69 is open but may be filtered.

TFTP uses cleartext, lacks authentication, and has no encryption. Knowing this, I attempt to establish a TFTP connection to the device using: “tftp 172.20.1.101”.

I’m in. However, TFTP does not provide built‑in commands to list directory contents. To enumerate files, I need to use a TFTP‑specific auxiliary scanner in the Metasploit Framework. I execute “quit” to close my TFTP session.

I launch Metasploit using “msfconsole.”
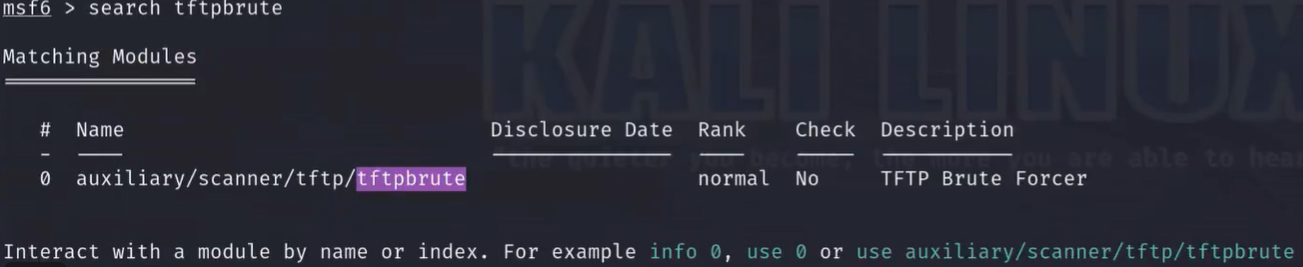
Once loaded, I use “search tftpbrute” to locate the auxiliary scanner I need (auxiliary/scanner/tftp/tftpbrute). This scanner targets the TFTP protocol using a wordlist of commonly found filenames and attempts to match them to files present on the target device. If matches are found, the filenames are returned so I know which ones to exfiltrate.

To select the scanner, I run: “use auxiliary/scanner/tftp/tftpbrute.”
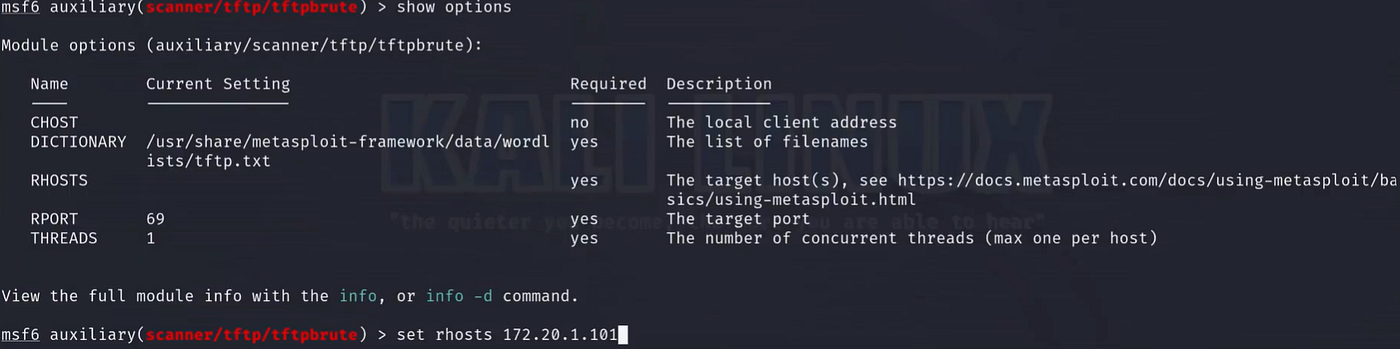
There are a few variables I need to configure. Using “show options,” I can see the wordlist, the RPORT (set to 69 by default), and THREADS (set to 1). The only setting I need to configure is RHOSTS, the target device’s address. I set it using: “set RHOSTS 172.20.1.101”.
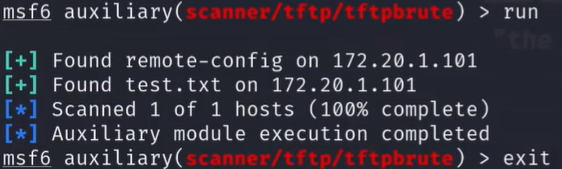
With all settings configured, I run “run” to initiate the scan. It finds two files on the TFTP server: remote-config and test.txt. I exit Metasploit and reestablish a TFTP connection to 172.20.1.101.

Once connected, I use the “get” command with each filename to download them to my local directory (get remote-config / get test.txt). After quitting the TFTP session, I run “ls” to confirm the files downloaded successfully. Both remote-config and test.txt are present.

The first file I examine is remote-config. Using “cat remote-config,” I display its contents.
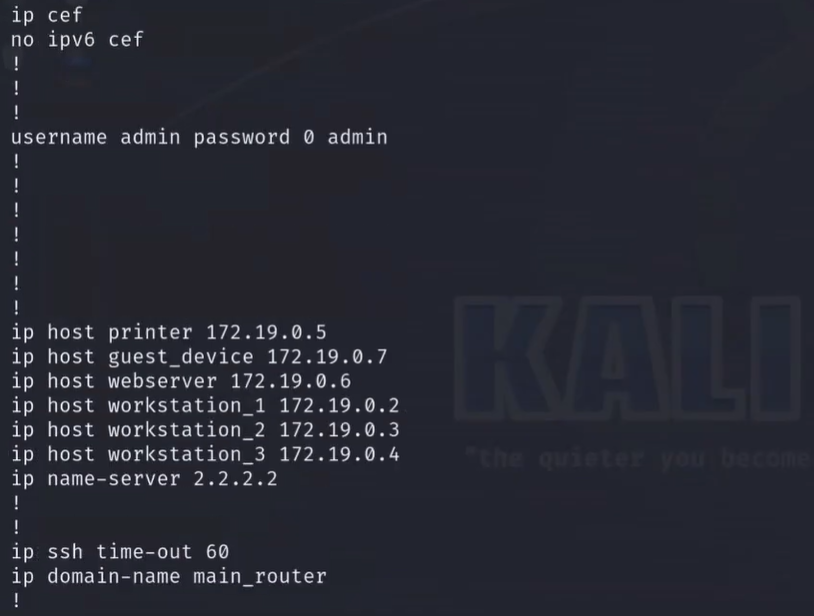
There is a lot of information in this document, but eventually I find cleartext user credentials (admin, admin). Remembering the ARP scan results, I decide to try these credentials on another device listed in the results (172.20.1.102).
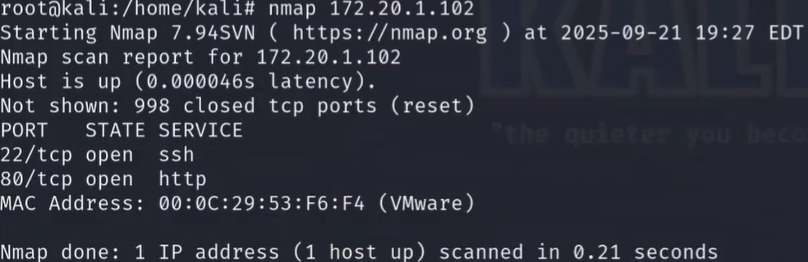
To identify which protocol these credentials might be for, I run Nmap on 172.20.1.102 (nmap 172.20.1.102). This time, ports 22 (SSH) and 80 (HTTP) are open. My next step is to attempt SSH authentication.
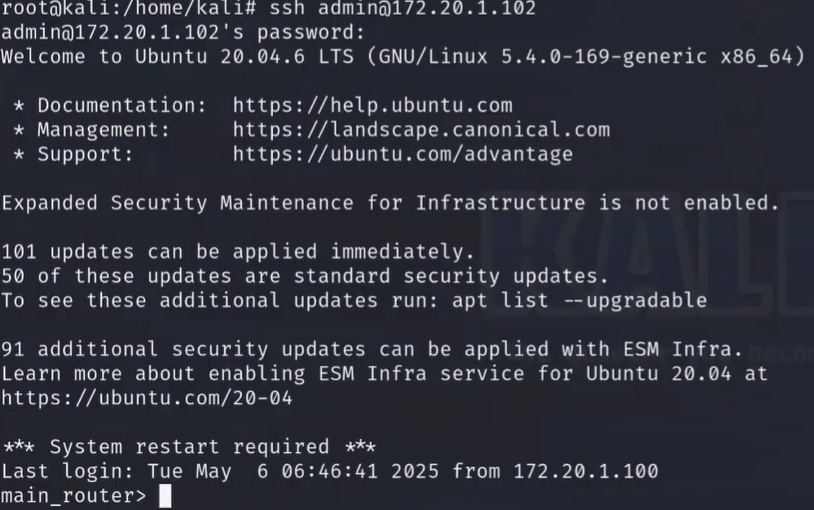
I run: “ssh admin@172.20.1.102” and enter “admin” when prompted for the password. I successfully gain entry — it looks like I’ve accessed another router.
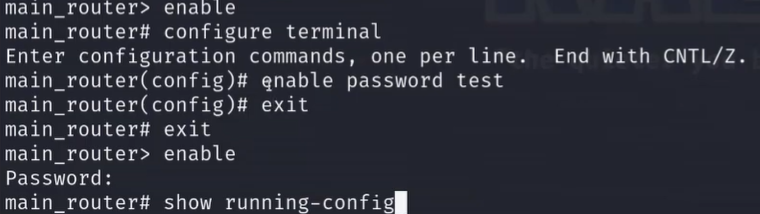
Before searching the router for additional credentials that may allow me to pivot further, I want to change the password to lock out legitimate users. First, I run “enable” to enter privileged EXEC mode, which allows configuration changes. Wanting to reserve this privilege for myself, I enter configuration mode using “configure terminal,” then run “enable password test” to set “test” as the privileged EXEC password. Only I know this password now. I exit configuration mode and privileged EXEC mode, then test my new password. When I reenter “enable,” I’m prompted for a password; entering “test” grants access. Imagine the shock of the network administrator next time they log in to make a change (😈).
Now that I’ve demonstrated how to set a privileged EXEC password, I want to take it a step further and set an encrypted password. I run “show running-config” to review the current configuration.
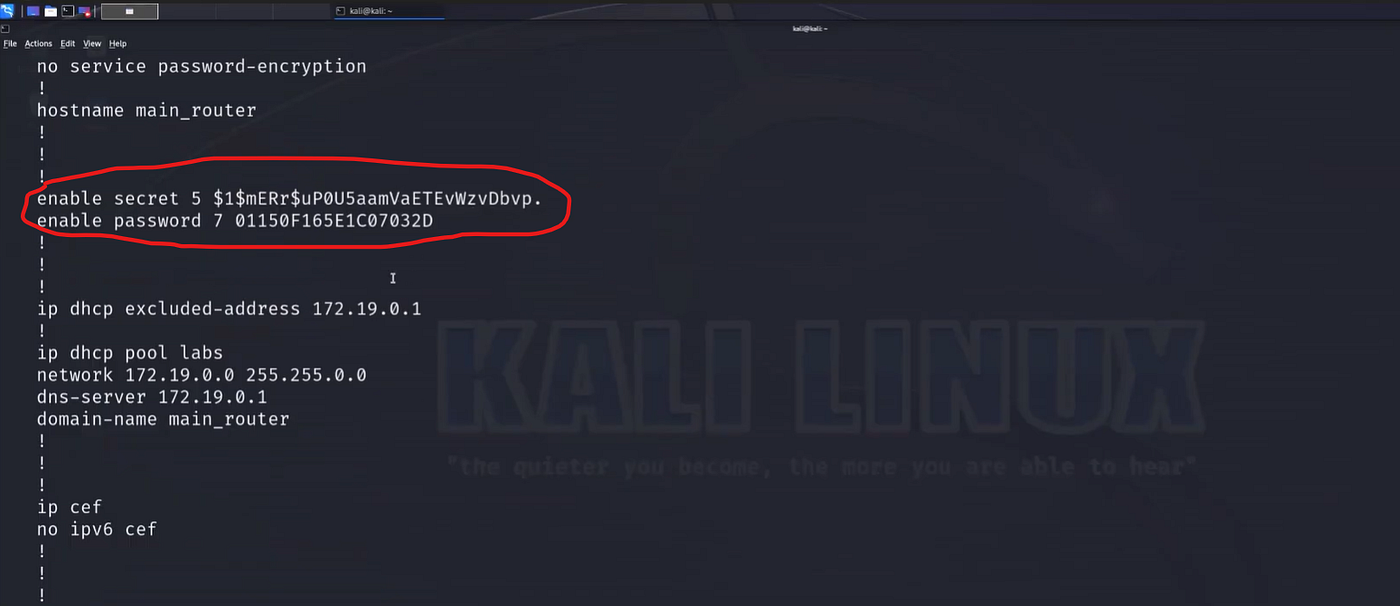
While enumerating the router’s configuration, I find two interesting entries that appear to be obfuscated credentials. I make note of them for later.
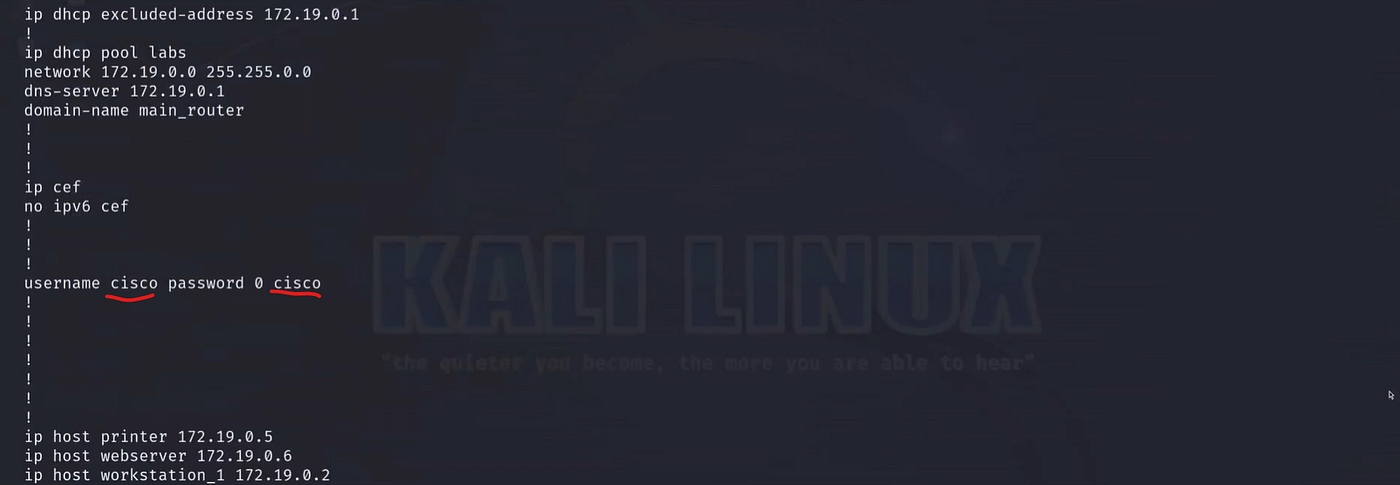
I also find another set of cleartext credentials (cisco, cisco), which I record for future use.

To configure an encrypted privileged EXEC password, I run “configure terminal” again and use: “enable secret P@ssw0rd”. I could also have used: “enable secret level 5 P@ssw0rd”.

After setting the secret password, I exit configuration mode and run “show running-config” again to view the updated settings.
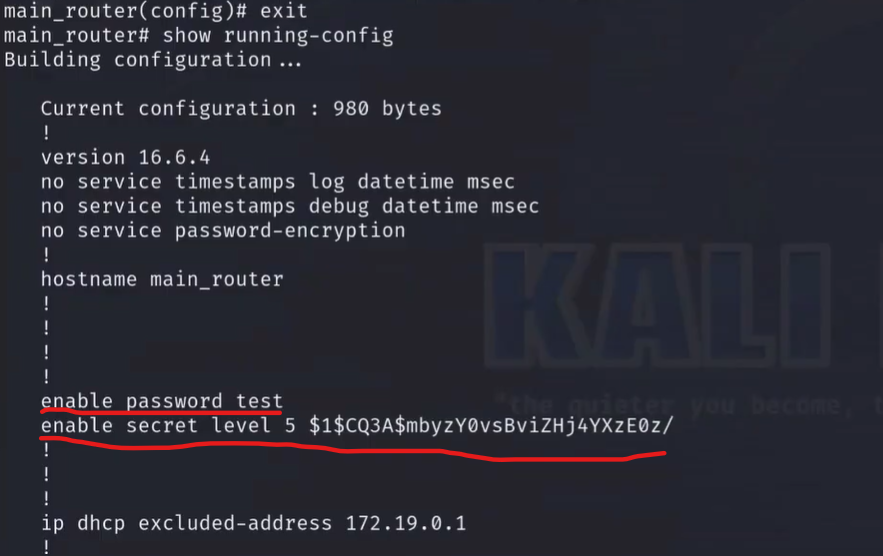
As shown, even though “enable password” is set to “test,” the “enable secret” password is stored as ciphertext. Only I know that the ciphertext corresponds to “P@ssw0rd.” The secret password takes priority over the plaintext one.
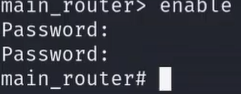
To confirm, I exit privileged EXEC mode and run “enable” again. Entering “test” fails, but “P@ssw0rd” succeeds.
Even if legitimate users check the router’s configuration, all they will see is the hashed version of the secret password. Since it uses a weak MD5 hashing algorithm (the “$1” prefix gives it away), they shouldn’t have much trouble cracking it — but speaking of cracking passwords, let’s see if I can decrypt the two obfuscated credentials I found earlier.
Using John the Ripper and Hashcat to Crack MD5 Passwords
In case it isn’t clear which credentials I’m referring to, they are the two shown in the image above.

I execute the exit command twice to leave privileged EXEC mode and fully log out of the router. In this next phase of the project, I’m going to use multiple tools to decrypt the MD5‑hashed credential I found. The first tool I’ll use is John the Ripper, a password security auditing and recovery tool that comes pre‑installed on Kali Linux.
I need to save the hash value in a file for John to read and attempt to decrypt. To do this, I use the following command to copy the ciphertext into a file named hash.txt:
echo "\$1\$mERr\$uPOU5aamVaETEvWzvDbvp." > hash.txt
To verify that the file was successfully created in my current directory, I use the ls command to display all contents. As seen in the image above, hash.txt is present.
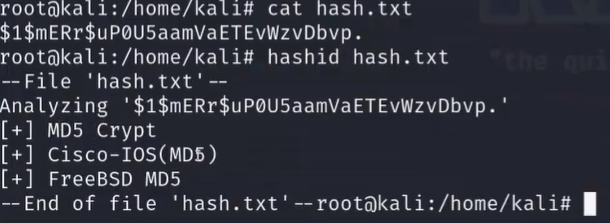
Next, I verify that the hash value was correctly copied into the text file by running cat hash.txt. The hash appears, confirming it was copied successfully. Before running John, I also want to demonstrate how to display information about the hash value contained in hash.txt. When executed, the command hashid hash.txt returns information about the hash algorithm (MD5) as well as the specific variation of the algorithm.

With the hashing value stored in a text file, it’s time to let John rip! The following command initiates a brute‑force attack using the rockyou.txt wordlist:
john hash.txt --wordlist=/usr/share/wordlists/rockyou.txt
Like most dictionary‑based brute‑force attacks, John compares commonly used password hashes against the target hash in an attempt to cause a collision and reveal the plaintext password. Once John completes the attack, I run john — show hash.txt to display the results. It appears that the cleartext password is “router”.

I always recommend verifying results between multiple tools with similar capabilities to reduce the risk of false positives. To confirm the output, I’m going to use another popular password‑cracking tool: Hashcat. The following command is a bit more complex than John the Ripper’s but should yield similar results:
hashcat -a 0 -m 500 hash.txt /usr/share/wordlists/rockyou.txt --show
Hashcat uses the same rockyou.txt wordlist, and I’ve added the — show option to immediately display the result. The image above shows that I receive the same result as with John: “router”.
Using a Custom Python Script to Crack Cisco Type 7, 8, and 9 Passwords

Now that I’ve decrypted the $1$mERr$uPOU5aamVaETEvWzvDbvp. credential, I return to the configuration file to examine the other credential I need to decrypt (cat remote-config).
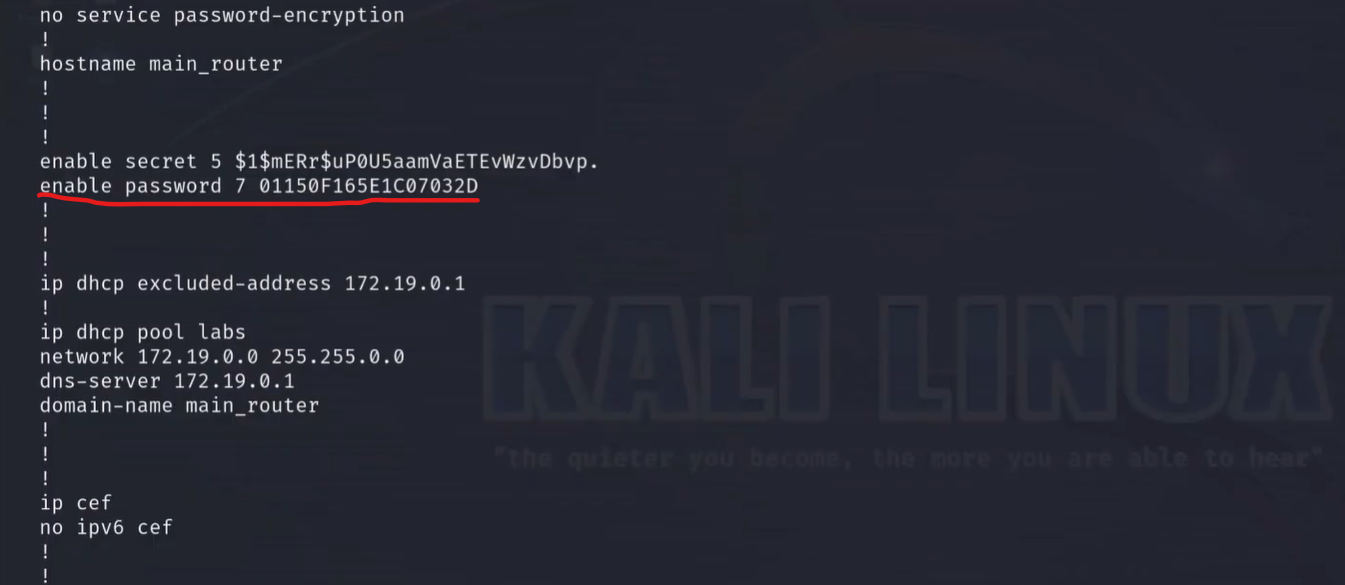
It appears that the remaining credential is a Type 7 password. These passwords use a legacy, weak, and reversible encryption method in Cisco IOS configuration files. With that in mind, let’s see if I can crack it.

To decrypt the obfuscated password, I’m going to use a custom Python script. First, I switch to the brute‑force directory where the script is located (cd /brute-force). Running ls, I can see the ciscot7.py file that I’ll be using. I execute the following command, which specifies the version of Python installed (python3), the script (ciscot7.py), the decrypt instruction (-d), and the target string (-p 01150F165E1C07032D):
python3 ciscot7.py -d -p 01150F165E1C07032D
The results return a cleartext password of “firewall”.

Now that I’ve cracked a simple Cisco Type 7 password, I want to try something stronger — Type 8 and Type 9 passwords. To access the hashes, I use cd / to switch to the root directory of the Kali root user. Once there, I run ls and see the hashes subdirectory. Entering it with cd hashes, I run ls again to confirm the files I need are present: type_8.hash and type_9.hash.

I use Hashcat again to conduct the brute‑force attack. To decrypt type_8.hash, I execute:
hashcat -m 9200 -a 0 /hashes/type_8.hash /usr/share/wordlists/rockyou.txt --show
This yields the cleartext password "cisco".

I then perform the same process for type_9.hash:
hashcat -m 9300 -a 0 --force /hashes/type_9.hash /usr/share/wordlists/rockyou.txt --show
Again, the cleartext password "cisco" is returned.
One thing to note: although the ciphertext strings differ between Type 8 and Type 9 hashes — indicated by the $8 and $9 prefixes — the decrypted output is identical.
Conclusion
The purpose of this project was to demonstrate how the insecurity of a plaintext protocol such as TFTP can lead to a much larger data breach. Once an attacker gains a foothold in a network, they can pivot to additional devices, exploit vulnerabilities, and continue moving laterally until reaching the sensitive information they seek.
Some key lessons learned from this project: • Disable insecure protocols to harden a system’s attack surface • Use strong encryption algorithms to protect stored credentials • Password‑protect privilege escalation vectors wherever possible • Enable strict account‑lockout mechanisms after a small number of failed login attempts • Enforce strong password policies with mandatory complexity requirements
You can watch the video walkthrough of this same project at the top of page. Until next time, take care of yourself and…SHOW YOUR WORK!!! 😉
메타데이터
- post_id
- f4e304597e14
- slug
- walkthrough-hash-cracking-w-john-the-ripper-and-hashcat-f4e304597e14
- url
- https://medium.com/@dbrooks810/walkthrough-hash-cracking-w-john-the-ripper-and-hashcat-f4e304597e14
- canonical_url
- https://medium.com/@dbrooks810/walkthrough-hash-cracking-w-john-the-ripper-and-hashcat-f4e304597e14
- author_url
- https://medium.com/@dbrooks810
- status
- ok
- fetched_at
- 2026-07-08 14:18:07