Setting Up ArgoCD Capability on EKS: A Complete GitOps Deployment Guide
A hands-on walk through covering installation, SSO, multi-cluster registration, RBAC, and production-grade app configuration.
Setting Up ArgoCD Capability on EKS: A Complete GitOps Deployment Guide
A hands-on walk through covering installation, SSO, multi-cluster registration, RBAC, and production-grade app configuration.
Introduction
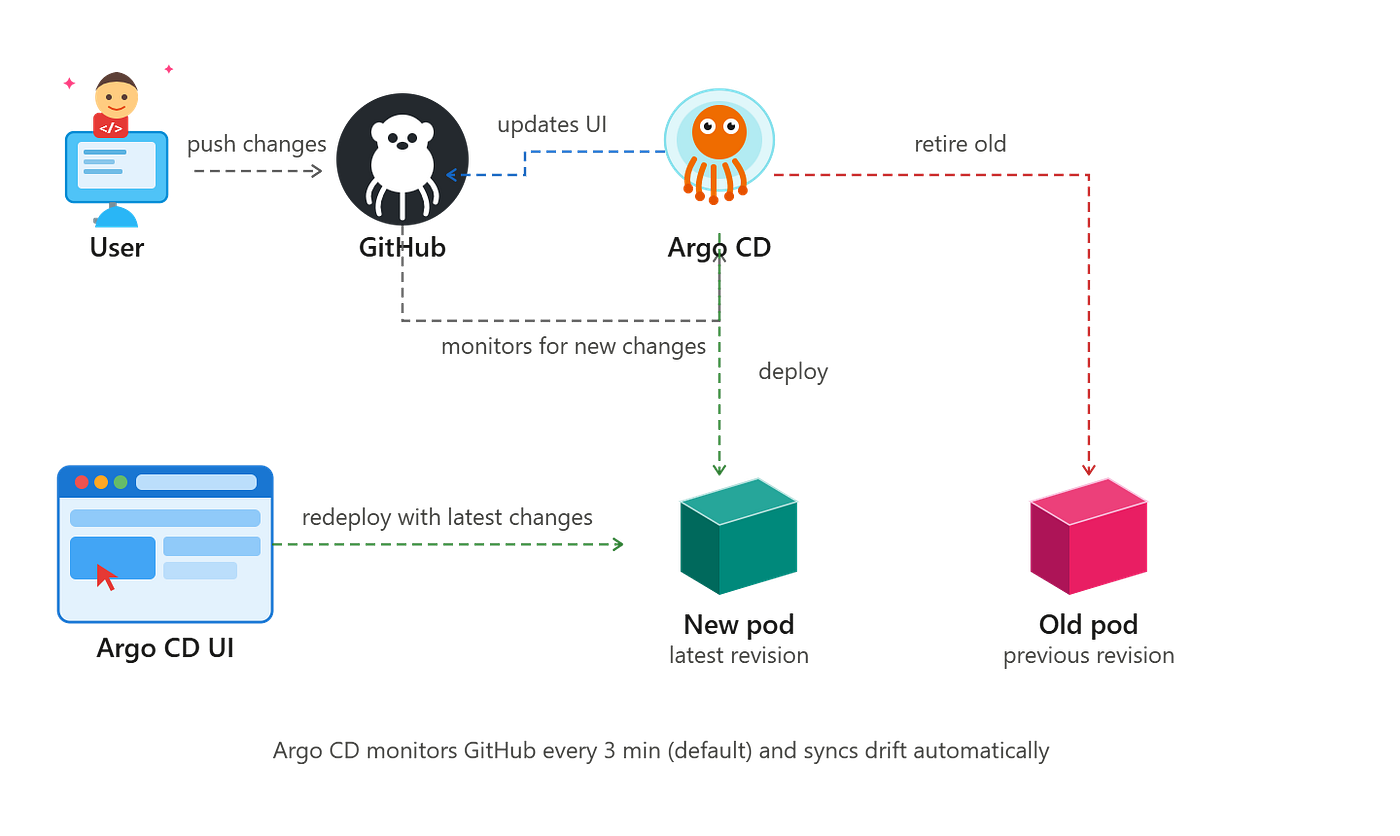
ArgoCD has become the de facto GitOps engine for Kubernetes teams. But getting it truly production-ready — with SSO, proper RBAC, multi-cluster support, and smart sync policies — takes more than just a Helm install. This guide walks through everything end-to-end, from enabling the capability on your EKS cluster to deploying and syncing your first application.
Step 1: Enable the ArgoCD Capability on EKS
Navigate to your EKS cluster in the console and go to Capabilities. Select the ArgoCD capability and:
- Create an IAM role for ArgoCD.
- Configure and create the ArgoCD capability.
Once provisioned, you’ll have an ArgoCD URL. Click it and log in via SSO.
Step 2: Configure ArgoCD Projects and Roles
Inside the ArgoCD GUI, head to Settings → Projects and create a new project. Fill in:
Name — a meaningful identifier (e.g.,dev, non-prod, prod)
- Source Repos — the Git repositories ArgoCD can pull from
- Destination — the target cluster and namespace
- Cluster Resources — which resource types are allowed
Add Roles
Within the same project, create two roles: Editor and Viewer. Define policy rules for each — what actions they can perform on which resources. You’ll come back to assign users to these roles after SSO login IDs are known.
Step 3: Install the ArgoCD CLI (Windows)
$VERSION="v3.2.7" Invoke-WebRequest `
-Uri "https://github.com/argoproj/argo-cd/releases/download/$VERSION/argocd-windows-amd64.exe" `
-OutFile "$env:USERPROFILE\argocd.exe"mkdir C:\Tools\argocd -Force
Move-Item "$env:USERPROFILE\argocd.exe" "C:\Tools\argocd\argocd.exe" -Force[Environment]::SetEnvironmentVariable(
"Path",
$env:Path + ";C:\Tools\argocd",
[EnvironmentVariableTarget]::Machine
)$env:Path += ";C:\Tools\argocd"argocd version --clientStep 4: Authenticate the CLI via API Token
Since you’re using SSO, generate an API token in ArgoCD under Settings → Accounts → Generate Token, then export it in your shell:
$env:ARGOCD_AUTH_TOKEN="your-token-here"Verify the CLI can reach your ArgoCD server:
argocd cluster list --server <your-argocd-server-url> --grpc-web --insecureStep 5: Register the EKS Cluster with ArgoCD
argocd cluster add arn:aws:eks:ap-south-1:<account-id>:cluster/prod-eks ` --name prod-eks `
  --aws-cluster-name arn:aws:eks:ap-south-1:<account-id>:cluster/prod-eks `
  --server <your-argocd-server-url> `
  --grpc-web --insecure
The cluster will be added — but it’ll show Unknown status. The next section fixes that.
Step 6: Fix the “Unknown” Cluster Status
This requires three things: updating aws-auth, creating an EKS access entry, and setting up RBAC bindings.
6a. Update the aws-auth ConfigMap
kubectl edit configmap aws-auth -n kube-systemAdd this entry under mapRoles:
- groups:
    - system:masters
  rolearn: arn:aws:iam::<account-id>:role/AmazonEKSCapabilityArgoCDRole
  username: argocd
6b. Create an EKS Access Entry (AWS Console)
Navigate to EKS → your cluster → Access tab → Access entries and create a new entry:
- IAM Principal ARN:
arn:aws:iam::<account-id>:role/AmazonEKSCapabilityArgoCDRole - Policies to attach:
AmazonEKSArgoCDClusterPolicy(cluster scope)AmazonEKSArgoCDPolicy(argocd namespace)AmazonEKSClusterAdminPolicy(cluster scope) ← required
6c. Create RBAC Bindings
# Bind cluster-admin role to the argocd user
kubectl create clusterrolebinding argocd-cluster-admin-binding \
  --clusterrole=cluster-admin \
  --user=argocd

# Bind the ArgoCD manager role
kubectl create clusterrolebinding argocd-capability-iam-binding \
  --clusterrole=argocd-manager-role \
  --user=argocd
6d. Allow the Project to Use the argocd Namespace
argocd proj set prod \
  --source-namespaces argocd \
  --server <your-argocd-server-url> \
  --grpc-web --insecure
After these steps, the cluster status in ArgoCD should turn Healthy.
Step 7: Connect Your Git Repository
In the ArgoCD GUI, go to Settings → Repositories → Connect Repo:
- Method: HTTPS
- Repository URL: your repo’s URL
- Password / Token: your Personal Access Token (PAT)
Click Connect and verify the connection shows as successful.
Step 8: Create Your Application
In the ArgoCD GUI, create a new application with:
- Name — your app name
- Project — the project created in Step 2
- Source URL — your Git repo and the path to the manifests
- Destination — target cluster URL and namespace
Choose between manual sync and auto sync based on your workflow preference.
Step 9: Configure ignoreDifferences to Prevent False Out-of-Sync
Some Kubernetes resources will always appear out-of-sync without any real change — StorageClass (immutable, ArgoCD can't add annotations to it) and Deployment restartedAt annotations being the most common culprits. Add this to your Application manifest to suppress them:
ignoreDifferences:
  - group: storage.k8s.io
    kind: StorageClass
    jsonPointers:
      - /metadata/annotations
      - /metadata/labels
  - group: apps
    kind: Deployment
    jsonPointers:
      - /spec/template/metadata/annotations/kubectl.kubernetes.io~1restartedAt
Why this matters:
StorageClassis immutable — ArgoCD cannot reconcile annotation differences and will repeatedly flag it. Similarly, every time aDeploymentis restarted, therestartedAtannotation changes and ArgoCD treats it as drift. Ignoring these keeps your dashboard clean and meaningful.
After creating the application, review the Out of Sync resources carefully and sync only what should genuinely be reconciled.
Step 10: Configure RBAC for SSO Users
ArgoCD’s RBAC has three action levels: Admin, Editor, and Viewer.
Add Users to the ArgoCD Capability
In the EKS ArgoCD capability settings, add each user and assign them one of the three roles.
Assign Users to Project Roles
After users log in via SSO, grab their ArgoCD username IDs and add them to the appropriate role in the project:
- Go to Settings → Projects → your project → Roles
- Under the editor or viewer role, add the user’s SSO username in the Groups/Users section
Important: Do not add a single user to more than one role. ArgoCD will grant the most privileged access when a user belongs to multiple roles. Admins don’t need to be added to any project role — they inherit full access automatically.
메타데이터
- post_id
- f56508a99de4
- slug
- setting-up-argocd-capability-on-eks-a-complete-gitops-deployment-guide-f56508a99de4
- url
- https://medium.com/@abhishekthakur2068/setting-up-argocd-capability-on-eks-a-complete-gitops-deployment-guide-f56508a99de4
- canonical_url
- https://medium.com/@abhishekthakur2068/setting-up-argocd-capability-on-eks-a-complete-gitops-deployment-guide-f56508a99de4
- author_url
- https://medium.com/@abhishekthakur2068
- status
- ok
- fetched_at
- 2026-06-09 15:37:30