Advanced Ray Tracer: Part 4.2
Fixes to Part 4 Problems
Advanced Ray Tracer: Part 4.2
In this update I will talk about the fixes and changes I did after part 4.
All images seen in the post are rendered by my raytracer. The tests are conducted using the Apple MacBook M3 Pro chip with 5 performance cores with 4.06 GHz and 6 efficiency cores with 2.8 GHz.
Problems and Fixes
As you might remember, I could not render the VeachAjar and mytap scenes. I suspected the issue to be about the parsing part and so it was. In the mytap scene, I did not read the texture coordinates correctly and that was way more appearent than what was going on in the VeachAjar scene.
Turns out while parsing texture coordinates from .ply files, I added an unnecessary +1 to get the indexing right for the tex_coords I hold, but I was wrong to do so. That fixed the mytap scene:
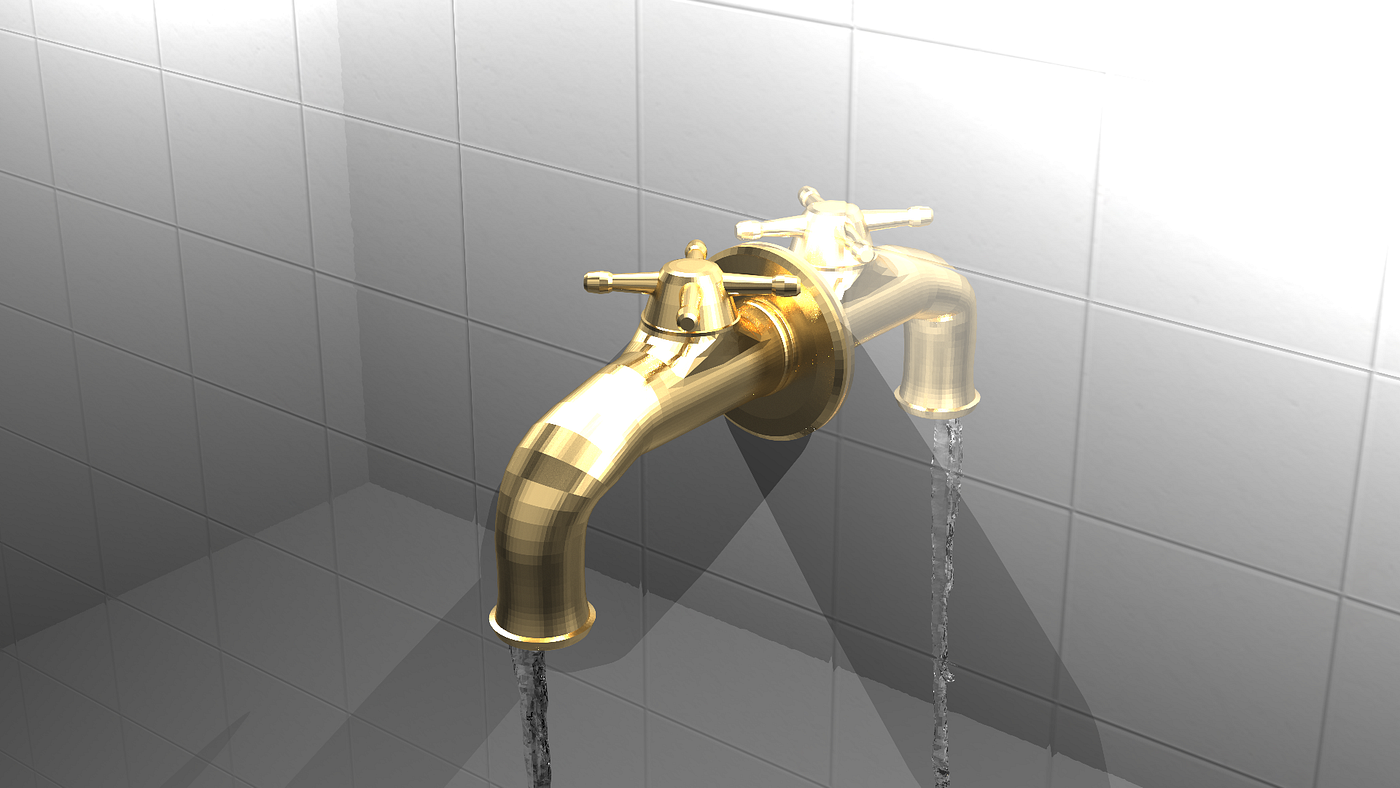
My Tap — 791.8 seconds — 256 samples — 0.01 bump factor
In this case, the bumps on the wall are less appearent of that in the sample output. You can see bumps when you zoom in or see the image in full size. I decided to increase the bump factor to make them more visible. I did not want to wait for another 13 minutes so decided to run with 4 samples:

My Tap — 11.7 seconds — 4 samples — 0.1 bump factor
We can see the bumps way more clearly this way. I mentioned this issue where the visible bumps are not exactly the same with the sample outputs and I multiplied with some constants to match closely with the samples. In this case, the bumps stayed less appearent than my other results so this bump factor change was a need.
After handling this, I moved onto the VeachAjar scene. It turns out that I had a problem with mesh and mesh_instance ids. In part 2, mesh_instances could take other mesh_instances as a base mesh. I handled that by looking at the ids. In part 2, the meshes and mesh instances were indexed in the same list like:
mesh — id = 1
mesh — id = 2
mesh_instance — id = 3
mesh — id = 4
mesh_instance — id = 5
But the VeachAjar scene equivalent is:
mesh — id = 1
mesh — id = 2
mesh_instance — id = 1
mesh — id = 4
mesh_instance — id = 2
This was a problem for me and I did not know how to work the using a mesh_instance as a base mesh for another mesh_instance part. I could not find a way to differ which is it: mesh id or mesh instance id. I could change the code to be correct for this part but I would in return sacrifice some scenes from part 2 which I do not want to. So I changed ids in the VeachAjar scene a little by approaching mesh instances in the same list as meshes. This provided some results:

Veach Ajar — Problematic
The issue was about the objects that have composite transformations. This was the first scene that had composite transformations and turns out the issue here was that I parsed the composite transformation matrix elements as integers. After fixing that I had this result:

Veach Ajar — 26.9 seconds — 16 samples
Conclusion
This looks all correct to me so all outputs from part 4 are now fine. Although I did not try every single scene from the prior parts right now, there seems to be no faulty render in the big scenes from the first 4 parts.
I finished these fixes 5 days after the deadline, which is 2 days after the blogpost deadline and writing this post that night so this does not really matter grade-wise. I just wanted to render every scene. I also want to keep this blog as my whole journey, so I was tempted to write about it.
Again, see you in part 5!
메타데이터
- post_id
- f783379e89de
- slug
- advanced-ray-tracer-part-4-2-f783379e89de
- url
- https://medium.com/@Ksatese/advanced-ray-tracer-part-4-2-f783379e89de
- canonical_url
- https://medium.com/@Ksatese/advanced-ray-tracer-part-4-2-f783379e89de
- author_url
- https://medium.com/@Ksatese
- status
- ok
- fetched_at
- 2026-07-21 15:02:46


