GitHub Pages
Use the Website to showcase you and your projects.
GitHub Pages — showcase yourself
Use the Website to showcase you and your projects.
Here I will show you how to make a simple website from Github Pages to showcase your project or yourself.

GitHub Pages
Summary
- What is “GitHub Pages”?
- Build your site — Quickstart
- Customize your website — Database
- What I use to develop a website — Lektor CMS
1. What is “GitHub Pages”?
There are a lot of different platforms to deploy a website to the public Internet. GitHub Pages is GitHub’s free service for you to create a website.
Why do I choose to use GitHub Pages? GitHub Pages offers a lot of features and flexibility, all for free! It is convenient for me to develop something and test it there!
Some of the benefits include:
- Easy to setup
- Seamless collaboration using Git and GitHub
- Live updating with normal GitHub workflow
- Free hosting with
- Flexible to customize your website (HTML / CSS/ JavaScript)
GitHub Pages is a static web hosting service offered by GitHub. It means that your website is hosted directly from the HTML, JS, and CSS files.
GitHub users for hosting user blogs, project documentation, or even whole books created as a page.
2. Build your site — Quickstart
There are two main kinds to start. Below is the link to go to the browser.
1. User or Organization
username.github.io2. **Project Sites**
username.github.io/repository.As GitHub users, GitHub offers you a subdomain of the github.io domain. Your domain will look like this *https://username*.github.io**
— Let’s open a User or Organization page first
First, you need to have a GitHub account if you don’t have one. Sign up for one!
- From your main page, you are at “Overview”. Go to “Repositories” and create a new repository.

overview

repository
- Create a new repository
Fill repository name: username.github.io
username is your account name. Don’t forget to replace it.
Then select “Public” and add a “README file” ->Click “Create repository”


Create a new Repository
- When you saw a page like this, it means you created a repository!

After a while, look at the “orange circle” here, it means still in progress. The Environment will show “github-pages”.

- Go to “Setting” -> “Page” on the left
you will see your website link there

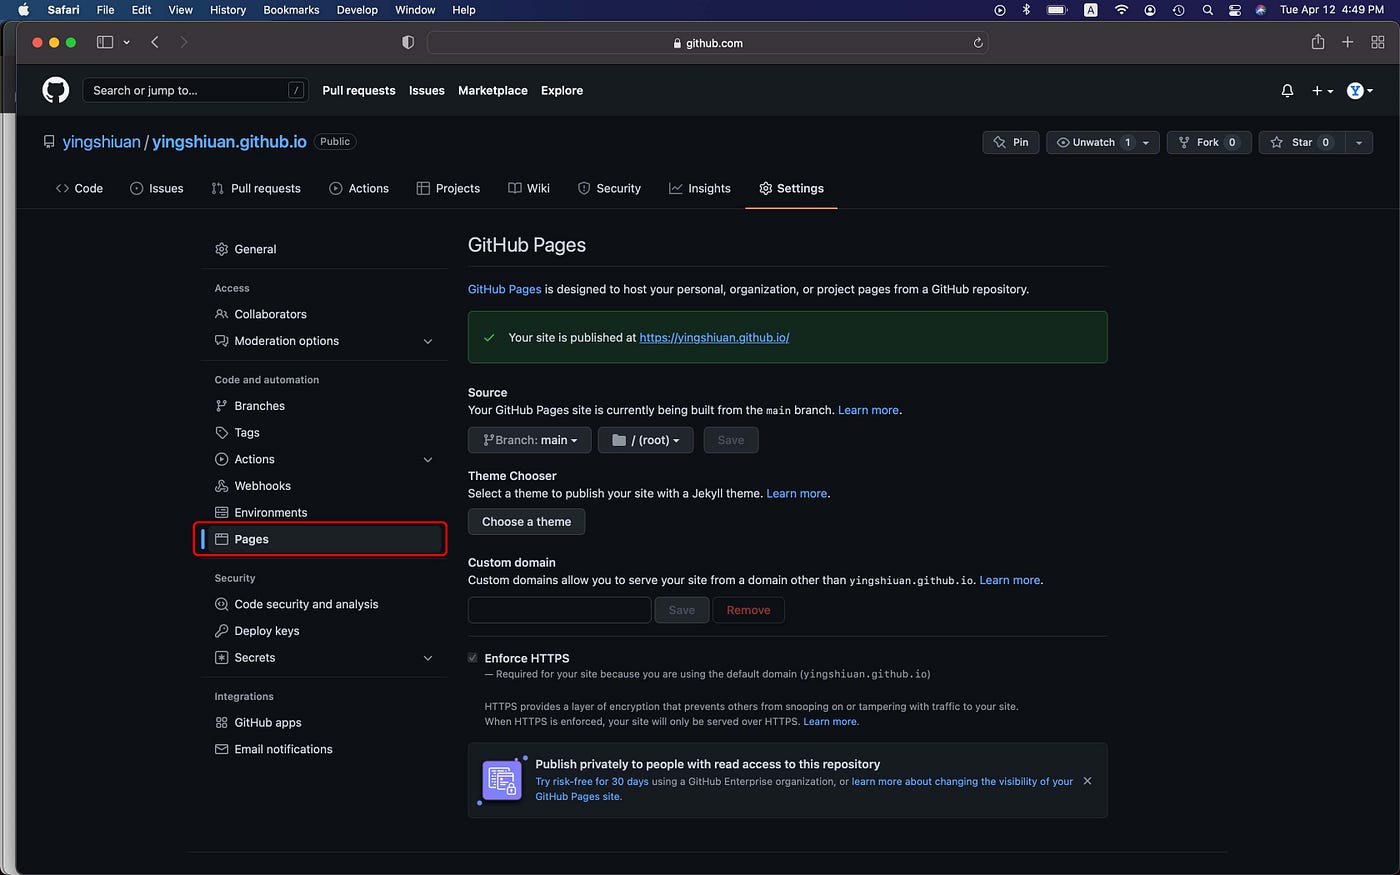
When you click it, it looks like a raw page

- Let’s type simple HTML to try.
Click “Add File”-> “Create new file”

When you want to make GitHub Pages recognize it is a page. Name the file “ index.html ” Even if you have multiple sub-pages inside different folders, Still name it “index.html” (more details come after).

Then I type some simple HTML to test it.
<h1>Hello World </h1>
<h2>Welcome to my page</h2>
Commit new file

- check the “orange circle”. You also can click it to look at it. When it was done. It will turn green. Then you can reload your website page.


- Well done! we create our GitHub pages

Above is how to build a page for the user site
The next part is to build a page for a project site
— Create a Project site
- Create a new repository
Then select “Public” and add a “README file” ->Click “Create repository”

- There is two way to make your repository a website: theme or create from scratch
— choose a theme: “ Setting” -> “Pages” -> Choose a “theme”

or
— create from scratch: create a new file

and files name as “index.html” -> “commit new file”


You will see Environment has “github-pages” active

- Don’t forget to “setting” -> “pages”
Source choose branch “main” /(root) and save it.

your website link also shows on “setting” -> “pages”

Now you will have a simple page !!
3. Customize your website
We can customize our website with HTML, CSS, and JavaScript. But first, we need to know how to build your database for different pages on your website.
Create different folders for each page, inside each folder only save your every HTML as “index.html”

database structure
Here is an example. There are three folders called “about”, “works” and “contact”. There will be three pages named “about”, “works” and “contact” on the website. Add the “about”, “works” and “contact” after the link of your repository. You can link to the pages via GitHub Pages.
https://username.github.io/repository/page
Example of how the Website looks like
https://username.github.io/repository/ -- Homepagehttps://username.github.io/repository/about -- about page
https://username.github.io/repository/works -- works page
https://username.github.io/repository/contact -- contact page4. What I use to develop the website — Lektor CMS
CMS is a content management system, which is computer software used to manage the creation and modification of digital content.
Lektor is a CMS design for static websites. Click the link below if you are interested in it.
A flexible and powerful static content management system for building complex and beautiful websites out of flat files — for people who do not want to make a compromise between a CMS and a static blog engine — Lektor
If you are familiar with CMS systems, HTML, CSS, and JavaScript. You definitely can try Lektor CMS.
Resource
GitHub: https://github.com/
GitHub Pages: https://pages.github.com/
Lektor CMS: https://www.getlektor.com/
Hope you enjoy the Tutorial. If you have any questions, please leave a message below.
메타데이터
- post_id
- f7b35c87b7ba
- slug
- github-pages-f7b35c87b7ba
- url
- https://medium.com/@yingsc/github-pages-f7b35c87b7ba
- canonical_url
- https://medium.com/@yingsc/github-pages-f7b35c87b7ba
- author_url
- https://medium.com/@yingsc
- status
- ok
- fetched_at
- 2026-07-27 06:50:25



