Vegeta Load Testing with OpenShift
Load testing
Vegeta Load Testing with OpenShift
Load testing
Load testing in computers, a type of performance testing, simulates real-world usage of a system or application by subjecting it to multiple, concurrent user requests to identify potential bottlenecks, performance issues, and stability problems under heavy load. It helps ensure the system can handle expected or peak user traffic without significant degradation in performance.
Key aspects of load testing:
- Simulating Real-World Usage: Load testing involves mimicking how multiple users access and interact with a system simultaneously, which is crucial for identifying potential problems that may arise during peak usage periods.
- Identifying Bottlenecks: By applying simulated load, load testing helps pinpoint performance bottlenecks in the system, such as slow response times, high resource consumption, or errors that occur under pressure.
- Performance Evaluation: Load testing measures various performance metrics, including response times, throughput, resource utilization, and error rates, to assess the system’s behavior under load and identify areas needing optimization.
- Early Issue Detection: Load testing is typically performed during the development and testing phases to catch performance issues before they impact real users in a production environment.
This tutorial will guide you through using Vegeta, a versatile HTTP load testing tool, to performance test your applications deployed on OpenShift. We’ll cover deploying Vegeta as a standalone pod and scaling it for distributed load testing using OpenShift’s Job objects.
Understanding Vegeta Basics
Vegeta is a powerful command-line tool for HTTP load testing. It allows you to:
- Define Targets: Specify the URLs and HTTP methods to attack. This can be done directly in the command line or via a
targets.txtfile. - Control Rate and Duration: Set the number of requests per second and the total duration of the attack.
- Add Headers and Body: Include custom headers (e.g., for authentication like JWT) and request bodies (for POST/PUT requests).
- Generate Reports: Output results in various formats, including text, JSON, or an easy-to-comprehend HTML graph.
For more detailed information on Vegeta’s basic functionalities, refer to the Vegeta Load Testing Primer.
Working with Standard
Before we starting to work with Vegeta from a container, I would strongly recommend building an RPM for Vegeta to make it available to other external systems or even just to add it to a minimal UBI image. Building an RPM will help us to keep a strong hold over the version being used and verified, where Vegeta is installed/available, and if we would want to change permission or add configuration and deploy it in a mass scale (when using Red Hat Satellite for example).
Building the Vegeta RPM
In order to build Vegeta, we first need to build “easyjson” and an RPM which is being used during the Vegeta build process.
1) Setting up the environment
All the commands in the following tutorial are running over RHEL 10 system with root privileges. In order to build the RPM, we need to make sure the build packages are available and the right directories exist.
Install RPM Build Tools:
dnf group install -y rpm-development-tools2. Create Directories:
mkdir -p ~/rpmbuild/{BUILD,BUILDROOT,RPMS,SOURCES,SPECS}2) Building easyjson-bin
Luckily, easyjson-bin comes with a very simple Makefile so all we need to do is run the make command that generates the binary and then wrap it and put it in an accessible directory.
Creating the spec file
First create the easyjson-bin.spec file under the ~/rpmbuild/SPECS/ with the following content:
Name: easyjson-bin
Version:        0.9.0
Release:        1%{?dist}
Summary: Package easyjson provides a fast and easy way to marshal/unmarshal
Go structs to/from JSON without the use of reflection

Group:          Utilities
License:        GPLv3
Source0:        https://github.com/mailru/easyjson/archive/refs/tags/v%{version}.tar.gz
BuildArch:      x86_64
BuildRequires:  golang
BuildRequires:  systemd-rpm-macros

%description
Package easyjson provides a fast and easy way to marshal/unmarshal Go structs
to/from JSON without the use of reflection. In performance tests, easyjson
outperforms the standard encoding/json package by a factor of 4-5x, and
other JSON encoding packages by a factor of 2-3x.

easyjson aims to keep generated Go code simple enough so that it can be
easily optimized or fixed. Another goal is to provide users with the ability
to customize the generated code by providing options not available with the
standard encoding/json package, such as generating "snake_case" names or
enabling omitempty behavior by default.

%define debug_package %{nil}
%define _build_id_links none
%global debug_package %{nil}

%prep
%setup -q
#%autosetup

%build
make build

%install
rm -rf $RPM_BUILD_ROOT
install -d -m 0755 $RPM_BUILD_ROOT%{_bindir}
install -m 0755 bin/easyjson  $RPM_BUILD_ROOT%{_bindir}/

%clean
#make clean
rm -rf $RPM_BUILD_ROOT
rm -f debugfiles.list  debuglinks.list  debugsourcefiles.list  debugsources.list  elfbins.list

%files
%defattr(-,root,root,-)
%{_bindir}/easyjson

%changelog
* Thu Feb 06 2025 Me Root <me@root.me>
-
2. Download the source tar file
and download the release package from github.com to the ~/rpmbuild/SOURCES/ directory:
wget https://github.com/mailru/easyjson/archive/refs/tags/v0.9.0.tar.gz \
-P ~/rpmbuild/SOURCES/
before we continue we need to change the name of the build directory
cd ~/rpmbuild/SOURCES/ && \
tar -zxvf v0.9.0.tar.gz && \
mv easyjson-0.9.0/ easyjson-bin-0.9.0/ && \
rm -f v0.9.0.tar.gz && \
tar -zcvf v0.9.0.tar.gz easyjson-bin-0.9.0/ && \
rm -Rf easyjson-bin-0.9.0/
3. Building the RPM
Now we can go ahead and build the easyjson package:
rpmbuild -ba ~/rpmbuild/SPECS/easyjson-bin.specIf everything is o.k. you would see the following output:
Checking for unpackaged file(s): /usr/lib/rpm/check-files /root/rpmbuild/BUILDROOT/easyjson-0.9.0-1.el10.x86_64
Wrote: /root/rpmbuild/SRPMS/easyjson-0.9.0-1.el10.src.rpm
Wrote: /root/rpmbuild/RPMS/x86_64/easyjson-0.9.0-1.el10.x86_64.rpm
Executing(%clean): /bin/sh -e /var/tmp/rpm-tmp.GhULKS
+ umask 022
+ cd /root/rpmbuild/BUILD
+ cd easyjson-0.9.0
+ rm -rf /root/rpmbuild/BUILDROOT/easyjson-0.9.0-1.el10.x86_64
+ rm -f debugfiles.list debuglinks.list debugsourcefiles.list debugsources.list elfbins.list
+ RPM_EC=0
++ jobs -p
+ exit 0
Executing(rmbuild): /bin/sh -e /var/tmp/rpm-tmp.U1OM9A
+ umask 022
+ cd /root/rpmbuild/BUILD
+ rm -rf /root/rpmbuild/BUILD/easyjson-0.9.0-SPECPARTS
+ rm -rf easyjson-0.9.0 easyjson-0.9.0.gemspec
+ RPM_EC=0
++ jobs -p
+ exit 0
4. Installing the RPM
The next step will be to install the RPM and the easyjson binary will be available on your system:
dnf install -y /root/rpmbuild/RPMS/x86_64/easyjson-bin-0.9.0-1.el10.x86_64.rpm3) Building the Vegeta RPM
For Vegeta RPM we are going to follow the same steps we did for building the easyjson package.
Create the SPEC file
Create the vegeta.spec file under the ~/rpmbuild/SPECS/ with the following content:
Name: vegeta
Version:        12.12.0
Release:        2%{?dist}
Summary: vegeta binary for HTTP load testing tool.

Group:          Utilities
License:        GPLv3
Source0:        https://github.com/tsenart/vegeta/archive/refs/tags/v12.12.0.tar.gz
BuildArch:      x86_64
BuildRequires:  golang easyjson-bin
BuildRequires:  systemd-rpm-macros

%description
Vegeta is a versatile HTTP load testing tool built out of a need to
drill HTTP services with a constant request rate. It's over 9000!

%define debug_package %{nil}
%define _build_id_links none
%global debug_package %{nil}

%prep
#%setup -q
%autosetup

%build
make vegeta

%install
rm -rf $RPM_BUILD_ROOT
install -d -m 0755 $RPM_BUILD_ROOT%{_bindir}
install -m 0755 vegeta  $RPM_BUILD_ROOT%{_bindir}/vegeta

%clean
rm -rf $RPM_BUILD_ROOT
rm -f debugfiles.list  debuglinks.list  debugsourcefiles.list  debugsources.list  elfbins.list

%files
%defattr(-,root,root,-)
%{_bindir}/vegeta

%changelog
* Thu Feb 06 2025 Oren Oichman <two.oes@gmail.com>
-
2. Download the source tar file and download the release package from github.com to the ~/rpmbuild/SOURCES/ directory:
wget https://github.com/tsenart/vegeta/archive/refs/tags/v12.12.0.tar.gz \
-P ~/rpmbuild/SOURCES/
3. Building the RPM
Now we can go ahead and build the easyjson package:
rpmbuild -ba ~/rpmbuild/SPECS/vegeta.specIf everything is o.k. you would see the following output:
Wrote: /root/rpmbuild/SRPMS/vegeta-12.12.0-2.el10.src.rpm
Wrote: /root/rpmbuild/RPMS/x86_64/vegeta-12.12.0-2.el10.x86_64.rpm
Executing(%clean): /bin/sh -e /var/tmp/rpm-tmp.Ttb5VQ
+ umask 022
+ cd /root/rpmbuild/BUILD
+ cd vegeta-12.12.0
+ rm -rf /root/rpmbuild/BUILDROOT/vegeta-12.12.0-2.el10.x86_64
+ rm -f debugfiles.list debuglinks.list debugsourcefiles.list debugsources.list elfbins.list
+ RPM_EC=0
++ jobs -p
+ exit 0
Executing(rmbuild): /bin/sh -e /var/tmp/rpm-tmp.hwT5VY
+ umask 022
+ cd /root/rpmbuild/BUILD
+ rm -rf /root/rpmbuild/BUILD/vegeta-12.12.0-SPECPARTS
+ rm -rf vegeta-12.12.0 vegeta-12.12.0.gemspec
+ RPM_EC=0
++ jobs -p
+ exit 0
Now that you have the Vegeta RPM, you can go ahead and install it on the ubi-minimal image.
4. Building the Image
Option 1 : using the RPM
In order to deploy Vegeta, we will need first to install it on a UBI image and then copy the binary to the minimal image (Yes, if we set up a dnf repository and sign it with a GPG key we can simply run the microdnf command and install it, but this is a quick bypass for that).
Start by creating a working directory and switching to it:
mkdir ubi-vegeta && cd ubi-vegetaCreating the Containerfile
The Containerfile will look as follows:
FROM registry.redhat.io/ubi10 AS builder

COPY vegeta-12.12.0-2.el10.x86_64.rpm /opt/app-root/

RUN dnf install -y /opt/app-root/vegeta-12.12.0-2.el10.x86_64.rpm && \
    dnf clean all && \
    rm -f /opt/app-root/vegeta-12.12.0-2.el10.x86_64.rpm

FROM registry.redhat.io/ubi10-minimal
COPY --from=builder /usr/bin/vegeta /usr/bin/vegeta
COPY run.sh /opt/app-root/

USER 1001
ENTRYPOINT ["/opt/app-root/run.sh"]
As mentioned above, we are using UBI10 to deploy the RPM and then just copy the binary file to UBI-minimal and the run.sh file as the ENTRYPOINT in order to run when we start the Pod.
- The
run.shfile
The run.sh file is a simple tail command to /dev/null in order to create an infinite loop:
#!/bin/sh
tail -f /dev/null
and make sure the file is executable:
chmod a+x run.sh3. Copying the RPM
Let’s copy the RPM we have created in the previous section to our working directory:
cp /root/rpmbuild/RPMS/x86_64/vegeta-12.12.0-2.el10.x86_64.rpm .Option 2 : Building from source
similar to the process above we can build a multi layer Containerfile which will compile the go LANG code and add the necessary files.
here is the Containerfile content for the source build :
FROM registry.redhat.io/ubi10/go-toolset AS builder

USER root
RUN dnf install -y make tar curl gzip && \
    mkdir /opt/work && \
    dnf clean all && \
    cd /opt/work

ENV WORKDIR /opt/work
RUN curl -sL v0.9.0.tar.gz https://github.com/mailru/easyjson/archive/refs/tags/v0.9.0.tar.gz | tar zxvf - -C /opt/work && \
   cd /opt/work/easyjson-0.9.0 && \
   go build -o /usr/bin/easyjson ./easyjson

RUN curl -sL v12.12.0.tar.gz https://github.com/tsenart/vegeta/archive/refs/tags/v12.12.0.tar.gz | tar zxvf - -C /opt/work && \
    cd /opt/work/vegeta-12.12.0 && \
    make vegeta

FROM registry.redhat.io/ubi10-minimal
COPY --from=builder /opt/work/vegeta-12.12.0/vegeta /usr/bin/vegeta
COPY run.sh /usr/bin/

USER nobody

ENTRYPOINT ["/usr/bin/run.sh"]
CMD ["/usr/bin/run.sh"]
4. Building the Image
We will use buildah to build our new image and we will set up the registry and push the image to it as a following step to make it available to OpenShift:
export REGISTRY="registry.example.com"
buildah bud -f Containerfile -t $REGISTRY/ubi-vegeta && \
buildah push $REGISTRY/ubi-vegeta
Deploying Vegeta on OpenShift
To leverage Vegeta for testing applications within your OpenShift cluster, you can deploy Vegeta directly as a pod. This allows for in-cluster load testing, which can be more efficient as traffic stays within the OpenShift network.
Prerequisites:
- Access to an OpenShift cluster.
- OpenShift CLI (
oc) installed and configured.
1. Set up an Example Application (Optional but Recommended)
For demonstration purposes, it’s helpful to have a simple application deployed on OpenShift to target with Vegeta. You can deploy a basic Go-based API service as described in the Red Hat Developer article on performance testing microservices on Kubernetes.
2. Running Standalone Vegeta Tests
You can run Vegeta as a temporary pod to execute a single load test. This is suitable for quick tests or when you don’t require massive, distributed load.
Create the namespace :
oc new-project vegetaA. Building the deployment
To launch a Vegeta pod and run a test against a service (in our exam we are going to test the OpenShift Console URL ) within the same OpenShift namespace (project), use the following command:
oc create deployment vegeta-deployment \
    --image $REGISTRY/ubi-vegeta \
    --namespace vegeta \
    --replicas 1
and we will set an environment variable to match the openshift console which we will test during our command :
oc set env deployment.apps/vegeta-deployment \
VEGETA_TARGET=<Your Application URL>
B. Running the test
Now that we are running the vegeta container we can rsh to it and run vegeta :
VEGETA_POD=$(oc get pods -o name| grep vegeta)
oc rsh ${VEGETA_POD}
once your open the POD console you can run the vegeta command with the following arguments :
echo "GET ${VEGETA_TARGET}" | vegeta \
    attack \
    -duration=5s \
    -rate=5 | vegeta report \
    --type=text
echo 'GET${VEGETA_TARGET}': Defines the target for vegeta and the Method to use during the tests.vegeta attack -duration=5s -rate=5 -max-workers=64: Executes the attack for 5 seconds.-rate=5means the rate is set to 5, lettingmax-workerscontrol concurrency.vegeta report: Generates a summary report of the attack in the terminal.
3. Running vegeta recursive testing with an HTML report
For higher load or more complex testing scenarios, you can leverage OpenShift’s cronjob object to run multiple Vegeta pods in parallel, distributing the load across them and save all the loads to a persisted storage and then use an HTTPD to access it.
a. Create the Persistent storage claim :
We would want a PVC in order to share the results between the vegeta cronjob and an HTTPD service to publish them.
create a **vegeta-pvc.yaml**file with the following content :
cat << EOF | oc apply -f -
apiVersion: v1
kind: PersistentVolumeClaim
metadata:
  name: vegeta-data-pvc
  namespace: vegeta
spec:
  accessModes:
    - ReadWriteMany
  resources:
    requests:
      storage: 1Gi
  storageClassName: nfs-storage
EOF
b. Create a vegeta-run.sh script file
in Order to run the script under a cronjob we will create a script that takes in environment variables and run it.
The **vegeta-run.sh**script file has the following content :
#!/bin/bash

if [[ ${TARGET_URL} == "" ]]; then
    echo "the TARGET_URL is not specified"
    exit 2;
fi

echo "GET ${TARGET_URL}" | vegeta attack -duration=5s \
    -rate=5 \
    -output=/dev/stdout | tee -a /mnt/data/results.bin-$(date +%s)
Let’s make sure it’s executable :
chmod a+x vegeta-run.shFor the last step of the script we will add it to our vegeta container :
FROM $REGISTRY/ubi-vegeta

COPY vegeta-run.sh /usr/bin/
and rebuild the container :
export REGISTRY="registry.example.com"
buildah bud -f Containerfile -t $REGISTRY/ubi-vegeta && \
buildah push $REGISTRY/ubi-vegeta- replace the REGISTRY value with your own registry URL.
C. Creating a vegeta-cronjob.yaml file:
We don’t want to use the default service account so we will create a new service account for vegeta:
oc create sa vegetaThis YAML defines an OpenShift cronJob that will launch multiple Vegeta pods concurrently.
cat << EOF | oc apply -f -
apiVersion: batch/v1
kind: CronJob
metadata:
  name: vegeta-cronjob
spec:
  schedule: "*/5 * * * *"
  jobTemplate:
    spec:
      parallelism: 1
      completions: 5
      backoffLimit: 0
      template:
        metadata:
          name: vegeta
        spec:
          serviceAccount: vegeta
          serviceAccountName: vegeta
          restartPolicy: Never
          containers:
          - name: vegeta
            image: ${REGISTRY}/ubi-vegeta
            command: ["/usr/bin/vegeta-run.sh"]
            volumeMounts:
            - name: data-volume
              mountPath: /mnt/data
          volumes:
          - name: data-volume
            persistentVolumeClaim:
              claimName: vegeta-data-pvc
EOF- Make sure TARGET_URL` `is set once you deploy the cronjob , we have uploaded to OpenShift in the previous section :
oc set env cronjob.batch/vegeta-cronjob \
TARGET_URL=<Your application URL>rate=5: Each pod will send 100 requests per second. The total rate will beparallelism * rate.-output=/dev/stdout | tee -a /mnt/data/results.bin-$(data +%s): Each Vegeta pod will save its results to a binary file.
b. Collect and Aggregate Results (Advanced):
Let’s use the deployment from the previous step to run some test results with our shared PVC .
Modify the deployment and add the pvc :
oc set volume deployment.apps/vegeta-deployment \
--add \
--name=data-volume \
--type=persistentVolumeClaim \
--claim-name=vegeta-data-pvc  \
--mount-path=/mnt/data
Now let’s rsh into our pod :
oc rsh $(oc get pods -o name | grep deployment)After the distributed job completes, you’ll have results.bin-<number> files (or their content in logs) from each Vegeta pod. To get a consolidated report, you would typically:
- Extract Results: Retrieve the
results.bin-<number>content from each pod's logs or a shared volume. - Aggregate: Concatenate all
results.bin-<number>files into a single file.
- Example (if results are in separate files like
result.bin-1111,results.bin-1112):
vegeta report /mnt/data/results.bin-* > /tmp/combined_report.txt

vegeta plot /mnt/data/results.bin-* > /tmp/combined_report.html- The Red Hat article provides a more elaborate script to collect and aggregate results from multiple Vegeta pods using
oc get poandoc rsync.
Generating Reports
A. Vegeta provides powerful reporting capabilities:
- Text Report: To see a summary in your terminal:
cat /mnt/data/results.bin-* | vegeta report- JSON Report: For programmatic consumption:
cat /mnt/data/results.bin-* | vegeta report --type=json- HTML Plot: To generate an interactive HTML graph:
cat /mnt/data/results.bin-* | vegeta plot \
--title="My Load Test" > report.html
Once you have the report you can run a small httpd container and see the content of the report which should look like this :
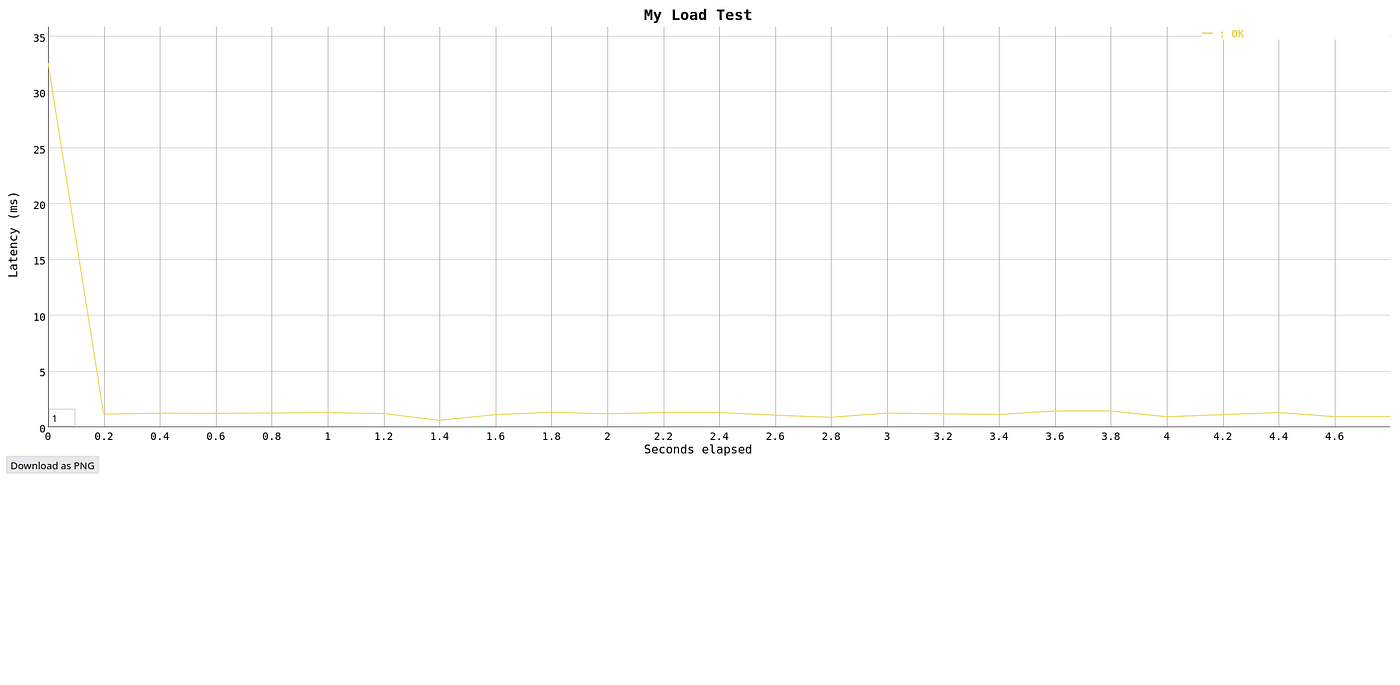
If you have any question feel free to respond/ leave a comment. You can find me on linkedin at : https://www.linkedin.com/in/orenoichman Or twitter at : https://twitter.com/ooichman
메타데이터
- post_id
- f8a38a0d0887
- slug
- vegeta-load-testing-with-openshift-f8a38a0d0887
- url
- https://medium.com/@two-oes/vegeta-load-testing-with-openshift-f8a38a0d0887
- canonical_url
- https://medium.com/@two-oes/vegeta-load-testing-with-openshift-f8a38a0d0887
- author_url
- https://medium.com/@two-oes
- status
- ok
- fetched_at
- 2026-07-18 18:26:16


