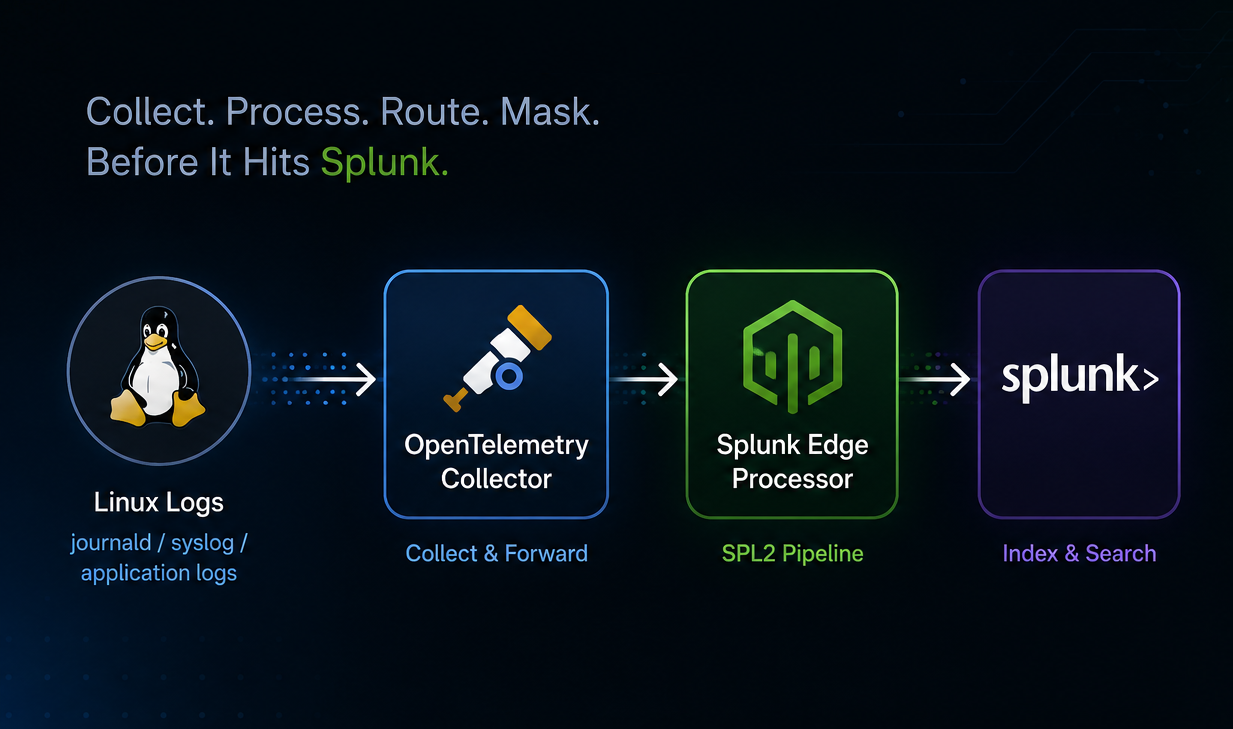
PART 2 — Distributed Splunk in Docker: Forwarder Architecture & Data Ingestion Pipeline
In Part 1 of this series, a fully distributed Splunk deployment was created using Docker, including both Indexer Clustering and Search…
PART 2 — Distributed Splunk in Docker: Forwarder Architecture & Data Ingestion Pipeline
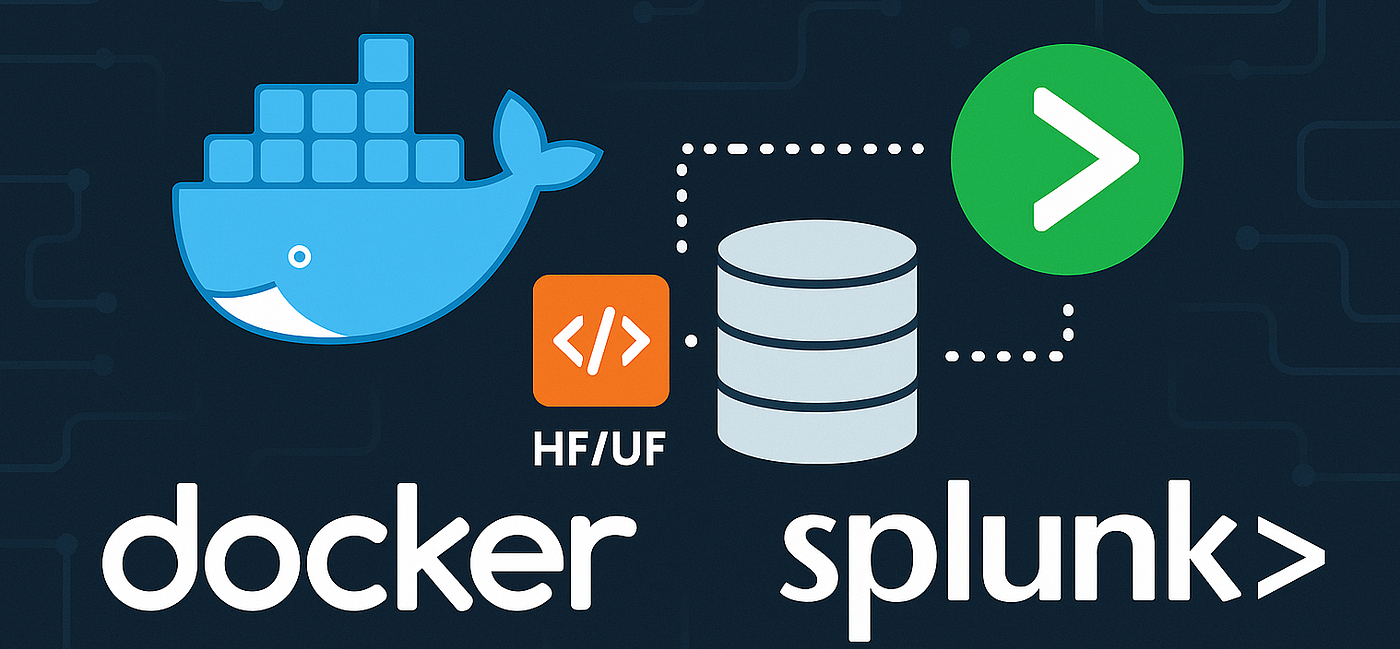
In Part 1 of this series, a fully distributed Splunk deployment was created using Docker, including both Indexer Clustering and Search Head Clustering. With the core architecture now established, the next step is to examine how data flows into Splunk. Part 2 focuses on Heavy Forwarders and Universal Forwarders, two critical components that define data ingestion, parsing behavior, and scalability across complex environments.
🧩 Step 1: Build the Compose file
In Part 1, the Docker Compose configuration established the core components of the distributed Splunk environment. For Part 2, the stack is expanded to include two additional services: a Heavy Forwarder (HF) and a Universal Forwarder (UF). These forwarders are integrated into the same Docker network (splunk-net), allowing them to communicate seamlessly with the Indexer Cluster and the rest of the Splunk infrastructure.
The Heavy Forwarder service introduces a parsing and routing layer capable of handling more advanced data-processing tasks before events reach the indexers. The Universal Forwarder, on the other hand, represents Splunk’s lightweight data shipper designed for minimal resource consumption and high-volume log forwarding.
Both forwarders are added as standalone containers with their own persistent volumes, exposed management ports, and environment variables that ensure compatibility with the rest of the distributed setup.
⚠️ Warning: As in Part 1, confirm that the new ports assigned for HF and UF do not conflict with existing services on the host.
docker-compose.yml:
# docker-compose.yml (snippet)
# Source: https://github.com/seynur/seynur-demos/blob/main/splunk/splunk-cluster-lab-docker/docker-compose.yml

...
  hf:
    image: splunk/splunk:latest
    container_name: splunk-hf
    hostname: splunk-hf
    platform: linux/amd64
    environment:
      SPLUNK_START_ARGS: "--accept-license"
      SPLUNK_GENERAL_TERMS: "--accept-sgt-current-at-splunk-com"
      SPLUNK_PASSWORD: "admin123"
    ports:
      - "10000:8000"  # HF Web UI
      - "1189:8089"   # HF Management Port
      - "9997:9997"   # Forwarding Port
    volumes:
      - hf-etc:/opt/splunk/etc
      - hf-var:/opt/splunk/var
    networks:
      - splunk-net
  uf:
    image: splunk/universalforwarder:latest
...
You can view the complete docker-compose file here.
Run the following command to start all containers for the Splunk distributed environment, including the Heavy Forwarder (HF) and Universal Forwarder (UF) services introduced in Part 2:
docker compose -p splunk_dist up -dAfter starting, monitor all running containers in Docker Desktop under the Containers section. You should now see two additional services listed as splunk-hf and splunk-uf, representing the Heavy Forwarder and Universal Forwarder respectively.
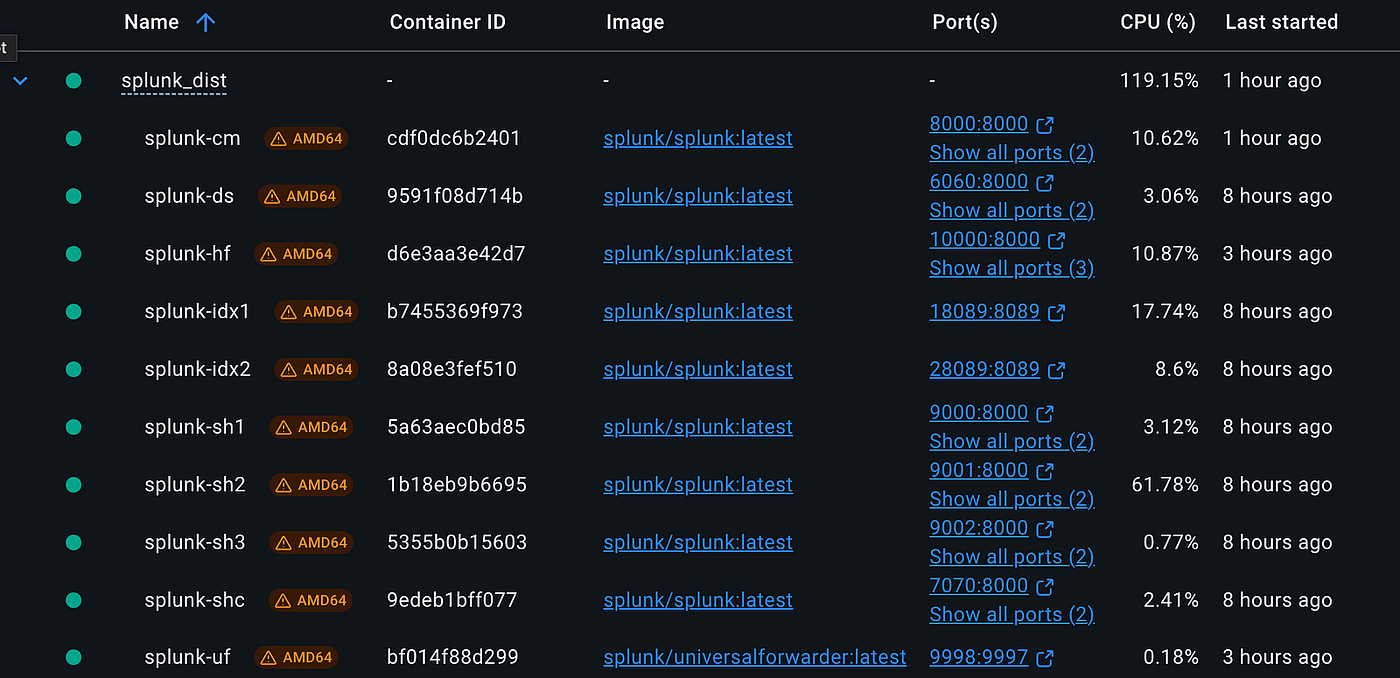
Docker Containers
To access the newly added forwarder containers, follow the same approach used in Part 1. Use docker exec with the -u splunk flag to open a shell with the correct permissions:
# Access the container shell as the 'splunk' user
docker exec -u splunk -it splunk-hf bash    # Heavy Forwarder
docker exec -u splunk -it splunk-uf bash    # Universal Forwarder
As in Part 1, add the following entry to your
/etc/hostsfile to simplify access to thesplunk-hfinterface:127.0.0.1 splunk-hf
Once the forwarder containers are running, the Heavy Forwarder can be accessed through its exposed Splunk Web port, just like the other components in Part 1. The Universal Forwarder does not include a web interface, so only the HF will appear in the browser, as shown below:
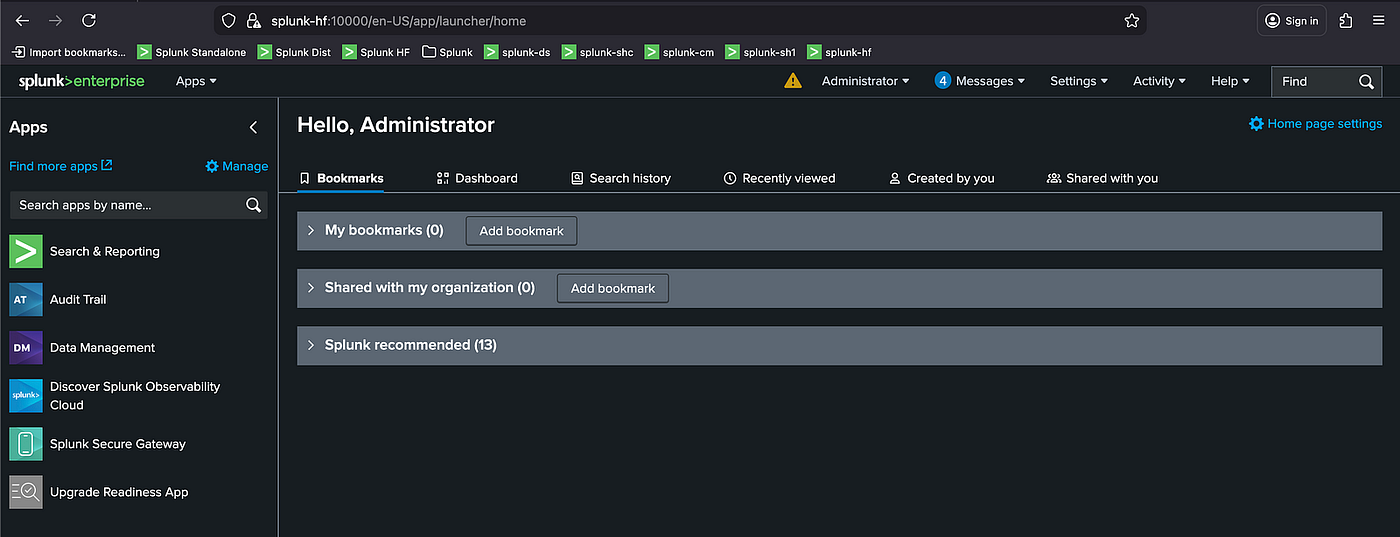
Splunk Web Interface
⚠️ Note: The repository cloned in Part 1 is also required for this section. Ensure it is present on your system before continuing.
In this part of the article series, the workflow is organized into the following steps: first, configuring the Universal Forwarder (Step 2) and the Heavy Forwarder (Step 3); next, setting up data routing for both forwarders (Step 4); then configuring log inputs (Step 5); followed by verifying data flow on the Search Head (Step 6); and finally, configuring the Splunkbase app (Step 7).
🧩 Step 2: Configure the Universal Forwarder
This step prepares the Universal Forwarder by applying essential configuration apps, adjusting permissions, and registering it with the Deployment Server. After completing these tasks, the UF becomes ready to ingest and forward log data.
1. Copy Configuration Apps to the Universal Forwarder
Apps placed under /opt/splunk/etc/apps are used locally by the Universal Forwarder itself. To copy the necessary configuration apps, run the following commands:
docker cp <path_to_cloned_repo>/seynur-demos/splunk/splunk-cluster-lab-docker/uf/:opt:splunkforwarder:etc:apps/org_all_deploymentclient splunk-uf:/opt/splunkforwarder/etc/apps/2. Adjust File Permissions
To ensure proper file ownership and permissions, enter the Universal Forwarder container as root and update ownership:
docker exec -u 0 -it splunk-uf bash # enter as root
chown -R splunk:splunk /opt/splunkforwarder
exit
3. Restart Splunk
Restart the Splunk instance within the container to apply the changes:
docker exec -u splunk -it splunk-uf bash # re-enter as splunk
/opt/splunk/bin/splunkforwarder restart
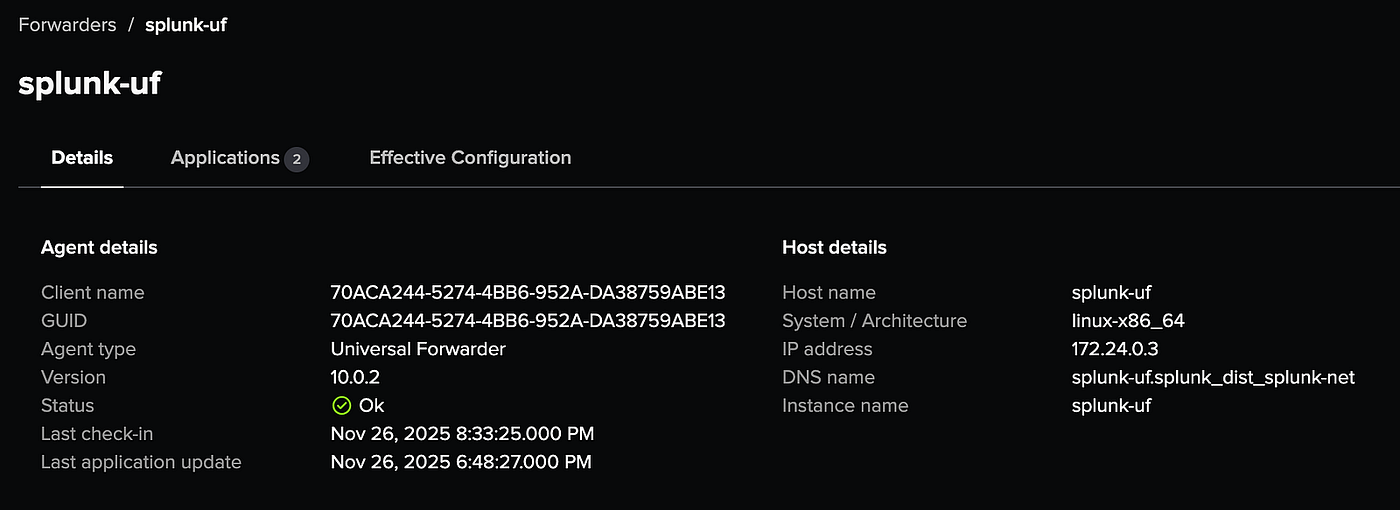
4. Verify the Deployment Server
Navigate to Settings → Agent Management and confirm that splunk-uf appears in the list of connected deployment clients.
🧩 Step 3: Configure the Heavy Forwarder
This step prepares the Heavy Forwarder with the necessary configuration apps and permissions so it can register with the Deployment Server and operate correctly within the environment.
1. Copy Configuration Apps to the Heavy Forwarder
Apps placed under /opt/splunk/etc/apps are used locally by the Heavy Forwarder itself. To copy the necessary configuration apps, run the following commands:
docker cp <path_to_cloned_repo>/seynur-demos/splunk/splunk-cluster-lab-docker/hf/:opt:splunk:etc:apps/org_all_deploymentclient splunk-hf:/opt/splunk/etc/apps/2. Adjust File Permissions
To ensure proper file ownership and permissions, enter the Universal Forwarder container as root and update ownership:
docker exec -u 0 -it splunk-hf bash # enter as root
chown -R splunk:splunk /opt/splunk
exit
3. Restart Splunk
Restart the Splunk instance within the container to apply the changes:
docker exec -u splunk -it splunk-hf bash # re-enter as splunk
/opt/splunk/bin/splunk restart
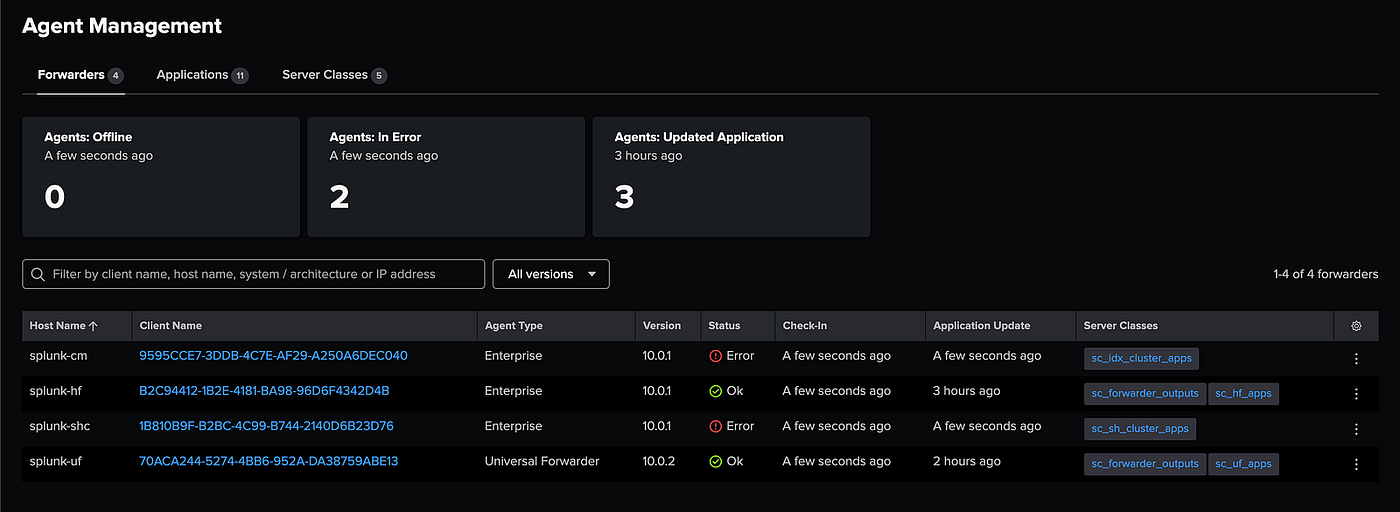
4. Verify the Deployment Server
Navigate to Settings → Agent Management and confirm that splunk-hf appears in the list of connected deployment clients.
🧩 Step 4: Configure Data Routing (HF & UF)
To ensure that both the Universal Forwarder (UF) and Heavy Forwarder (HF) send data to the correct indexers, a routing configuration must be applied through the Deployment Server. This section creates a dedicated Server Class and assigns the output application that defines where the forwarders should forward their data.
1. Create the Server Class
- Navigate to: Settings → Agent Management → Server Classes → New Server Class
- Enter the server class name:
sc_forwarder_outputs, then save.
2. Assign the Output Configuration App
- Go to: Settings → Agent Management → Server Classes → sc_forwarder_outputs →
org_forwarder_outputs→ Save - This attaches the output configuration app to the server class.
3. Define Agent Scope
- Navigate to: Settings → Agent Management → Server Classes → sc_forwarder_outputs → Agents
- Set the Include section to
*, and in the Exclude section addsplunk-cmandsplunk-shc.
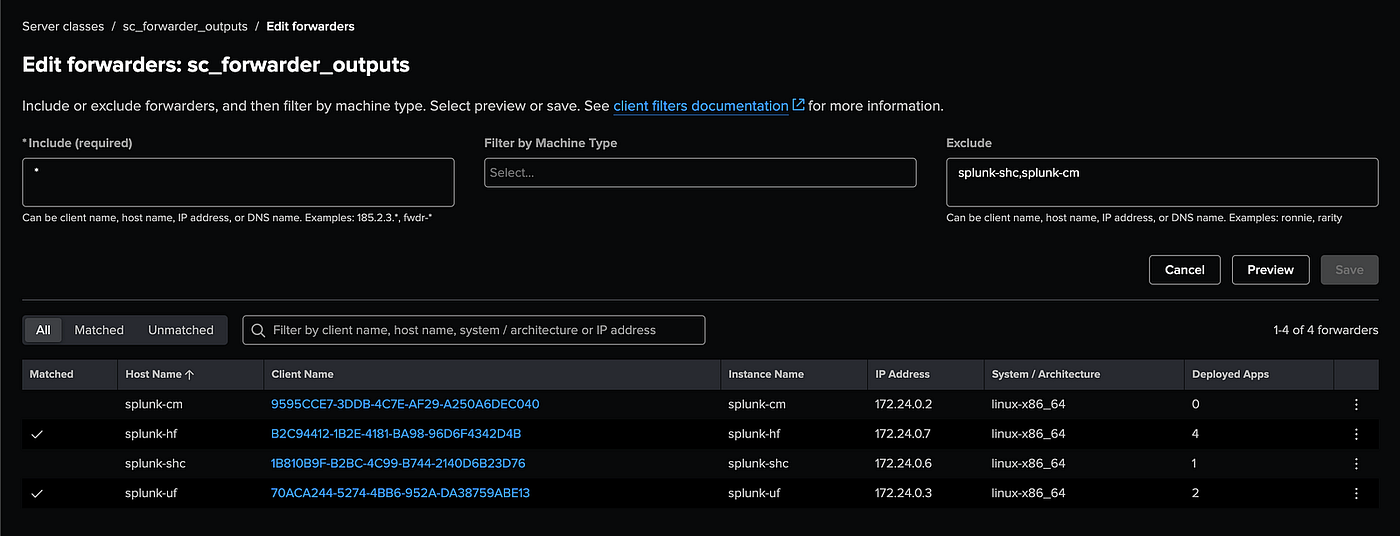
- This ensures that only UF and HF containers receive the output configuration.
4. Restart Forwarders (Recommended for Production)
To apply the new output configuration, it is recommended to restart the forwarders via: Settings → Agent Management → Applications → org_forwarder_outputs → Restart Agent
While this step is not critical in a lab environment, performing a restart in production helps avoid unintended restarts across all agents and ensures configurations are applied cleanly.
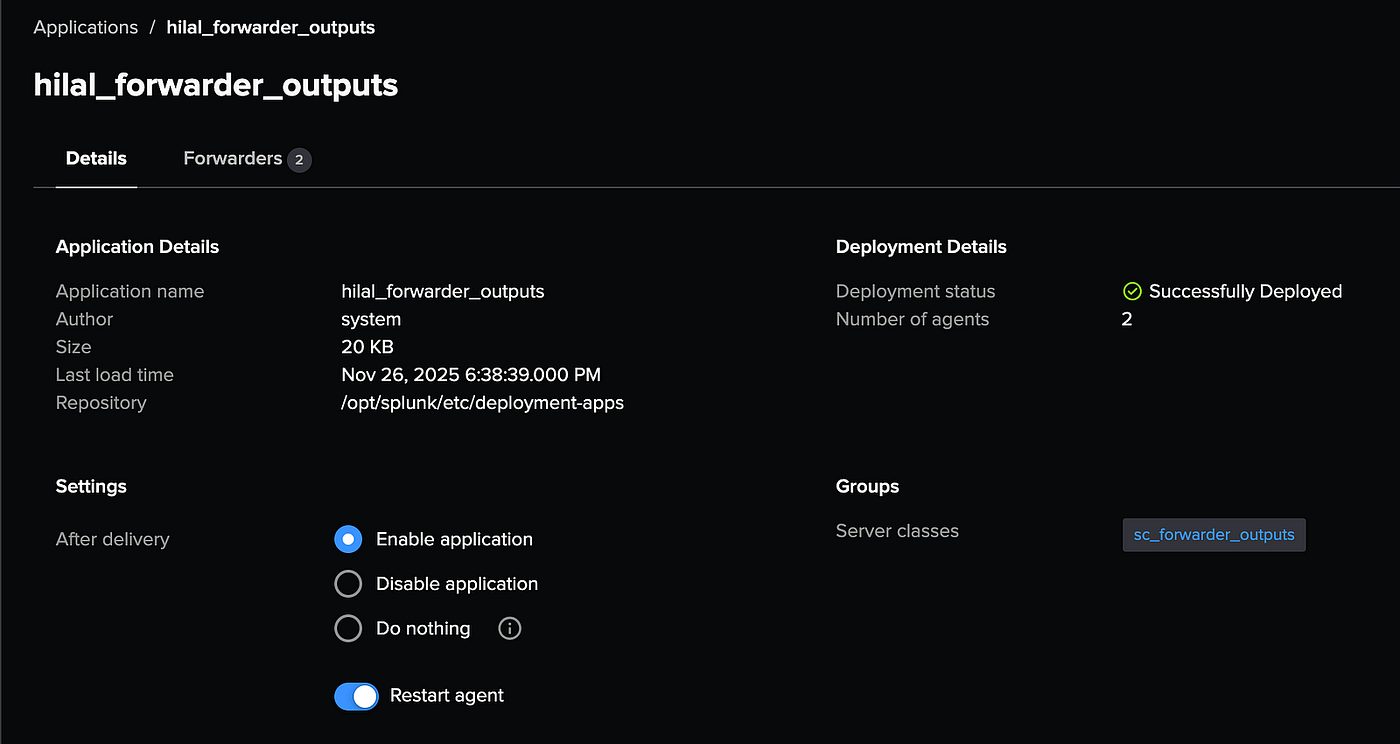
The environment is now ready for input configuration.
🧩 Step 5: Configure Log Inputs
Configuring log inputs for both the Universal Forwarder (UF) and Heavy Forwarder (HF) involves preparing indexes, deploying input configurations, simulating log data.
1. Create new indexes for input
Connect to the Deployment Server and navigate to the indexes app directory. Then open the indexes.conf file located at /opt/splunk/etc/deployment-apps/org_all_indexes/local/:
docker exec -u splunk -it splunk-ds bash
vi /opt/splunk/etc/deployment-apps/org_all_indexes/local/indexes.conf
Add the following configuration to the file, then save and close it.
[uf_os]
homePath = $SPLUNK_DB/uf_os/db
coldPath = $SPLUNK_DB/uf_os/colddb
thawedPath = $SPLUNK_DB/uf_os/thaweddb

[hf_os]
homePath = $SPLUNK_DB/hf_os/db
coldPath = $SPLUNK_DB/hf_os/colddb
thawedPath = $SPLUNK_DB/hf_os/thaweddb

[hf_security]
homePath = $SPLUNK_DB/hf_security/db
coldPath = $SPLUNK_DB/hf_security/colddb
thawedPath = $SPLUNK_DB/hf_security/thaweddb
These indexes will be used to store data processed by the Universal Forwarder (UF) and Heavy Forwarder (HF).
2. Deploy Input Configurations
To enable UF and HF to collect and process logs, input and props apps must be deployed via the Deployment Server.
Copy the UF and HF configuration apps to the Deployment Server:
docker cp <path_to_cloned_repo>/seynur-demos/splunk/splunk-cluster-lab-docker/ds/:opt:splunk:etc:deployment-apps/org_hf_inputs splunk-ds:/opt/splunk/etc/deployment-apps/
docker cp <path_to_cloned_repo>/seynur-demos/splunk/splunk-cluster-lab-docker/ds/:opt:splunk:etc:deployment-apps/org_hf_props splunk-ds:/opt/splunk/etc/deployment-apps/
docker cp <path_to_cloned_repo>/seynur-demos/splunk/splunk-cluster-lab-docker/ds/:opt:splunk:etc:deployment-apps/org_uf_inputs splunk-ds:/opt/splunk/etc/deployment-apps/
Reload the Deployment Server to activate the new apps:
/opt/splunk/bin/splunk reload deploy-serverCreate two Server Classes on the DS UI:
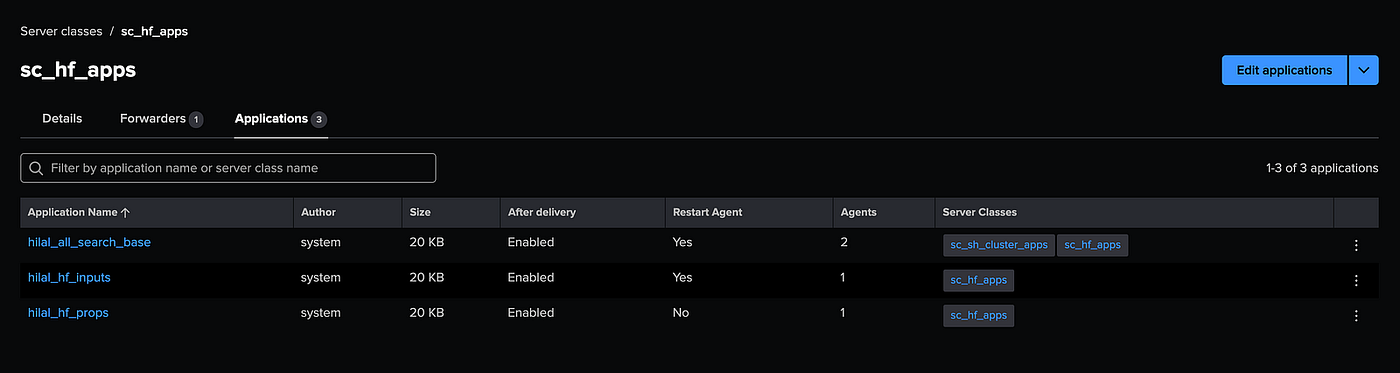
- Assign the following apps to sc_hf_apps:
org_hf_inputsorg_hf_propsorg_all_search_base
The org_all_search_base app enables SSL and requires a forwarder restart to take effect. You can either enable automatic restarts within the app or manually connect to the Heavy Forwarder and restart it. Since this is a lab environment, both methods are acceptable.
- Assign the following apps to sc_uf_apps:
org_uf_inputs

This setup ensures that the Heavy Forwarder (HF) and Universal Forwarder (UF) receive their respective input configurations correctly.
3. Push the changes
After configuring the server classes, go to the Cluster Manager’s Splunk Web interface. Under Settings → Indexer Clustering → Configuration Bundle Actions, validate the bundle, check for errors, and then push the bundle to apply the changes across the cluster.
4. Apply the SHCluster Bundle
To ensure consistent configuration across all Search Heads, including indexes, event types, and other knowledge objects, the SHC bundle must be applied.
/opt/splunk/bin/splunk apply shcluster-bundle -target https://splunk-sh1:8089This finalizes the input configuration deployment for both the Universal Forwarder and Heavy Forwarder.
5. Create dummy linux inputs
Since Splunk containers do not generate real /var/log activity, synthetic data must be injected into both the Universal Forwarder (UF) and Heavy Forwarder (HF) to simulate a traditional Linux host
Copy the sample syslog file to the forwarders:
docker cp <path_to_cloned_repo>/seynur-demos/splunk/splunk-cluster-lab-docker/syslog splunk-uf:/var/log/
docker cp <path_to_cloned_repo>/seynur-demos/splunk/splunk-cluster-lab-docker/syslog splunk-hf:/var/log/
Example syslog entries include:
Nov 26 10:12:34 ubuntu kernel: [  123.456789] usb 1-1: new high-speed USB device number 3 using ehci-pci
Nov 26 10:12:35 ubuntu systemd[1]: Starting Daily apt download activities...
Nov 26 10:12:35 ubuntu systemd[1]: apt-daily.service: Succeeded.
...
Both the UF and HF will detect /var/log/syslog and forward events based on the input configurations previously deployed.
🧩 Step 6: Verify Data Flow on the Search Head
Once all configurations are applied and sample log data is ingested, the final step is to verify on the Search Head that events flow correctly through the ingestion pipeline. This validation confirms that inputs, routing, parsing, and indexing are functioning as expected.
⚠️ Note: Since the sample syslog data contains entries dated Nov 26, be sure to adjust your search time range accordingly when querying the logs.
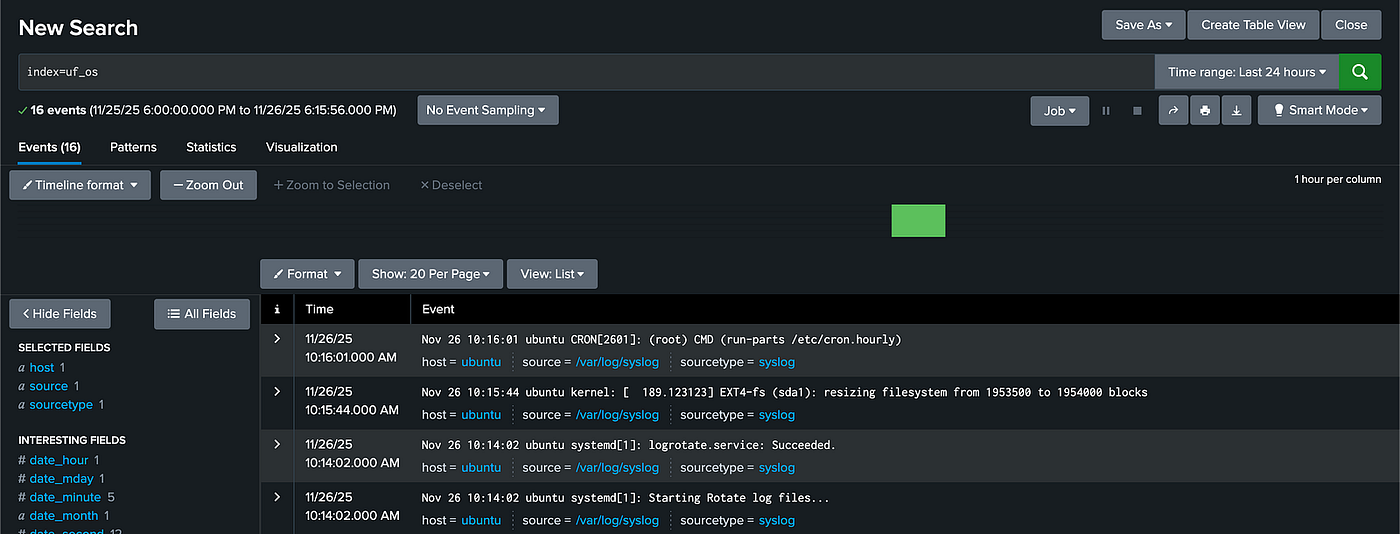
1. Universal Forwarder (UF) Data Inputs
The Universal Forwarder (UF) simply forwards raw logs without processing. In this setup, it sends all logs directly to the uf_os index.
Search using: index=uf_os
2. Heavy Forwarder (HF) Data Inputs
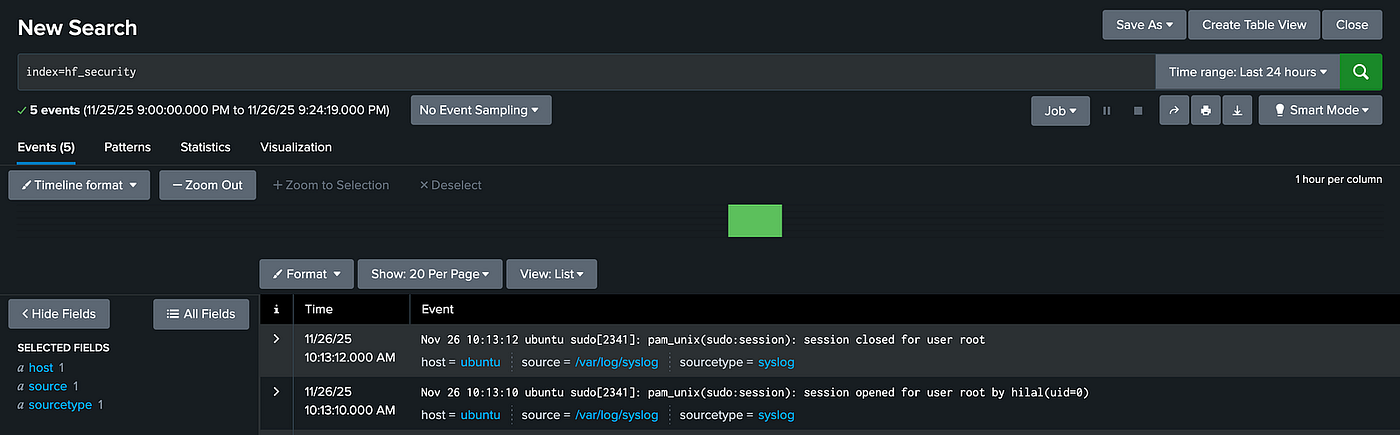
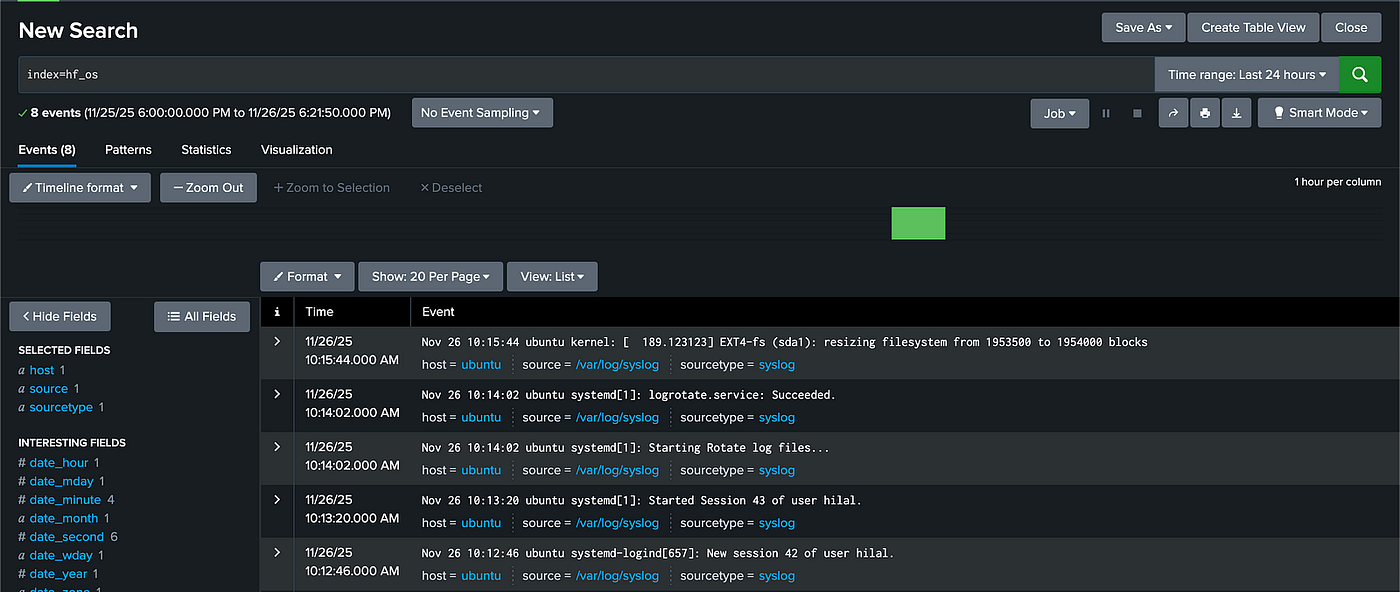
The Heavy Forwarder (HF) parses, filters, drops, and routes data at index-time based on transforms. According to the configurations below, it:
- Drops noisy CRON and NetworkManager logs
- Routes
sshdandsudologs to thehf_securityindex.
Search using: index=hf_security
- Sends all other logs to the
hf_osindex.
Search using: index=hf_os
Relevant Configuration Snippets:
- props.conf:
[syslog]
# Drop noisy logs such as CRON and NetworkManager using the drop_cron_nm transform
TRANSFORMS-drop-noise = drop_cron_nm
# Route security-related logs (sshd, sudo) to the security index via route_security transform
TRANSFORMS-route-security = route_security
# Route all other logs to the default OS index using route_default transform
TRANSFORMS-route-default = route_default- transforms.conf:
# 1) Drop noise logs
#    Filter out CRON and NetworkManager logs so they are not indexed
[drop_cron_nm]
REGEX = (CRON\[[0-9]+\]|NetworkManager)
DEST_KEY = queue
FORMAT = nullQueue

# 2) Route important security logs to a dedicated index
#    Send logs related to sshd and sudo to the 'hf_security' index
[route_security]
REGEX = (sshd|sudo)
DEST_KEY = _MetaData:Index
FORMAT = hf_security

# 3) Route all remaining logs to the default OS index
#    Any logs not matching above rules will go to 'hf_os' index
[route_default]
REGEX = .
DEST_KEY = _MetaData:Index
FORMAT = hf_os
🧩 Step 7: Data Model Extraction & Tagging
The Splunk Add-on (TA) installed from Splunkbase comes with built-in data model extractions and tagging configurations. These configurations automatically extract important fields and apply consistent tags to the data. This setup simplifies searching and improves event correlation, especially within Splunk Enterprise Security environments.
Below are two screenshots comparing data processing and field extraction behavior with and without the Splunk Add-on for Unix and Linux.
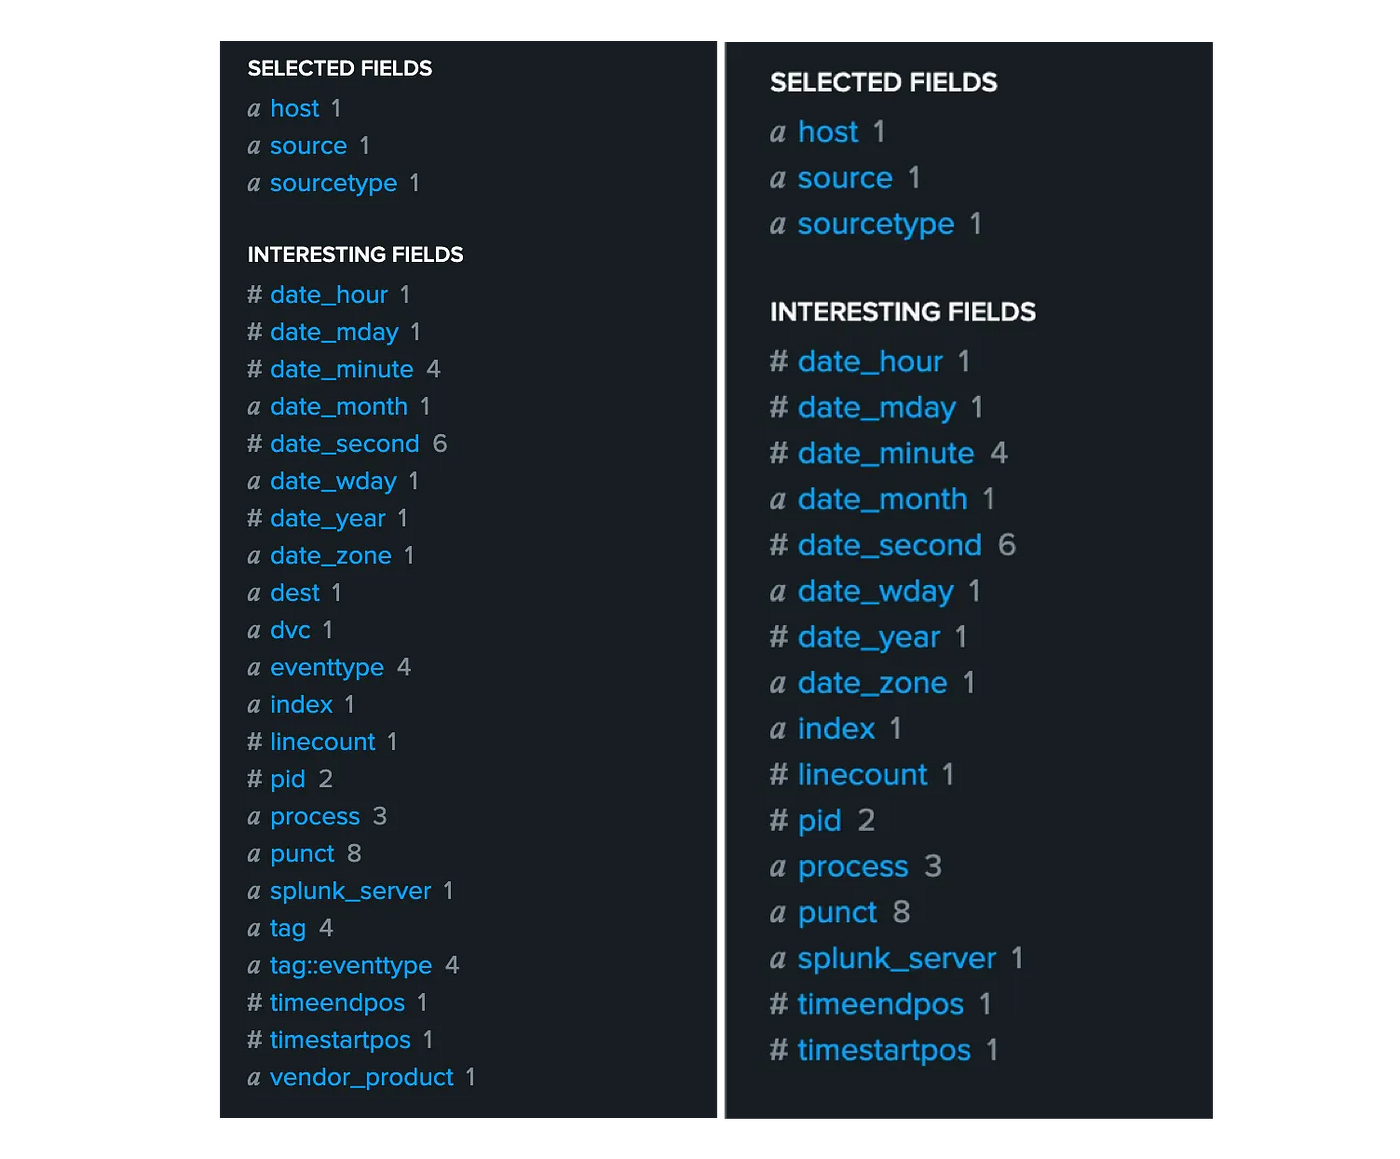
With TA vs Without TA — Comparison of data processing and extraction behavior
📚 References
- Splunk Enterprise Docker Image
- Splunk Universal Forwarder Docker Image
- Deploy and Run Splunk Enterprise Inside a Docker Container
- Splunk Enterprise Documentation & Resources
- docker‑splunk GitHub Repository
- docker-splunk Documentation Site
Originally published at https://blog.seynur.com.
메타데이터
- post_id
- f8aeeee384f0
- slug
- part-2-distributed-splunk-in-docker-forwarder-architecture-data-ingestion-pipeline-f8aeeee384f0
- url
- https://medium.com/seynur/part-2-distributed-splunk-in-docker-forwarder-architecture-data-ingestion-pipeline-f8aeeee384f0
- canonical_url
- https://medium.com/seynur/part-2-distributed-splunk-in-docker-forwarder-architecture-data-ingestion-pipeline-f8aeeee384f0
- author_url
- https://medium.com/@hilalgevrek
- status
- ok
- fetched_at
- 2026-07-11 10:04:19