Use an SSD1306 OLED display with an ESP32-H2 Super Mini Development Board
This tutorial is part of a series of articles about the small ESP32-H2 Super Mini (“SM”) development board. I will explain how to control…
Use an SSD1306 OLED display with an ESP32-H2 Super Mini Development Board
This tutorial is part of a series of articles about the small **ESP32-H2 Super Mini (“SM”) development board. I will explain how to control an external SSD106 OLED display so that you can use it in your projects. I store all relevant settings and methods in a separate header file** so that I can add them modularly as needed.
For this tutorial, I have chosen the SSD1306 OLED display with a resolution of 128 x 64 pixels and a size of 0.96 inches.
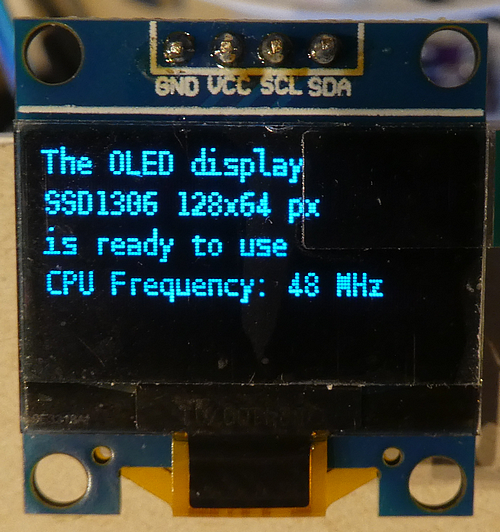
These modules are available on AliExpress for approximately 3 euros. Please pay attention to the supply voltage (we require 3.3 volts) and the I2C interface. The advantage of the I2C interface is that several different devices can be connected to the two-pin bus, as they have different addresses. So we do not need more GPIOs to connect, as our final project will have at least two more I2C-interfaced devices.
Note: This display will not be part of the final project, but it helps with sub-projects for outputting, for example, sensor data during battery operation (where the serial interface is usually not available).
Integration of the SSD1306 header file
In the main sketch, you include this header file as follows.
#include "SSD1306_OLED.h"The header section defines an entry that can later be referenced in the program to include or omit a part of the program (“preprocessor directives”).
For communication between our ESP32-H2 device and the sensor, I use the **esp8266-oled-ssd1306 library** in version 4.6.2.
The complete header section looks like this:
#ifndef IS_SSD1306_OLED
#define IS_SSD1306_OLED
#endif
#define SSD1306_FLIP_SCREEN_ORIENTATION true

#define SSD1306_I2C_SDA_PIN 5
#define SSD1306_I2C_SCL_PIN 4
#define SSD1306_I2C_ADDRESS 0x3C

#include "FONT_MONOSPACE_9.h"   // gives 5 rows with 25 characters each
#include "FONT_MONOSPACE_13.h"  // gives 5 rows with 16 characters each
#include "FONT_MONOSPACE_18.h"  // gives 4 rows with 115 characters each

#include <Wire.h>
#include "SSD1306.h"  // https://github.com/ThingPulse/esp8266-oled-ssd1306 version 4.6.2
SSD1306Wire oDisplay(SSD1306_I2C_ADDRESS, SSD1306_I2C_SDA_PIN, SSD1306_I2C_SCL_PIN);

String oDisplay1 = "";
String oDisplay2 = "";
String oDisplay3 = "";
String oDisplay4 = "";
String oDisplay5 = "";
In addition to the library for the display, I’m also loading three font files. This allows us to display our output in different sizes. I’ve created three templates for this purpose (see below under OLED display fonts).
Setup of the display
The display is wired to an I2C bus, and calling this method will set up the sensor:
void setupSsd1306() {...}You can change the display orientation by commenting out “#define SSD1306_FLIP_SCREEN_ORIENTATION true”.
OLED display fonts
For displaying technical data on a screen, I prefer to use a monospaced font with a constant width. Since the default font of the library I’m using displays characters with varying widths, three additional font data files are included alongside the helper file. All three files are named “Font_Monospaced_xx.h”, with the number at the end defining the font size. At font size 9, 25 characters fit into 5 lines; at font size 13, xx characters fit into 5 lines; and at font size 18, xx characters fit into 3 lines.

Data displayed with displayData13()
The principle of outputting to the OLED display is simple: in the sketch, you assign a value to the variables oDisplay1…oDisplay5, and then you let the function displayData() display the values. This prints out the data in font size 9, but if you use, e.g., displayData13(), the method uses the Monospace Font with size 13, or displayData18() gives a size of 18.

Data displayed with displayData18()
My favorite, however, is displayData1813(), because it displays the first line with font size 18 and three more lines with font size 13.

Data displayed with displayData1813()
Function oDisplayPowerOff
This method switches off the display’s internal power supply, thus reducing power consumption during deep sleep. To bring the display back to work, you need to call oDisplayPowerOn(). I found a schematic of an SSD1306 display on some website, but of course I can’t guarantee that all SSD1306 displays have this type of control.

Schematic of the display power circuit of an SSD1306 OLED display
Behavior of the SSD1306 at different CPU frequencies
When you select a board in Arduino Tools, you define certain parameters, including the processor speed. However, with the ESP32-H2 Dev Module, there is no way (bug?) to adjust the speed via the Arduino IDE interface.
There is a simple reason for lowering the processor speed: a slower-running processor consumes less power and is therefore a valid option for battery-powered devices to increase runtime.
Therefore, I have included a feature in the test program to reduce the processor speed from 96 MHz (default) to the lowest possible speed of 48 MHz. This is done by enabling (uncommenting) this line in the header:
#define TEST_48MHZ_CPU_FREQUENCYThe result is positive; the program works perfectly even with a CPU speed of 48 MHz.
Test program
The test program tests all the functions of the helper file. To ensure the output is displayed in the “Serial Monitor”, you must enable the parameter “USB CDC on boot enabled” during compilation and upload.
Source code of the app
You find the complete code of the app in my **GitHub repository**. Since this is a series of articles, all sketches in this series are compiled in one repository. In this repository you will find zip files with all relevant libraries used in this sketch, in case they are no longer available online.
Return to the overview tutorial “**ESP32-H2 Super Mini — Small form factor, big impact (LoRa, ePaper, environment sensor, and battery powered and monitored)**”
Happy coding !
메타데이터
- post_id
- f97dae3a8144
- slug
- use-an-ssd1306-oled-display-with-an-esp32-h2-super-mini-development-board-f97dae3a8144
- url
- https://medium.com/@androidcrypto/use-an-ssd1306-oled-display-with-an-esp32-h2-super-mini-development-board-f97dae3a8144
- canonical_url
- https://medium.com/@androidcrypto/use-an-ssd1306-oled-display-with-an-esp32-h2-super-mini-development-board-f97dae3a8144
- author_url
- https://medium.com/@androidcrypto
- status
- ok
- fetched_at
- 2026-06-11 15:16:29