Authorize.net Payment Gateway integration in Java Spring Boot(Part-3)
Hosting Payment Forms and Creating Payment Links.
Authorize.net Payment Gateway integration in Java Spring Boot(Part-3)
Hosting Payment Forms and Creating Payment Links.
“In Part-1 and Part-2, we learned how to integrate Authorize.Net keys and APIs into our Java Spring Boot application. We gained a basic understanding of Authorize.Net and explored how to securely process payments using their APIs.”
Now, in Part-3, we will take our payment processing capabilities to the next level by exploring Authorize.Net’s hosted form feature. We will learn how to create and customize payment forms directly on our website, leveraging the power of Authorize.Net’s secure infrastructure.
Create Payment Link
In this feature, you can create a special link that, when clicked, opens a payment form. Here’s an example of the code you can use to generate this payment link. By using this code, you can create a unique payment link that directs people to a specific payment form on your website. This makes it easy for them to make a payment by simply clicking on the link.
public Object getPaymentLink(String customerProfileId, String loginId, String transactionKey, Double amount) {
    ApiOperationBase.setEnvironment(Environment.SANDBOX);

    // Set the merchant authentication
    MerchantAuthenticationType merchantAuthenticationType = new MerchantAuthenticationType();
    merchantAuthenticationType.setName(loginId);
    merchantAuthenticationType.setTransactionKey(transactionKey);
    ApiOperationBase.setMerchantAuthentication(merchantAuthenticationType);

    // Set the customer profile to charge
    CustomerProfilePaymentType profileToCharge = new CustomerProfilePaymentType();
    profileToCharge.setCustomerProfileId(customerProfileId);

    // Get customer details
    Object customerDetail = getCustomerDetail(loginId, transactionKey, customerProfileId);
    GetCustomerProfileResponse getCustomerProfileResponse;

    if (customerDetail == null) throw new BusinessValidationException("Customer not found.");
    if (customerDetail instanceof String) {
        throw new BusinessValidationException(customerDetail.toString());
    } else {
        getCustomerProfileResponse = objectMapper.convertValue(customerDetail, GetCustomerProfileResponse.class);
    }

    // Set customer data
    CustomerDataType customerDataType = new CustomerDataType();
    customerDataType.setType(CustomerTypeEnum.INDIVIDUAL);
    customerDataType.setId(getCustomerProfileResponse.getProfile().getMerchantCustomerId());
    customerDataType.setEmail(getCustomerProfileResponse.getProfile().getEmail());

    // Create the payment transaction request
    TransactionRequestType txnRequest = new TransactionRequestType();
    txnRequest.setTransactionType(TransactionTypeEnum.AUTH_CAPTURE_TRANSACTION.value());
    txnRequest.setProfile(profileToCharge);
    txnRequest.setCustomer(customerDataType);
    txnRequest.setAmount(BigDecimal.valueOf(amount).setScale(2, RoundingMode.CEILING));

    // Set the hosted payment page settings
    SettingType setting1 = new SettingType();
    setting1.setSettingName("hostedPaymentButtonOptions");
    setting1.setSettingValue("{\"text\": \"Pay\"}");

    SettingType setting2 = new SettingType();
    setting2.setSettingName("hostedPaymentOrderOptions");
    setting2.setSettingValue("{\"show\": true}");

    SettingType setting3 = new SettingType();
    setting3.setSettingName("hostedPaymentPaymentOptions");
    setting3.setSettingValue("{\"cardCodeRequired\": true, \"showCreditCard\": true, \"showBankAccount\": false}");

    SettingType setting4 = new SettingType();
    setting4.setSettingName("hostedPaymentCustomerOptions");
    setting4.setSettingValue("{\"showEmail\": true, \"requiredEmail\": true, \"addPaymentProfile\": true}");

    String successUrl = "Please paste the URL of your success page for after successful payment."
    String cancelUrl = "Please paste the URL of your cancel page for after canceling the payment."
    SettingType setting5 = new SettingType();
    setting5.setSettingName("hostedPaymentReturnOptions");
    setting5.setSettingValue("{\"showReceipt\": false, \"url\": \"" + successUrl + "\", \"urlText\": \"Continue\", \"cancelUrl\": \"" + cancelUrl + "\", \"cancelUrlText\": \"Cancel\"}");

    ArrayOfSetting settingList = new ArrayOfSetting();
    settingList.getSetting().add(setting1);
    settingList.getSetting().add(setting2);
    settingList.getSetting().add(setting3);
    settingList.getSetting().add(setting4);
    settingList.getSetting().add(setting5);

    GetHostedPaymentPageRequest apiRequest = new GetHostedPaymentPageRequest();
    apiRequest.setTransactionRequest(txnRequest);
    apiRequest.setHostedPaymentSettings(settingList);

    GetHostedPaymentPageController controller = new GetHostedPaymentPageController(apiRequest);
    controller.execute();

    GetHostedPaymentPageResponse response = controller.getApiResponse();

    if (response != null && response.getMessages().getResultCode() == MessageTypeEnum.ERROR) {
        return response.getMessages().getMessage().get(0).getText();
    } else {
        return response;
    }
}
In the above code, the
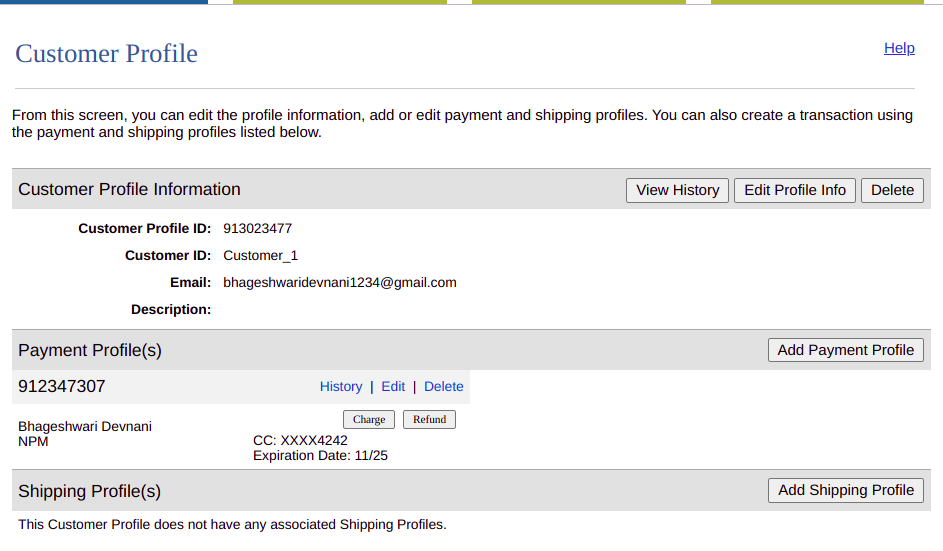
loginIdandtransactionKeyprovided by Authorize.net will be used, andcustomerProfileIdrepresents the customer's profile ID in Authorize.net, as shown in the screenshot below.
In the above code, the settings in the code are used to customize the appearance and behavior of the payment page. Let’s go through each setting.
hostedPaymentButtonOptions: This setting is used to configure the appearance of the payment button on the hosted payment page. In this case, it sets the text of the payment button to “Pay”.
hostedPaymentOrderOptions: This setting is used to control the display of the order summary section on the payment page. In this case, it sets show to true, indicating that the order summary should be visible.
hostedPaymentPaymentOptions: This setting is used to configure the payment options on the payment page. It specifies whether the card code (CVV) is required (cardCodeRequired), and whether to show credit card information (showCreditCard) and bank account information (showBankAccount). In this case, it requires the card code and shows credit card information but hides bank account information.
hostedPaymentCustomerOptions: This setting is used to customize the customer information section on the payment page. It defines whether to show the email field (showEmail), whether the email field is required (requiredEmail), and whether to offer customers the option to add a new payment profile (addPaymentProfile). In this case, it shows the email field, requires the email, and allows customers to add a new payment profile.
hostedPaymentReturnOptions: This setting is used to define the behavior of the “Continue” and “Cancel” buttons on the payment page. It specifies the URL (url) to which the customer should be redirected after a successful payment. It also sets the text of the “Continue” button to “Continue” (urlText) and configures the URL and text of the “Cancel” button. In this case, it shows the receipt page after a successful payment and redirects to a specific success URL. If the customer cancels the payment, they are redirected to a specific cancel URL.
These settings are part of the request sent to the Authorize.Net API to generate the hosted payment page. By customizing these settings, you can control how the payment page looks and behaves for your customers. The alist object contains an array of SettingType objects, each representing one of these settings, and it is then attached to the GetHostedPaymentPageRequest to configure the hosted payment page accordingly. Below is the example of how hosted form look like.

Authorize.net hosted form
“In addition, when using hosted forms for payment processing, it is important to note that the actual status of customer payments may not be immediately available. To obtain real-time updates and notifications about payment statuses, it is recommended to implement a webhook. In my upcoming blog, I will explain how to connect a webhook in Java Spring Boot for Authorize.net.”
“To gain a basic understanding of Authorize.net, please refer to **Part 1 of my blog series. For implementing the API, you can find detailed instructions in [Part 2](https://medium.com/@bhageshwaridevnani1234/authorize-net-payment-gateway-integration-in-java-spring-boot-part-2-ff25fb3f47e).”**
메타데이터
- post_id
- f9974a42d7e
- slug
- authorize-net-payment-gateway-integration-in-java-spring-boot-part-3-f9974a42d7e
- url
- https://medium.com/@bhageshwaridevnani/authorize-net-payment-gateway-integration-in-java-spring-boot-part-3-f9974a42d7e
- canonical_url
- https://medium.com/@bhageshwaridevnani/authorize-net-payment-gateway-integration-in-java-spring-boot-part-3-f9974a42d7e
- author_url
- https://medium.com/@bhageshwaridevnani
- status
- ok
- fetched_at
- 2026-08-17 15:47:19