Emotion Detection With DeepFace: A Beginner’s Honest Walkthrough
A few weeks ago, I decided to build a facial emotion detector. Not because I had some grand plan for it, but because I wanted to see if I…
Emotion Detection With DeepFace: A Beginner’s Honest Walkthrough
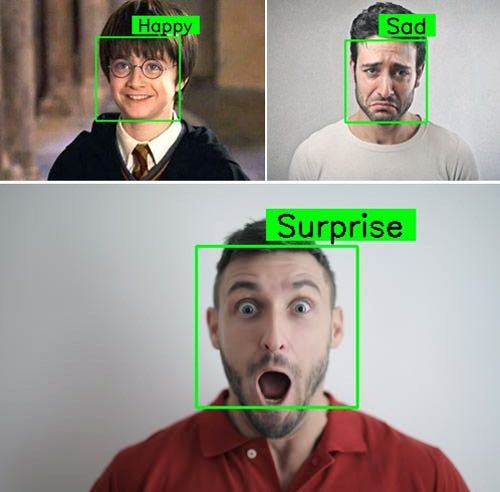
A few weeks ago, I decided to build a facial emotion detector. Not because I had some grand plan for it, but because I wanted to see if I could take a face, run it through a model, and get back something meaningful — like “happy” or “confused” — without faking it.
Here’s what actually happened, including the parts that didn’t work the first time.
Why I Picked This Project
I’d already built a sentiment analysis app using TF-IDF and Logistic Regression — that one worked with text. This time I wanted to work with something visual. Emotion detection felt like a natural next step: same core idea (classify a human state), completely different input.
I didn’t want to build a model from scratch. I wanted to understand how to use one well, wire it into something usable, and actually ship it. So I picked two tools that do the heavy lifting: DeepFace for emotion classification and RetinaFace for face detection.
What DeepFace and RetinaFace Actually Do
Before touching any code, I had to understand the split in responsibilities:
- RetinaFace finds the face in an image first — where it is, its boundaries, key landmarks like eyes and mouth.
- DeepFace then takes that detected face and runs it through pre-trained models to estimate things like emotion, age, gender, and even likely ethnicity.
They’re not competing tools — they’re a pipeline. Detection first, then analysis. That distinction took me longer to get than I’d like to admit. My first instinct was to just throw a raw image at DeepFace and expect it to figure out the “where” and “what” at once. It technically can do both, but understanding the separation made debugging so much easier later.
Where I Got Stuck
The setup wasn’t as plug-and-play as I expected. A few honest snags:
- Inconsistent detection on angled faces. Anything that wasn’t a clean, front-facing photo sometimes failed to detect at all, or detected the wrong region.
- Confidence in the wrong direction. The model would occasionally return “neutral” with high confidence on a face that was clearly smiling in the source image — usually when lighting was inconsistent.
- Environment setup friction. Since I work entirely in Google Colab, getting the right combination of dependencies installed without conflicts took more trial and error than the actual model logic did.
None of these were dealbreakers, but they were a good reminder that “using a pre-trained model” doesn’t mean “skip understanding what’s happening underneath.”
Building the Interface
Once detection and classification were working reliably, I wired it into a simple Gradio interface — upload an image, get the detected face back with its predicted emotion. Gradio made this part fast. I didn’t need to build a custom frontend just to make the project usable by someone other than me.
Shipping It
I deployed the final version on HuggingFace Spaces so it’s actually usable by anyone with a link, not just something sitting in a notebook. The code itself lives on GitHub, both as documentation of the process and as a piece I can point to when I talk about what I’ve built.
What I’d Do Differently Next Time
If I rebuilt this today, I’d:
- Test on a wider variety of lighting conditions and angles before calling detection “done.”
- Log confidence scores alongside predictions, not just the final label — it would’ve caught the “confidently wrong” cases earlier.
- Spend less time debugging environment setup by pinning dependency versions from the start.
Why This Project Mattered
This wasn’t a groundbreaking model. It’s not novel research. But it forced me to actually understand a two-stage ML pipeline, work through real debugging instead of copy-pasting a tutorial, and ship something that runs outside my own notebook.
That’s the part I think matters most when you’re early in this — not whether the project is impressive, but whether you understand every piece of it well enough to explain it to someone else.
I’m a second-year CS student learning cybersecurity, ML, and blockchain development, mostly out in the open. If you’re building similar things, I’d like to hear what’s tripped you up too.
메타데이터
- post_id
- f9a9142d5d7b
- slug
- emotion-detection-with-deepface-a-beginners-honest-walkthrough-f9a9142d5d7b
- url
- https://medium.com/@pragyaagrasenmittal/emotion-detection-with-deepface-a-beginners-honest-walkthrough-f9a9142d5d7b
- canonical_url
- https://medium.com/@pragyaagrasenmittal/emotion-detection-with-deepface-a-beginners-honest-walkthrough-f9a9142d5d7b
- author_url
- https://medium.com/@pragyaagrasenmittal
- status
- ok
- fetched_at
- 2026-07-17 19:48:49





