HOW TO INSTALL AND CONFIGURE THE IBM QRADAR COMMUNITY EDITION ON VIRTUAL MACHINE
Here is a step-by-step guide that provides detailed instructions on installing and setting up IBM Qradar Community Edition for EDR on a…
HOW TO INSTALL AND CONFIGURE THE IBM QRADAR COMMUNITY EDITION ON VIRTUAL MACHINE
Here is a step-by-step guide that provides detailed instructions on installing and setting up IBM Qradar Community Edition for EDR on a virtual machine (VM). In this guide, I will be using VMware Workstation Pro.
What is IBM QRadar SIEM?
IBM QRadar SIEM is a complete tool made to analyze security alerts in real time. It looks at alerts from different devices and apps in a company’s network. It does more than just manage logs; it uses smart analytics, machine learning, and threat intelligence to find and prioritize possible security issues.
System Requirement
250GB of disk space
2 CPU Cores (Minimum), 6 CPU Cores (Recommended)
8GB Memory
One network adapter with access to the internet
Step-by-Step Installation Guide
- First, we need to download the latest version of the IBM QRadar Community Edition on the official website: https://www.ibm.com/community/101/qradar/ce/ or go to your favorite web browser and input ‘qradar community edition’ on the search bar.


- Click on the first option, as highlighted above.

Note: Before installation, take note of the requirements and ensure your PC or machine has the minimum resources required.

- Get the most recent release of the community edition, which is currently version 7.3.3.

Note: To access the OVA file, you must create an account. If you already have one, great! Otherwise, create a new account.

The file is approximately 4.1GB, so make sure you have sufficient data before starting the download. It may take a few minutes.

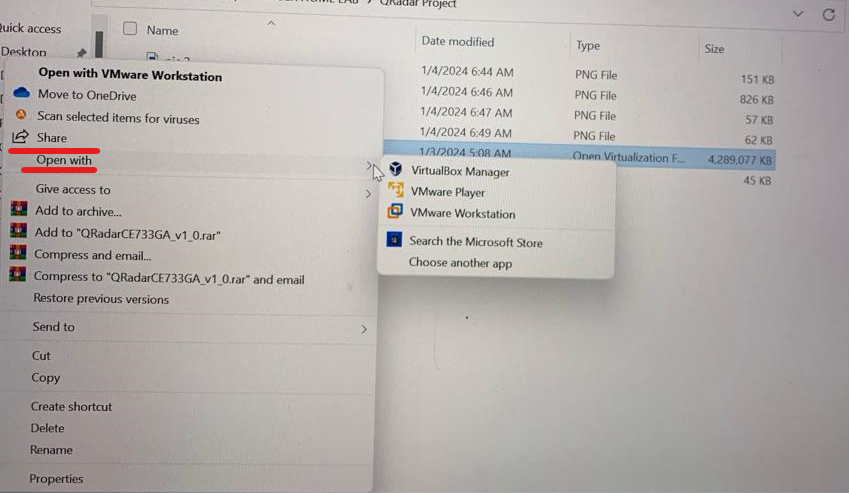
- Open the downloaded QRadar OVA file with VMware Workstation or your preferred VM.
- Now, let's give our VM a preferred name, set the storage location to your preferred location, and click on import.


- Adjust the settings to meet IBM’s requirements. Double-click on memory and set it to 8GB, assign a minimum of 2 CPU cores, and configure the network adapter to NAT.

- Now, let’s run our virtual machine. Press enter to boot if it doesn’t start up immediately.

- The prompt will ask for a username. so set localhost login as root.
localhost login: root
Press enter.
Then set and confirm your password. It should be complex.

- Now, proceed to run the setup. Before doing that, let’s explore the contents of the setup by executing the command:
ls
then,
ls -la

- Now, let’s run the setup command:
./setup
then press enter

- You should see a bunch of words, so scroll down to read everything. Afterward, press the ‘Q’ key to exit, and then hit enter.

- You will be prompted to press Y to proceed with the installation or N to cancel the installation. Press ‘Y’.

The installation will take some time, so feel free to grab a bottle of water or juice while waiting for it to finish.. 😉
Note: If you encounter this, “Error: Generating AUTO_INSTALL_INSTRUCTIONS file failed”.
Run this command:
“hostnamectl set-hostname localhost.localdomain”
and ensure that your network adapter is set to NAT. Then continue the process from step 10.

- Once the installation is finished, a prompt will appear for setting up an admin password. This password will be used later to access the QRadar console.

- Let’s verify the active and smooth operation of our VM. Additionally, since QRadar relies on Tomcat services, let’s examine the service status using the command:
“systemctl status tomcat”

It is active and running, awesome!
Now, let’s find the IP address of the VM to access the QRadar console in our preferred browser. Execute the command:
“ifconfig”

Copy the address somewhere. Now, let’s go to our favorite browser and paste the IP address we just copied.
192.168.44.132 (your IP address)
Note: You may get a notification that the site is not safe; ignore it and proceed by clicking on advanced.

It may take a few seconds before coming up.

I hope you recall the admin password you established earlier; this is where it will come in handy.
username: admin
password: (admin password)
You will be prompted to accept the license agreement to proceed.

Finally, there goes our long-anticipated console.

I hope you had fun setting up QRadar. See you later.
Byeeee!!!👋
If you like this type of content, do not hesitate to follow me. 😉
메타데이터
- post_id
- f9fcaa167656
- slug
- how-to-install-and-configure-the-ibm-qradar-community-edition-on-virtual-machine-f9fcaa167656
- url
- https://medium.com/@RuthOkereke/how-to-install-and-configure-the-ibm-qradar-community-edition-on-virtual-machine-f9fcaa167656
- canonical_url
- https://medium.com/@RuthOkereke/how-to-install-and-configure-the-ibm-qradar-community-edition-on-virtual-machine-f9fcaa167656
- author_url
- https://medium.com/@RuthOkereke
- status
- ok
- fetched_at
- 2026-06-28 14:26:31





