Building a Highly Available, Scalable Web Application (AWS Academy Lab Project)
By the end of this project, you should be able to do the following:
Building a Highly Available, Scalable Web Application (AWS Academy Lab Project)

By the end of this project, you should be able to do the following:
- Deploy a functional web application that runs on a single virtual machine and is backed by a relational database.
- Architect a web application to separate layers of the application, such as the web server and database.
- Create a virtual network that is configured appropriately to host a web application that is publicly accessible and secure.
- Deploy a web application with the load distributed across multiple web servers.
- Configure the appropriate network security settings for the web servers and database.
- Implement high availability and scalability in the deployed solution.
- Configure access permissions between AWS services.
Phase 2: Creating a basic functional web application
In this phase, you will start to build the solution. The objective of this phase is to have a functional web application that works on a single virtual machine in a virtual network that you create. By the end of this phase, you will have a POC to demonstrate hosting the application on the AWS Cloud. You can then build upon your work in later phases.
Task 1: Creating a virtual network
Create a virtual network to host the web application.
Tip: Create networking resources such as a virtual private cloud (VPC) and subnets.
When you have accessed the Lab, head over to ‘Services’ and select ‘VPC’

Go ahead and click on ‘Create VPC’

And making some changes to accordingly:

- 2 A.Z (Availability Zones)
- 2 Public & Private Subnets
Customize Subnets CIDR Blocks:
- Public subnet CIDR block in us-east-1a: 10.0.0.0/27
- Public subnet CIDR block in us-east-1b: 10.0.0.32/27
- Private subnet CIDR block in us-east-1a: 10.0.0.64/27
- Private subnet CIDR block in us-east-1b: 10.0.0.96/27
Press in ‘Create VPC’ and wait for a few seconds:

We have created our Virtual Networks!
Task 2: Creating a virtual machine
Create a virtual machine in the cloud to host the web application.
To install the required web application and database on the virtual machine, use the JavaScript code from the following link: SolutionCodePOC
Tips:
Use a compute service such as Amazon Elastic Compute Cloud (Amazon EC2).
Use the latest Ubuntu Amazon Machine Image (AMI).
Once again, head back to ‘Services’ and choose ‘EC2’

On the left side panel, click on ‘Instance’ and press on ‘Launch Instances’

We will then do accordingly (add name, UBUNTU AMI etc)


Key pair: vockey
VPC: The VPC n/w we had created earlier
Subnet: <vpc-name>-subnet-public1
We will be creating a security group, name it something meaningful and a valid description.
The load balancer security group allows inbound HTTP (80) from anywhere to make the application publicly accessible.
The web server security group allows inbound HTTP (80) only from the ALB, ensuring that EC2 instances are not directly exposed.
The database security group allows inbound MySQL/Aurora (3306) only from the WebServer-SG so the application can connect to the database, and temporarily from the Cloud9 environment for the database migration step.
This setup ensures proper security isolation across the load balancer, application layer, and database layer.
So, before we launch this instance, we require to set up a Cloud9 Environment etc:
(THIS IS PART OF Phase 3 Task 3)

Click on ‘Create Environment’

and just create:


And head back to the EC2 page and check if it pops up:

and it has, great! Once that’s settled, we can continue with our EC2 configuration

Pick Lab instance.
Now within the ‘User Data’, we will use the ‘SolutionCodePOC’ that has been provided to us:


Place that in and Lauch Instance:


Great Success!
Task 3: Testing the deployment
Test the deployment of the web application to ensure it is accessible from the internet and functional.
Use the Instances Public IP to access and see if it accessible:


Phase 3: Decoupling the application components
In this phase, you will continue building. The objective is to separate the database and the web server infrastructure so that they run independently. The web application should run on a separate virtual machine, and the database should run on the managed service infrastructure.
Task 1: Changing the VPC configuration
Update or re-create the virtual network components that are necessary to support hosting the database separately from the application.
Note: You need private subnets in a minimum of two Availability Zones.
Create a sperate security group for the database using cloud9 environments


Created:

Task 2: Creating and configuring the Amazon RDS database
Create an Amazon Relational Database Service (Amazon RDS) database that runs a MySQL engine. You can choose to create a provisioned instance or run it serverlessly.
Notes:
Allow only the web application to access the database.
Don’t enable enhanced monitoring.
You know the drill by now. Head over to ‘Services’ and ‘RDS’

On the left panel, head over to Subnet Groups and create a DB subnet group:


Now we will be making a database:


In the existing VPC security groups, you should be able to see ‘dbaccess’ that we had made earlier:

and simply just ‘Create Database’


TASK 3 (CONTINUE)

You can make changes accordingly:

For the RDS endpoint, you just head over tothe database just created and


Head over to the CLOUD9 termnal and paste it:

Task 4: Provisioning Secrets Manager
Use AWS Secrets Manager to create a secret to store the database credentials and configure the web application to use Secrets Manager.
Use Script-1 from the following link to create a secret in Secrets Manager by using the AWS CLI: AWS Cloud9 Scripts
Note: This .yml file also contains scripts that you will use in later tasks.


and alongside that make changes within the code earlier at the bottom:

Replace the <EC2instancePrivateip> with internal IP address of the EC2 instance created in Phase-2 earlier.

now make changes just at the very bottom:

and paste within the cloud9 terminal:

We will first be doing this, as there isn’t technically a database called ‘STUDENTS’ so,
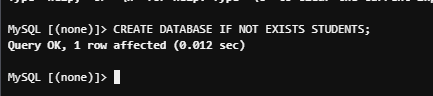
Once that’s done, do the following commands:
- use STUDENTS; (uses the table students)
- *select from students;**
(Assuming you had added some information on the student's website that we did earlier, if not restart the instance and put in some data and try this out)

to test further, we added another student:

Let’s see if the database has been updated:

and it has!
Task 5: Provisioning a new instance for the web server
Create a new virtual machine to host the web application.
To install the required web application on the virtual machine, use the JavaScript code from the following link: Solution Code for the App Server
For the AWS Identity and Access Management (IAM) profile on the EC2 instance, attach the existing LabInstanceProfile profile. This profile attaches an IAM role called LabRole to the instance so that it can fetch the secret securely.
Note: Optionally, you can continue to use the existing virtual machine for the web application. However, you will need to reconfigure the application to connect to Amazon RDS.
The process is almost similar with the exception of choosing ‘LabInstanceProfile’ in the Advanced Details section:

and in the User data:

Launch it wait for the checks to pass:

Phase 4: Implementing high availability and scalability
In this phase, you will complete the design and fulfill the remaining solution requirements. The objective is to use the key components that you created in earlier phases to build a scalable and highly available architecture.
Task 1: Creating an Application Load Balancer
Launch a load balancer. The endpoint will be used to access your web application.
Tip: Use a minimum of two Availability Zones.
On the left panel of the EC2 dashboard, you can see Load Balancers, click on that:

It would be empty most probably, so create and select the application Load Balancer. But before that, we would need to create a Target Group so do that first

Selcet the previous tasks (task 5) instance you made:


Head backto Load Balancers and:


and just Create.

Task 2: Implementing Amazon EC2 Auto Scaling
Create a new launch template, and use an Auto Scaling group to launch the EC2 instances that host the web application.
To accomplish this, you can create an AMI from the running instance, or create a new AMI and install the necessary packages and application code. Then, configure an Auto Scaling group to use the load balancer.
Tips:
Use a Target tracking policy.
Set the Auto scaling group size according to your estimated requirements.
You can use the default values (for example, for group size and CPU utilization) initially and then adjust them later as needed.

We’re going to have to create a launch template. Luckily, we can just create a template from an instance:


Now we have a launch template and go page by page:


Review and Create the auto scaling group:

Task 3: Accessing the application
Access the application and perform a few tasks to test it. For example, view, add, delete, and modify student records.
In the instance, you can see that there is now a ‘students-final’ instance (or whatever name you gave it):

Copy the DNS name of the load balancer made earlier:

Copy the name in URL and try adding information/data:

Just adding some random inforamtion:

Added!

Big thanks to these videos for helping me out:
메타데이터
- post_id
- fbb9ec2914c3
- slug
- building-a-highly-available-scalable-web-application-aws-academy-lab-project-fbb9ec2914c3
- url
- https://towardsaws.com/building-a-highly-available-scalable-web-application-aws-academy-lab-project-fbb9ec2914c3
- canonical_url
- https://towardsaws.com/building-a-highly-available-scalable-web-application-aws-academy-lab-project-fbb9ec2914c3
- author_url
- https://medium.com/@abdulmoeezsiddiqui4
- status
- ok
- fetched_at
- 2026-09-11 18:47:17