Authorize.net Payment Gateway integration in Java Spring Boot(Part-2)
Integration of Authorize.Net APIs in Java Spring Boot.
Authorize.net Payment Gateway integration in Java Spring Boot(Part-2)
Integration of Authorize.Net APIs in Java Spring Boot.
“In Part-1, we learned how to integrate Authorize.Net keys into our Spring Boot application using the “application.properties” file and gained a basic overview of Authorize.Net. Now, let’s proceed with integrating the Authorize.Net APIs to securely process payments.”
Verify Account
Before we can accept payments, it’s essential to verify the login ID and transaction key to ensure they are valid. Authorize.Net provides an API for this purpose, allowing us to verify if the account exists and is active. Let’s take a look at the method to verify the account:
public boolean verifyAccount(String loginId, String transactionKey) {
        // Set the environment to Sandbox for testing purposes. When deploying for customer use, remember to set it to Production.
        ApiOperationBase.setEnvironment(Environment.SANDBOX);

        // Set merchant authentication details
        MerchantAuthenticationType merchantAuthenticationType = new MerchantAuthenticationType();
        merchantAuthenticationType.setName(loginId);
        merchantAuthenticationType.setTransactionKey(transactionKey);
        ApiOperationBase.setMerchantAuthentication(merchantAuthenticationType);

        // Prepare API request
        GetMerchantDetailsRequest getRequest = new GetMerchantDetailsRequest();
        getRequest.setMerchantAuthentication(merchantAuthenticationType);

        // Execute the request
        GetMerchantDetailsController controller = new GetMerchantDetailsController(getRequest);
        controller.execute();
        GetMerchantDetailsResponse getMerchantDetailsResponse = controller.getApiResponse();

        // Check if the verification is successful
        if (getMerchantDetailsResponse != null && getMerchantDetailsResponse.getMessages().getResultCode() == MessageTypeEnum.OK) {
            return true;
        } else {
            return false;
        }
    }
In the “verifyAccount” method, we set the environment to Sandbox, which is suitable for testing and development. However, when deploying the project for customer use, remember to change the environment to Production and ensure that the correct production keys are used.
Create Customer Profile
Now that we have verified the keys, we can proceed to create a customer profile in Authorize.Net to process their payments. To do this, we will use the Create Customer Profile API provided by Authorize.Net. Below is an example of how to achieve this:
public Object createCustomer(String loginId, String transactionKey, String customerEmailId) {
        // Set the request to operate in either the Sandbox or Production environment
        ApiOperationBase.setEnvironment(Environment.SANDBOX);

        // Set merchant authentication details
        MerchantAuthenticationType merchantAuthenticationType = new MerchantAuthenticationType();
        merchantAuthenticationType.setName(loginId);
        merchantAuthenticationType.setTransactionKey(transactionKey);

        // Set customer profile data
        CustomerProfileType customerProfileType = new CustomerProfileType();
        customerProfileType.setMerchantCustomerId("Customer_1");
        customerProfileType.setEmail(customerEmailId);

        // Create the API request and set the parameters for this specific request
        CreateCustomerProfileRequest apiRequest = new CreateCustomerProfileRequest();
        apiRequest.setMerchantAuthentication(merchantAuthenticationType);
        apiRequest.setProfile(customerProfileType);

        // Call the controller
        CreateCustomerProfileController controller = new CreateCustomerProfileController(apiRequest);
        controller.execute();

        // Get the response
        CreateCustomerProfileResponse response;
        response = controller.getApiResponse();

        // Parse the response to determine results
        if (response != null && response.getMessages().getResultCode() == MessageTypeEnum.ERROR) {
            return response.getMessages().getMessage().get(0).getText();
        } else {
            return response;
        }
    }
}
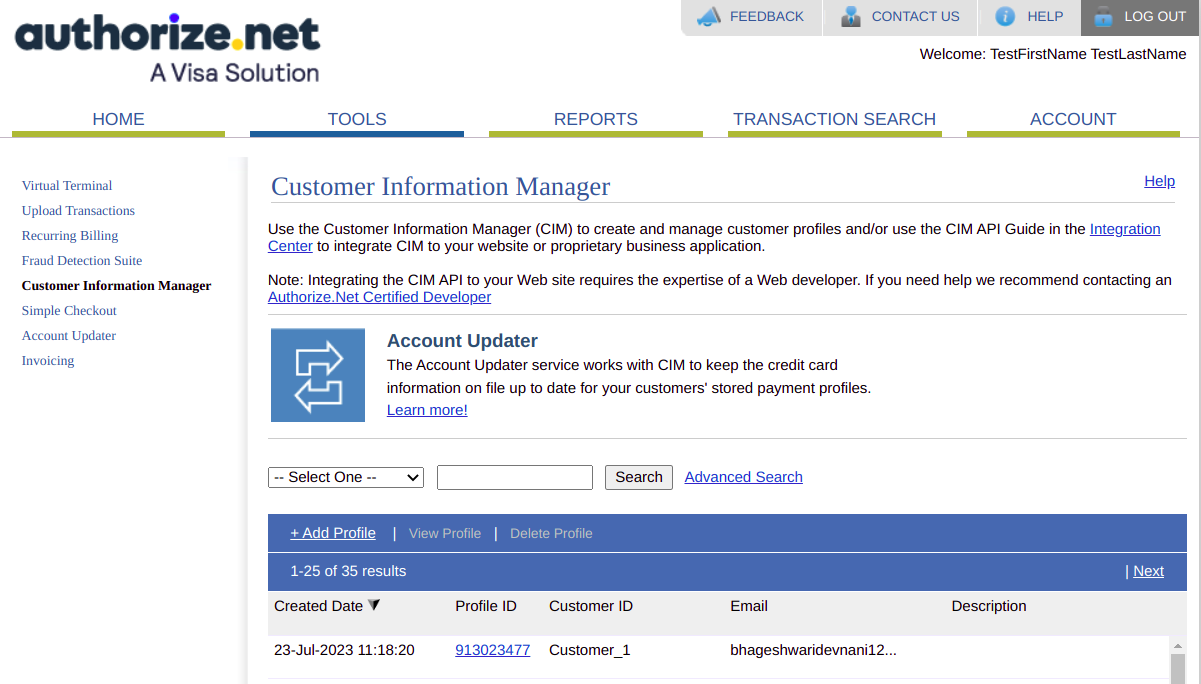
In above method as you see in this line customerProfileType.setMerchantCustomerId(“Customer_1”) we set the customerId ypu can set as your prefrence . Below is the screen shot how customer show on authorize.net
Add Card Details to Customer Profile
After creating the customer profile, we need to add their payment method, such as a credit card or bank details, to enable payments. Below is an example of how to add a credit card to the customer’s profile:
  public Object addCardInCustomer(String loginId, String transactionKey, String customerId, String cardNumber, String cardCode, String expirationYear, String expirationMonth) throws Exception {
        setEnvironment();

        MerchantAuthenticationType merchantAuthenticationType = new MerchantAuthenticationType();
        merchantAuthenticationType.setName(loginId);
        merchantAuthenticationType.setTransactionKey(transactionKey);
        ApiOperationBase.setMerchantAuthentication(merchantAuthenticationType);

        // Create the API request and set the parameters for adding a payment profile
        CreateCustomerPaymentProfileRequest apiRequest = new CreateCustomerPaymentProfileRequest();
        apiRequest.setMerchantAuthentication(merchantAuthenticationType);
        apiRequest.setCustomerProfileId(customerId);
        apiRequest.setValidationMode(ValidationModeEnum.LIVE_MODE);

        // Set credit card details
        CreditCardType creditCard = new CreditCardType();
        creditCard.setCardNumber(CryptoJsUtility.decryptString(cardNumber));
        creditCard.setExpirationDate(expirationYear + "-" + expirationMonth);
        creditCard.setCardCode(cardCode);

        CustomerPaymentProfileType profile = new CustomerPaymentProfileType();
        profile.setPayment(new PaymentType().setCreditCard(creditCard));

        // Populate the address data (Optional)
        CustomerAddressType customerAddressType = new CustomerAddressType();
        customerAddressType.setFirstName("Customer FirstName");
        customerAddressType.setLastName("Customer LastName");
        customerAddressType.setAddress("Customer address");
        customerAddressType.setCity("Customer city");
        customerAddressType.setState("Customer state");
        customerAddressType.setZip("Customer zip code");
        customerAddressType.setCountry("Customer country");

        profile.setBillTo(customerAddressType);
        apiRequest.setPaymentProfile(profile);

        CreateCustomerPaymentProfileController controller = new CreateCustomerPaymentProfileController(apiRequest);
        controller.execute();
        CreateCustomerPaymentProfileResponse response;
        response = controller.getApiResponse();

        if (response != null && response.getMessages().getResultCode() == MessageTypeEnum.ERROR) {
            return response.getMessages().getMessage().get(0).getText();
        } else {
            return response;
        }
    }
In the
addCardInCustomermethod, we add the credit card details to the customer's profile. You may need to adjust the address data and other customer information based on your use case.
In the above method
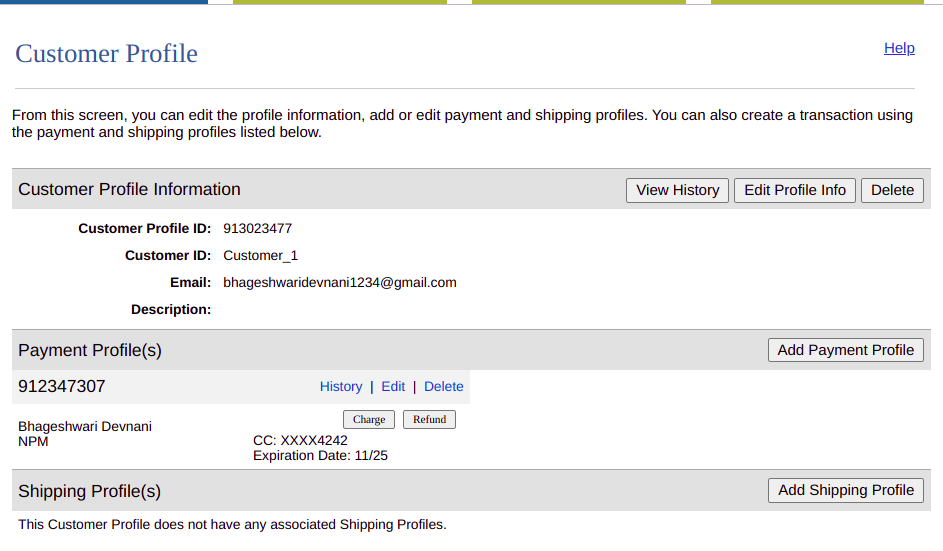
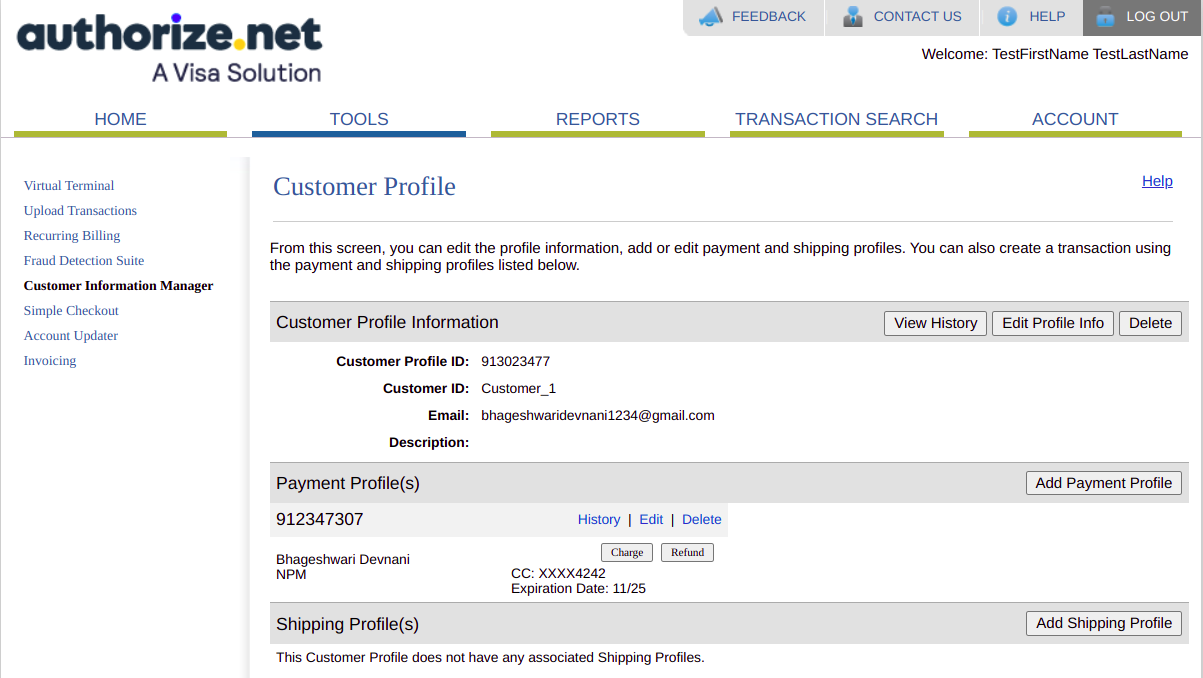
addCardInCustomer, we pass thecustomerIdas an input parameter, and thiscustomerIdrepresents the customer's profile ID in the Authorize.Net system. After successfully adding the card details using the API, the card information will be associated with that specific customer's profile. Below screenshot showing the customer detail page and the payment profiles.
Create Payment
Now, we are finally able to create a payment against the customer. Below is an example of how to do that:
public CreateTransactionResponse createPayment(String loginId, String transactionKey, String customerId) {
    setEnvironment();

    MerchantAuthenticationType merchantAuthenticationType = new MerchantAuthenticationType();
    merchantAuthenticationType.setName(loginId);
    merchantAuthenticationType.setTransactionKey(transactionKey);
    ApiOperationBase.setMerchantAuthentication(merchantAuthenticationType);

    // Retrieve customer's payment profile ID
    String paymentProfileId = getCustomerPaymentProfileId(loginId, transactionKey, customerId);
    // Set the profile ID to charge
    CustomerProfilePaymentType profileToCharge = new CustomerProfilePaymentType();
    profileToCharge.setCustomerProfileId(customerId);

    PaymentProfile paymentProfile = new PaymentProfile();
    paymentProfile.setPaymentProfileId(paymentProfileId);
    profileToCharge.setPaymentProfile(paymentProfile);

    // Create the payment transaction request
    TransactionRequestType txnRequest = new TransactionRequestType();
    txnRequest.setTransactionType(TransactionTypeEnum.AUTH_CAPTURE_TRANSACTION.value());
    txnRequest.setProfile(profileToCharge);
    txnRequest.setAmount(BigDecimal.valueOf(collectPaymentDTO.getAmount()).setScale(2, RoundingMode.CEILING));

    CreateTransactionRequest apiRequest = new CreateTransactionRequest();
    apiRequest.setTransactionRequest(txnRequest);
    CreateTransactionController controller = new CreateTransactionController(apiRequest);
    controller.execute();

    return controller.getApiResponse();
}

// Helper method to retrieve the payment profile ID of the customer
private String getCustomerPaymentProfileId(String loginId, String transactionKey, String customerId) {
    ApiOperationBase.setEnvironment(Environment.SANDBOX);

    MerchantAuthenticationType merchantAuthenticationType = new MerchantAuthenticationType();
    merchantAuthenticationType.setName(loginId);
    merchantAuthenticationType.setTransactionKey(transactionKey);
    ApiOperationBase.setMerchantAuthentication(merchantAuthenticationType);

    GetCustomerProfileRequest getRequest = new GetCustomerProfileRequest();
    getRequest.setMerchantAuthentication(merchantAuthenticationType);
    getRequest.setCustomerProfileId(customerId);

    GetCustomerProfileController controller = new GetCustomerProfileController(getRequest);
    controller.execute();
    GetCustomerProfileResponse getCustomerProfileResponse = controller.getApiResponse();

    if (getCustomerProfileResponse != null && getCustomerProfileResponse.getMessages().getResultCode() == MessageTypeEnum.OK) {
        List<CustomerPaymentProfileMaskedType> paymentProfiles = getCustomerProfileResponse.getProfile().getPaymentProfiles();
        if (paymentProfiles != null && !paymentProfiles.isEmpty()) {
            // Assuming the first payment profile is the one to be used, you can adjust this logic based on your use case
            return paymentProfiles.get(0).getCustomerPaymentProfileId();
        }
    }

    return null; // Return null if payment profile ID retrieval failed
}
After successfully creating the payment using the provided
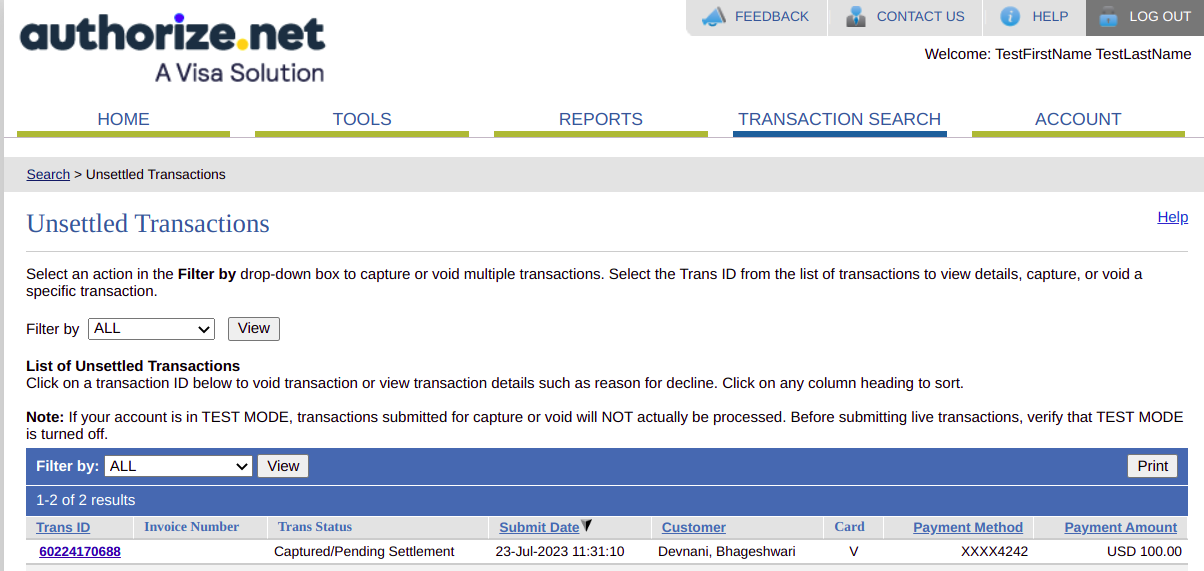
createPaymentmethod, you can view the list of unsettled transactions in the Authorize.Net Merchant Interface. These unsettled transactions represent the recent payments that have been processed but have not yet been settled (i.e., the funds have not been transferred to your bank account).
By following these steps, you can securely integrate Authorize.Net APIs with your Java Spring Boot application to process payments for your customers.
Keep in mind that this is Part-2 of the series, and in **Part-3**, we will explore another method of accepting payments by hosting the form.
“For a basic understanding of Authorize.Net, you can refer to Part-1 of this series by clicking here.”
메타데이터
- post_id
- ff25fb3f47e
- slug
- authorize-net-payment-gateway-integration-in-java-spring-boot-part-2-ff25fb3f47e
- url
- https://medium.com/@bhageshwaridevnani/authorize-net-payment-gateway-integration-in-java-spring-boot-part-2-ff25fb3f47e
- canonical_url
- https://medium.com/@bhageshwaridevnani/authorize-net-payment-gateway-integration-in-java-spring-boot-part-2-ff25fb3f47e
- author_url
- https://medium.com/@bhageshwaridevnani
- status
- ok
- fetched_at
- 2026-07-15 03:20:38