The Complete Guide to Figma, Miro, LangChain & Lovable
From Total Beginner to Confident Builder — In Plain English
The Complete Guide to Figma, Miro, LangChain & Lovable
From Total Beginner to Confident Builder — In Plain English
Who this is for: Anyone who has heard these tool names and wants to actually understand them — not just skim a definition. Whether you’ve never opened any of them or you use one daily but want to go deeper, this guide covers everything from “what is this?” to “how do I use this like a pro?”
Tools
Introduction — Why These 4 Tools?
In the past few years, building digital products has changed completely. You no longer need a huge team, six months, or a big budget to go from idea to working product. A designer can prototype in hours. A non-developer can ship a real app in a day. A solo founder can build an AI product without deep machine learning knowledge. These four tools are at the center of that change:
- Figma — Design what your product looks like
- Miro — Think through what your product should be
- LangChain — Make your product talk to AI intelligently
- Lovable — Build the product itself using plain English
They cover the full journey: thinking → designing → building → powering with AI. Master these four and you can move from idea to product faster than most teams with 10 people. This guide explains each one from scratch. No jargon. No assumed knowledge. Just clear explanations, real steps, common mistakes, and advanced techniques — all in one place.
1. Figma — Design Without Limits
What Is Figma?
Figma is a design tool that runs entirely in your browser. You use it to create the visual layouts of apps, websites, and interfaces — what things look like, where buttons sit, how colors and text are arranged. Think of it like this: before a building gets built, an architect draws blueprints. Figma is where designers draw the “blueprints” of digital products. It shows what an app should look like before any code is written.
The big difference from older tools like Photoshop or Sketch: Figma is live and collaborative. Multiple people can open the same file at the same time and work on it together — like Google Docs, but for design.
Who Uses Figma?
- UI/UX designers building screens for apps and websites
- Product managers sketching out ideas quickly
- Developers reading design specs to write accurate code
- Founders and entrepreneurs mocking up product ideas before hiring developers
- Students and learners building a design portfolio
Core Concepts (Plain English)
Canvas: An infinite, zoomable whiteboard where everything lives. You zoom in to work on details, zoom out to see the big picture.
Frame: Think of a Frame as one screen. It’s a defined rectangle that represents a phone screen, a laptop browser window, a tablet — whatever you’re designing for. Press **F **to create one, then pick a preset size from the right panel.
Layer: Every element on your canvas is a layer — a rectangle, a piece of text, an icon, an image. Layers stack on top of each other. The Layers panel on the left shows you all layers in order.
Component: A reusable building block. You design a button once, turn it into a Component, and use it 50 times across your design. If you later change the original (called the “Main Component”), all 50 copies update automatically. This is the most important concept in Figma for serious work.
Variant: A version of a Component in a different state. A button Component might have variants: Default, Hover, Pressed, Disabled. All four look slightly different but are linked to the same Component.
Auto Layout: Makes your designs flexible and responsive. When you add Auto Layout to a group of elements, they automatically reflow when content changes — like how websites reflow on different screen sizes. If you add a word to a button with Auto Layout, the button grows to fit it. This is Figma’s most powerful layout feature.
Prototype: A clickable, interactive version of your designs. You draw arrows between Frames to say “clicking this button takes you to this screen.” Then press Play and click through it like a real app — without writing any code.
Styles: Saved colors, text sizes, and effects that you define once and apply everywhere. Change the Style, and everything using it updates. Works like CSS variables in code.
Variables: A newer, more powerful version of Styles. Variables can store colors, numbers, strings, and even boolean (true/false) values. They allow a single design file to have multiple “modes” — like Light Mode and Dark Mode — that you switch between instantly.
Getting Started: Step by Step
Step 1 — Create an Account
Go to figma.com, click “Get Started for free.” The free plan gives you unlimited personal files and 3 collaborative files per month.
Step 2 — Create Your First File
Click “New Design File.” You’ll see a blank canvas. The toolbar at the top has your tools. The left panel shows layers. The right panel shows properties of whatever is selected.
Step 3 — Create a Frame
Press **F** (or click the Frame tool in the toolbar). On the right panel, you'll see device presets. Click "iPhone 14" and a frame appears — 390px wide, 844px tall. This is your first "screen."
Step 4 — Add a Rectangle
Press **R** and drag on the canvas to draw a rectangle. In the right panel you can change:
- W and H — Width and Height
- Fill — Background color
- Corner radius — Rounded corners
- Stroke — Border
Step 5 — Add Text
Press **T** and click on the canvas. Type anything. In the right panel, change font, size, weight, and color.
Step 6 — Create a Component
Draw a button — a rectangle with text on top. Select both (Shift+click), then press **Ctrl+Alt+K (Windows) or `Cmd+Option+K`** (Mac) to create a Component. It turns purple with a diamond icon. Now duplicate it and use it throughout your design — changes to the original will update all copies.
Step 7 — Add Auto Layout
Select a group of elements. Press **Shift+A** to add Auto Layout. In the right panel you'll see controls for direction (horizontal/vertical), spacing between items, and padding. Try adding and removing elements — watch how they reflow automatically.
Step 8 — Make a Prototype
Press P or click "Prototype" in the top right to switch to Prototype mode. Click on a button in your design — a blue circle appears on the right side of it. Drag it to another Frame. Now press the Play button (top right) and click your button — the prototype navigates to the next screen.
Step 9 — Share Your Work
Click “Share” (top right). Copy the link and send it to anyone. They can view, comment, and if you give them edit access, work on the file alongside you — in real time.
Intermediate Skills
Using the Community: Figma has a massive library of free templates, icon sets, and UI kits. Click the Figma logo → Community. Search “iOS 18 UI Kit” or “Tailwind Components” and duplicate a file to your account instantly. Don’t design from scratch when someone has already built the components.
Dev Mode: Developers can switch to Dev Mode (toggle in the top right) and click on any element to see its exact CSS properties — hex codes, font sizes, spacing, and even exported code snippets. Share your Figma link with your developer and tell them to use Dev Mode. It eliminates most “does this match the design?” back-and-forth.
Inspect Panel: Even without Dev Mode, the Inspect tab (right panel, when something is selected) shows spacing, colors, and font values that developers can read.
Constraints: When you resize a Frame (like changing from mobile to tablet size), how do elements behave? Constraints tell Figma: “keep this button stuck to the top-right corner” or “stretch this image to fill the full width.” Set constraints in the right panel under “Constraints.”
Boolean Operations: Combine shapes like a designer. Select two shapes → right-click → Boolean Groups. Options: Union (merge), Subtract (punch a hole), Intersect (keep only overlap), Exclude (keep only non-overlap). Essential for creating custom icons and shapes.
Advanced Skills
Design Tokens with Variables: Create Variables for every color, spacing value, and font size in your design system. Then create “collections” of those Variables — one for Light Mode, one for Dark Mode. Switch between them in one click. Your entire design updates. This is how professional teams maintain design systems at scale.
Component Properties: Modern Figma lets you add Properties to Components — like a checkbox for “has icon” or a dropdown to pick “primary / secondary / ghost” button style. This lets designers swap Component variants without diving into nested layers. Create them in the right panel when a Component is selected.
Interactive Components: Make Components themselves interactive — hover states, pressed states, toggled states — all without leaving the Component. Use this to build dropdowns, toggles, and accordions that work realistically inside a prototype.
Branching: Like Git branches for design. Create a “branch” of a file, make experimental changes, then merge them back — or throw the branch away. Prevents breaking the main design file while experimenting.
Plugins to Know:
- Unsplash — Insert free stock photos directly
- Iconify — Access 200,000+ icons in one click
- Lorem ipsum — Automatically fill text with placeholder content
- Figma to HTML — Export designs to basic HTML code
- Tokens Studio — Manage design tokens and sync with code
Keyboard Shortcuts That Change Everything:
**Ctrl/Cmd + D** — Duplicate selected element**Alt + drag** — Copy and move at the same time**Ctrl/Cmd + G** — Group selected elements**Ctrl/Cmd + Shift + H** — Flip horizontal**K**— Scale tool (resize while preserving proportions)**Ctrl/Cmd + \** — Hide/show UI panels for a distraction-free view**Ctrl/Cmd + Shift + E** — Export selected elements
Common Mistakes and How to Avoid Them
Mistake 1: Not using Components. Beginners design each button separately. When the design changes, they update 40 buttons manually. Use Components from day one.
Mistake 2: Ignoring Auto Layout. Manually spacing elements means your design breaks when content changes. Add Auto Layout to any container where elements need to flow.
Mistake 3: Designing only for one screen size. Real apps work on phones, tablets, and desktops. Design for at least two sizes (mobile and desktop) and use Constraints to handle the in-between.
Mistake 4: Skipping the Prototype step. A static design doesn’t tell you if the user flow makes sense. Always prototype and click through the experience yourself before sharing.
Mistake 5: Using random colors instead of Styles/Variables. Picking colors freely leads to 12 slightly different shades of gray. Define a color Style or Variable palette early and stick to it.
Tools
2. Miro — Your Team’s Second Brain
What Is Miro?
Miro is an online collaborative whiteboard. If Figma is for designing what a product looks like, Miro is for figuring out what the product should be in the first place.
It’s an infinite canvas where teams place sticky notes, diagrams, flowcharts, images, documents, timelines, and more — all in one shared space. It’s designed for teams to think, plan, and align together, especially when they’re not in the same room.
Who Uses Miro?
- Product teams mapping user journeys and planning sprints
- Engineering teams diagramming system architecture
- Design teams running design thinking workshops
- Managers running retrospectives, roadmaps, and brainstorming sessions
- Consultants and agencies collaborating with clients remotely
- Educators running interactive workshops and lessons
Core Concepts (Plain English)
Board: Your workspace. One infinite canvas. You can zoom in, zoom out, pan left and right. Everything your team adds lives here.
Sticky Note: The most basic building block. Double-click on the board to create one. Type an idea, change its color, group similar ones. Sticky notes are the “atoms” of Miro brainstorming.
Frame: A named, defined region of the board. You can create multiple frames — one for each section of your workshop, planning phase, or presentation. Frames also let you present sections of your board in order, like slides.
Shape: Rectangles, circles, diamonds, arrows, and more. The building blocks of flowcharts, diagrams, and wireframes. Miro has hundreds of built-in shape libraries including flowchart shapes, network diagrams, and UML symbols.
Connector (Arrow): Draw arrows between items to show relationships, flow, or dependencies. Hover over any object until you see blue dots appear on the edges — drag from those dots to create a connector.
Template: Pre-built board layouts for common use cases. There are hundreds — agile retrospectives, customer journey maps, mind maps, product roadmaps, SWOT analyses, brainstorming frameworks. Start from a template instead of a blank board.
Card: A more structured version of a sticky note. Cards can have titles, descriptions, tags, due dates, and assignees. Better than sticky notes for tracking tasks or user stories.
Mind Map: A radial diagram for organizing ideas. One central idea connects to branches, which connect to sub-branches. Miro has a dedicated Mind Map mode where connections auto-draw and you navigate with Tab (add sibling) and Enter (add child).
Timer: A built-in countdown timer you can show to everyone on the board. Useful during workshops: “5 minutes to add your sticky notes, go!”
Voting: A feature that lets every participant vote on ideas with dots. Run a vote → everyone clicks to place their votes → results appear. Fast way to prioritize ideas in a group.
Getting Started: Step by Step
Step 1 — Sign Up
Go to miro.com. The free plan gives you 3 editable boards — plenty to start.
Step 2 — Create a New Board
Click “New Board.” You’ll see an empty canvas. The toolbar is on the left.
Step 3 — Add Sticky Notes
Double-click anywhere on the canvas. A sticky note appears. Type your idea. Press **Escape** to deselect. Double-click again somewhere else for another note.
Step 4 — Change Colors
Select a sticky note. Click the color circles that appear above it. Different colors = different categories. Common convention: one color per person, or one color per type of idea (problem, solution, question).
Step 5 — Add a Shape
Click the Shapes tool in the left toolbar (the diamond icon). Pick a shape and drag it onto the canvas. To connect shapes, hover over one until blue dots appear on the edges, then drag from a dot to another shape.
Step 6 — Try a Template
Click the Templates button in the left toolbar (grid icon). Search for “Retrospective” or “User Journey Map.” Preview it and click “Use Template.” A pre-built board structure appears — just fill it in.
Step 7 — Invite Your Team
Click “Share” in the top right. Enter email addresses or copy a shareable link. Collaborators appear as colored cursors on the board. You can see where everyone is and what they’re clicking — in real time.
Step 8 — Present Your Board
Click the Frame you want to start from. Then click the “Present” button (top right, looks like a play button). You’ll enter presentation mode and can click through your frames in order — like PowerPoint, but on your Miro board.
Intermediate Skills
Clustering Sticky Notes: After a brainstorm, drag related sticky notes together into groups. Add a text label above each group to name the category. This “affinity mapping” technique turns a chaotic storm of ideas into organized insights.
Using Reactions: In a workshop, instead of interrupting to give feedback, participants can react to items with emoji (👍, ❤️, 🔥, etc.). Hover over any item → click the smiley face that appears. Great for silent dot-voting without interrupting flow.
Bulk Creation of Sticky Notes: You can paste a list of items from a spreadsheet or document and Miro will turn each line into a separate sticky note automatically. Copy a column of cells from Excel, paste onto the Miro board, and watch it generate 20 sticky notes in one action.
Tagging and Filtering: Add tags to cards and sticky notes (like “urgent,” “phase 2,” “blocked”). Then use Miro’s filter feature to show only items with specific tags. Instantly declutter a crowded board.
Swimlanes: A swimlane is a horizontal or vertical band used to separate different actors or phases in a process. Miro has swimlane templates built in. Perfect for showing “what does the user do vs. what does the system do?” in parallel.
Recording with Miro: You can record your screen while presenting in Miro to make asynchronous video walkthroughs of boards for teammates in different time zones.
Advanced Skills
Miro AI: Miro has built-in AI features that can:
- Generate a mind map from a topic you describe
- Cluster sticky notes automatically by content similarity
- Summarize all sticky notes on a board into key themes
- Create diagrams from text descriptions
- Suggest next steps for a workshop
Find AI features in the left toolbar (the sparkle icon). Use “Cluster” after a brainstorm to group ideas — it’s shockingly good at finding themes without you having to read every note.
Miro API and Automations: For developers and power users, Miro has a REST API and Zapier/Make integrations. You can:
- Automatically create Miro cards from Jira tickets
- Push sticky notes to a spreadsheet
- Trigger board creation from a form submission
Custom Templates: Build your own board template — design it, then right-click the background → “Save as Template.” Next time, create a board from your custom template in seconds.
Miro for Agile: Miro has a dedicated Agile toolkit with sprint planning boards, backlog templates, and a built-in estimation mode (Planning Poker). Teams run entire sprint ceremonies — sprint planning, standups, retrospectives — inside Miro instead of switching between Jira and Confluence.
Embed Anything: Miro lets you embed Google Docs, YouTube videos, Figma files, PDFs, GitHub code snippets, and more directly on the board. Your board becomes a single source of truth where everything related to a project lives together.
Common Mistakes and How to Avoid Them
Mistake 1: Making the board too dense. A Miro board packed with 200 sticky notes in a wall-to-wall grid is unreadable. Use frames to divide content into sections. Give each section breathing room.
Mistake 2: Using Miro like PowerPoint. Miro is spatial — relationships between ideas matter. Don’t put all content in a neat linear list. Cluster related ideas, draw connections, let the layout carry meaning.
Mistake 3: Not setting a timer during brainstorms. Without a timer, brainstorming drags and people scroll instead of creating. Use the built-in timer for every generation phase.
Mistake 4: Forgetting to lock background elements. If you’re facilitating a workshop, lock your template structure (right-click → Lock) so participants can’t accidentally move the headers and lanes while adding their content.
Mistake 5: Leaving boards forever. Old boards pile up and get confusing. Archive finished boards or move them to a dedicated “Archive” folder in your workspace.
Tools
3. LangChain — The AI Wiring Kit
What Is LangChain?
LangChain is a software library — a collection of pre-written code — that helps developers build applications powered by large language models (LLMs). LLMs are the AI models like GPT-4, Claude, Gemini, and Llama that can understand and generate text.
Here’s the simple version: LangChain is plumbing. The AI model is the brain. Your data and tools are the world. LangChain connects them.
Without LangChain, if you want an AI that can answer questions from your company’s PDF documents, you’d need to write a lot of custom code to:
- Load and split the PDFs into chunks
- Turn those chunks into vector embeddings (searchable math representations)
- Store them in a vector database
- When a question comes in, find the relevant chunks
- Pass them to the AI model with the question
- Return the answer
LangChain gives you ready-made components for every one of those steps. Instead of writing it all yourself, you snap pieces together.
LangChain works in Python and JavaScript/TypeScript. Most examples you’ll find are in Python.
Who Uses LangChain?
- Backend developers building AI-powered features into apps
- Data scientists building question-answering systems over documents
- Startups building AI products fast without reinventing every component
- Enterprises connecting AI to internal knowledge bases
- Researchers experimenting with AI agent behavior
Core Concepts (Plain English)
LLM / Chat Model: The AI brain. LangChain supports dozens of models — OpenAI’s GPT-4, Anthropic’s Claude, Google’s Gemini, Meta’s Llama, and many more. You pick one and plug it in. Switching models later is just changing one line of code.
Prompt Template: A reusable blueprint for instructions you send to the AI. Instead of writing the full prompt every time, you define a template with placeholders: **"You are a helpful assistant. Answer this question: {question}"**. LangChain fills in the placeholders automatically at runtime.
Chain: A sequence of steps that run in order. Step 1 might format a prompt. Step 2 sends it to the AI. Step 3 parses the response. Chains let you build multi-step AI workflows clearly and reliably.
Document Loader: A component that reads content from different sources — PDFs, Word documents, websites, databases, CSV files, YouTube transcripts, Notion pages — and turns them into a standard format LangChain can work with.
Text Splitter: Long documents need to be broken into smaller chunks before the AI can use them. A Text Splitter divides documents into pieces (e.g., 500 words each, with 50-word overlaps so context isn’t lost at chunk boundaries).
Embeddings: A way to turn text into numbers that capture meaning. Similar sentences get similar numbers. “The dog ran fast” and “The puppy sprinted quickly” will have similar embeddings. This is how AI can find relevant content even when the exact words don’t match.
Vector Store: A database designed to store embeddings and find similar ones quickly. You store your document chunks as embeddings. When a question comes in, you find the chunks whose embeddings are most similar to the question’s embedding. Popular vector stores: Pinecone, Chroma, FAISS, Weaviate.
Retriever: The component that, given a question, fetches the most relevant document chunks from a Vector Store. It bridges user questions and stored knowledge.
RAG (Retrieval Augmented Generation): The most common LangChain pattern. The AI doesn’t rely only on its training data — it first retrieves relevant documents, then generates an answer based on them. This is how you build “chat with your documents” systems. The AI answers from your data, not from general knowledge.
Memory: Makes AI conversations feel continuous. Without memory, every message to an AI is a fresh start — it has no idea what you said earlier. LangChain’s memory components store conversation history and include it in future prompts automatically. Types:
- ConversationBufferMemory — stores the full conversation
- ConversationSummaryMemory — summarizes older parts to save space
- ConversationWindowMemory — keeps only the last N messages
Tool: A function the AI can call to do something in the world — search the web, run Python code, query a database, call an API. Tools extend what the AI can do beyond just generating text.
Agent: An AI that decides on its own what to do next. Given a goal, it picks tools, takes actions, observes results, and decides the next step — repeating until the goal is reached. LangChain’s agent framework manages this decision loop.
Output Parser: Tells LangChain how to interpret the AI’s response. If you want the AI to return a JSON object, a list, or a structured data type, an Output Parser extracts and validates that structure.
LCEL (LangChain Expression Language): A newer syntax (using the | pipe operator) for building chains in a clean, readable way. **prompt | model | output_parser** is a complete chain. LCEL also enables streaming, parallel processing, and easier debugging.
Getting Started: Step by Step
Step 1 — Install LangChain
pip install langchain langchain-openai python-dotenvFor Claude / Anthropic:
pip install langchain langchain-anthropicStep 2 — Set Up Your API Key
Create a **.env** file:
OPENAI_API_KEY=sk-...your-key-here...In your Python file:
from dotenv import load_dotenv
load_dotenv()
Get an OpenAI key at platform.openai.com. Get an Anthropic key at console.anthropic.com.
Step 3 — Your First LLM Call
from langchain_openai import ChatOpenAI
from langchain_core.messages import HumanMessage

model = ChatOpenAI(model="gpt-4o-mini")
response = model.invoke([HumanMessage(content="What is the capital of France?")])
print(response.content)
# Output: Paris
Step 4 — Use a Prompt Template
from langchain_core.prompts import ChatPromptTemplate

prompt = ChatPromptTemplate.from_messages([
    ("system", "You are a helpful assistant that explains things simply."),
    ("human", "Explain {topic} in 3 sentences.")
])
chain = prompt | model
result = chain.invoke({"topic": "photosynthesis"})
print(result.content)
Step 5 — Build Your First RAG Pipeline
from langchain_community.document_loaders import PyPDFLoader
from langchain.text_splitter import RecursiveCharacterTextSplitter
from langchain_openai import OpenAIEmbeddings
from langchain_community.vectorstores import Chroma
from langchain.chains import RetrievalQA

# Load a PDF
loader = PyPDFLoader("your-document.pdf")
docs = loader.load()
# Split into chunks
splitter = RecursiveCharacterTextSplitter(chunk_size=500, chunk_overlap=50)
chunks = splitter.split_documents(docs)
# Create embeddings and store them
embeddings = OpenAIEmbeddings()
vectorstore = Chroma.from_documents(chunks, embeddings)
# Create a retrieval chain
qa_chain = RetrievalQA.from_chain_type(
    llm=model,
    retriever=vectorstore.as_retriever()
)
# Ask a question
answer = qa_chain.invoke({"query": "What does the document say about pricing?"})
print(answer["result"])
This is a complete, working RAG pipeline. The AI answers from your PDF, not from its training data.
Intermediate Skills
Adding Memory to a Chatbot:
from langchain.memory import ConversationBufferMemory
from langchain.chains import ConversationChain

memory = ConversationBufferMemory()
conversation = ConversationChain(llm=model, memory=memory)
conversation.predict(input="Hi, my name is Alex.")
conversation.predict(input="What's my name?")
# Output: "Your name is Alex."  - it remembers!
Streaming Responses:
for chunk in model.stream("Tell me a story about a robot"):
    print(chunk.content, end="", flush=True)
Streaming lets you show text as it’s generated — like ChatGPT’s typewriter effect.
Giving the AI Tools:
from langchain.agents import create_tool_calling_agent, AgentExecutor
from langchain_community.tools import DuckDuckGoSearchRun

search = DuckDuckGoSearchRun()
tools = [search]
agent = create_tool_calling_agent(model, tools, prompt)
executor = AgentExecutor(agent=agent, tools=tools)
result = executor.invoke({"input": "What's the latest news about AI today?"})
The agent automatically decides when to search and incorporates the results.
Structured Output:
from pydantic import BaseModel
from langchain_core.output_parsers import JsonOutputParser

class MovieReview(BaseModel):
    title: str
    rating: int
    summary: str
parser = JsonOutputParser(pydantic_object=MovieReview)
prompt = ChatPromptTemplate.from_messages([
    ("human", "Review the movie '{movie}'. {format_instructions}"),
]).partial(format_instructions=parser.get_format_instructions())
chain = prompt | model | parser
review = chain.invoke({"movie": "Inception"})
print(review.rating)  # An integer, not a string
Advanced Skills
LangSmith — Debug Your AI: LangSmith is LangChain’s observability platform. It records every step of every chain — what prompt went in, what the model returned, how long it took, and what it cost.
import os
os.environ["LANGCHAIN_TRACING_V2"] = "true"
os.environ["LANGCHAIN_API_KEY"] = "your-langsmith-key"
os.environ["LANGCHAIN_PROJECT"] = "my-project"
After adding these lines, go to smith.langchain.com and see every run visualized as a tree. When your agent does something unexpected, LangSmith shows you exactly why.
LangGraph — Advanced Agent Control: LangGraph is LangChain’s framework for building more complex, controllable AI agents. Instead of a linear chain, you build a graph of nodes (steps) with conditional edges (different paths depending on what happens). This lets you build agents that:
- Loop until a condition is met
- Branch into parallel sub-tasks
- Have human approval steps mid-process
- Handle errors gracefully and retry
from langgraph.graph import StateGraph, END

graph = StateGraph(State)
graph.add_node("researcher", research_step)
graph.add_node("writer", write_step)
graph.add_node("reviewer", review_step)
graph.add_edge("researcher", "writer")
graph.add_conditional_edges("reviewer", should_revise, {
    "yes": "writer",
    "no": END
})
RAG Advanced Techniques:
Hybrid Search: Combine keyword search (BM25) with semantic search (embeddings). Keyword search finds exact matches; semantic search finds conceptual matches. Together, they’re more accurate than either alone.
Reranking: After retrieving 10 candidate chunks, use a “reranker” model (like Cohere Rerank) to score which chunks are most relevant and return only the top 3. This dramatically improves answer quality.
Multi-Query Retrieval: Instead of searching for just the user’s exact question, generate 3–5 reformulations of the question and search for all of them. The union of results covers more relevant content.
Parent Document Retrieval: Store small chunks for accurate search, but retrieve the full parent document when a chunk matches. This gives the AI more context than the tiny chunk alone.
Custom Tools and Tool Schemas:
from langchain.tools import tool

@tool
def get_weather(city: str) -> str:
    """Get the current weather for a city. Use this when the user asks about weather."""
    # call a weather API here
    return f"The weather in {city} is sunny and 22°C."
LangChain automatically uses the docstring as the tool description — this is what the AI reads to decide when to use the tool. Write clear, accurate docstrings.
Choosing the Right Vector Store:
Vector Store Best For FAISS Local development, no infrastructure needed Chroma Local or small-scale production Pinecone Production, fully managed, scales automatically Weaviate Production, hybrid search, open source pgvector Already using PostgreSQL? Add vectors to it
Common Mistakes and How to Avoid Them
Mistake 1: Using outdated tutorials. LangChain updates very fast. A tutorial from 2023 might use **LLMChain or ConversationalRetrievalChain **— these still work but are deprecated. Use LCEL and the current docs at python.langchain.com.
Mistake 2: Not chunking documents thoughtfully. Default chunk sizes often aren’t right for your content. If your documents have natural sections (articles, chapters, Q&A pairs), consider custom splitting logic that preserves those units rather than cutting mid-sentence.
Mistake 3: Ignoring costs. Each API call to GPT-4 or Claude costs money. During development, use cheaper models (gpt-4o-mini, claude-haiku) and only switch to powerful models in production.
Mistake 4: Skipping LangSmith. Building AI systems without observability is like debugging code without print statements. Set up LangSmith from day one.
Mistake 5: Building an agent when a chain would do. Agents are powerful but unpredictable. If your workflow is deterministic (always the same steps), use a chain. Use agents only when the AI genuinely needs to decide what to do next.
Tools
4. Lovable — Build Apps With Words
What Is Lovable?
Lovable is an AI-powered app builder. You describe the app you want in plain English, and Lovable writes the code and shows you a working, clickable preview in real time.
This is not a “visual drag-and-drop” builder like Wix or Squarespace. Lovable generates actual React code — real, professional-grade frontend code that developers use to build production apps. You’re not building a toy; you’re building something you can hand to an engineer to extend, or deploy yourself.
With one click, you can also connect a real Supabase database — giving your app authentication (login/logout), user accounts, and persistent data storage, all without touching a terminal or writing a database query.
Who Uses Lovable?
- Non-technical founders who want to build an MVP before hiring developers
- Designers who want to see ideas as working apps, not just static mockups
- Developers who want to skip boilerplate and scaffold apps faster
- Product managers who want a realistic prototype that actually works
- Students and learners who want to build things without years of coding study
Core Concepts (Plain English)
Project: One app you’re building. Each project has its own code, pages, and database.
Prompt: The plain-English instructions you type to create or modify your app. “Add a dark mode toggle to the header” or “Create a login page with email and password fields.”
Preview: The live view of your app that updates as you make changes. Click through it like a real app — buttons work, pages navigate, forms submit.
Chat Mode: The main way to talk to Lovable. Type instructions here to add new features, change how things work, or ask Lovable why something is broken.
Select & Edit Mode: Click directly on an element in the Preview panel, then tell Lovable exactly what to change about that specific element. More targeted than Chat for small visual tweaks.
Supabase Integration: Supabase is a free, open-source database service (like Firebase). Lovable connects to it with one click, giving your app:
- Authentication — email/password login, magic links, Google OAuth
- Database — tables, rows, queries — all managed for you
- Storage — file uploads (images, PDFs, etc.)
- Row-Level Security — controls who can see whose data
Deployment: Publishing your app so anyone on the internet can use it. Lovable gives you a .lovable.app URL instantly. You can also connect a custom domain.
Code Export: Lovable lets you download the full React project at any time. Take it to your own code editor, push it to GitHub, or hand it to a developer to continue.
Getting Started: Step by Step
Step 1 — Sign Up
Go to lovable.dev. Sign up with Google or email. You get free credits to start.
Step 2 — Write Your First Prompt
Click “New Project.” A text box appears. Describe your app clearly. Be specific about:
- What it does (“a task management app where users can create projects and add tasks to them”)
- The pages (“a dashboard, a project detail page, and a settings page”)
- The style (“clean, minimal, dark mode by default”)
- Key features (“drag and drop tasks between columns”)
Press Enter. Lovable starts building. This takes 30–90 seconds.
Step 3 — Review the Preview
The preview panel on the right shows your app. Click through it. Does the navigation work? Do the forms appear? Note what you want to change.
Step 4 — Make Changes
In the Chat panel on the left, type one change at a time:
- “Make the sidebar narrower”
- “Change the button color to indigo”
- “Add a search bar at the top of the task list”
Watch the preview update after each prompt. One change at a time is much more reliable than listing 10 changes at once.
Step 5 — Add a Database (Supabase)
Click “Add Supabase” in the top panel. Create a free Supabase account if you don’t have one. Lovable automatically:
- Creates the necessary database tables
- Sets up user authentication
- Connects your app’s frontend to the database
- Adds Row-Level Security so users only see their own data
Your app now has real, persistent data. Users can sign up, log in, and their data saves permanently.
Step 6 — Publish
Click “Publish” (top right). Your app goes live at a .lovable.app URL. Share it with anyone. To add a custom domain, go to Project Settings → Domains.
Intermediate Skills
Referencing Images in Prompts: You can upload a screenshot, sketch, or mockup and say “build this.” Lovable reads the image and generates the app layout based on what it sees. Sketch something on paper, photograph it, upload it, and get a working version in 2 minutes.
Asking Lovable to Explain Code: Type “explain what the UserDashboard component does” in the chat. Lovable will walk you through the code in plain English. Great for learning while you build.
Fixing Bugs: When something breaks, paste the error message into Chat. Lovable diagnoses and fixes it. For errors in the console (press F12 in your browser → Console tab), copy the red error text and paste it in.
Using Select Mode for Precision: Switch from Chat to Select mode (the cursor icon above the preview). Click on a specific element — a button, a card, a label. The element highlights. Then type your instruction. “Make this button rounded” applies only to that button, not every button.
Creating Multiple Pages: “Add a new page called About Us with a bio section and a contact form below it.” Lovable adds the page and wires it into the navigation automatically.
Connecting External APIs: “Add a button that fetches the latest Bitcoin price from the CoinGecko API and displays it.” Lovable writes the fetch code and handles errors. You can connect almost any public REST API this way.
Advanced Skills
Working with the Code Directly: Lovable has a built-in code editor. Click “Code” (top of the preview panel) to see the files. You can edit them directly — useful for precise changes that are hard to describe in a prompt. The code is standard React + TypeScript + Tailwind CSS.
GitHub Integration: Connect your project to a GitHub repository. Every change Lovable makes gets committed to GitHub automatically. This means:
- Full version history
- Ability to roll back to any point
- Developers can clone the repo and continue in their own editor
Row-Level Security (RLS) in Supabase: By default, Lovable sets up basic RLS. For production, review the rules in your Supabase dashboard (Authentication → Policies). Make sure:
- Users can only read their own data
- Users can only update their own records
- No unauthenticated access to sensitive tables
Custom Supabase Functions (Edge Functions): For backend logic (sending emails, processing payments, calling third-party APIs from the server side), Supabase supports Edge Functions — small TypeScript functions that run on the server. Ask Lovable: “Create a Supabase edge function that sends a welcome email when a user signs up.” It’ll write the function code and wire it to the database trigger.
Deploying with a Custom Domain:
- Go to Project Settings → Custom Domains
- Enter your domain (bought from Namecheap, GoDaddy, etc.)
- Lovable gives you DNS records to add
- Wait for DNS propagation (usually under 30 minutes)
- Your app is now live at your own domain with HTTPS
Stripe Payments: “Add a Stripe payment button for a $29 subscription.” Lovable adds the Stripe Checkout component and instructs you to add your Stripe publishable key in the environment variables. For server-side payment confirmation (webhooks), you’ll need a Supabase Edge Function — ask Lovable to create it.
Prompt Engineering for Better Results:
Instead of: **"Make the app better"**
Write: **"On the Dashboard page, change the stats row at the top to show 4 cards side by side with icons. Each card should have a title, a big number, and a subtitle showing percentage change from last week. Use green for positive changes and red for negative."**
The more specific and visual your description, the better Lovable’s output.
Using Components from shadcn/ui: Lovable uses shadcn/ui under the hood — a popular React component library. You can ask for specific components by name: “Add a shadcn Combobox for selecting a category” or “Replace the dropdown with a shadcn Command palette.” This gives you polished, accessible UI components instantly.
Common Mistakes and How to Avoid Them
Mistake 1: Too many changes in one prompt. “Add a search bar, change the color scheme, add user profiles, fix the mobile layout, and create an export button” will confuse Lovable and break things. One feature per prompt, always.
Mistake 2: Not describing the full context. “Add a button” — where? What does it do? What should it look like? Be precise: “Add a red Delete button in the top-right corner of each task card that removes the task from the list.”
Mistake 3: Ignoring the mobile view. Click the mobile/tablet toggle above the preview. If your app looks broken on mobile, say: “Fix the navigation so it collapses into a hamburger menu on mobile screens.”
Mistake 4: Not connecting Supabase for production. Lovable apps without Supabase have no real database — data disappears when you refresh. If your app needs to save anything, connect Supabase.
Mistake 5: Not exporting the code. If you’ve built something valuable, download the code and save it. Don’t leave your entire product in a SaaS tool without a backup.
Mistake 6: Fighting Lovable’s architecture. Lovable makes design decisions (folder structure, component naming, state management approach). Working against these decisions by giving contradictory prompts leads to messy, broken code. Learn the conventions Lovable uses and work with them.
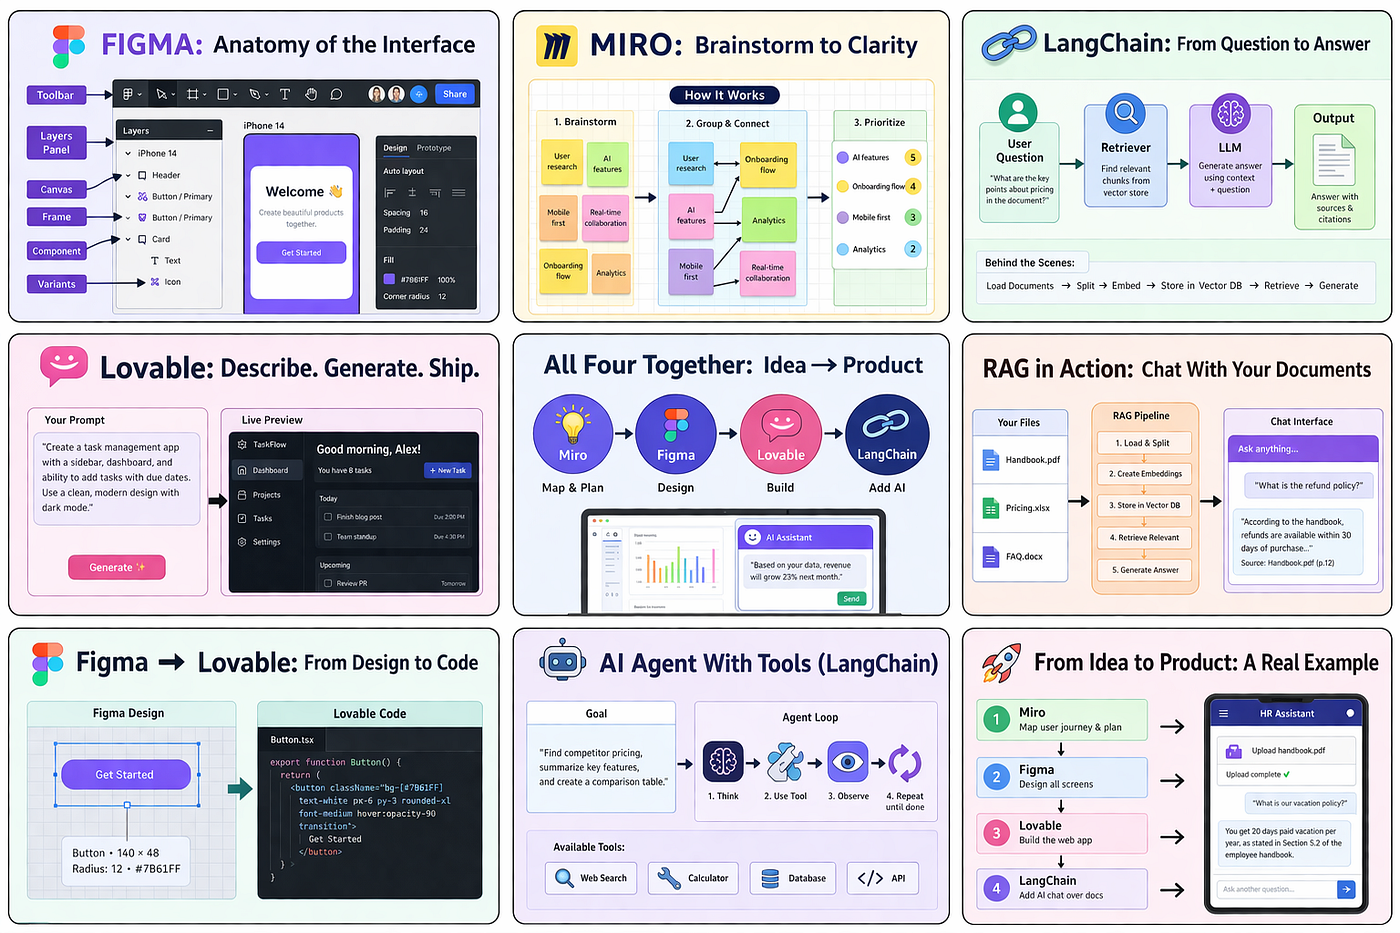
How All Four Work Together
The real power of these tools is how they fit into one coherent workflow:
IDEA
  ↓
MIRO — Map your idea, draw user flows, run workshops, plan what to build
  ↓
FIGMA — Design every screen, define the visual system, prototype the experience
  ↓
LOVABLE — Build the actual app using your Figma designs as reference
  ↓
LANGCHAIN — Add AI capabilities to your Lovable app (chatbots, document search, agents)
  ↓
PRODUCT
A practical example: You want to build a tool that lets HR teams upload employee handbooks and then ask questions about them using AI.
- Miro: Map the user journey — HR manager uploads PDF → employees ask questions → system returns answers with source citations. Identify edge cases. Get alignment from your team.
- Figma: Design the upload screen, the chat interface, the admin dashboard. Build a clickable prototype. Share with future users for feedback.
- Lovable: Build the frontend — the upload form, the chat UI, the user authentication. Connect Supabase for storing users and uploaded documents.
- LangChain: Build the backend AI pipeline — load the uploaded PDF → chunk it → embed it → store in a vector database → answer questions with RAG. Expose this as an API that your Lovable frontend calls.
Each tool does exactly what it’s best at. None of them tries to do everything.
Conclusion
These four tools represent a new way of building things. A way that’s faster, more collaborative, and accessible to people who couldn’t have built these things five years ago.
Miro gives ideas a home. Before anything is designed or built, you need a space to think clearly with your team. Miro is that space — infinite, collaborative, and structured just enough to turn brainstorms into plans.
Figma gives ideas a face. Once you know what you’re building, Figma lets you design it with professional precision — beautiful enough to inspire, detailed enough to build from.
Lovable turns ideas into real things, faster than seemed possible. Describe what you want. Get working code. Ship it. The gap between “I have an idea” and “here’s the app” has never been smaller.
LangChain makes your ideas intelligent. Once you have a product, LangChain is how you give it the power to understand documents, remember conversations, make decisions, and use tools. It’s how software stops being passive and starts feeling alive.
You don’t need to master all four at once. Start with the one that matches where you are right now:
- Got an idea you want to map out? → Miro
- Want to design what something looks like? → Figma
- Want to build a working app without code? → Lovable
- Want to add AI features to something? → LangChain
The tools will meet you where you are. The only thing left is to start.

Thanks for reading!!
Cheers!! Happy reading!! Keep learning!!
Please upvote, share & subscribe if you liked this!! Thanks!!
You can connect with me on LinkedIn, **YouTube, Kaggle, [Medium](https://medium.com/@jyotidabass)**, and GitHub for more related content. Thanks!!
메타데이터
- post_id
- ffc552f0e264
- slug
- the-complete-guide-to-figma-miro-langchain-lovable-ffc552f0e264
- url
- https://medium.com/tech-ai-made-easy/the-complete-guide-to-figma-miro-langchain-lovable-ffc552f0e264
- canonical_url
- https://medium.com/tech-ai-made-easy/the-complete-guide-to-figma-miro-langchain-lovable-ffc552f0e264
- author_url
- https://medium.com/@jyotidabass
- status
- ok
- fetched_at
- 2026-06-20 20:29:01





