Deploying a Highly Available Web App on AWS Using Terraform
Introduction
Deploying a Highly Available Web App on AWS Using Terraform
Introduction
In this walk through, we break down how to leverage Terraform to deploy a highly available, horizontally scalable & fault tolerant web server architecture. The setup pairs an Application Load Balancer with an Auto Scaling Group to distribute traffic across multiple EC2 instances that span several availability zones.
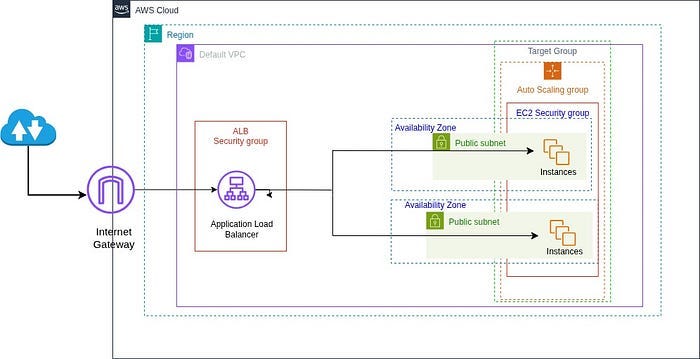
Highly Available Web server Architecture
Prerequisites
- AWS Account with permissions to create EC2, VPC, Load Balancers, Auto Scaling group resources.
- AWS CLI installed & configured with a named or default profile credentials.
- Terraform v1.3 or late installed. Verify by running
terraform versioncommand on the terminal. Expected output
mugo@sunny:$ terraform version
Terraform v1.14.7- Git (optional but recommended for version controll of the Terraform code).
Codebase Walkthrough
In a new directory, create a main.tf file
- Provider: Input this provider block that tell Terraform to target AWS on region us-east-2 for resource provisioning
provider "aws" {
  region = "us-east-2"
}
2. Data Sources:
A data source represents a piece of read-only information that is fetched from the provider every time you run Terraform.
Rather than hard-coding values, these data sources dynamically resolve them at apply time.
Here we query the provider’s API for :
- amazon linux 2 AMI ID from AWS Systems Manager Parameter Store(aws_ssm_parameter). Instances will always launch with the current patched AMI (latest version).
- default VPC:
*aws_vpc.default* retrieves the default VPC in the region. - availability zones:
*aws_availability_zones.all* fetches all AZs available in the region. - subnets:
*aws_subnets.default* filters for all subnets that belong to the default VPC, gives you one public subnet per AZ.
Add this to main.tf
data "aws_ssm_parameter" "amzn2_ami" {
  name = "/aws/service/ami-amazon-linux-latest/amzn2-ami-hvm-x86_64-gp2"
}

data "aws_vpc" "default" {
  default = true
}

data "aws_availability_zones" "all" {}

data "aws_subnets" "default" {
  filter {
    name   = "vpc-id"
    # References the Id of the default vpc
    values = [data.aws_vpc.default.id]
  }
}
Note: The default VPC approach is convenient for demos but unsuitable for production. Default VPCs have all subnets public and no network segmentation. In a production setup, you would provision a custom VPC with private subnets where instances will be launched, a public subnet for the load balancer & route outbound traffic through a NAT gateway.
3. Security Groups:
These act as virtual firewalls that control inbound & oubound traffic for AWS resources like EC2 instance. They operate at tehe instace level.
Add this to main.tf
# Application Load Balancer security group
resource "aws_security_group" "alb_sg" {
  name        = "alb-sg"
  description = "Allow HTTP inbound to ALB"
  vpc_id      = data.aws_vpc.default.id

#Allow Http traffic from anywhere
  ingress {
    from_port   = var.app_port      # varible reference -80
    to_port     = var.app_port
    protocol    = "tcp"
    cidr_blocks = ["0.0.0.0/0"]
  }

#Allows all outbound traffic for ALB forwarding
  egress {
    from_port   = 0
    to_port     = 0
    protocol    = "-1"
    cidr_blocks = ["0.0.0.0/0"]
  }
}
# Instance security group
resource "aws_security_group" "instance_sg" {
  name   = "instance-sg"
  vpc_id = data.aws_vpc.default.id

#Allow only to reach instances
  ingress {
    from_port       = var.server_port          # Variable Reference - 8080
    to_port         = var.server_port
    protocol        = "tcp"
    security_groups = [aws_security_group.alb_sg.id]
  }

  egress {
    from_port   = 0
    to_port     = 0
    protocol    = "-1"
    cidr_blocks = ["0.0.0.0/0"]
  }
}- The key security design decision in the whole architecture, there’s no direct internet access to the application servers. Your EC2 instances are effectively shielded behind the load balancer.
4. Variables
They keep our code DRY (Don’t Repeat Yourself) making it easy to tweak our infrastructure.
- Create a variables.tf file
variable "instance_type" {
  description = "EC2 instance type"
  type        = string
  default     = "t3.micro"
}

#
variable "app_port" {
  description = "Port the web app listens on"
  type        = number
  default     = 80
}

variable "server_port" {
  description = "Port the web app listens on"
  type        = number
  default     = 8080
}

variable "asg_min_size" {
  description = "Minimum number of instances in ASG"
  type        = number
  default     = 2
}

variable "asg_max_size" {
  description = "Maximum number of instances in ASG"
  type        = number
  default     = 5
}

variable "asg_desired_capacity" {
  description = "Desired number of instances in ASG"
  type        = number
  default     = 2
}
5. Launch Template — EC2 Blueprint
This is the blueprint the Auto Scaling group uses to spin up new instances. It makes sure their identical.
- append this to the main.tf
resource "aws_launch_template" "web-template" {
  image_id      = data.aws_ssm_parameter.amzn2_ami.value
  name_prefix   = "web-lt-"
  instance_type = var.instance_type

  vpc_security_group_ids = [aws_security_group.instance_sg.id]

  user_data = base64encode(<<-EOF
              #!/bin/bash
              echo "Hello, World" > index.html
              nohup python3 -m http.server ${var.server_port} &
              EOF
            )

  tag_specifications {
    resource_type = "instance"
    tags = {
      Name = "web-server"
    }
  }

#Enables zero downtime updates.
  lifecycle {
    create_before_destroy = true
  }
}
The user_data script runs at first boot and does two things: writes a simple index.html to the working directory, then starts Python's built-in HTTP server in the background (nohup ... &) to serve that file on port 8080.
The lifecycle { create_before_destroy = true } block is critical for zero-downtime updates. When you modify the template (e.g., change instance type), Terraform will spin up the new version before destroying the old one.
6. Application Load Balancer ( ALB )
This operates at Layer 7 ( HTTP/HTTPS), enabling path based & host based routing. It’s internet facing & gets a public DNS name.
- add this to your main.tf
resource "aws_lb" "web_lb" {
  name               = "web-lb"
  internal           = false   #Makes it internet facing
  load_balancer_type = "application"
  security_groups    = [aws_security_group.alb_sg.id]

#Deploys across all subnets thus ALL AZ's
  subnets            = data.aws_subnets.default.ids

  tags = {
    Name = "web-cluster-alb"
  }
}
Aws requires at least 2 subnets in different availability zones for ALB thus eliminating single point of failure.
7. Target Group
This is a pool of instances the ALB routes traffic to. Distributes traffic across healthy instances.
- add this to your main.tf
resource "aws_lb_target_group" "web_tg" {
  name     = "web-tg"
  port     = var.server_port
  protocol = "HTTP"
  vpc_id   = data.aws_vpc.default.id

  health_check {
    enabled             = true
    path                = "/"
    protocol            = "HTTP"
    matcher             = "200"
    interval            = 30
    timeout             = 5
    healthy_threshold   = 2
    unhealthy_threshold = 2
  }
}
The health check: Every 30 seconds the ALB sends GET requests to / on port 80. If it gets a 200 OK back within 5 seconds, the instance is healthy. It acts as a glue between ALB and Auto scaling group(ASG) when combined with health_check_type = "ELB" on the ASG.
Failed health checks trigger automatic instance replacement on top of stopping traffic
8. Application Load Balancer Listener
This tells the ALB what to do with traffic arriving on port 80 ( internet traffic)
- add this to your main.tf
resource "aws_lb_listener" "http" {
  load_balancer_arn = aws_lb.web_lb.arn
  port              = var.app_port       # 80
  protocol          = "HTTP"

#Forwards traffic to target group
  default_action {
    type             = "forward"
    target_group_arn = aws_lb_target_group.web_tg.arn
  }
}
9. Auto Scaling Group (ASG)
It reads the Launch template, maintains desired number of instances and replaces failed instances ( ELB health check ).
- add this to your main.tf
resource "aws_autoscaling_group" "web_asg" {
  name                = "web-sg"
  max_size            = var.asg_max_size            # 5
  min_size            = var.asg_min_size            # 2
  desired_capacity    = var.asg_desired_capacity    # 2
  vpc_zone_identifier = data.aws_subnets.default.ids

  launch_template {
    id      = aws_launch_template.web-template.id
 #Use most recent Version of Launch Template
    version = "$Latest"
  }

  target_group_arns = [aws_lb_target_group.web_tg.arn]

  health_check_type         = "ELB"
  health_check_grace_period = 60

  tag {
    key                 = "Name"
    value               = "web-server"
    propagate_at_launch = true
  }

  lifecycle {
    create_before_destroy = true
  }
}
EC2 health check v ELB: EC2 only marks an instance unhealthy if it’s terminated or stopped. ALB reports unhelathy when application is unreachable.
health_check_grace_period = 60 gives new instances 60 seconds after launch before the ASG starts evaluating health checks. This prevents instances from being terminated during their startup phase while user_data is still running.
10. Outputs — outputs.tf
This file stores ouput declarations that expose specific data from your infrastructure example Ip addresses to other modules or scripts after terraform apply.
- create outputs.tf and add this;
#URl to test the web server
output "alb_dns_name" {
  description = "Public DNS name of the Application Load Balancer"
  value       = "http://${aws_lb.web_lb.dns_name}"
}

output "asg_name" {
  description = "Name of the Auto Scaling Group"
  value       = aws_autoscaling_group.web_asg.name
}

output "vpc_id" {
  description = "Default VPC used for deployment"
  value       = data.aws_vpc.default.id
}

output "availability_zones" {
  description = "AZs instances are spread across"
  value       = data.aws_availability_zones.all.names
}
Deployments steps
- Initialize Terraform While in your project directory , open terminal & run;
# Initialize Terraform (downloads AWS provider)
terraform init- Review the deployment
# visualize resources to be created
terraform plan- Deploy the Infrastructure
# Apply the configuration
terraform apply
# Type 'yes' when prompted to confirm- Get the Load Balancer URL
# View outputs ALB DNS name
terraform output alb_dns_name- Test your Application
# Use the ALB DNS name from the output
curl http://your-alb-dns-name.us-east-2.elb.amazonaws.com
You should see "Hello, world" returned.
- Monitor Your infrastructure
- Check the AWS console to see your instances.
- Test High availability: Terminate an instance manually and wait for the Auto scaling group to replace it.
- Check Auto scaling group tab in the EC2 console. Confirm that the Terminated instance is declared unhealthy. Thus ASG replaces it.
- Clean Up
When you’re done testing , destroy the infrastructure.
terraform destroy
# Type 'yes' to confirm deletion
Conclusion
The clustered architecture solves for the majority of issue that come with single instance deployment such as manual recovery, no fault isolation, no redudancy and the confinement to vertiacal scaling. The architecture is a practical baseline for web servers in production.
메타데이터
- post_id
- 091d3833c705
- slug
- deploying-a-highly-available-web-app-on-aws-using-terraform-091d3833c705
- url
- https://medium.com/@stephenmugo/deploying-a-highly-available-web-app-on-aws-using-terraform-091d3833c705
- canonical_url
- https://medium.com/@stephenmugo/deploying-a-highly-available-web-app-on-aws-using-terraform-091d3833c705
- author_url
- https://medium.com/@stephenmugo
- status
- ok
- fetched_at
- 2026-06-09 15:37:30



