Document Scanner in Python: Perspective Correction and Enhancement
Document Scanner in Python: Perspective Correction and Enhancement
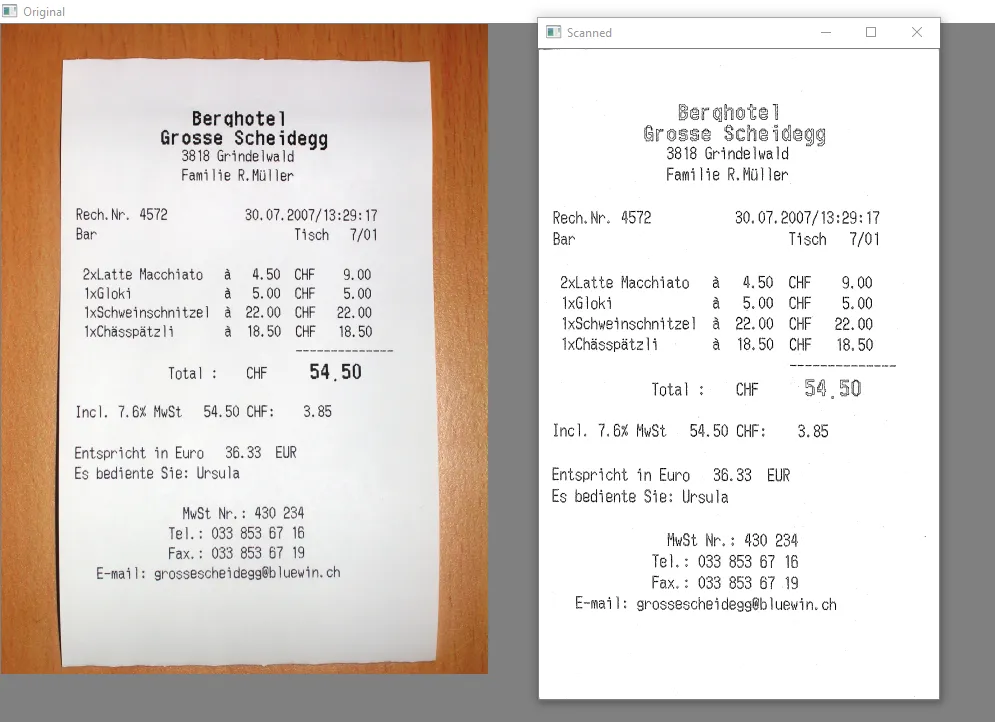
You take a photo of a receipt. It’s tilted, the lighting is uneven, and the edges are barely visible. Somehow, your phone’s scanner app turns it into a clean, flat, perfectly readable document. Let’s build that.
I’ve been working on a project recently that needed to process hundreds of photographed documents. Handwritten forms, invoices, ID cards, you name it. The photos came from different people using different phones in different lighting conditions, and every single one was a mess. Tilted angles, shadows across the text, wrinkled paper, fingers in the shot.
Buying a commercial solution was an option, but I wanted to understand what was actually happening under the hood. Turns out, the core of every document scanner, from Adobe Scan to Microsoft Lens, can be built with about 200 lines of Python and some clever use of OpenCV.
The Problem, Clearly Stated
When you photograph a document, you introduce several distortions:
Perspective distortion: The camera isn’t perfectly perpendicular to the document, so a rectangle becomes a trapezoid.
Uneven illumination: Shadows, lamp reflections, ambient light gradients make parts of the document brighter or darker than others.
Noise and blur: Camera shake, low light auto-ISO, compression artifacts.
Barrel/pincushion distortion: Wide-angle lenses on phones warp straight lines slightly (though this is usually minor).
Our scanner needs to fix all of these. The pipeline looks like this:
Input Photo
    │
    ▼
┌──────────────────┐
│ Find Document    │  (Edge detection + contour finding)
│ Boundaries       │
└────────┬─────────┘
         │
         ▼
┌──────────────────┐
│ Perspective      │  (Four-point transform)
│ Correction       │
└────────┬─────────┘
         │
         ▼
┌──────────────────┐
│ Image            │  (Thresholding, denoising,
│ Enhancement      │   sharpening)
└────────┬─────────┘
         │
         ▼
    Clean Document
Let’s Build It
The Imports
import cv2
import numpy as np
from scipy.spatial import distance as dist
import os

# Optional, for PDF output
# pip install img2pdf
Nothing exotic. OpenCV does the heavy lifting. scipy is just for one distance calculation that would be annoying to write from scratch.
Step 1: Finding the Document in the Image
This is the hardest part, and where most naive implementations break. The goal: find four corner points that define the document boundaries.
def find_document(image, debug=False):
    """
    Locate a document in an image and return its
    four corner points.

    Returns None if no document-like contour is found.
    """
    orig = image.copy()

    # Resize for faster processing
    # (we'll scale the points back later)
    ratio = image.shape[0] / 500.0
    resized = resize_to_height(image, 500)

    # Convert to grayscale and blur
    gray = cv2.cvtColor(resized, cv2.COLOR_BGR2GRAY)
    blurred = cv2.GaussianBlur(gray, (5, 5), 0)

    # Edge detection
    # The trick: use Canny with automatic thresholds
    edges = auto_canny(blurred)

    if debug:
        cv2.imwrite('debug_edges.jpg', edges)

    # Dilate edges to close gaps
    kernel = cv2.getStructuringElement(
        cv2.MORPH_RECT, (3, 3)
    )
    edges = cv2.dilate(edges, kernel, iterations=1)

    # Find contours
    contours, _ = cv2.findContours(
        edges, cv2.RETR_LIST, cv2.CHAIN_APPROX_SIMPLE
    )

    # Sort by area, largest first
    contours = sorted(
        contours, key=cv2.contourArea, reverse=True
    )[:10]

    doc_contour = None

    for contour in contours:
        perimeter = cv2.arcLength(contour, True)
        approx = cv2.approxPolyDP(
            contour, 0.02 * perimeter, True
        )

        # A document is a quadrilateral
        if len(approx) == 4:
            # Sanity check: should be at least 10% of image
            area = cv2.contourArea(approx)
            image_area = resized.shape[0] * resized.shape[1]

            if area > 0.1 * image_area:
                doc_contour = approx
                break

    if doc_contour is None:
        return None

    # Scale points back to original image size
    doc_contour = doc_contour.reshape(4, 2) * ratio

    return doc_contour.astype(np.float32)

def resize_to_height(image, height):
    """Resize image to a specific height, maintaining ratio."""
    ratio = height / image.shape[0]
    dim = (int(image.shape[1] * ratio), height)
    return cv2.resize(image, dim, interpolation=cv2.INTER_AREA)

def auto_canny(image, sigma=0.33):
    """
    Automatic Canny edge detection with computed thresholds.
    Credit to Adrian Rosebrock for this technique.
    """
    median = np.median(image)
    lower = int(max(0, (1.0 - sigma) * median))
    upper = int(min(255, (1.0 + sigma) * median))
    return cv2.Canny(image, lower, upper)
The auto_canny function is a gem. Instead of manually tuning Canny thresholds for every image, it computes them from the image's median pixel intensity. This one trick alone makes edge detection work across wildly different lighting conditions.
But what happens when contour detection fails? Busy backgrounds, patterned tablecloths, or documents that blend with the surface can all defeat edge-based detection. Let’s add a fallback.
def find_document_fallback(image):
    """
    Alternative document detection using morphological
    operations and the largest bright region.

    Works better when edges are weak or background is noisy.
    """
    gray = cv2.cvtColor(image, cv2.COLOR_BGR2GRAY)

    # Assume the document is the largest bright region
    # Apply adaptive threshold
    thresh = cv2.adaptiveThreshold(
        gray, 255, cv2.ADAPTIVE_THRESH_GAUSSIAN_C,
        cv2.THRESH_BINARY, 51, 10
    )

    # Morphological close to fill gaps
    kernel = cv2.getStructuringElement(
        cv2.MORPH_RECT, (15, 15)
    )
    closed = cv2.morphologyEx(thresh, cv2.MORPH_CLOSE, kernel)

    # Find the largest contour
    contours, _ = cv2.findContours(
        closed, cv2.RETR_EXTERNAL, cv2.CHAIN_APPROX_SIMPLE
    )

    if not contours:
        return None

    largest = max(contours, key=cv2.contourArea)

    # Get the minimum area rectangle
    rect = cv2.minAreaRect(largest)
    box = cv2.boxPoints(rect)
    box = np.array(box, dtype=np.float32)

    # Verify it's large enough to be a document
    area = cv2.contourArea(box)
    image_area = image.shape[0] * image.shape[1]

    if area < 0.1 * image_area:
        return None

    return box
Step 2: Ordering the Corner Points
This seems trivial, but it’s a surprisingly common source of bugs. We need the four corner points in a consistent order: top-left, top-right, bottom-right, bottom-left. Get this wrong and your perspective transform produces a mangled mess.
def order_points(pts):
    """
    Order points as: top-left, top-right,
    bottom-right, bottom-left.

    This is the method from the pyimagesearch blog,
    which handles edge cases better than the naive
    "sort by x then y" approach.
    """
    # Sort by y-coordinate
    rect = np.zeros((4, 2), dtype=np.float32)

    # Top-left has the smallest sum (x+y)
    # Bottom-right has the largest sum
    s = pts.sum(axis=1)
    rect[0] = pts[np.argmin(s)]
    rect[2] = pts[np.argmax(s)]

    # Top-right has the smallest difference (y-x)
    # Bottom-left has the largest difference
    diff = np.diff(pts, axis=1)
    rect[1] = pts[np.argmin(diff)]
    rect[3] = pts[np.argmax(diff)]

    return rect
Step 3: The Four-Point Perspective Transform
This is the magical part. Given four corner points of a skewed document, we warp it into a flat rectangle.
def four_point_transform(image, pts):
    """
    Apply a perspective transform to obtain a
    top-down view of the document.
    """
    rect = order_points(pts)
    tl, tr, br, bl = rect

    # Compute the width of the new image
    # (max of top edge and bottom edge)
    width_top = dist.euclidean(tl, tr)
    width_bottom = dist.euclidean(bl, br)
    max_width = max(int(width_top), int(width_bottom))

    # Compute the height of the new image
    height_left = dist.euclidean(tl, bl)
    height_right = dist.euclidean(tr, br)
    max_height = max(int(height_left), int(height_right))

    # Destination points for the transform
    dst = np.array([
        [0, 0],
        [max_width - 1, 0],
        [max_width - 1, max_height - 1],
        [0, max_height - 1]
    ], dtype=np.float32)

    # Compute the perspective transform matrix
    M = cv2.getPerspectiveTransform(rect, dst)

    # Apply the transform
    warped = cv2.warpPerspective(
        image, M, (max_width, max_height),
        flags=cv2.INTER_CUBIC,
        borderMode=cv2.BORDER_REPLICATE
    )

    return warped
The math behind getPerspectiveTransform is actually beautiful if you're into linear algebra. It solves a system of equations to find the 3x3 homography matrix that maps the four source points to the four destination points. The warpPerspective function then applies this transformation to every pixel in the image.
INTER_CUBIC interpolation is important here. Bilinear (INTER_LINEAR) is faster but produces noticeably softer text. Cubic interpolation preserves sharpness much better, which matters a lot for OCR downstream.
Step 4: Image Enhancement
We now have a flat document, but it still looks like a photo. We need to make it look like a scan. That means uniform white background, crisp black text, no shadows.
def enhance_document(image, method='adaptive'):
    """
    Enhance a document image for readability.

    Methods:
    - 'adaptive': Best for most documents
    - 'otsu': Good for clean, high-contrast documents
    - 'sauvola': Best for documents with varying backgrounds
    - 'color': Preserve color while enhancing
    """
    if method == 'adaptive':
        return enhance_adaptive(image)
    elif method == 'otsu':
        return enhance_otsu(image)
    elif method == 'sauvola':
        return enhance_sauvola(image)
    elif method == 'color':
        return enhance_color(image)
    else:
        raise ValueError(f"Unknown method: {method}")

def enhance_adaptive(image):
    """
    Adaptive thresholding. Works well for most
    text documents.
    """
    gray = cv2.cvtColor(image, cv2.COLOR_BGR2GRAY)

    # Denoise
    denoised = cv2.fastNlMeansDenoising(gray, h=10)

    # Sharpen
    kernel = np.array([
        [0, -1, 0],
        [-1, 5, -1],
        [0, -1, 0]
    ])
    sharpened = cv2.filter2D(denoised, -1, kernel)

    # Adaptive threshold
    binary = cv2.adaptiveThreshold(
        sharpened, 255,
        cv2.ADAPTIVE_THRESH_GAUSSIAN_C,
        cv2.THRESH_BINARY,
        21, 15
    )

    return binary

def enhance_otsu(image):
    """
    Otsu's method. Good for clean documents with
    bimodal histogram.
    """
    gray = cv2.cvtColor(image, cv2.COLOR_BGR2GRAY)
    gray = cv2.GaussianBlur(gray, (5, 5), 0)

    _, binary = cv2.threshold(
        gray, 0, 255,
        cv2.THRESH_BINARY + cv2.THRESH_OTSU
    )

    return binary

def enhance_sauvola(image, window_size=25, k=0.2):
    """
    Sauvola thresholding. Handles varying
    illumination across the document.

    Each pixel's threshold is computed from local
    mean and standard deviation.
    """
    gray = cv2.cvtColor(image, cv2.COLOR_BGR2GRAY)
    gray = gray.astype(np.float64)

    # Local mean
    mean = cv2.blur(gray, (window_size, window_size))

    # Local standard deviation
    mean_sq = cv2.blur(gray ** 2, (window_size, window_size))
    std = np.sqrt(np.maximum(mean_sq - mean ** 2, 0))

    # Sauvola threshold
    R = 128  # Dynamic range of standard deviation
    threshold = mean * (1 + k * (std / R - 1))

    binary = np.zeros_like(gray, dtype=np.uint8)
    binary[gray > threshold] = 255

    return binary

def enhance_color(image):
    """
    Enhance while preserving color.
    Good for documents with colored text,
    logos, or images.
    """
    # Remove shadows using morphological operations
    rgb_planes = cv2.split(image)
    result_planes = []

    for plane in rgb_planes:
        # Large kernel dilate to estimate background
        dilated = cv2.dilate(plane, np.ones((7, 7), np.uint8))
        bg = cv2.medianBlur(dilated, 21)

        # Subtract background and normalize
        diff = 255 - cv2.absdiff(plane, bg)

        # Normalize to full range
        norm = cv2.normalize(
            diff, None, alpha=0, beta=255,
            norm_type=cv2.NORM_MINMAX
        )
        result_planes.append(norm)

    result = cv2.merge(result_planes)

    # Increase contrast
    lab = cv2.cvtColor(result, cv2.COLOR_BGR2LAB)
    l, a, b = cv2.split(lab)
    clahe = cv2.createCLAHE(clipLimit=2.0, tileGridSize=(8, 8))
    l = clahe.apply(l)
    lab = cv2.merge([l, a, b])
    result = cv2.cvtColor(lab, cv2.COLOR_LAB2BGR)

    return result
The enhance_color function deserves special attention. That shadow removal technique (estimate the background via morphological operations, then subtract it) is incredibly effective. It handles things like the shadow from the phone being held over the document, uneven desk lamp lighting, and gradual brightness falloff at the edges.
Step 5: Putting It All Together
class DocumentScanner:
    """
    Complete document scanning pipeline.

    Usage:
        scanner = DocumentScanner()
        result = scanner.scan('photo.jpg')
        cv2.imwrite('scanned.jpg', result)
    """

    def __init__(self, enhance_method='adaptive'):
        self.enhance_method = enhance_method

    def scan(self, image_path, output_size=None):
        """
        Scan a document from a photo.

        image_path: Path to the input image
        output_size: Optional (width, height) tuple
                     for the output. Use standard sizes like
                     (2550, 3300) for US Letter at 300 DPI.
        """
        # Load image
        image = cv2.imread(image_path)
        if image is None:
            raise FileNotFoundError(
                f"Cannot read image: {image_path}"
            )

        # Find document boundaries
        doc_corners = find_document(image, debug=False)

        if doc_corners is None:
            print("Primary detection failed, trying fallback...")
            doc_corners = find_document_fallback(image)

        if doc_corners is None:
            print("Warning: No document detected. "
                  "Processing full image.")
            # Use the full image corners as fallback
            h, w = image.shape[:2]
            doc_corners = np.array([
                [0, 0], [w, 0],
                [w, h], [0, h]
            ], dtype=np.float32)

        # Apply perspective transform
        warped = four_point_transform(image, doc_corners)

        # Resize to standard size if specified
        if output_size is not None:
            warped = cv2.resize(
                warped, output_size,
                interpolation=cv2.INTER_CUBIC
            )

        # Enhance
        enhanced = enhance_document(
            warped, method=self.enhance_method
        )

        return enhanced, warped

    def scan_to_pdf(self, image_paths, output_path):
        """
        Scan multiple images and combine into a PDF.
        """
        import img2pdf

        scanned_paths = []

        for i, img_path in enumerate(image_paths):
            print(f"Scanning page {i+1}/{len(image_paths)}: "
                  f"{img_path}")

            enhanced, _ = self.scan(img_path)

            temp_path = f'/tmp/scanned_page_{i}.jpg'
            cv2.imwrite(temp_path, enhanced)
            scanned_paths.append(temp_path)

        # Combine into PDF
        with open(output_path, 'wb') as f:
            f.write(img2pdf.convert(scanned_paths))

        # Clean up temp files
        for path in scanned_paths:
            os.remove(path)

        print(f"PDF saved to: {output_path}")

    def scan_batch(self, input_dir, output_dir):
        """
        Scan all images in a directory.
        """
        os.makedirs(output_dir, exist_ok=True)

        extensions = {'.jpg', '.jpeg', '.png', '.bmp'}

        for filename in sorted(os.listdir(input_dir)):
            ext = os.path.splitext(filename)[1].lower()
            if ext not in extensions:
                continue

            input_path = os.path.join(input_dir, filename)
            output_path = os.path.join(
                output_dir,
                f"scanned_{filename}"
            )

            try:
                enhanced, _ = self.scan(input_path)
                cv2.imwrite(output_path, enhanced)
                print(f"Scanned: {filename}")
            except Exception as e:
                print(f"Failed: {filename}: {e}")

# Usage examples

# Single document
scanner = DocumentScanner(enhance_method='adaptive')
enhanced, warped = scanner.scan('receipt_photo.jpg')
cv2.imwrite('receipt_scanned.jpg', enhanced)

# Color document (preserve colors)
scanner_color = DocumentScanner(enhance_method='color')
enhanced, warped = scanner_color.scan('brochure_photo.jpg')
cv2.imwrite('brochure_scanned.jpg', enhanced)

# Multi-page to PDF
scanner.scan_to_pdf(
    ['page1.jpg', 'page2.jpg', 'page3.jpg'],
    'document.pdf'
)

# Batch processing
scanner.scan_batch('./photos/', './scanned/')
Making It Better: Advanced Techniques
Automatic Rotation Detection
Sometimes the document is detected correctly but upside down or rotated 90 degrees. We can detect and fix this using text orientation analysis.
def detect_text_orientation(image):
    """
    Detect if text is rotated and return the
    correction angle.

    Uses Tesseract's orientation detection.
    """
    import pytesseract

    try:
        osd = pytesseract.image_to_osd(image)
        angle = int(osd.split('Rotate: ')[1].split('\n')[0])
        return angle
    except Exception:
        return 0

def auto_rotate(image):
    """
    Automatically rotate the document so text
    reads correctly.
    """
    angle = detect_text_orientation(image)

    if angle == 0:
        return image

    # OpenCV rotation
    if angle == 90:
        return cv2.rotate(image, cv2.ROTATE_90_CLOCKWISE)
    elif angle == 180:
        return cv2.rotate(image, cv2.ROTATE_180)
    elif angle == 270:
        return cv2.rotate(
            image, cv2.ROTATE_90_COUNTERCLOCKWISE
        )

    return image
Removing Page Curl
Books and bound documents often have curved pages. Fixing this properly is a research-level problem, but a simplified approach works for mild curvature:
def correct_mild_curl(image):
    """
    Correct mild page curvature using horizontal
    line detection and local warping.

    This is a simplified version. Full page dewarping
    is significantly more complex (check out page-dewarp
    by Matt Zucker for a serious implementation).
    """
    gray = cv2.cvtColor(image, cv2.COLOR_BGR2GRAY)

    # Detect horizontal lines using HoughLines
    edges = cv2.Canny(gray, 50, 150)
    lines = cv2.HoughLinesP(
        edges, 1, np.pi/180, 100,
        minLineLength=image.shape[1] // 4,
        maxLineGap=20
    )

    if lines is None or len(lines) < 5:
        return image  # Not enough lines to estimate curl

    # Find the average curvature of horizontal lines
    # (lines that should be straight but aren't)
    horizontal_lines = []
    for line in lines:
        x1, y1, x2, y2 = line[0]
        angle = np.abs(np.arctan2(y2-y1, x2-x1) * 180 / np.pi)
        if angle < 10:  # Nearly horizontal
            horizontal_lines.append(line[0])

    if len(horizontal_lines) < 3:
        return image

    # For mild curl, a simple approach is to
    # use thin-plate splines or piecewise affine transforms
    # For now, return as-is with a note that this needs
    # more sophisticated handling for production use

    return image
I want to be upfront here: proper page dewarping is really hard. The simplified version above barely scratches the surface. If you need production-quality page curl correction, look into Matt Zucker’s page-dewarp project on GitHub, or the research on “document image dewarping” using deep learning approaches like DocUNet.
Performance Tips
A few things I learned the hard way:
Process at the right resolution. For document detection (finding the corners), resize to about 500px height. It’s faster and often gives better results because you eliminate noise. For the actual perspective transform and enhancement, work with the full resolution image.
Use JPEG for intermediate steps. If you’re building a pipeline that saves intermediate results, use JPEG at quality 95. The file size difference compared to PNG is massive, and the quality loss at 95 is imperceptible for documents.
Profile before optimizing. In my testing, the bottleneck is usually fastNlMeansDenoising in the enhancement step. If you can live without denoising (for clean, well-lit photos), removing it speeds things up by 3-4x.
Consider GPU acceleration. OpenCV’s CUDA module can speed up the perspective transform and thresholding by 5–10x if you have an NVIDIA GPU. Worth it for batch processing thousands of documents.
The Honest Limitations
Let’s be real about what this approach can and cannot do:
It works great for: Single documents on contrasting backgrounds, receipts on tables, printed documents, forms, whiteboards.
It struggles with: Multiple overlapping documents, documents on same-color backgrounds, severely crumpled paper, documents photographed at extreme angles (>60 degrees from perpendicular), handwritten text on lined paper (the lines can confuse edge detection).
It won’t replace: Commercial solutions like ABBYY FineReader or Adobe Scan, which use much more sophisticated deep learning models for document detection, combined with optimized OCR and years of fine-tuning.
But for a lot of practical applications, this gets you 90% of the way there with zero cost and full control over the pipeline.
Have you built a document scanner for a project? What was the trickiest edge case you encountered? I’d love to hear your war stories in the comments.
메타데이터
- post_id
- 1a5c5ac9bf6c
- slug
- document-scanner-in-python-perspective-correction-and-enhancement-1a5c5ac9bf6c
- url
- https://medium.com/@coders.stop/document-scanner-in-python-perspective-correction-and-enhancement-1a5c5ac9bf6c
- canonical_url
- https://medium.com/@coders.stop/document-scanner-in-python-perspective-correction-and-enhancement-1a5c5ac9bf6c
- author_url
- https://medium.com/@coders.stop
- status
- ok
- fetched_at
- 2026-06-09 15:37:30