Easy string-stretch effect in Cavalry
Motion Design Starter Series
Easy string-stretch effect in Cavalry
Motion Design Starter Series

In our latest Cavalry tutorial, we’ll be setting up an easy but versatile effect using basic functionality which you can adapt for your own creations.
Step 1
Create a composition at the required size. Here I am using a 1000 x 1000 canvas with a light blue colour applied.

Step 2
Create four shapes on separate layers (or import four shapes you want to use in your animation). In my example, I used the shape tools to create the following:
- Alt-click on the ellipse tool and set the radius in the Attribute Editor to 100
- Alt-Click on the rectangle tool and set the width to 200 and height to 300 and the corner radius to 400


- Alt-click on the ellipse tool and set the radius in the Attribute Editor to 100 to create another circle
- And alt-click on the rectangle tool to create a final square shape with the width and height set to 200 and a corner radius set to 20.
Step 3
After selecting all four layers in the scene window, I clicked on Duplicator in the Shelf. You can also press Cmd-. and call it up from the library. You should now have an arrangement like this:


With the Duplicator selected in the scene window, go to the Attribute Editor and change the Distribution to “Sub-Mesh”:

Step 5
In the Scene window, press ‘+’ or Cmd-. to add a Rectangle Pattern. This is basically going to create a baseline grid on which the various shapes will be distributed:

When you add the rectangle pattern layer, drag it to the bottom:

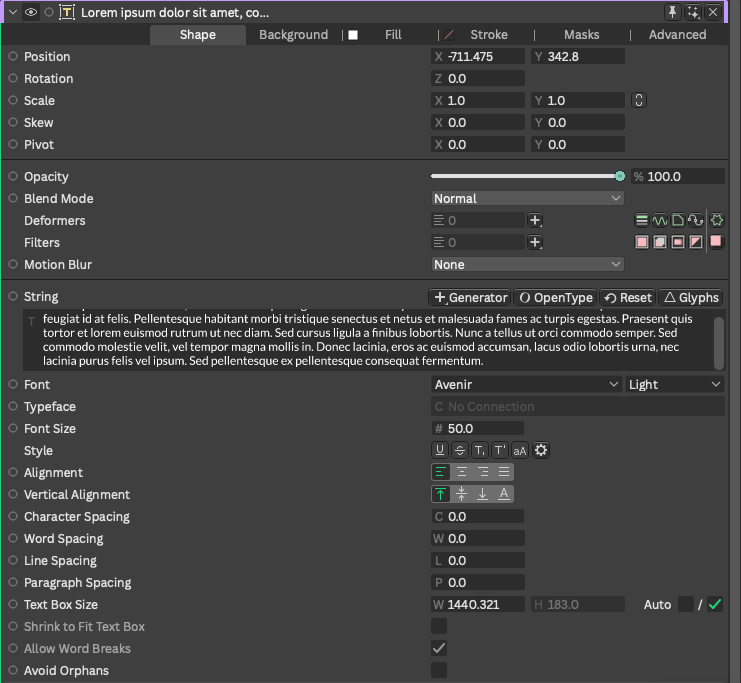
After selecting the Rectangle Pattern layer, go to the Attribute Editor and change the following parameters:
- Size 700 x 300
- Gap Type: Fixed Width
- Fixed Gap Width: 2
- Count: 15

Then, right-click on the Dynamic Bar Size attribute, and Add Behaviour: Noise. This is going to “drive” our animation.

Step 6
In the scene window, drag the Noise layer onto the Rectangle Pattern layer to help keep things organised, and select the Noise Layer.

In the attributes editor, change the following:
- Minimum: 0
- Maximum 50000
- Stagger: 1000
- Time Scale: 2

At this point, you should have something like this during playback:

Step 7
Let’s add some colour to our shapes. Using the ‘+’ in the scene window (or Cmd-. to call up the library) we then add a Color Array. An alternative method is to choose or create a palette in the Color section on the right hand side of the workspace and choose “create array from palette” from the dropdown menu:

Either way, this adds an editable array of colours as a layer to your composition:

Drag the Color Array onto each of your shapes to assign a fill colour to your shapes:

Step 8
With the Duplicator selected in the scene window, drag the Rectangle Pattern layer into the Input Shape attribute. We now have the following:


Step 9
Our “system” can now be reused or expanded into a pattern of, say, multiple lines. One of the simplest ways of doing this is to select the Duplicator (which contains our single stetch-string system) and generate copies of it. In other words, select the Duplicator in the scene window, alt-click on Duplicator in the shelf:

Then, select the second duplicator in your scene window and, over in the attributes editor change the following:
- Distribution: Linear
- Count: 7
- Size: 700
- Direction: Vertical


Which creates the following in playback:

The beauty of this, and anything else you create with Cavalry, is the possibility of tracking back through the various steps to adjust parameters and quickly iterate your designs. You can easily change colours, shapes, count and sizes to generate completely different results while still maintaining a coherent system.

For my final render, I simply added an ellipse shape over the stretch-strings, and dragged that layer into the Masks tab of Duplicator 2 to place the animation in a type of capsule:

Note: For the purposes of writing this tutorial on Medium, I have exported the animations as GIFs, but you can, of course, export your creations as high-quality looping videos, etc.
You may also like:
[embed]Build and animate a complex shape quickly in Cavalry Motion Design Starter Seriesmedium.com
[embed]Simple 2.5 Text Animation in Cavalry Motion Design Starter Seriesmedium.com
메타데이터
- post_id
- 61104bfc78c7
- slug
- easy-string-stretch-effect-in-cavalry-61104bfc78c7
- url
- https://medium.com/brandmanagementdesign/easy-string-stretch-effect-in-cavalry-61104bfc78c7
- canonical_url
- https://medium.com/brandmanagementdesign/easy-string-stretch-effect-in-cavalry-61104bfc78c7
- author_url
- https://medium.com/@nigel_reyes
- status
- ok
- fetched_at
- 2026-06-14 16:15:44