Experiment 7 React Introduction: Components, JSX, and Props — Complete Beginner to Advanced Guide
From Zero to Job-Ready — A Step-by-Step Guide for Engineering Students
Experiment 7 React Introduction: Components, JSX, and Props — Complete Beginner to Advanced Guide
From Zero to Job-Ready — A Step-by-Step Guide for Engineering Students
This blog is for anyone learning React for the very first time. No prior React knowledge needed. If you know basic JavaScript — variables, functions, arrays — you are completely ready. Let’s go!
🔥 1. What is React?
Imagine you are building a big website — like Swiggy or Amazon. It has:
- A header (logo, search bar, cart icon)
- Product cards
- Footer
- Sidebar filters
Now imagine writing all of this in one giant HTML file. The code becomes so long and messy that even a tiny change becomes a nightmare.
React solves this problem. It lets you break your UI into small, independent “blocks” — and each block is called a Component.
Think of it like LEGO blocks — you build small pieces separately and then plug them together to form the complete website.
Website
├── Header Component
│   ├── Logo
│   ├── SearchBar
│   └── CartIcon
├── ProductList Component
│   ├── ProductCard (repeated)
│   └── ProductCard (repeated)
└── Footer Component
Why Does the Industry Use React?
Feature: What it Means Component-Based Write small, reusable pieces of UI Fast (Virtual DOM) Only the changed part updates — not the whole page Reusable Write once, use anywhere. Huge Community Massive demand in the job market, Built by Meta, Facebook, Instagram — all built with React
Who Uses React in the Real World?
Facebook, Instagram, WhatsApp Web, Netflix, Airbnb, Atlassian — they all use React.
So if you want a frontend developer job, React is not optional — it’s essential.
⚙️ 2. Setting Up a React Project — From Absolute Scratch
Step 0: Install the Prerequisites
What is Node.js and Why Do We Need It?
React doesn’t just run in the browser — it also runs on your laptop during development. For that, your computer needs to understand JavaScript — and that’s exactly what Node.js does.
Think of Node.js like the engine inside a car. Without the engine, the car doesn’t move. Without Node.js, React won’t run.
👉 Download here: https://nodejs.org Always download the LTS version (Long Term Support — it’s stable and reliable).
After installation, open your terminal and verify:
node --version
# Output: v20.x.x
npm --version
# Output: 10.x.xIf you see version numbers — Node.js is successfully installed! 🎉
What is npm and npx?
- npm = Node Package Manager — like an app store for JavaScript tools and libraries.
- npx = A feature of npm — lets you run a tool without permanently installing it.
🏗️ Create Your React Project — 2 Methods
✅ Method 1: Vite (Recommended — Modern & Super Fast)
Vite is a modern build tool that is significantly faster than the old CRA method. The industry has largely shifted to Vite for new projects.
Open your terminal and run these commands one by one:
npm create vite@latest my-first-appAfter running this, you’ll see some options — choose these:
✔ Select a framework: › React
✔ Select a variant: › JavaScript
Then run:
cd my-first-app
npm install
npm run dev
Your terminal will show something like:
VITE v5.x.x ready in 300 ms ➜ Local: http://localhost:5173/Open http://localhost:5173/ in your browser — your first React app is running! 🎊
Method 2: Create React App (CRA) — The Traditional Way
npx create-react-app my-first-app
cd my-first-app
npm start
The browser will automatically open at [http://localhost:3000/.](http://localhost:3000/.)
Note: CRA is slower than Vite, so prefer Vite for new projects. But both have nearly identical structure — learn one, you’ll understand both.
🎯 3. Your First Real Project — “Student Marksheet App”
Right after setting up, let’s replace the default Vite code with a real working app so you can actually see how React produces output in the browser.
What Are We Building?
Student List App
We will create a small app that displays:
- A title (Student List)
- 3 students with their names and marks
Let’s build a very simple real app so you can understand how React actually shows output in the browser.
Step 1: Open src/App.jsx, delete everything inside it, and write the new code:
// src/App.jsx// src/App.jsxfunction App() {
return (
<div>
<h1> Student List</h1><Student name="Aman" marks={92} />
<Student name="Priya" marks={78} />
<Student name="Rahul" marks={85} />
</div>
);
}// Student Component
function Student({ name, marks }) {
return (
<div>
<h2>{name}</h2>
<p>Marks: {marks}</p>
</div>
);
}export default App;Step 2: Open src/index.css and delete all the CSS inside it ,We are not using any CSS right now to keep things simple.
Step 3: npm run dev should already be running — check your browser.
Output:Your browser will display:
📋 Student ListAman
Marks: 92Priya
Marks: 78Rahul
Marks: 85This is React’s magic! You created ONE Studentcomponent and used it three times with different data. If you had 100 students, you'd still use the same one component — the code barely grows.
📁 4. React Project Structure — What Every File Does
When your project was created, several folders and files appeared. Here’s what each one does:
my-first-app/
│
├── node_modules/       ← Never touch this!
├── public/             ← Static files (favicon, images)
│   └── vite.svg
├── src/                ← All your React code lives here
│   ├── App.jsx         ← Your main component
│   ├── main.jsx        ← Entry point — where React starts
│   └── index.css       ← Global CSS styles
├── index.html          ← The only HTML file — browser loads this first
├── package.json        ← Project info + list of dependencies
└── vite.config.js      ← Vite configuration settings
Breaking Down Each File:
**node_modules/** This is where all installed libraries live (React, etc.). Never edit this manually. It's also excluded from Git (listed in .gitignore).
**public/** Files here go directly to the browser without any processing — like your favicon, robots.txt, or static images.
**src/** This is your workspace. Every React file you write goes here.
**index.html** The browser loads this file first. Inside it, there's a single <div id="root"></div> — React injects your entire UI into this one div.
**src/main.jsx** This is React's starting point. It takes the App component and renders it inside the root div:
// src/main.jsx
import React from 'react'
import ReactDOM from 'react-dom/client'
import App from './App.jsx'
import './index.css'
ReactDOM.createRoot(document.getElementById('root')).render(
  <React.StrictMode>
    <App />
  </React.StrictMode>,
)**src/App.jsx** Your main component — the top-level block from which all other components branch out.
The Rendering Flow — How It All Connects:
Browser loads index.html
        ↓
Finds <div id="root">
        ↓
main.jsx runs
        ↓
Injects App component into the root div
        ↓
App renders all child components
        ↓
Your UI appears in the browser ✅
🧩 5. Components in React — The Core Concept
What is a Component?
A Component is an independent, reusable piece of UI that does one specific job.
Think about building a house:
- Window = Window Component
- Door = Door Component
- Kitchen = Kitchen Component
Each piece is independent, has its own purpose, and the house is assembled from all these pieces together.
Creating Your First Component:
function Hello() {
  return <h1>Hello World</h1>;
}
Line by line breakdown:
function Hello()→ A regular JavaScript function. Component names must start with a capital letter — this is not optional.return→ This function returns something that looks like HTML (called JSX — we'll cover this soon).<h1>Hello World</h1>→ This is JSX — React's way of writing HTML.
How to Use a Component:
You use components exactly like HTML tags:
function App() {
  return (
    <div>
      <Hello />
      <Hello />
      <Hello />
    </div>
  );
}
Output: “Hello World” appears three times on the screen.
One definition → infinite uses. That’s the power of components.
Functional vs Class Components
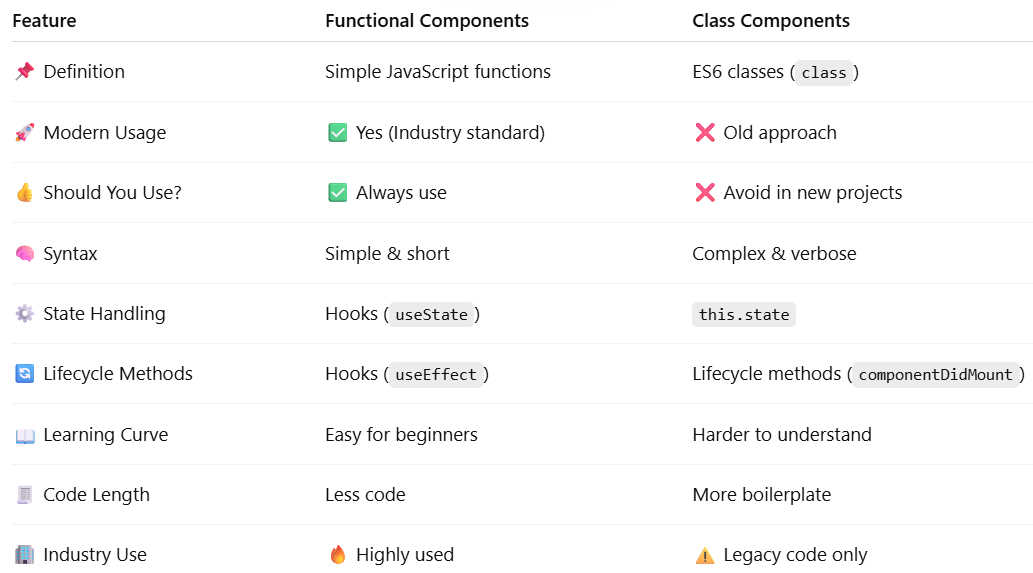
Functional vs Class Components
The entire industry has moved to Functional Components. Class components are legacy — you might see them in old codebases or interview questions, but you should always write functional components.
📄 6. Creating Components in Separate Files — The Professional Way
In real projects, every component lives in its own file. This keeps your code organized, readable, and easy to maintain.
Step-by-Step Example:
Step 1: Inside the src folder, create a new file called Greeting.jsx
// src/Greeting.jsxfunction Greeting() {
return (
<div>
<h2>👋 Welcome!</h2>
<p>You are learning React — great decision!</p>
</div>
);
}export default Greeting;Step 2: Import and use this component inside App.jsx
// src/App.jsximport Greeting from "./Greeting";function App() {
return (
<div>
<h1>My React App</h1>
<Greeting />
</div>
);
}export default App;Understanding Import and Export:
**export default Greeting;** Means — "This component can be used outside of this file."
**import Greeting from "./Greeting";** Means — "Go to the ./Greeting file and bring the Greeting component here." (The .jsx extension is optional — React finds it automatically.)
Naming Conventions — Build Professional Habits:
✅ Greeting.jsx        → Component file names use PascalCase
✅ function Greeting   → Component function also PascalCase
✅ import Greeting     → Import name matches the exported name
❌ greeting.jsx        → Lowercase is wrong for component files
❌ mycomponent.jsx     → No camelCase for component files
🎨 7. JSX — The Most Important Concept
What is JSX?
JSX = JavaScript + XML (HTML-like syntax)
It’s React’s special way of writing UI. It looks like HTML, but it’s actually JavaScript under the hood.
// This is JSX — looks like HTML
const element = <h1>Hello, World!</h1>;
// But React internally converts it to this:
const element = React.createElement("h1", null, "Hello, World!");You don’t need to worry about the internal conversion — learn to write JSX correctly.
JSX vs HTML — Key Differences:
Difference 1: Use className instead of class
// ❌ HTML
<div class="container">Hello</div>
// ✅ JSX
<div className="container">Hello</div>Why? class is a reserved keyword in JavaScript (used for ES6 classes). So React uses className instead.
Difference 2: You Must Have One Root Element
// ❌ WRONG — can't return two sibling elements directly
function Wrong() {
  return (
    <h1>Hello</h1>
    <p>World</p>
  );
}
// ✅ CORRECT — wrap in a parent element
function Right() {
return (
<div>
<h1>Hello</h1>
<p>World</p>
</div>
);
}// ✅ ALSO CORRECT — use a Fragment (doesn't add extra div to the DOM)
function AlsoRight() {
return (
<>
<h1>Hello</h1>
<p>World</p>
</>
);
}Difference 3: JavaScript Goes Inside {}
const studentName = "Aman";
const age = 20;
function Profile() {
  return (
    <div>
      <h1>Hello, {studentName}!</h1>
      <p>Age: {age} years</p>
      <p>Age in 5 years: {age + 5}</p>
      <p>Current time: {new Date().toLocaleTimeString()}</p>
    </div>
  );
}
Inside {}, you can put any JavaScript expression — variables, calculations, function calls, ternary operators — anything that produces a value.
Difference 4: Inline Styles Use Double Curly Braces
// ❌ HTML style (string)
<div style="color: red; font-size: 16px">Text</div>
// ✅ JSX style (object)
<div style={{ color: "red", fontSize: "16px" }}>Text</div>Important notes:
font-sizebecomes**fontSize** (camelCase)background-colorbecomes**backgroundColor**- All CSS properties become camelCase in JSX
Conditional Rendering — A Must-Know Pattern
function Dashboard() {
  const isLoggedIn = true; // Try changing this to false
return (
    <div>
      {isLoggedIn ? (
        <h1>👋 Welcome back, Aman!</h1>
      ) : (
        <h1>🔒 Please login first</h1>
      )}
    </div>
  );
}
Ternary operator: condition ? show_if_true : show_if_false
Another short pattern using &&:
function Notification() {
  const hasMessages = true;
return (
    <div>
      <h1>Dashboard</h1>
      {hasMessages && <p>📬 You have 3 new messages!</p>}
    </div>
  );
}
&& means: "Only show the second thing if the first condition is true."
🔗 8. Props — Passing Data Into Components
What are Props?
Props = Properties — data that you pass into a component from outside.
Think of a rubber stamp machine. The machine is the same, but you insert different names — each time you get a different stamp. That’s exactly how props work.
src/App.jsx
function App() {
return (
<div>
<h1>👨🎓 Student Details</h1>
<User name="Aman" age={20} city="Delhi" />
<User name="Priya" age={21} city="Mumbai" />
<User name="Rahul" age={19} city="Kolkata" />
</div>
);
}Same component — three uses — three different outputs. That’s props in action.
How Props Work — Full Example:
// Child Component
function User(props) {
  console.log(props); // important for understanding

  return (
    <div>
      <h2>Name: {props.name}</h2>
      <p>Age: {props.age}</p>
      <p>City: {props.city}</p>
      <hr />
    </div>
  );
}

export default App;
Things to notice:
- String props:
name="Aman"— use double quotes - Number/boolean props:
age={20}— use curly braces - Accessing props:
props.name,props.age— dot notation
One Important Rule About Props:
Props are read-only. A component can never modify the props it receives — it can only read them. This is what makes React predictable and easy to debug.
📦 9. Props Destructuring — Cleaner Code (Important)
This is slightly advanced but used in literally every real React project.
Without Destructuring:
function User(props) {
  return <h1>{props.name} is {props.age} years old</h1>;
}
With Props Destructuring:
function User({ name, age, city }) {
  return (
    <div>
      <h1>{name} is {age} years old</h1>
      <p>From: {city}</p>
    </div>
  );
}
Instead of writing props and then accessing each value with dot notation, you directly pull out the values by name in the function parameter. Same result, much cleaner code.
Project Structure
src/
├── App.jsx
└── main.jsx
File: src/App.jsx (FULL CODE)
// src/App.jsxfunction App() {
return (
<div>
<h1>👨🎓 Student Info</h1> <User name="Aman" age={20} city="Delhi" />
<User name="Priya" age={21} city="Mumbai" />
<User name="Rahul" age={19} city="Kolkata" />
</div>
);
}// ✅ Props Destructuring used here
function User({ name, age, city }) {
return (
<div>
<h2>{name}</h2>
<p>Age: {age}</p>
<p>City: {city}</p>
<hr />
</div>
);
}export default App;Default Prop Values — Handling Missing Data:
What if someone forgets to pass a prop? Give it a default value:
function User({ name = "Guest", age = 18, city = "Unknown" }) {
  return (
    <div>
      <h1>{name}</h1>
      <p>Age: {age}</p>
      <p>City: {city}</p>
    </div>
  );
}
// If city is not passed, it shows "Unknown"
<User name="Aman" age={20} />🏗️ 10. Real Project — Student Card App(Complete Multi-File Example)
Now let’s combine everything we’ve learned into a complete, professional-style mini project using multiple files.
Project Structure:
What We’ll Build?
A small app that shows:
- A header (app title)
- 3 student cards
- Each card shows:
- Name
- Marks
👉 No complex styling 👉 No heavy logic 👉 Focus: Components + Props + Multiple Files
src/
├── App.jsx
├── components/
│   ├── StudentCard.jsx
│   └── Header.jsx
└── main.jsx
File 1: src/components/Header.jsx
// src/components/Header.jsx// src/components/Header.jsxfunction Header({ title }) {
return (
<div>
<h1>{title}</h1>
<hr />
</div>
);
}export default Header;File 2: src/components/StudentCard.jsx
// src/components/StudentCard.jsx// src/components/StudentCard.jsxfunction StudentCard({ name, marks }) {
return (
<div>
<h2>{name}</h2>
<p>Marks: {marks}</p>
</div>
);
}export default StudentCard;File 3: src/App.jsx
// src/App.jsx// src/App.jsximport Header from "./components/Header";
import StudentCard from "./components/StudentCard";function App() {
return (
<div>
<Header title="📋 Student App" /><StudentCard name="Aman" marks={92} />
<StudentCard name="Priya" marks={78} />
<StudentCard name="Rahul" marks={85} />
</div>
);
}export default App;Run the App:
npm run devWhat you’ll see in the browser:
- 📋 Student App
- Aman Marks: 92
- Priya Marks: 78
- Rahul Marks: 85
❌ 11. Common Beginner Mistakes — Avoid These
Mistake 1: Forgetting the Return Statement
// ❌ WRONG — nothing is returned
function Hello() {
  <h1>Hello</h1>;
}
// ✅ CORRECT
function Hello() {
return <h1>Hello</h1>;
}Mistake 2: Component Name Starts with Lowercase
// ❌ WRONG — React thinks this is an HTML tag, not a component
function studentCard() { ... }
<studentCard />
// ✅ CORRECT — Always PascalCase
function StudentCard() { ... }
<StudentCard />Mistake 3: Using class Instead of className in JSX
// ❌ WRONG
<div class="container">...</div>
// ✅ CORRECT
<div className="container">...</div>Mistake 4: Forgetting the key Prop in Lists
// ❌ WRONG — React will warn you in the console
{students.map((s) => <StudentCard name={s.name} />)}
// ✅ CORRECT — each item needs a unique key
{students.map((s) => <StudentCard key={s.id} name={s.name} />)}The key prop helps React identify which item changed — it's crucial for performance and correctness.
Mistake 5: Wrong Import Path
// ❌ WRONG — these paths don't work
import StudentCard from "StudentCard";
import StudentCard from "/StudentCard";
// ✅ CORRECT — use relative paths
import StudentCard from "./StudentCard";
import StudentCard from "./components/StudentCard";Mistake 6: Returning Multiple Root Elements
// ❌ WRONG — JSX can only return one root element
function App() {
  return (
    <h1>Title</h1>
    <p>Description</p>
  );
}
// ✅ CORRECT — wrap everything in a fragment
function App() {
return (
<>
<h1>Title</h1>
<p>Description</p>
</>
);
}🧠 12. Best Practices — Think Like a Professional Developer
1. Keep Components Small and Focused
One component should do one thing. If your component is growing past 80–100 lines, it’s likely doing too much — break it apart.
// ❌ One giant component doing everything
function BigCard() {
  return (
    <div>
      {/* Header logic — 30 lines */}
      {/* Body logic — 60 lines */}
      {/* Footer logic — 40 lines */}
    </div>
  );
}
// ✅ Split into focused components
function Card() {
return (
<div>
<CardHeader />
<CardBody />
<CardFooter />
</div>
);
}2. Use Meaningful Names
Your component’s name should immediately tell you what it does:
// ❌ What does this even do?
function Comp1() { ... }
function MyDiv() { ... }
// ✅ Purpose is clear from the name
function StudentProfileCard() { ... }
function CourseEnrollmentForm() { ... }3. Keep a Clean Folder Structure
src/
├── components/        ← Reusable components used across pages
│   ├── Button.jsx
│   ├── Card.jsx
│   └── Header.jsx
├── pages/             ← Full page components
│   ├── Home.jsx
│   └── About.jsx
├── App.jsx
└── main.jsx
4. Design for Reusability
If something will be used in more than one place, make it a component with props:
// ✅ A reusable Button that works everywhere
function Button({ text, color = "blue", onClick }) {
  return (
    <button
      onClick={onClick}
      style={{
        backgroundColor: color,
        color: "white",
        padding: "8px 16px",
        border: "none",
        borderRadius: "6px",
        cursor: "pointer"
      }}
    >
      {text}
    </button>
  );
}
// Use it anywhere with different data:
<Button text="Submit" color="green" onClick={handleSubmit} />
<Button text="Cancel" color="red" onClick={handleCancel} />
<Button text="Save" onClick={handleSave} />5. Validate Props (PropTypes or TypeScript)
In bigger projects, always validate what props a component expects:
import PropTypes from 'prop-types';
function StudentCard({ name, marks }) {
  return <div>{name}: {marks}</div>;
}
StudentCard.propTypes = {
  name:  PropTypes.string.isRequired,
  marks: PropTypes.number.isRequired,
};
This will show helpful warnings in the console if wrong data is passed.
13. Conclusion — What’s Next on Your React Journey
What You Learned in This Blog:
- ✅ What React is and why the industry uses it
- ✅ Setting up a React project with Vite
- ✅ Building your first real working app
- ✅ Understanding project folder structure
- ✅ Creating functional components
- ✅ JSX — all the rules and patterns
- ✅ Passing data using props
- ✅ Props destructuring and default values
- ✅ A complete multi-file project
- ✅ Common mistakes and how to avoid them
- ✅ Professional best practices
What to Learn Next:
1. State — useState Hook Make your UI interactive. Click a button → counter increases. Type in a field → value updates. This is where React truly comes alive.
2. useEffect Hook Fetch data from an API, run code when a component loads, handle side effects.
3. React Router Build multi-page apps — Home, About, Contact — all without refreshing the browser.
4. Forms in React Handle user input, form submissions, and validation properly.
5. Context API Share data across many components without passing props through every single level.
💪 Final Note — You’ve Got This
React doesn’t become clear in a day. But here’s the truth — the concepts you just learned are the exact same ones every React developer uses daily, from freshers to senior engineers at top companies.
The only difference between someone who learns React and someone who doesn’t is consistent daily practice. Build a small component today. Pass some props. Experiment. Break things and fix them.
Do this every day for a week, and you’ll be surprised how confident you feel.
Your journey to becoming a job-ready React developer has already started — right now, with this article.
Happy Coding! 🚀
If this helped you, share it with a friend who’s learning React. Drop a comment if you have questions — I read every one.
Tags: #ReactJS #WebDevelopment #JavaScript #FrontendDevelopment #Programming #LearnToCode #JSX #ReactBeginners #ReactProps #ReactComponents #ReactTutorial
메타데이터
- post_id
- 6407bfe07460
- slug
- react-introduction-components-jsx-and-props-complete-beginner-to-advanced-guide-6407bfe07460
- url
- https://medium.com/@pranshi100verma/react-introduction-components-jsx-and-props-complete-beginner-to-advanced-guide-6407bfe07460
- canonical_url
- https://medium.com/@pranshi100verma/react-introduction-components-jsx-and-props-complete-beginner-to-advanced-guide-6407bfe07460
- author_url
- https://medium.com/@pranshi100verma
- status
- ok
- fetched_at
- 2026-06-11 17:15:47