Part 6 — Getting Started with VS Code, AI Toolkit & Microsoft Foundry (Beginner-Friendly Guide —…
In the previous parts of this series, we built and tested AI agents and workflows entirely inside the Microsoft Foundry Portal, using a…
Part 6 — Getting Started with VS Code and Microsoft Foundry (Beginner-Friendly Guid -1)
In the previous parts of this series, we built and tested AI agents and workflows entirely inside the Microsoft Foundry Portal, using a no-code/low-code approach.
Now, in Part 6, we begin the transition to a code-first experience.
This part focuses purely on environment setup:
- Installing the required tools
- Signing in correctly
- Connecting Visual Studio Code to Microsoft Foundry
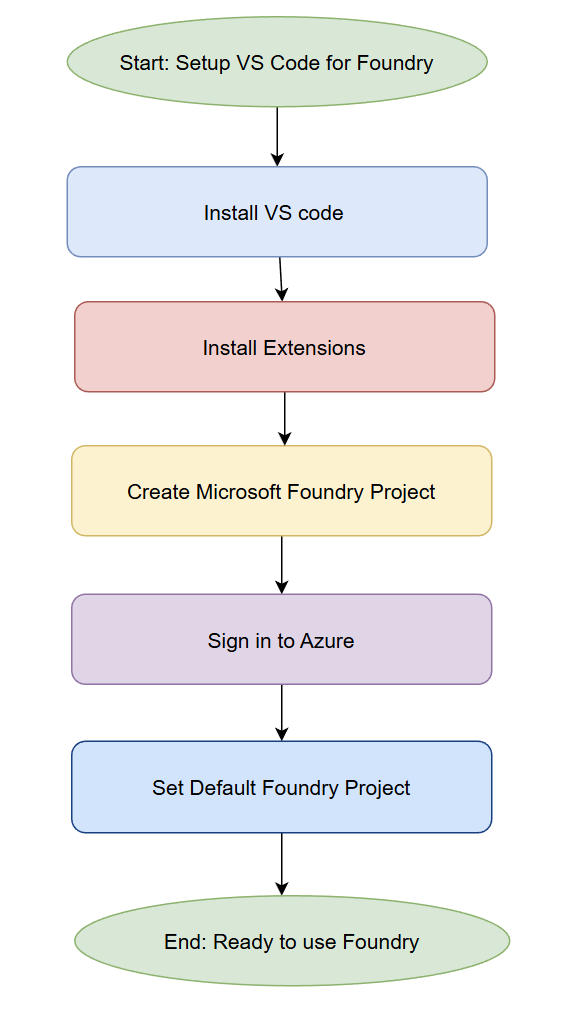
No coding yet.
We are preparing a clean and correct development environment so everything works smoothly in the next part.
Purpose of This Guide
This guide explains how to set up Visual Studio Code (VS Code) to work with:
- AI Toolkit for Visual Studio Code
- Microsoft Foundry
After completing this setup, your local environment will be ready to:
- Connect to Foundry projects
- Interact with agents and workflows from code
- Deploy and manage AI resources securely
What You Need Before Starting
- A Microsoft account with access to Azure
- Access to Microsoft Foundry
- Permission to install VS Code extensions
- Internet access
No prior Azure or AI development experience is required.
Phase 1 — Install Visual Studio Code
Why this matters
VS Code is the primary development environment we’ll use to interact with Foundry from code.
Steps
- Download VS Code from: https://code.visualstudio.com
- Install it using default settings
- Launch VS Code
Recommended version: Use the latest stable release of VS Code.
Phase 2— Install Required VS Code Extensions
Why this matters
VS Code needs extensions to connect to Azure and Foundry resources.

VS code Extensions
Steps
- Open VS Code
- Open the Extensions panel
- Install the following:
1. Azure Resources extension

2. AI Toolkit for Visual Studio Code (this includes Microsoft Foundry integration)

3. Microsoft Foundry

Restart VS Code if prompted.
Phase 3 — Create or Select a Microsoft Foundry Project
Why this matters
Microsoft Foundry is where your:
- Agents
- Workflows
- Models
- Tools
are created and managed. VS Code will connect directly to this project.
Note: Foundry projects can be created in the portal or in VS Code. In this guide, we create the project using the Foundry Portal.
Steps
Note — This section includes the required Phase 3 steps. If you are new to Microsoft Foundry or prefer more detailed, step-by-step visuals, the following article provides a deeper walkthrough of how to create and configure these steps:— Part 1 — A Step-by-step walkthrough of the Microsoft Foundry portal | by alpa buddhabhatti | Dec, 2025 | Medium
- Open the Microsoft Foundry Portal
- Enable the New Foundry Experience (toggle at the top)
- Choose one:
Select an existing project
Or click Create New Project
- When creating a new project:
Project name: e.g., FoundryDem
Subscription: select the correct Azure subscription
Resource group: create new or reuse
Region: choose a suitable region (e.g., East US)
- Click Create
Wait for provisioning to complete
You should land on the Foundry welcome screen
Tip — Always confirm the subscription and region to avoid access or quota issues later.
Phase 4 — Sign in to Azure from VS Code
Why this matters
Signing in links VS Code securely to:
- your Azure account
- your Foundry projects
Steps
- Open the Azure Resources extension in VS Code
- Click Sign in to Azure

- Sign in using your Microsoft account
- Complete multi-factor authentication if required
- Choose Sign in for this app only (recommended)
After signing in, your subscriptions will appear in VS Code.

Phase 5 — Set the Default Microsoft Foundry Project
Why this matters
VS Code must know which Foundry project to use when:
- Calling agents
- Running workflows
- Interacting with AI resources

After successfully completing Phase 4, VS Code will be connected to your Azure account.
Steps
- In VS Code, open Azure Resources
- Expand your Azure Subscription
- Navigate to Microsoft Foundry
- Locate your Foundry project (for example, project-default)
- Right-click → Open in Microsoft Foundry Extension


End State — What You’ve Achieved
After completing these steps:
✔ Visual Studio Code is installed ✔ AI Toolkit is installed ✔ Azure authentication is complete ✔ Microsoft Foundry project is linked ✔ Your environment is ready for code-first AI development
You haven’t written any code yet — and that’s intentional.
What’s Next (Part 6 — Part 2)
In the next part, we will:
- Call a Microsoft Foundry agent from VS Code
- Send input programmatically
- Receive structured output
This is where code meets Foundry.
메타데이터
- post_id
- 7613e754900f
- slug
- part-6-getting-started-with-vs-code-ai-toolkit-microsoft-foundry-beginner-friendly-guide-7613e754900f
- url
- https://medium.com/@meetalpa/part-6-getting-started-with-vs-code-ai-toolkit-microsoft-foundry-beginner-friendly-guide-7613e754900f
- canonical_url
- https://medium.com/@meetalpa/part-6-getting-started-with-vs-code-ai-toolkit-microsoft-foundry-beginner-friendly-guide-7613e754900f
- author_url
- https://medium.com/@meetalpa
- status
- ok
- fetched_at
- 2026-06-23 17:05:31