Play iconic Arcade Games like Pac-Man or Donkey Kong on ESP32 Cheap Yellow Display (“CYD”) [full…
The 1980s were the time when Arcade Games showed up in Gaming Halls, and games like Pac-Man, Donkey Kong, Galaga, Frogger, Digdug or 1942…
Play iconic Arcade Games like Pac-Man or Donkey Kong on ESP32 Cheap Yellow Display (“CYD”) [full guide]
The 1980s were the time when Arcade Games showed up in Gaming Halls, and games like Pac-Man, Donkey Kong, Galaga, Frogger, Digdug or 1942 were the ever played. They came all in cabinets with a video monitor, joystick and buttons. Of course, each cabinet has a slot to put the coins in…
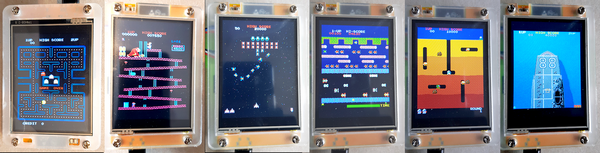
Nowadays, the modern games run on machines like a PlayStation 5, but in a former time they were driven by a handful of microcontroller boards, each for a specific task. There were controllers for audio, video, lightning, button and joystick control and much more. The complete code was stored in ROMs, and fortunately some guys tried to read out the source code of the games.
This tutorial is about running the old code on new microcontrollers like the ESP32 that have a TFT display connected to, and the ESP32 Cheap Yellow Display device is the ideal basis to run the project. If you have all hardware available, you can run this project in a total of 40 minutes.
The code of this project is not written by me, but from Till Harbaum. The complete code is available in his GitHub Repository “**galagino”, so all credits go to him for this fantastic work**.
This is the overview of this tutorial:
- hardware needed for the project
- software needed for the project
- get the basis source code (“naked” source code)
- download the Game ROMs of the included games
- convert the Game ROMs to files that our ESP32 is understanding by running Python scripts
- wire the joystick to the ESP32 CYD device
- make the settings in the sketch
- upload the code to the ESP32 CYD device
- Troubleshooting
- enjoy your new game controller !
Hardware needed for the project
Most important for the project is the correct Cheap Yellow Display version: please use only the 2.8-inch variants of the CYD device. Please don’t complain when your 2.4 or 3.2-inch CYD device won’t run! This is due to the fact that the code does not use the TFT_eSPI or any other display library but a proprietary display driver. There are two TFT displays allowed for this project: ST7789 or ILI9341 — nothing else. A touch variant is not necessary to run the project.
This is the complete hardware:

As the ESP32-CYD has just some limited GPIOs available, the game control is done by a Nunchuck joystick, so you need to buy one if it is not already available. As the joystick comes with a specific connector, you should consider buying an adapter module with male connector pins as well.

Last but not least, the connection between the joystick and the ESP32 CYD is done by a 4-wire JST connector cable, that is usually delivered together with your CYD and connected between the Nunchuck adapter module and the JST connector in the middle (on the right side of the SD-Card reader, labeled as “CN1”):

Audio Hardware
Although the CYD device comes with an Audio / Speaker connection, I didn’t use a speaker and I can’t tell you if the conversion and sketch is running, sorry.
Software needed for the project
The most important software is the Arduino IDE in version 2.x. Usually, you would use the most recent version of ESP32 boards (at the time of writing it is version 3.3.0), but for this project you need an older version. As the author of the project recommends to use version 2.0.9 I compiled the code with this version without any problems. Using a newer version in the 2.x branch may work, but you could run into problems with the sound module. The 3.x branch of ESP32 boards will compile up to version 3.1.3 (using ≥ 3.2.x fails) but probably with bad sound support.
To compile the project, just two additional libraries are necessary:
- NintendoExtensionCtrl for Nunchuck support, version 0.8.3
- FastLED for LED control (not used in this setup but still active), version 3.10.2
You can install both with your Arduino Library Manager.
The second software is a running instance of Python. You will need Python to convert the Game ROM files into ESP32 readable files, so this is a one time process. I wrote a very short tutorial that describes how to install Python on a Windows computer: “**Install Python 3.x on your Windows computer with 4 clicks**”. I tested the conversion with current version (3.13.x), but older versions should work as well.
Get the basis source code (“naked” source code)
This part seems to be a little crazy, but indeed, the code and games are not compilable, because the Game codes are not part of the GitHub Repository. This is due to the (Copy-) Rights situation: all games were sold 40 years ago by companies like Namco or Nintendo, and they still own the rights. Some guys extracted the code from the ROM Cartridges and published them for download. As this is a copy of existing software, everyone who offers a game with this code could get offended. For that reason, nether Till Harbaum not me include the ROM code of games in our GitHub Repo’s.
I recommend downloading the sketch code from my GitHub Repository, because I’m providing some extra information about the ROM code conversion.
A recommendation: just download the Galagino repository, unzip the directory and proceed with the next step:
Download the Game ROMs of the included games
As mentioned above, the Game ROMs are available on several internet sites, but you need to be sure to download the correct files. That is due to the fact that the sames game was available on some game platforms and for different regions. Please compare the following information with your findings and download the files (they are smaller than 100 kb each).
Although the code could work with just one game (“single machine” option) I strongly recommend to download all 6 Game ROMs, because the conversion script is awaiting all game files.
Search and download these files, use your preferred Search Machine and use e.g. ‘Galaga Namco Rev B ROM’. The following links use Google Search:
and store them.
The original games run on Z80 microcontrollers, and so we need a Z80 Emulator as well. There is a fine one by Marat Fayzullin, but the License Terms didn’t allow appending the code, so you need to download the Z80 Emulator code from his website and place the ZIP-File in the new created directory (don’t unzip the file !).
Convert the Game ROMs to files that our ESP32 is understanding
The conversion is done by several Python scripts that will convert a lot of files to C header files (e.g. “1942_rom1_b0.h”). The good news is: all is done with one simple call on a Windows computer. For other platforms, an easy solution is available as well.
Preparation
Please create a new folder in the root directory of a drive. This should avoid path length problems that could occur when running the conversion script in user directories.
In my example, I’m using the drive E: and the new folder “gal”.
Unzipping the galagino zip-file
When unzipping the galagino-master.zip file, you should receive one README.md and 7 subfolders, that are all placed in the “gal” folder:

Copy downloaded Games ROMs and the Z80 Emulator files
Please copy all 6 downloaded Games ROMs and the Z80 Emulator in the subfolder “roms”:

Unzipping the Games ROM files
Now unzip all Games ROM files in the “roms” folder. Please DO NOT UNZIP the Z-80 Emulator ! All files need to be in this folder, not in any subfolders. This will give you a lot of files.

Copy the conversion scripts
When you downloaded the galagino code from my GitHub repository, you downloaded a Windows helper file as well, as I placed it in the repository. I marked two important files (conv_win.bat and helloworld.py).

Test your Python installation
Before starting the conversion of the Game ROM files, you should test your Python installation. I’m proving the most simplified “Hello World” Python example (“helloworld.py”).
Please run these steps:
- open a command window in Windows with Administrator privileges: Click on Search -> ‘cmd’ -> Open as Administrator -> confirm in User Account Control

Please confirm the User Account Control as you ask for Admin rights. Now you are in the Command window and enter these commands:
- e: [Note: the drive where your ‘gal’ folder is located]
- cd gal [Note: the name of your folder]
- cd romconv
- helloworld.py

If your Python environment is ready, you see the output ‘This line will be printed’. Great, now you can start the next step.
Prepare a file for conversion of all files
When reading the *README.md page of the “romconv” directory, you will notice a lot of entries to work with. Fortunately, it is much easier to do the conversion. If your development environment includes a bash interpreter, you probably could run the ‘conv.sh’ or ‘conv_win.sh’ scripts directly, but they don’t work on my computer. In this case simply open the file “conv_win.sh*” and make these edits:
1 Delete the first line: #!/bin/bash
2 Search and Replace
  Search for: python
  Replace with: py
3 Save the file as conv_win.bat
My Galagino GitHub repository already contains this ‘conv_win.bat’ batch file. Now it's time to start the conversion. The steps are already the same as with the “Test your Python installation” section, and you can enter “conv_win.bat”:

Now the conversion process is starting. You will notice some “errors” because some parts of the conversion script is commented. This is the end of the conversion:

I placed a waiting command at the end of the file, so there is the last output “Drücken Sie eine beliebige Taste…” meaning “Press any character on the keyboard to end the script”.
Result of the conversion
After downloading the “naked” galagino folder there were around 32 files in the galagino folder, now you find 85 files in the folder, so the conversion worked.

This was the hardest step, now it is getting much easier.
Open the ‘galagino.ino’ sketch with your Arduino IDE
You will notice that it takes some time to open all tabs, as the author split the code in several files. The most important file for now is the ‘config.h’ file. Open the tab and scroll down to line 32 and uncomment the “#define”:
//#define CHEAP_YELLOW_DISPLAY_CONF
change to:
#define CHEAP_YELLOW_DISPLAY_CONF
The second step is regarding your Cheap Yellow Display (CYD) device version. If your CYD has ONE (Micro) USB connector, the mounted display is an ILI9341 chip type. If you own a (newer) CYD with two (Micro and C) USB connectors, the mounted display is driven by an ST7789 chip. Scroll down to the CYD section (probably line 81) and comment the “#define TFT_ILI9341” entry in case you have an ST7789 display:
#else // Cheap Yellow Display Conf
// video config
#define TFT_SPICLK 40000000 // 40 Mhz. Some displays cope with 80 Mhz
...
#define TFT_BL 21   // don't set if backlight is hard wired
#define TFT_ILI9341 // define for ili9341, otherwise st7789
// #define TFT_VFLIP   // define for upside down
// #define TFT_MAC  0x20  // some CYD need this to rotate properly and have correct colors
The “TFT_VLIP” is responsible for the display orientation (are the USB connectors at the top or bottom ?).
One word on the included games: If you could not get one or more games, you can exclude them fromthe sketch by commenting a line in the file above:
// disable e.g. if roms are missing
#define ENABLE_PACMAN
#define ENABLE_GALAGA
#define ENABLE_DKONG
#define ENABLE_FROGGER
#define ENABLE_DIGDUG
#define ENABLE_1942
That are all necessary changes, it’s time to compile and upload the sketch:
Compile and Upload the code
This will take some seconds as there is a lot of code that is processed, but in the end the game selector will show up on the display:

Use your Nunchuck controller to select a game, press the lower “Z” button to confirm, press the upper “C” button (C = insert coin) and have fun with your game.
Change to another game
Press the “Reset” button on your CYD and select another game by scrolling the selector.
Play Audio files
See the README.md file of the repository for further help as I did not test this setup.
Troubleshooting
After uploading I see this “scrolling” window:

Solution: you are probably running a newer CYD with ST7789 display, but the setting in config.h is still ILI9341, so comment the line and you are done (be for sure you are in the CYD section of the setup, see above).
The display is inverted
The game is starting but with a white background:

Solution: This happend on my newer CYD with ST7789 display. Unfortunately there is no setting in the config.h file, but move to the ‘video.cpp’ tab and scroll down to line 104:
103  0x2b, 4, W16(0), W16(320),        // Row addr set, YSTART = 0, YEND = 320
104  0x21, 0,                          // INV ON
105  0xff, 10,                         // 10 ms delay
Comment line 104 like this and compile & upload again.
103  0x2b, 4, W16(0), W16(320),        // Row addr set, YSTART = 0, YEND = 320
104 //  0x21, 0,                          // INV ON
105  0xff, 10,                         // 10 ms delay
B.t.w.: you can change the display orientation by uncommenting this line in config.h:
// #define TFT_VFLIP // define for upside downSummary
It makes a lot fun to play this old games, as they are still fascinating to me and others.

Source code of the apps
You find the complete code of the app (without the Game ROMs) in my GitHub repository. As this is a forked and minimal added repository I recommend having a second look at the original galagino repository, as there are “Issues” and “Discussions” tab available for further help.
Happy coding !
메타데이터
- post_id
- 899321881f28
- slug
- play-iconic-arcade-games-like-pac-man-or-donkey-kong-on-esp32-cheap-yellow-display-cyd-full-899321881f28
- url
- https://medium.com/@androidcrypto/play-iconic-arcade-games-like-pac-man-or-donkey-kong-on-esp32-cheap-yellow-display-cyd-full-899321881f28
- canonical_url
- https://medium.com/@androidcrypto/play-iconic-arcade-games-like-pac-man-or-donkey-kong-on-esp32-cheap-yellow-display-cyd-full-899321881f28
- author_url
- https://medium.com/@androidcrypto
- status
- ok
- fetched_at
- 2026-07-11 11:40:08