Step-by-Step Guide to Deploying Websites on Azure VM with CyberPanel & GitHub Integration
Deploying a website on an Azure Linux Virtual Machine using CyberPanel and GitHub is one of the most powerful, scalable, and cost-effective…
Step-by-Step Guide to Deploying Websites on Azure VM with CyberPanel & GitHub Integration
Deploying a website on an Azure Linux Virtual Machine using CyberPanel and GitHub is one of the most powerful, scalable, and cost-effective ways to host modern web applications — especially if you’re building with Laravel, WordPress, or custom PHP apps.
This guide will walk you through everything — from provisioning your Azure VM to setting up CyberPanel, connecting GitHub, and deploying your website seamlessly.
Architecture Overview
Before diving in, here’s what your setup will look like:
- Azure VM (Ubuntu/Linux) → Your cloud server
- CyberPanel (OpenLiteSpeed) → Hosting control panel
- GitHub Repository → Source code storage
- Domain + SSL → Public access to your app
Create an Azure Linux Virtual Machine
Sign in to Azure Portal: ○ Access the Azure portal (portal.azure.com).
Create a Resource: ○ Click on “Create a resource” and select “Virtual Machine.”
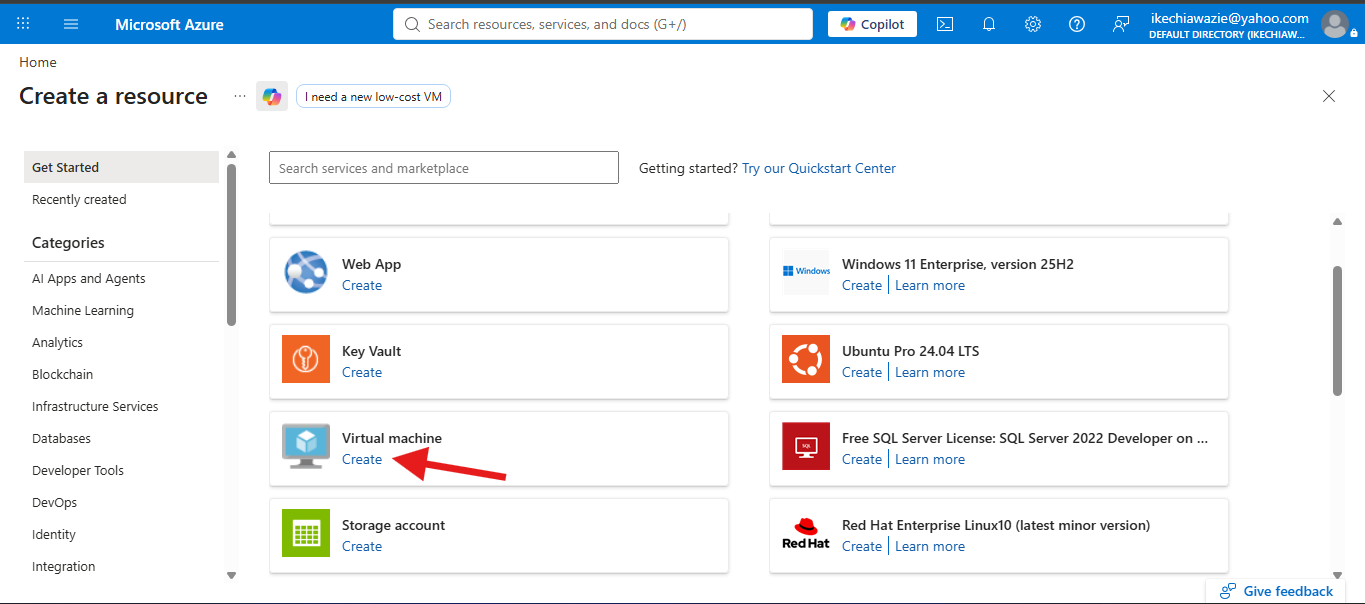
Configure Basics: ○ Select subscription, resource group, and VM name. ○ Choose the region and availability options. ○ Select Linux (Almalinux 9)

Choose VM Size:
Pick a VM size based on the required CPU, memory, and storage

Configure Settings:
Set up an administrator account.

Set Inbound Ports
In Networking → Inbound rules, allow:
22(SSH)80(HTTP)443(HTTPS)
Note: Ensure that inbound rules for ports 80 (HTTP) and 443 (HTTPS) are enabled. Without these, CyberPanel may not install correctly

Review and Create:
Review the configuration and create the VM.

Connect to your server:(Putty, Windows Powershell, etc)


Install CyberPanel on Azure VM
Update your server OS first. Run this command on Powershell

Run the Installation Script.
Execute the provided command to initiate the automated installation script. This script will guide you through several decisions regarding the LiteSpeed version and additional add-ons you wish to install.

Select the version of LiteSpeed that you would like to use.


Select CyberPanel with OpenLite
If you select Litespeed Enterprise, please first ensure that you have the license key. You can visit the Pricing page to get the required plan.
Remote MySQL (default N): Allow for your Database to be installed on a remote server. Type No
Memcached (default Y): Distributed memory object caching system. Type Yes
Redis (default Y): In-memory data structure store, used as a database, cache, and message broker. Type Yes
Watchdog (default Yes): A kernel watchdog is used to monitor if a system is running. It is supposed to automatically reboot hanged systems. Type Yes
Installation Processing The installation process will initiate automatically and is expected to be complete within 10 minutes, depending on your server’s speed. Please note your password details during installation, as it will be used to access CyberPanel

Access Cyberpanel
Once the installation is complete, navigate back to your Azure VM’s Networking settings and add an inbound rule to allow traffic on port 8090 before accessing CyberPanel.


You can now access CyberPanel by visiting: https://<your-vm-public-ip>:8090.


Create a Website in CyberPanel
Go to Websites → Create Website Fill in:
- Select Package
- Select Owner (Admin by Default)
- Domain. (Make sure your domain is pointing to the VM instance in A Records. Wait for DNS propagation (5 mins — 24 hrs).)
- Php Version: 8.4
- Next is to create a website

Once the website has been created, ensure it's listed among the List Websites

Connect GitHub Repository
Navigate back to your PowerShell and clone this repo to the site directory.

Navigate to your file manager.

Ensure that your files are under the public_html folder for the website to work properly. Also, make sure that you have the correct permissions for the files, as this could pose a challenge when accessing the site. if your files have a permission issue, run the following commands


Once this is done, you can now access the website with your domain name

Common Issues & Fixes
❌ 403 Forbidden
- Fix permissions
- Check document root
❌ Git Permission Denied
- Re-add SSH key
- Check repo access
🚀 Final Result
You now have:
- A live website on Azure VM
- Managed via CyberPanel
- Synced with GitHub
- Secured with SSL
- Ready for scaling
메타데이터
- post_id
- a8958d88b492
- slug
- step-by-step-guide-to-deploying-websites-on-azure-vm-with-cyberpanel-github-integration-a8958d88b492
- url
- https://medium.com/@ikechiawazie/step-by-step-guide-to-deploying-websites-on-azure-vm-with-cyberpanel-github-integration-a8958d88b492
- canonical_url
- https://medium.com/@ikechiawazie/step-by-step-guide-to-deploying-websites-on-azure-vm-with-cyberpanel-github-integration-a8958d88b492
- author_url
- https://medium.com/@ikechiawazie
- status
- ok
- fetched_at
- 2026-07-28 15:18:08


