Xcode-讓你的碰觸點位清晰可見
目錄
Xcode-讓你的碰觸點位清晰可見
目錄
⦿ Simulator Recording
⦿ UIView
⦿ UIWindow
⦿ SceneDelegate
⦿ 測試
Simulator Recording
在 Xcode 中,我們將 APP build 在 Simulator 時,若想看見觸碰位置,可在 Simulator => Setting => Visual indicators 中將 **Show single touches** 打勾,如下:
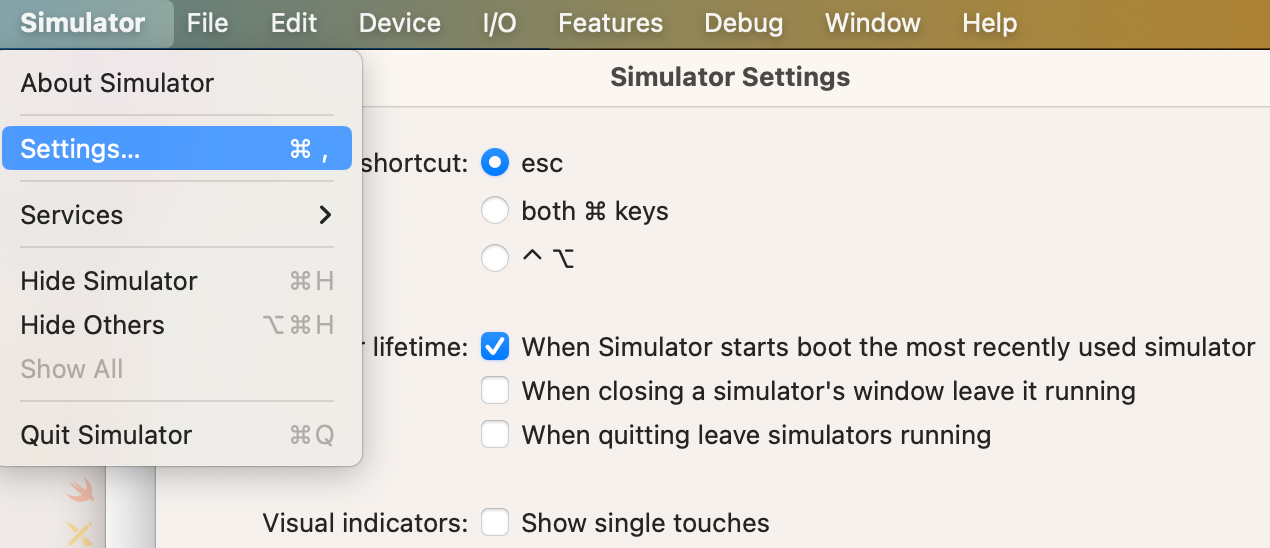

如此,滑鼠觸碰的位置就會清楚(?)顯示在 Simulator 上,但用這種方式似乎不能在錄影時記錄下來,若真用 Simulator 錄影會發現最後影片異常的短,10 秒影片在瞬間播放結束,也許這是 Apple 用來節省資源的方式。
那麼,我們下面試試看加入觸碰點位並錄影吧。
繼續閱讀|回目錄UIView
首先,我們創立一個 UIView,加入下面程式碼:
class TouchIndicatorView: UIView {

    override init(frame: CGRect) {
        super.init(frame: frame)
        configure()
    }

    required init?(coder: NSCoder) {
        super.init(coder: coder)
    }

    private func configure() {
        backgroundColor = UIColor.systemBlue.withAlphaComponent(0.5)
        layer.cornerRadius = frame.width / 2
    }
}
除了複寫程式碼生成的 view 的 init,還必須加入若以 Interface Builder 或 Storyboard 生成的 required init?,程式生成後,就對這個 view configure。
我們希望在觸碰位置加入一個新的 view,讓這個 view 呈現你的觸碰點位,所以加入 layer.cornerRadius = frame.width / 2 呈**圓點**,將圓點設為半透明系統藍。
繼續閱讀|回目錄UIWindow
接著,我們再創立一個 UIWindow,加入下面程式碼:
class TouchIndicatorWindow: UIWindow {
    private var touchIndicators = [UITouch: TouchIndicatorView]()

    override func sendEvent(_ event: UIEvent) {
        super.sendEvent(event)

        guard event.type == .touches else { return }

        for touch in event.allTouches! {
            switch touch.phase {
            case .began:
                let touchIndicator = TouchIndicatorView(frame: CGRect(x: 0, y: 0,
                                                                      width: 44, height: 44))
                touchIndicator.center = touch.location(in: self)
                addSubview(touchIndicator)
                touchIndicators[touch] = touchIndicator
            case .moved:
                if let touchIndicator = touchIndicators[touch] {
                    touchIndicator.center = touch.location(in: self)
                }
            case .ended, .cancelled:
                if let touchIndicator = touchIndicators[touch] {
                    touchIndicator.removeFromSuperview()
                    touchIndicators.removeValue(forKey: touch)
                }
            default: break
            }
        }
    }
}
先建立一個字典為 [UITouch: UIView] 型別,用來記錄 touch 跟 view。
複寫 sendEvent(_ event: UIEvent),在 event 下管理 touch 的行為,主要有幾個: .began、.moved、.ended、.canceled,即開始、移動、結束、取消。
.began
在開始時,建立剛才創建的 UIView 為標準 44 x 44 的方塊,但因為有 cornerRidius,所以這個方塊就變成了圓點,將這個圓點的中心位置對到 touch 的位置並 addSubview,圓點就會在你點到螢幕的位置出現。再把 touch 與 view 記錄在字典裡方便管理,先看看到這邊的結果:

很好!就是這個圓點。
.moved
我們再來看移動時的程式碼:
if let touchIndicator = touchIndicators[touch] {
  touchIndicator.center = touch.location(in: self)
}
意思是創建出來的 view,在移動時需要時時刻刻**對齊**到你的觸碰位置,結果如下:

注意!這邊這個 view 是 .began 創建出來的 view,只是 touch phase 為 .moved 時不斷對齊。如果我們希望 view 像畫筆一樣,那就得在移動時不斷產生新的 view,將程式碼改為:
let touchIndicator = TouchIndicatorView(frame: CGRect(x: 0, y: 0,
                                                      width: 11, height: 11))
touchIndicator.center = touch.location(in: self)
addSubview(touchIndicator)
結果會像這樣:

有趣吧?
.ended / .canceled
最後看到結束、取消的地方:
if let touchIndicator = touchIndicators[touch] {
  touchIndicator.removeFromSuperview()
  touchIndicators.removeValue(forKey: touch)
}
將創建出來的 view 移除,並且也將字典中存在該 view 的地方移除這個 **key: value**,且這個地方會回傳該 view。

其實還沒完,為了導入 sendEvent 這個 Window function,我們還要創建客製化的 Window。
繼續閱讀|回目錄SceneDelegate
iOS13 以後 AppDelegate 的 window 改由 SceneDelegate 來處理,我們加入以下程式碼:
var window: UIWindow?

func scene(_ scene: UIScene,
           willConnectTo session: UISceneSession,
           options connectionOptions: UIScene.ConnectionOptions) {
   guard let windowScene = (scene as? UIWindowScene) else { return }

   let window = TouchIndicatorWindow(windowScene: windowScene)
   let viewController = UIStoryboard(name: "Main", bundle: nil).instantiateViewController(withIdentifier: "ViewController")
   window.rootViewController = viewController
   self.window = window
   window.makeKeyAndVisible()
}
如果知道 build 時 LaunchScreen 會先出現,在什麼都沒有設定的情況下,LaunchScreen 後就切換到 Main.storyboard 裡的 ViewController,我們到 Main 去看到如下:

由於 ViewController 被設為 **initial**,所以當 APP 進到這個 Storyboard 時就會顯示它,我們設定 Storyboard ID,與它 class 的名稱一樣。
在 scene willConnectTo 這個 function 中,我們看到 UIWindow 有一個 init function 如下:

UIWindowScene 是 UIScene 的子類,將 scene 降轉為 UIWindowScene 傳入我們創建的 TouchIndicatorWindow 中。
再把 window 的 rootViewController 設為 ViewController 實例,把預設的 window 設為這個 window 且 makeKeyAndVisible(),即是把這個 window 設為 key window,若在 iPhone 中,我們大概只會用一個 window,也可以 **window.isHidden = false** 得到一樣的結果。
聽起來很饒口,若你兩個都不做,畫面就會黑掉了,因為這時候 window isHidden 為 true,如下:

這可不是 backgroundColor = .black 的 VC 喔。
測試
完成了!
不過,我們可以來測試觸碰的移動痕跡,以及多處點位時會得到如下結果:


拖動痕跡時最多只能識別出兩條,單點觸碰時只能識別出五個點。
這次就分享到這,感謝您的閱讀。
繼續閱讀|回目錄最後附上 GitHub:
메타데이터
- post_id
- b0a2a594c43d
- slug
- xcode-讓你的碰觸點位清晰可見-b0a2a594c43d
- url
- https://medium.com/%E5%BD%BC%E5%BE%97%E6%BD%98%E7%9A%84-swift-ios-app-%E9%96%8B%E7%99%BC%E6%95%99%E5%AE%A4/xcode-%E8%AE%93%E4%BD%A0%E7%9A%84%E7%A2%B0%E8%A7%B8%E9%BB%9E%E4%BD%8D%E6%B8%85%E6%99%B0%E5%8F%AF%E8%A6%8B-b0a2a594c43d
- canonical_url
- https://medium.com/%E5%BD%BC%E5%BE%97%E6%BD%98%E7%9A%84-swift-ios-app-%E9%96%8B%E7%99%BC%E6%95%99%E5%AE%A4/xcode-%E8%AE%93%E4%BD%A0%E7%9A%84%E7%A2%B0%E8%A7%B8%E9%BB%9E%E4%BD%8D%E6%B8%85%E6%99%B0%E5%8F%AF%E8%A6%8B-b0a2a594c43d
- author_url
- https://medium.com/@cowton0517
- status
- ok
- fetched_at
- 2026-08-10 22:42:58