Build a Serverless Application using Cloudflare Worker
Cloudflare worker is a serverless application platform, that allow you to create applications and deploy them on it’s Edge network.
Build a Serverless Application using Cloudflare Worker

Photo by Ion Şipilov on Unsplash
Cloudflare worker is a serverless application platform, that allow you to create applications and deploy them on it’s Edge network.
We will learn to build a simple application in this post and deploy it to Cloudflare Edge network.
The first thing which we need to do is create a Cloudflare worker account. So, head over to https://workers.cloudflare.com/ and Sign Up. In the next page give your email and password and click on Create Account button.

User
In the next page, it will ask us to create a sub-domain. It will contain in the link, in which we deploy our app.

App
In the next page, click on the Continue with Free button.

Free
Next, it will ask us to confirm from our email.

Confirm email
Now, when you click the email link you will be asked for images to verify.

Images
After verifying we will be able to see our workers in the dashboard.

Worker
Now, the cloudflare account is created and it’s time to install wrangler. It is the command line tool we use to create and publish worker project. Install it globally in terminal my below command.
npm install -g @cloudflare/wranglerOnce it is install, we can verify it by the below command and check the version number.

version
Now, it’s time to authenticate our wrangler with our cloudflare account. So, type wrangler login in the terminal. It will ask for our permission to open in browser.

Browser
It will open the browser, but sometimes it doesn’t open the correct link. The best thing is to copy the link from the terminal and paste it in browser. Click on Authorize Wrangler button.

Link
Once you authorize, you will get this below page. You need to close this page.

Authorize
Sometimes, it gets stuck in the terminal and keep on waiting for the API token. In such cases, you need to see the API key by wrangler config command. In this you need to give your Account id for the cloudflare dashboard. This method is not recommended, but can be used as a last resort.

wrangler config
Now, run the command wrangler whoami to see if everything is setup correctly. I am currently logged in from my other account.

logged
Now, that you have logged in to wrangler, it’s time to create your first project. We need to run the wrangler generate command for that. You need to give you project name after that.
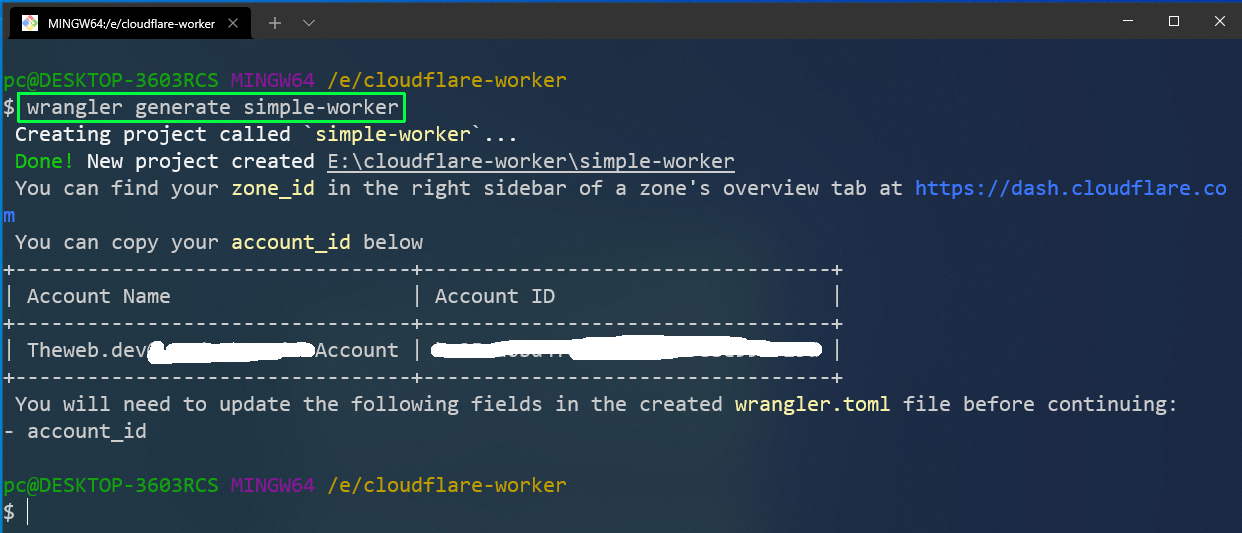
Simple project
There are also various templates to create a basic project. You can get them from this link.

Templates
Now, change to the directory and open it with VS Code.

VS Code
The starting point in a wrangler project is the index.js file and we will learn more about it later. Right now run wrangler preview to see how this looks like in browser.
It also tells us that we need to put account_id in our config file.

preview
It will give us a sort of testing environment and we can see our worker, is perfect.

Worker
Let’s now learn what the code in index.js means. The addEventListener is like a browser event listener and listens for the fetch event. In the worker worker right now there are two kinds of requests -
- fetch- a http request
- schedule- add schedule workers, which can be run on time basis
It have a callback function, which tell that for a fetch event, respond with handleRequest function.
The handleRequest is an async function, which is taking the request in as parameter and returning a response. The response first have a body, which is a simple string ‘Hello worker!’ in our case. Then it have a set of arguments, which are called options. It defines the type of body, which in our case is plain string.
There are all kind of different things that, we can return in a response. We can learn more about it here.
Now we will publish our project to Cloudflare CDN network, but for need need to set the account id in the config file. So, again run wrangler whoami and take the account id.
whoami
Put the account id in the wrangler.toml file, which is the configuration file for our wrangler project.
The worker_dev tell to deploy wrangler in our worker subdomain in wrangler.

wrangler.toml
Now, we will first check how our project looks in production by running wrangler dev, which will open the project on http://127.0.0.1:8787

wrangler dev
Once we run it in our browser, we will get Hello worker! shown.

Hello worker!
Now, we will publish the project. We will use the command wrangler publish to publish it to Cloudflare Edge network.

publish
It also gives us the url, which will show us the same Hello worker!

Hello worker
Now, we will start to add more functionality to the project, instead of displaying the plain Hello worker! text. For that we will create a HTML template, which will show the html page.
For that create a file template.js and add a simple function returning a template string. The template string contains html skeleton code, with simple title and body.

template.js
Back in index.js file we will import template and then use it in the Response().

index.js
Before going forward, we have to change javascript to webpack in wrangler.toml file. We are using import and other features, so it is required.
Since, we have done changes so we need to re-publish our project. We will do the same by wrangler publish command.

wrangler.toml
Now, when we look into our deployed app, we will see actually the html code is printed.

Deployed app
To render an html page, we need to change the header in index.js file to have a content-type of text/html.
Need to re-publish the project again after that.

index.js
Now, our page will look correctly in deployed host.

deployed
Now, we will do a bit more then just showing plain html. We are passing a request object inside the handleRequest function. It contains a lot of useful information to show.
There is request.cf which have ton of useful information. The details about it can be found here.
We will first pass request.cf in the template function in index.js file.

index.js
Now, before moving to template.js we will install a package for country flags. We are installing it, because we want to show country flag associated with a country.
So, open your terminal and npm install country-code-emoji.

npm
Now in template.js file, first import the flag from country-code-emoji. We are also now passing argument cf in the function. Also added curly brackets in the function, since it contains more statements.
Now, we will get the county emoji with passing, the county code by cf.country. We are showing a fire emoji, if this fails. After that in body, we are showing the country code and flag.

template.js
After wrangler publish, we will see this in the deployed host.

deployed
We will next add some style in our project. We are also showing more details now, which include the Cloudflare datacenter, city, latitude, longitude and Time Zone.

template.js
Now, our project is complete, and we are getting this beautiful information displayed.

Beautiful information
You can find code for the same here.
메타데이터
- post_id
- f71017093b86
- slug
- build-a-serverless-application-using-cloudflare-worker-f71017093b86
- url
- https://medium.com/@nabendu82/build-a-serverless-application-using-cloudflare-worker-f71017093b86
- canonical_url
- https://medium.com/@nabendu82/build-a-serverless-application-using-cloudflare-worker-f71017093b86
- author_url
- https://medium.com/@nabendu82
- status
- ok
- fetched_at
- 2026-07-10 19:15:58