Passwordless Cross-Tenant Azure SQL Access with User-Assigned Managed Identity
Introduction
Passwordless Cross-Tenant Azure SQL Access with User-Assigned Managed Identity
Introduction
While working on a real Azure project, I encountered a problem that seemed simple at first but turned out to be surprisingly confusing.
My application was running in Azure Tenant A, but it needed secure access to Azure SQL Database in Tenant B. The main requirement was clear:
- no passwords
- no secrets
- no certificates
- private network access only
Everything had to be fully passwordless.
The solution uses Managed Identity and Microsoft Entra ID to securely trust and exchange identities across tenants. This works with many Azure services (VMs, App Services, AKS, Azure Container Apps, Functions, and more).
In this article, I focus on the identity setup and validation, not application development. A Virtual Machine is used only for testing, because it’s easy to see what’s happening step by step.
This article assumes the infrastructure is already in place and explains how cross-tenant authentication works in practice.
And since this is my first article, I hope it saves you some of the time I lost figuring this out — happy reading! 😊
Prerequisites
The following are assumed to already exist:
- Azure SQL Server and database in Tenant B
- Two Azure virtual networks (one per tenant)
- Non-overlapping address spaces
- VNet peering between virtual networks
- Azure SQL exposed via Private Endpoint
- Private DNS is correctly configured and resolvable from both networks
- A workload (VM / App) in Tenant A ( For testing purposes, we will use Windows VM from Tenant A)
- Required permissions in both tenants to manage Entra ID, apps, and SQL users
This article does not cover:
- SQL or database creation
- Network or DNS setup
Architecture Overview
- Tenant A owns the workload with a managed identity
- Tenant B owns the data
- Microsoft Entra ID performs federation and token issuance
- Network communication occurs over a private network
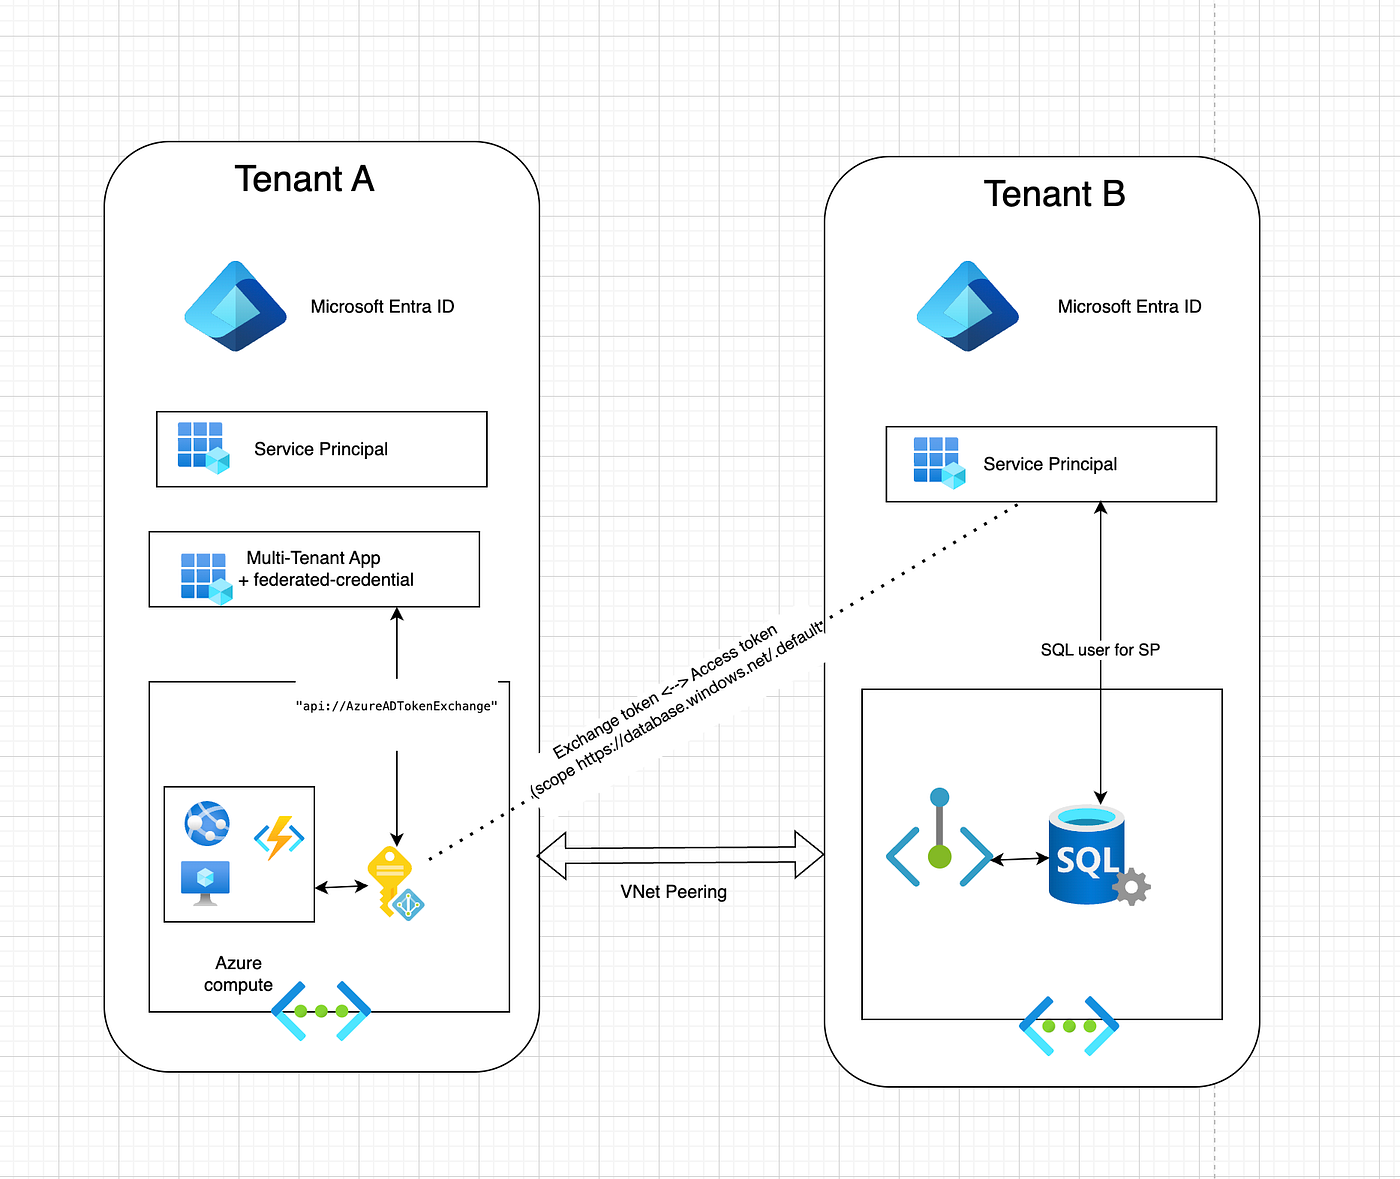
Phase 1: Tenant A — User-Assigned Managed Identity
Create a user-assigned managed identity for the workload.
az login --tenant <TENANT_A_ID>
az account set --subscription <SUBSCRIPTION_A_ID>
az identity create \
--name uami-cross-tenant \
--resource-group <IDENTITY_RG> \
--location <IDENTITY_LOCATION>Values to Save
UAMI_CLIENT_ID
This value comes from the clientId field in the command output.
It is used by the workload at runtime when authenticating with Managed. Identity.
UAMI_PRINCIPAL_ID
This value comes from the principalId field in the command output.
It represents the managed identity object in Microsoft Entra ID and is. required for workload identity federation.
Important:
Do not use clientId for federation. Federation only works with principalId.
Attach this managed identity to your workload (VM, App Service, AKS, etc.). For testing configuration, we will attach it to the VM at the end of the main solutions ( to be changed)
Phase 2: Tenant A — Multi-Tenant Application and Federation
Step 1: Create the Multi-Tenant Application
az ad app create \
  --display-name cross-tenant-app \
  --sign-in-audience AzureADMultipleOrgs
Save the following values for use in later steps :
APP_CLIENT_ID: This value comes from the appId field. It is the Application (Client) ID and must be reused in both Tenant A and Tenant B.
APP_OBJECT_ID: This value comes from the id field. It is the Application Object ID, which exists only in Tenant A, and is required to configure federation.
Step 2: Create the Service Principal in Tenant A
az ad sp create --id <APP_CLIENT_ID>Replace APP_CLIENT_ID with the value saved from the previous execution. This creates a tenant-local service principal for the same application created above
Step 3: Configure the Federated Identity Credential
az ad app federated-credential create \
  --id <APP_OBJECT_ID> \
  --parameters '{
    "name": "uami-federation",
    "issuer": "https://login.microsoftonline.com/<TENANT_A_ID>/v2.0",
    "subject": "<UAMI_PRINCIPAL_ID>",
    "audiences": ["api://AzureADTokenExchange"]
  }'
Use the following values:
- APP_OBJECT_ID is the Application Object ID from the app registration (saved after Phase 2, step 1).
- UAMI_PRINCIPAL_ID is the managed identity principalId (saved after Phase 1).
- TENANT_A_ID is the tenant ID for the hosted application.
Phase 3: Tenant B — Service Principal and SQL Authorization
At this stage, Tenant A is fully prepared:
- The managed identity exists
- The multi-tenant application exists
- Federation is configured correctly
Now we switch context to Tenant B, which owns the data and enforces authorization.
Step 1: Register the Application in Tenant B
The multi-tenant application created in Tenant A must have a corresponding service principal in Tenant B.
Important You must use the exact same Application (Client) ID that was created in Tenant A. Do not create a new app registration.
az login --tenant <TENANT_B_ID>
az ad sp create --id <APP_CLIENT_ID>
This command creates an Enterprise Application in Tenant B that represents the same application identity.
Step 2: Provision Azure SQL Access
Ensure the Azure SQL Server is configured for Microsoft Entra ID authentication.
- An Entra ID administrator must already be assigned to the SQL Server
- Log in to the database as an Entra ID admin
Create a database user for the federated application:
CREATE USER [cross-tenant-app] FROM EXTERNAL PROVIDER;
ALTER ROLE db_datareader ADD MEMBER [inter-tenant-app];
ALTER ROLE db_datawriter ADD MEMBER [inter-tenant-app];
Important Note About Testing Tools
Before validating the setup, one important limitation must be understood.
Interactive tools such as:
sqlcmd- SSMS
- Azure Data Studio
does not support workload identity federation or token exchange.
These tools always request tokens directly for the managed identity and cannot use
api://AzureADTokenExchange.
This means:
- They will fail even if the configuration is correct
- This is a tooling limitation, not a misconfiguration
Therefore, validation must be performed programmatically, using Microsoft-supported SDKs.
Validation: Running the Test from a VM
To verify that cross-tenant authentication works, we use a very small test program.
The VM is used only for testing. The same approach works from any Azure service that supports Managed Identity.
Step 1: Install .NET (one-time)
On the VM, open PowerShell and run:
winget install Microsoft.DotNet.SDK.8Verify installation:
dotnet --versionStep 2: Create a Test Folder
mkdir token-test
cd token-test
Step 3: Create a Small Test App
dotnet new consoleAdd required packages:
dotnet add package Azure.Identity
dotnet add package Microsoft.Data.SqlClient
Step 4: Replace the Test Code
Open the file:
notepad Program.csReplace everything with the code below and save.
Test Code
using Azure.Core;
using Azure.Identity;
using Microsoft.Data.SqlClient;
Console.WriteLine("Starting authentication test...");string managedIdentityClientId = "<UAMI_CLIENT_ID>";
string appClientId = "<APP_CLIENT_ID>";
string tenantBId = "<TENANT_B_ID>";
string sqlServer = "<sqlserver>.database.windows.net";
string database = "<database-name>";string exchangeAudience = "api://AzureADTokenExchange";// Get exchange token using Managed Identity
var miCredential = new ManagedIdentityCredential(
ManagedIdentityId.FromUserAssignedClientId(managedIdentityClientId));var exchangeContext =
new TokenRequestContext(new[] { $"{exchangeAudience}/.default" });// Exchange token for Azure SQL access token
var appCredential = new ClientAssertionCredential(
tenantBId,
appClientId,
async _ => (await miCredential.GetTokenAsync(exchangeContext)).Token);var sqlToken = await appCredential.GetTokenAsync(
new TokenRequestContext(new[] { "https://database.windows.net/.default" }));Console.WriteLine("Access token acquired");// Connect to Azure SQL using the token
using var connection =
new SqlConnection($"Server={sqlServer};Database={database};");connection.AccessToken = sqlToken.Token;
await connection.OpenAsync();var command = connection.CreateCommand();
command.CommandText = "SELECT SUSER_SNAME()";var result = await command.ExecuteScalarAsync();Console.WriteLine("CONNECTED SUCCESSFULLY");
Console.WriteLine($"SQL identity: {result}");Step 5: Run the Test
dotnet runSuccessful Output
Starting authentication test...
Access token acquired
CONNECTED SUCCESSFULLY
SQL identity: <APP_CLIENT_ID>@<TENANT_B_ID>
메타데이터
- post_id
- 819e80c8e70e
- slug
- passwordless-cross-tenant-azure-sql-access-with-user-assigned-managed-identity-819e80c8e70e
- url
- https://medium.com/@dvpaytyan/passwordless-cross-tenant-azure-sql-access-with-user-assigned-managed-identity-819e80c8e70e
- canonical_url
- https://medium.com/@dvpaytyan/passwordless-cross-tenant-azure-sql-access-with-user-assigned-managed-identity-819e80c8e70e
- author_url
- https://medium.com/@dvpaytyan
- status
- ok
- fetched_at
- 2026-08-19 12:13:33



