How Websites Keep You Logged In
How do websites securely communicate with servers and remember who I am after I log in?
How Websites Keep You Logged In
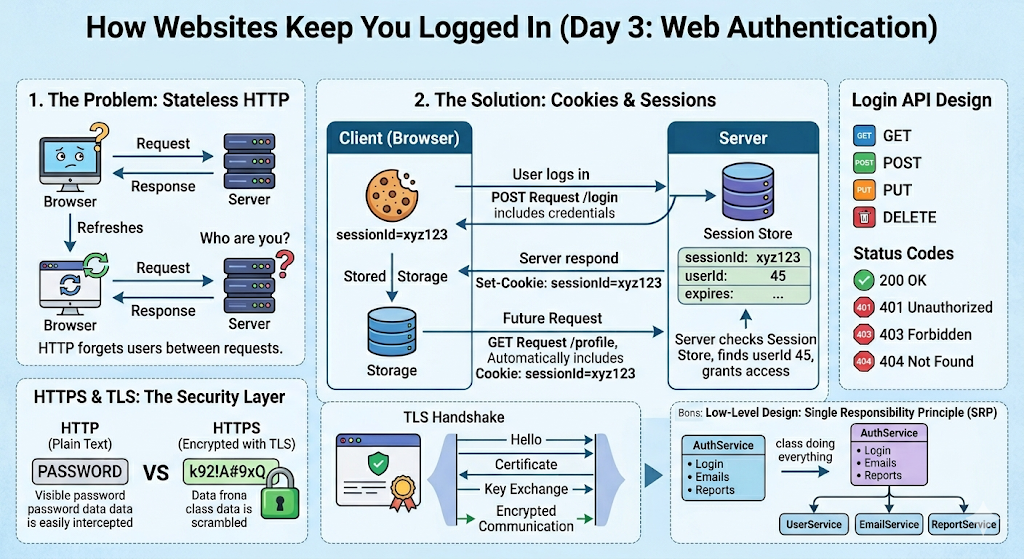
How do websites securely communicate with servers and remember who I am after I log in?
Every time we log into Instagram, Gmail, LinkedIn, or an online banking app, several technologies work together behind the scenes.
Today, I learned about HTTP, HTTPS, TLS, Cookies, Sessions, Login API Design, and the Single Responsibility Principle (SRP).
By the end of the day, I finally understood what happens after clicking the “Login” button.
The Missing Piece From Day 2
Yesterday, I learned about the Client-Server model.
Browser
   ↓
Server
The browser requests information.
The server responds.
Simple enough.
But a question remained unanswered:
How do they actually communicate?
Imagine trying to talk to someone who speaks only Japanese while you speak only English.
Communication becomes difficult because there is no common language.
Computers have the same problem.
To communicate, they need a shared set of rules.
That’s where HTTP comes in.
What Is HTTP?
HTTP stands for:
HyperText Transfer Protocol
Despite the intimidating name, it’s actually a simple concept.
HTTP is a protocol.
A protocol is just a set of agreed-upon rules.
Think about traffic lights.
Everyone understands that red means stop and green means go.
Those rules prevent chaos.
HTTP works the same way.
It defines how requests are sent, how responses are returned, and how data should be structured.
Without HTTP, browsers and servers wouldn’t know how to communicate with each other.
Understanding the Request-Response Cycle
Every web application follows the same pattern.
Browser
   ↓ Request
Server
   ↑ Response
For example, when you open Instagram:
Your browser sends a request.
Instagram’s server receives it.
The server processes it.
The server sends back a response.
Your browser displays the page.
That cycle repeats every time you scroll, like a post, search for someone, or send a message.
The entire web is built on this simple idea.
What’s Inside an HTTP Request?
A typical request might look like this:
GET /users HTTP/1.1
Host: api.example.com
Authorization: Bearer xyz
Every request contains three important parts.
The first is the method, which tells the server what action should be performed.
The second is the path, which identifies the resource being requested.
The third is the headers, which provide additional information about the request.
Together, these pieces tell the server exactly what the client wants.
HTTP Methods Every Developer Should Know
One topic that frequently appears in backend interviews is HTTP methods.
The most common method is GET.
GET /usersThis simply means: Give me the users.
To create something new, we use POST.
POST /usersThis means: Create a new user.
To completely replace an existing resource, we use PUT.
PUT /users/1This means: Replace User 1 entirely.
For partial updates, we use PATCH.
PATCH /users/1This means: Update only specific fields.
And finally, DELETE removes a resource.
DELETE /users/1This means: Delete User 1.
These five methods appear almost everywhere in modern APIs.
Understanding HTTP Responses
After receiving a request, the server responds.
A typical response looks like this:
HTTP/1.1 200 OK
Content-Type: application/json
{
"name": "Ansh"
}The response tells the browser whether the request succeeded or failed.
One of the most important parts of a response is the status code.
Status Codes You Should Memorize
If you’re preparing for backend interviews, these are worth remembering.
200 OK means everything worked successfully.
201 Created means a new resource was created.
400 Bad Request means the client sent invalid data.
401 Unauthorized means the user is not authenticated.
403 Forbidden means the user is authenticated but doesn’t have permission.
404 Not Found means the requested resource doesn’t exist.
500 Internal Server Error means something went wrong on the backend.
You’ll encounter these codes constantly as a developer.
Why HTTP Is Not Secure
Imagine logging into a website using plain HTTP.
The request might contain:
{
  "email": "ansh@gmail.com",
  "password": "mypassword"
}
The problem is that HTTP sends data in plain text.
If someone intercepts the traffic, they can read everything.
Your password.
Your banking information.
Your authentication tokens.
Everything.
That’s a huge security risk.
The Internet needed a safer solution.
Enter HTTPS
HTTPS stands for:
HyperText Transfer Protocol Secure
The communication process remains the same.
The difference is that the data is encrypted before being sent.
Think of HTTP as sending a postcard.
Anyone handling the postcard can read the message.
Now imagine putting that message inside a locked box.
Only the intended recipient can open it.
That’s HTTPS.
It protects communication between browsers and servers from being easily read by attackers.
What Is Encryption?
Encryption transforms readable information into unreadable information.
For example:
Hello Worldmight become:
k92!A#9xQWithout the proper key, the message becomes useless to anyone intercepting it.
Encryption is what makes online banking, shopping, and authentication possible.
The Secret Hero: TLS
HTTPS works because of a technology called TLS.
TLS stands for:
Transport Layer Security
Its primary responsibilities are:
- Encryption
- Authentication
- Integrity
TLS ensures that data remains private, that you’re talking to the correct server, and that the information hasn’t been modified during transmission.
Understanding the TLS Handshake
One of the most commonly asked interview questions is:
What happens during a TLS Handshake?
A simplified version looks like this:
Browser
   ↓ Hello
Server
   ↓ Certificate
Browser
   ↓ Verification
Both
   ↓ Key Exchange
Encrypted Communication
First, the browser says hello.
The server responds with a certificate.
That certificate proves the server is actually who it claims to be.
For example, it proves you’re talking to Google and not a hacker pretending to be Google.
The browser verifies the certificate.
Both sides then generate encryption keys.
Once that process is complete, all future communication becomes encrypted.
That’s how HTTPS becomes secure.
Why TLS Matters So Much
Without TLS, login credentials could be stolen.
Banking information could be exposed.
Authentication tokens could be intercepted.
With TLS, sensitive information is protected from most forms of network eavesdropping.
It’s one of the most important technologies on the modern Internet.
The Problem With HTTP’s Memory
Yesterday, I learned that HTTP is stateless.
This means the server forgets every request after processing it.
Imagine this scenario:
You log into Instagram.
The server verifies your credentials.
You refresh the page.
How does Instagram still know it’s you?
If HTTP forgets everything, how does that work?
The answer lies in cookies and sessions.
What Is a Cookie?
A cookie is a small piece of data stored by the browser.
For example:
userId=123Cookies help browsers remember information between requests.
They’re one of the reasons websites can remember who you are.
Login Example Using Cookies
Suppose a user logs in successfully.
The server responds with:
Set-Cookie:
sessionId=abc123
The browser stores that cookie.
On future requests, the browser automatically includes:
Cookie:
sessionId=abc123
The server now recognizes the user.
No additional login is required.
What Is a Session?
A session stores user information on the server.
A simple way to remember the relationship is:
Cookie → BrowserSession → ServerFor example, the server might store:
{
  "sessionId": "abc123",
  "userId": 45
}
When the browser sends sessionId=abc123, the server checks its records and identifies the user.
That’s how websites keep users logged in.
Session-Based Authentication Flow
The complete process looks like this:
The user submits an email and password.
The server validates the credentials.
A session is created.
A session ID is generated.
The session ID is sent back inside a cookie.
The browser stores the cookie.
Future requests automatically include the cookie.
The server uses the session ID to identify the user.
Authentication complete.
Advantages and Disadvantages of Sessions
One thing I learned is that sessions make logout extremely easy.
Delete the session and the user is instantly logged out.
Sessions are also easy to revoke if an administrator needs to terminate access.
The downside is that the server must store session information.
For applications with millions of users, managing session storage becomes a significant challenge.
A Quick Introduction to JWT
Modern applications often use JWT instead of sessions.
The easiest way to think about it is:
Session → State stored on serverJWT → State stored inside tokenI won’t dive deep into JWT yet because that’s planned for a later lesson.
For now, understanding the difference is enough.
Designing a Login API
After learning all these concepts, it was finally time to design a Login API.
The requirements were straightforward.
Users should be able to log in, log out, and remain authenticated.
The endpoint might look like:
POST /loginThe request body might contain:
{
  "email": "ansh@gmail.com",
  "password": "secret123"
}
What Happens Inside the Backend?
The backend receives the credentials.
It validates the input.
It searches for the user.
It verifies the password.
It creates a session.
It returns a success response.
The flow is surprisingly simple when broken into individual steps.
Successful Login Response
A successful response might look like:
{
  "message": "Login successful"
}
Along with:
Set-Cookie:
sessionId=abc123
The browser stores the cookie and the user remains authenticated.
Failed Login Response
If credentials are invalid, the response might be:
{
  "error": "Invalid credentials"
}
Along with:
401 UnauthorizedA proper API should always return meaningful status codes.
High-Level Design of a Login System
The architecture is simple:
Browser
   ↓
Login API
   ↓
User Service
   ↓
Database
The request travels from the browser to the backend, then to the database.
The user is verified.
A session is created.
A cookie is returned.
Authentication is complete.
Low-Level Design: Single Responsibility Principle (SRP)
Today’s Low-Level Design topic was SRP.
SRP stands for:
Single Responsibility Principle
It’s the first principle of SOLID.
The rule is simple:
A class should have only one reason to change.
Bad Design vs Good Design
Imagine a class that handles:
- Login
- Emails
- Reports
- Invoices
That class has too many responsibilities.
Now imagine:
UserService → AuthenticationEmailService → EmailsReportService → ReportsEach class focuses on a single responsibility.
The design becomes cleaner and easier to maintain.
A Restaurant Analogy
Imagine a restaurant where one person is simultaneously:
- Chef
- Cashier
- Waiter
- Manager
Things quickly become chaotic.
Now imagine separate people handling each role.
The restaurant becomes more efficient.
That’s exactly what SRP encourages in software systems.
Why SRP Matters
Following SRP makes code easier to understand, easier to test, easier to maintain, and easier to scale.
Many software engineering problems become significantly simpler when each component has a single clear responsibility.
My Day 3 Mini Assignment
To apply everything I learned, I designed a small authentication system.
The system should support login, logout, and remembering users.
Responses should be returned in under 500 milliseconds.
Communication must be secure.
The system should support around 1,000 users.
The API endpoints are:
POST /login
POST /logout
GET /profile
The architecture is:
Browser
↓
Backend
↓
Database
Authentication is handled using sessions and cookies.
What I’ll Remember From Day 3
If I remember only a handful of concepts from today, they’ll be these:
HTTP is the language browsers and servers use to communicate.
Requests travel from clients to servers, and responses travel back.
GET retrieves data while POST creates data.
HTTPS is HTTP protected by encryption.
TLS is what makes HTTPS secure.
Cookies store information inside the browser.
Sessions store user state on the server.
SRP means one class should have one responsibility.
Final Thoughts
Before today, clicking a Login button felt like a simple action.
Now I understand the entire chain of events behind it.
I understand how browsers communicate with servers.
I understand why HTTP alone isn’t enough.
I understand how HTTPS and TLS protect sensitive information.
I understand how cookies and sessions keep users authenticated.
I understand how a Login API is designed.
And I understand why clean software design principles like SRP matter.
At this point in my System Design journey, I finally feel like I’m starting to understand the foundations of every modern web application.
Day 1 taught me how systems scale.
Day 2 taught me how requests travel across the Internet.
Day 3 taught me how those requests become secure, authenticated, and reliable.
메타데이터
- post_id
- 9ff65ce72e14
- slug
- how-websites-keep-you-logged-in-9ff65ce72e14
- url
- https://medium.com/@sahayanshuman421/how-websites-keep-you-logged-in-9ff65ce72e14
- canonical_url
- https://medium.com/@sahayanshuman421/how-websites-keep-you-logged-in-9ff65ce72e14
- author_url
- https://medium.com/@sahayanshuman421
- status
- ok
- fetched_at
- 2026-06-13 12:55:53