Before UVM, We Were Just Guessing
Verification used to look like this…
Before UVM, We Were Just Guessing
Verification used to look like this…
You finish your RTL. You write a testbench — a Verilog file that instantiates your DUT, drives some signals, and checks if the outputs look right. You run a few simulations. Everything passes. You call it done.
Then silicon comes back broken.
Not always. But often enough that the industry had to ask a hard question: why do designs that pass simulation fail in hardware? And the answer, in most cases, was not that the RTL was wrong. It was that the testbench was not testing the right things. It was testing what the designer expected to happen, not what could happen.
This is the problem UVM was built to solve.
The world before UVM: directed tests and wishful thinking
In traditional verification, a testbench was a collection of directed tests. You would write a test that sends a specific packet with a specific payload and checks for a specific response. Then another test for a slightly different case. Then another.
This approach has a fundamental flaw: you can only test scenarios you think of. And the bugs that escape to silicon are, almost by definition, the scenarios nobody thought of.
There is another problem. As designs grew more complex through the 2000s, every company was building its own testbench infrastructure from scratch. A verification engineer at one company would spend months building a bus functional model. An engineer at another company would spend months building the exact same thing. There was no common language, no reusable architecture, no shared methodology. Verification was artisanal, inconsistent, and not scaling with design complexity.
Several methodologies emerged to address this. Synopsys developed VMM. Cadence and Mentor jointly developed OVM. Both introduced important ideas — constrained-random stimulus, coverage-driven verification, object-oriented testbenches. But they were incompatible with each other and with each other’s tooling.
In 2011, Accellera unified them. The result was UVM — Universal Verification Methodology. One standard, all simulators, the whole industry.
What UVM actually changes
UVM is not a language. It is a methodology — a set of conventions and a class library, implemented in SystemVerilog, that defines how a verification environment should be structured.
Three ideas are at its core:
Constrained-random stimulus. Instead of writing directed tests that exercise specific scenarios, you describe the space of valid inputs and let the tool generate thousands of random transactions within that space. You are no longer limited to what you thought of. The randomization finds corner cases you would never have written by hand.
Functional coverage. Randomization without measurement is just noise. Functional coverage lets you define, in code, what scenarios you care about testing — specific data values, specific sequences of events, specific combinations. The tool tracks which bins have been hit. Verification is not done when tests pass; it is done when coverage is closed.
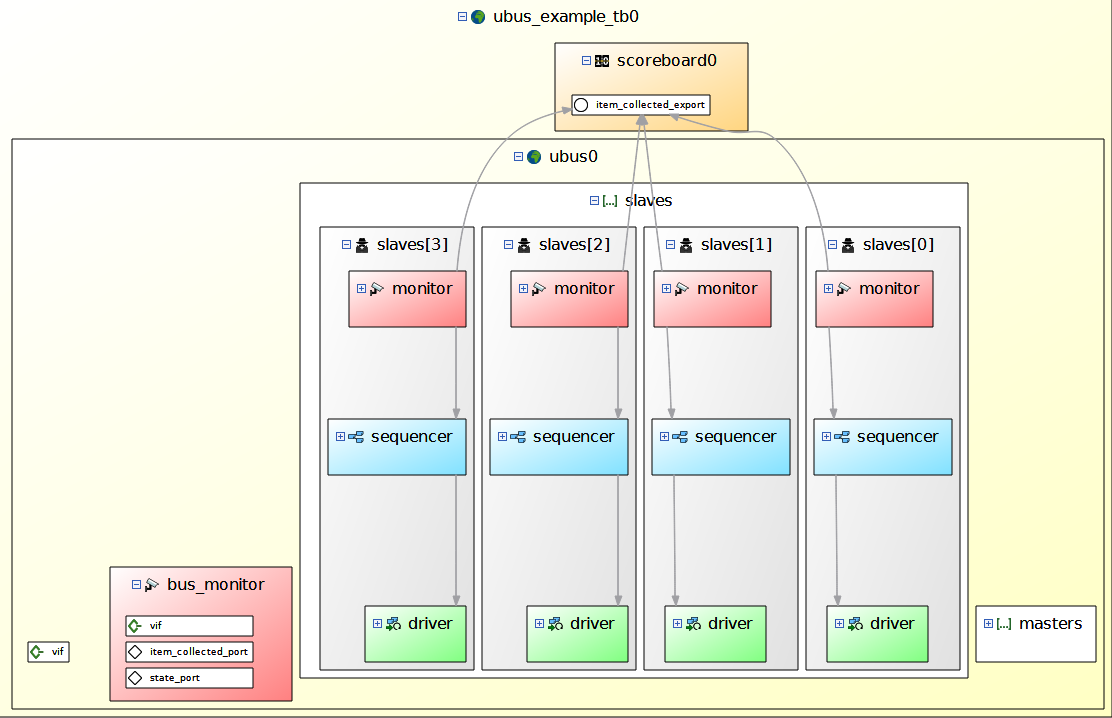
Reusable, layered architecture. UVM defines a standard component hierarchy. Every UVM environment looks roughly the same: a test at the top, an environment below it, agents inside the environment, and within each agent a driver, a monitor, and a sequencer. Because the structure is standard, a UVM agent written for one project can be reused in another. A verification IP (VIP) bought from a vendor plugs directly into your environment.
The component hierarchy
Understanding UVM starts with understanding what each component does and why the separation exists.

Test sits at the top. It selects which sequence to run and configures the environment for a specific test scenario. The test is the intent — “I want to verify what happens when the DUT receives back-to-back transactions with no gaps.”
Environment contains and connects all the agents. It also holds the scoreboard and any coverage collectors. The environment is reusable across tests; only the test changes.
Agent is the unit of reuse. One agent per interface. An agent that verifies an AXI4-Lite interface can be dropped into any environment that needs AXI4-Lite stimulus and monitoring. An agent contains three components:
- Sequencer — generates and schedules transactions. It is the source of stimulus, operating entirely at the transaction level (no signal awareness).
- Driver — takes transactions from the sequencer and translates them into pin-level signal toggles. It is the only component that drives DUT inputs.
- Monitor — watches the interface passively, reconstructs transactions from pin-level activity, and broadcasts them to other components via analysis ports. It never drives signals.
Scoreboard sits outside the agent, receiving transactions from the monitor. It checks that what the DUT produced matches what it should have produced.
How a transaction flows through the environment
This is the path a single transaction takes from intent to verification:

- The sequence generates a transaction object — for example, “write the value 0xBEEF to address 0x04.”
- The sequencer schedules it and sends it to the driver.
- The driver receives the transaction and drives the appropriate signals on the DUT’s interface — asserting VALID, putting the address and data on the bus, waiting for READY.
- The DUT processes the transaction.
- The monitor observes the pin-level activity on the output interface, reconstructs the response transaction, and sends it to the scoreboard via an analysis port.
- The scoreboard compares the actual response against the expected response and reports pass or fail.
Notice what this separation achieves. The sequence has no knowledge of how signals are driven. The driver has no knowledge of what is being checked. The monitor has no knowledge of what stimulus was sent. Each component does one thing. If the DUT changes, only the driver needs to change. If the check logic changes, only the scoreboard changes.
Before and after, side by side
This is what verification looked like before UVM, and what it looks like now:

Before: A single monolithic testbench file. Stimulus generation, signal driving, response checking — all in one place. No separation of concerns. No reuse. When a bug is found, you add a directed test. When coverage is unmeasurable, you guess.
After: A layered environment where each concern is isolated. Stimulus is randomized and constrained. Coverage is measured and tracked. Components are reusable. Debugging is faster because you know exactly which component owns each piece of behavior.
What “Constrained-Random” Actually Looks Like
Let’s make this concrete. If you are verifying a bus interface, the old directed way looks like a series of manual function calls. You write loops. You try to guess where the design might break.
For instance;
// The directed test (guessing)
write_bus(32'h0000_0000, 32'hDEADBEEF); // Test base address
write_bus(32'h0000_0004, 32'h12345678); // Test next word
write_bus(32'h0000_FFFC, 32'hFFFFFFFF); // "I should probably test the boundary!"
// You just tested 3 cases out of 4 billion.
In UVM (using SystemVerilog), you don’t write the data. You write the rules. You define a transaction class, declare variables as rand, and write constraints. Then you let the math solver do the heavy lifting.
Take a look this now;
// The constrained-random transaction (UVM sequence item)
class bus_trans extends uvm_sequence_item;
    rand bit [31:0] addr;
    rand bit [31:0] data;
    rand bit        write_en;
// Rule 1: We only want word-aligned addresses
    constraint word_aligned {
        addr % 4 == 0;
    }
    // Rule 2: Force the solver to hit edge cases 20% of the time,
    // and normal ranges 80% of the time.
    constraint memory_ranges {
        addr dist {
            32'h0000_0000           := 1,  // Hit the very bottom
            32'h0000_FFFC           := 1,  // Hit the very top
            [32'h0000_0004 : 32'h0000_FFF8] := 8   // Hit the middle
        };
    }
endclass
When you call transaction.randomize(), the solver looks at your rules and generates valid, but unpredictable stimulus. It will instantly find the weird combination of address and data that causes your FIFO to overflow—the exact combination you would never have the patience to write manually in a directed test.
What UVM does not solve
UVM is not magic. It gives you the architecture; it does not fill it in for you.
The hardest part of a UVM environment — the part that determines whether your verification actually finds bugs — is the scoreboard’s reference model. UVM tells you that a scoreboard should exist and roughly where it should sit. It does not tell you how to build a model that correctly predicts what your DUT should output for any given input.
That is the work. And it is harder than any of the framework code.
References
- UVM 1.2 Class Reference — Accellera Systems Initiative https://www.accellera.org/downloads/standards/uvm
- A Practical Guide to Adopting the Universal Verification Methodology — Sharon Rosenberg, Kathleen Meade
- Writing Testbenches Using SystemVerilog — Janick Bergeron
- OVM to UVM Migration — Mentor Graphics / Siemens EDA https://verificationacademy.com/topics/uvm
- The History of Verification Methodologies — Verification Academy https://verificationacademy.com/topics/methodology-background
메타데이터
- post_id
- f8133b320dcd
- slug
- before-uvm-we-were-just-guessing-f8133b320dcd
- url
- https://medium.com/@acrby/before-uvm-we-were-just-guessing-f8133b320dcd
- canonical_url
- https://medium.com/@acrby/before-uvm-we-were-just-guessing-f8133b320dcd
- author_url
- https://medium.com/@acrby
- status
- ok
- fetched_at
- 2026-06-24 04:09:36